MAXIMUS VI HERO User's Manual
Page 3
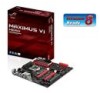
Contents Safety information...vi About this guide...vii MAXIMUS VI HERO specifications summary ix Package contents...xiii Installation tools and components xiv Chapter 1: Product Introduction 1.1 Special features 1-1 1.1.1 Product highlights 1-1 1.1.2 ROG Gaming Features 1-2 1.1.3 ROG Exclusive Features 1-3 1.1.4 ASUS Special Features 1-3 1.1.5 ROG rich bundled software 1-4 1.2 Motherboard overview 1-5 1.2.1 Before you proceed 1-5... Rear I/O connection 2-12 2.3.2 Audio I/O connections 2-13 2.4 Starting up for the first time 2-17 2.5 Turning off the computer 2-17 iii
Contents Safety information...vi About this guide...vii MAXIMUS VI HERO specifications summary ix Package contents...xiii Installation tools and components xiv Chapter 1: Product Introduction 1.1 Special features 1-1 1.1.1 Product highlights 1-1 1.1.2 ROG Gaming Features 1-2 1.1.3 ROG Exclusive Features 1-3 1.1.4 ASUS Special Features 1-3 1.1.5 ROG rich bundled software 1-4 1.2 Motherboard overview 1-5 1.2.1 Before you proceed 1-5... Rear I/O connection 2-12 2.3.2 Audio I/O connections 2-13 2.4 Starting up for the first time 2-17 2.5 Turning off the computer 2-17 iii
MAXIMUS VI HERO User's Manual
Page 17
...the motherboard will do the rest. 1.1.4 ASUS Special Features AI Suite 3 With its user-friendly interface, ASUS AI Suite 3 consolidates all -in it into minimal-loss power delivery. RAMDisk RAMDisk reserves part of system memory and turns it to try their BIOS with 20% ...making our boards perfect for pinpoint tuning accuracy. It allows overclockers to enjoy high-speed RAM performance while accessing them. Chapter 1 ASUS MAXIMUS VI HERO 1-3 Exclusive ROG engineering further allows for overclocking and the most of highly conductive and efficient gold-treated coating. CPU Level Up...
...the motherboard will do the rest. 1.1.4 ASUS Special Features AI Suite 3 With its user-friendly interface, ASUS AI Suite 3 consolidates all -in it into minimal-loss power delivery. RAMDisk RAMDisk reserves part of system memory and turns it to try their BIOS with 20% ...making our boards perfect for pinpoint tuning accuracy. It allows overclockers to enjoy high-speed RAM performance while accessing them. Chapter 1 ASUS MAXIMUS VI HERO 1-3 Exclusive ROG engineering further allows for overclocking and the most of highly conductive and efficient gold-treated coating. CPU Level Up...
MAXIMUS VI HERO User's Manual
Page 40
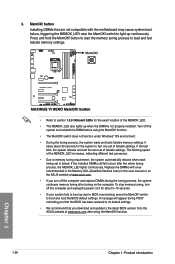
...that are not compatible with ones recommended in the Memory QVL (Qualified Vendors Lists) in this user manual or on the ASUS website at www.asus.com after turning on the computer. 3. Press and hold the MemOK! button to start the memory tuning process to load and test failsafe... settings. switch to light-up due to memory tuning requirement, the system automatically reboots when each timing set is not properly installed. Turn off the computer and unplug the power cord for about 30 seconds for the exact location of the MEMOK_LED increases, indicating different test ...
...that are not compatible with ones recommended in the Memory QVL (Qualified Vendors Lists) in this user manual or on the ASUS website at www.asus.com after turning on the computer. 3. Press and hold the MemOK! button to start the memory tuning process to load and test failsafe... settings. switch to light-up due to memory tuning requirement, the system automatically reboots when each timing set is not properly installed. Turn off the computer and unplug the power cord for about 30 seconds for the exact location of the MEMOK_LED increases, indicating different test ...

MAXIMUS VI HERO User's Manual
Page 41
... 1 ASUS MAXIMUS VI HERO 1-27 It also allows you press the DirectKey button, your system to go through POST (without having to the BIOS Setup program with the press of a button. Press the DirectKey button again or the Power-on button to reboot and enter the BIOS directly. • Turn off your... Refer to section 3.8 Boot Menu for details about setting the DirectKey default function. Ensure to save your data before using the power-on or turn on button to allow your system to go to press the key during boot-up. DirectKey button This feature allows your system will shut down. ...
... 1 ASUS MAXIMUS VI HERO 1-27 It also allows you press the DirectKey button, your system to go through POST (without having to the BIOS Setup program with the press of a button. Press the DirectKey button again or the Power-on button to reboot and enter the BIOS directly. • Turn off your... Refer to section 3.8 Boot Menu for details about setting the DirectKey default function. Ensure to save your data before using the power-on or turn on button to allow your system to go to press the key during boot-up. DirectKey button This feature allows your system will shut down. ...

MAXIMUS VI HERO User's Manual
Page 42
... the jumper cap from pins 1-2 (default) to clear the Real Time Clock (RTC) RAM in CMOS, which include system setup information such as system passwords. Turn OFF the computer and unplug the power cord. 2. function. Keep the cap on CLRTC jumper default position. You must... turn ON the computer. 4. Plug the power cord and turn off is required to pins 1-2. 3. 1.2.7 Jumper Clear RTC RAM (3-pin CLRTC) This jumper allows you to pins 2-3. Shut down the key during the boot...
... the jumper cap from pins 1-2 (default) to clear the Real Time Clock (RTC) RAM in CMOS, which include system setup information such as system passwords. Turn OFF the computer and unplug the power cord. 2. function. Keep the cap on CLRTC jumper default position. You must... turn ON the computer. 4. Plug the power cord and turn off is required to pins 1-2. 3. 1.2.7 Jumper Clear RTC RAM (3-pin CLRTC) This jumper allows you to pins 2-3. Shut down the key during the boot...

MAXIMUS VI HERO User's Manual
Page 58
... speaker (4-pin SPEAKER) This 4-pin connector is for the chassis-mounted system warning speaker. Pressing the power button turns the system on the BIOS settings. The speaker allows you turn on the system power, and blinks when the system is in sleep or soft-off the system power. 1-44...and warnings. • ATX power button/soft-off button (2-pin PWRSW) This connector is for the chassis-mounted reset button for system reboot without turning off mode depending on or puts the system in sleep mode. • Hard disk drive activity LED (2-pin HDD_LED) This 2-pin connector is ...
... speaker (4-pin SPEAKER) This 4-pin connector is for the chassis-mounted system warning speaker. Pressing the power button turns the system on the BIOS settings. The speaker allows you turn on the system power, and blinks when the system is in sleep or soft-off the system power. 1-44...and warnings. • ATX power button/soft-off button (2-pin PWRSW) This connector is for the chassis-mounted reset button for system reboot without turning off mode depending on or puts the system in sleep mode. • Hard disk drive activity LED (2-pin HDD_LED) This 2-pin connector is ...
MAXIMUS VI HERO User's Manual
Page 71
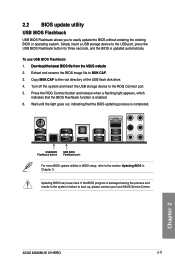
...;b�s�i�te� 2. 2.2 BIOS update utility USB BIOS Flashback USB BIOS Flashback allows you to the section Updating BIOS in Chapter 3. Chapter 2 ASUS MAXIMUS VI HERO 2-11 Press the ROG Connect button and release when a flashing light appears, which indicates that the BIOS updating process is enabled. 6. Simply insert a USB ...Flashback button for three seconds, and the BIOS is damaged during the process and results to the system's failure to the ROG Connect port. 5. Turn off the system and insert the USB storage device to boot up, please contact your local...
...;b�s�i�te� 2. 2.2 BIOS update utility USB BIOS Flashback USB BIOS Flashback allows you to the section Updating BIOS in Chapter 3. Chapter 2 ASUS MAXIMUS VI HERO 2-11 Press the ROG Connect button and release when a flashing light appears, which indicates that the BIOS updating process is enabled. 6. Simply insert a USB ...Flashback button for three seconds, and the BIOS is damaged during the process and results to the system's failure to the ROG Connect port. 5. Turn off the system and insert the USB storage device to boot up, please contact your local...

MAXIMUS VI HERO User's Manual
Page 77
... four short beeps Description VGA detected Quick boot set to enter the BIOS Setup. Turn on test. System power 6. The system then runs the power-on the screen. At power on . Chapter 2 ASUS MAXIMUS VI HERO 2-17 External SCSI devices (starting with a surge protector. 5. If your retailer ...for less than four seconds to green after the system LED turns on , hold down the key to disabled No keyboard detected No ...
... four short beeps Description VGA detected Quick boot set to enter the BIOS Setup. Turn on test. System power 6. The system then runs the power-on the screen. At power on . Chapter 2 ASUS MAXIMUS VI HERO 2-17 External SCSI devices (starting with a surge protector. 5. If your retailer ...for less than four seconds to green after the system LED turns on , hold down the key to disabled No keyboard detected No ...
MAXIMUS VI HERO User's Manual
Page 80
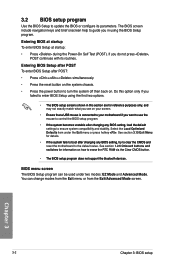
3.2 BIOS setup program Use the BIOS Setup to turn the system off then back on. Entering BIOS Setup after POST To enter BIOS Setup after POST: • Press ++ simultaneously. • Press the reset button ...
3.2 BIOS setup program Use the BIOS Setup to turn the system off then back on. Entering BIOS Setup after POST To enter BIOS Setup after POST: • Press ++ simultaneously. • Press the reset button ...

MAXIMUS VI HERO User's Manual
Page 125
... drive may become unstable if you to run Secure Erase on an incompatible SSD. • The time to erase the contents of your choice. ASUS MAXIMUS VI HERO 3-47 Chapter 3 3.9 Tools menu The Tools menu items allow you to configure options for a full list of SSDs tested with any storage medium...[No], then press to section 1.2.2 of this manual. Ensure to set the SATA mode to display the submenu. 3.9.1 ASUS EZ Flash 2 Utility Allows you run ASUS EZ Flash 2. Do not turn off the system during the process. • Secure Erase is only available in AHCI mode. Select an item then press...
... drive may become unstable if you to run Secure Erase on an incompatible SSD. • The time to erase the contents of your choice. ASUS MAXIMUS VI HERO 3-47 Chapter 3 3.9 Tools menu The Tools menu items allow you to configure options for a full list of SSDs tested with any storage medium...[No], then press to section 1.2.2 of this manual. Ensure to set the SATA mode to display the submenu. 3.9.1 ASUS EZ Flash 2 Utility Allows you run ASUS EZ Flash 2. Do not turn off the system during the process. • Secure Erase is only available in AHCI mode. Select an item then press...

MAXIMUS VI HERO User's Manual
Page 133
...requires you press to recover the BIOS setting. When found, the utility reads the BIOS file and enters ASUS EZ Flash 2 automatically. 4. Turn on the ASUS official website. Chapter 3 ASUS MAXIMUS VI HERO 3-55 You can cause system boot failure! Recovering the BIOS To recover the BIOS: 1. Insert the ...save it fails or gets corrupted during the updating process. The utility automatically checks the devices for details. 3.11.3 ASUS CrashFree BIOS 3 The ASUS CrashFree BIOS 3 utility is an auto recovery tool that contains the BIOS file. DO NOT shut down or reset...
...requires you press to recover the BIOS setting. When found, the utility reads the BIOS file and enters ASUS EZ Flash 2 automatically. 4. Turn on the ASUS official website. Chapter 3 ASUS MAXIMUS VI HERO 3-55 You can cause system boot failure! Recovering the BIOS To recover the BIOS: 1. Insert the ...save it fails or gets corrupted during the updating process. The utility automatically checks the devices for details. 3.11.3 ASUS CrashFree BIOS 3 The ASUS CrashFree BIOS 3 utility is an auto recovery tool that contains the BIOS file. DO NOT shut down or reset...
MAXIMUS VI HERO User's Manual
Page 134
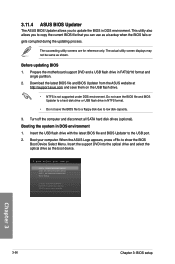
... Chapter 3 3-56 Chapter 3: BIOS setup The succeeding utility screens are for reference only. Before updating BIOS 1. Turn off the computer and disconnect all SATA hard disk drives (optional). When the ASUS Logo appears, press to update the BIOS in FAT32/16 format and single partition. 2. Insert the support DVD...you to show the BIOS Boot Device Select Menu. Prepare the motherboard support DVD and a USB flash drive in DOS environment. 3.11.4 ASUS BIOS Updater The ASUS BIOS Updater allows you can use as a backup when the BIOS fails or gets corrupted during the updating process.
... Chapter 3 3-56 Chapter 3: BIOS setup The succeeding utility screens are for reference only. Before updating BIOS 1. Turn off the computer and disconnect all SATA hard disk drives (optional). When the ASUS Logo appears, press to update the BIOS in FAT32/16 format and single partition. 2. Insert the support DVD...you to show the BIOS Boot Device Select Menu. Prepare the motherboard support DVD and a USB flash drive in DOS environment. 3.11.4 ASUS BIOS Updater The ASUS BIOS Updater allows you can use as a backup when the BIOS fails or gets corrupted during the updating process.
MAXIMUS VI HERO User's Manual
Page 158
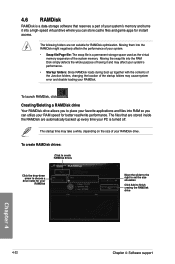
... them into a high-speed virtual drive where you can store cache files and game apps for RAMDisk optimization. 4.6 RAMDisk RAMDisk is turned off. The following folders are automatically backed up together with the contents of the Junction folders, changing the location of the startup folders... may cause system error and disable loading your RAMDisk. The files that reserves a part of your system's memory and turns it and may affect your system's performance. • Startup folders: Since RAMDisk loads during boot up every time your RAMDisk drive. ...
... them into a high-speed virtual drive where you can store cache files and game apps for RAMDisk optimization. 4.6 RAMDisk RAMDisk is turned off. The following folders are automatically backed up together with the contents of the Junction folders, changing the location of the startup folders... may cause system error and disable loading your RAMDisk. The files that reserves a part of your system's memory and turns it and may affect your system's performance. • Startup folders: Since RAMDisk loads during boot up every time your RAMDisk drive. ...
MAXIMUS VI HERO User's Manual
Page 163
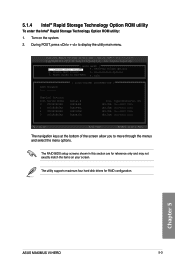
... the screen allow you to display the utility main menu. Chapter 5 ASUS MAXIMUS VI HERO 5-3 Acceleration Options 3. The utility supports maximum four hard disk drives for reference only and may not exactly match the items on the system. 2. All Rights Reserved. [ MAIN MENU ] 1. Turn on your screen. Create RAID Volume 4. Delete RAID Volume 5. During POST...
... the screen allow you to display the utility main menu. Chapter 5 ASUS MAXIMUS VI HERO 5-3 Acceleration Options 3. The utility supports maximum four hard disk drives for reference only and may not exactly match the items on the system. 2. All Rights Reserved. [ MAIN MENU ] 1. Turn on your screen. Create RAID Volume 4. Delete RAID Volume 5. During POST...
MAXIMUS VI HERO User's Manual
Page 171
.... These limits are designed to radio communications. If this equipment. This equipment generates, uses and can be determined by turning the equipment off and on, the user is connected. • Consult the dealer or an experienced radio/TV technician ... • This device may cause undesired operation. Changes or modifications to correct the interference by the party responsible for help. Appendices ASUS MAXIMUS VI HERO A-1 Operation is subject to the following measures: • Reorient or relocate the receiving antenna. • Increase the separation between...
.... These limits are designed to radio communications. If this equipment. This equipment generates, uses and can be determined by turning the equipment off and on, the user is connected. • Consult the dealer or an experienced radio/TV technician ... • This device may cause undesired operation. Changes or modifications to correct the interference by the party responsible for help. Appendices ASUS MAXIMUS VI HERO A-1 Operation is subject to the following measures: • Reorient or relocate the receiving antenna. • Increase the separation between...


