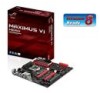
MAXIMUS VI HERO User's Manual
Page 5
...3...4-3 4.4.1 Dual Intelligent Processors 4 4-6 4.4.2 EZ Update 4-13 4.4.3 USB 3.0 Boost 4-14 4.4.4 System Information 4-15 4.4.5 USB BIOS Flashback 4-17 4.4.6 USB Charger 4-18 4.4.7 Audio configurations 4-19 4.5 MemTweakIt 4-20 4.6 RAMDisk...4-22 Chapter 5: RAID support 5.1 RAID configurations... 5-1 5.1.1 RAID definitions 5-1 5.1.2 Installing Serial ATA hard disks 5-2 5.1.3 Setting the RAID item in BIOS 5-2 5.1.4 Intel® Rapid Storage Technology Option ROM utility 5-3 5.2 Creating a RAID driver disk 5-8 5.2.1 Creating...
...3...4-3 4.4.1 Dual Intelligent Processors 4 4-6 4.4.2 EZ Update 4-13 4.4.3 USB 3.0 Boost 4-14 4.4.4 System Information 4-15 4.4.5 USB BIOS Flashback 4-17 4.4.6 USB Charger 4-18 4.4.7 Audio configurations 4-19 4.5 MemTweakIt 4-20 4.6 RAMDisk...4-22 Chapter 5: RAID support 5.1 RAID configurations... 5-1 5.1.1 RAID definitions 5-1 5.1.2 Installing Serial ATA hard disks 5-2 5.1.3 Setting the RAID item in BIOS 5-2 5.1.4 Intel® Rapid Storage Technology Option ROM utility 5-3 5.2 Creating a RAID driver disk 5-8 5.2.1 Creating...

MAXIMUS VI HERO User's Manual
Page 7
... This chapter describes the features of the motherboard and the new technology it supports. ASUS websites The ASUS website provides updated information on the motherboard. • Chapter 2: Basic Installation This ...chapter lists the hardware setup procedures that comes with the motherboard package and the software. • Chapter 5: RAID support This chapter describes the RAID configurations. vii Where to find more information Refer to change system settings through the BIOS...
... This chapter describes the features of the motherboard and the new technology it supports. ASUS websites The ASUS website provides updated information on the motherboard. • Chapter 2: Basic Installation This ...chapter lists the hardware setup procedures that comes with the motherboard package and the software. • Chapter 5: RAID support This chapter describes the RAID configurations. vii Where to find more information Refer to change system settings through the BIOS...

MAXIMUS VI HERO User's Manual
Page 36
... any slot as one pair of Dual-channel memory configuration. • ASUS exclusively provides hyper DIMM support function. PM128M8D3BU-15 C304627CB1AG22Fe E304459CB1AG32Cf K4B2G0846C NT5CB128M8AN-CG SP001GBLTU133S02...65533;�is ��ti�c�s�o��f�in the BIOS for better compatibility. (4) Supports four (4) modules inserted into both the red and ...65533;l�a�te�s��t �Q�V��L�. settings in ��d�iv�i�d�u�a��l �...
... any slot as one pair of Dual-channel memory configuration. • ASUS exclusively provides hyper DIMM support function. PM128M8D3BU-15 C304627CB1AG22Fe E304459CB1AG32Cf K4B2G0846C NT5CB128M8AN-CG SP001GBLTU133S02...65533;�is ��ti�c�s�o��f�in the BIOS for better compatibility. (4) Supports four (4) modules inserted into both the red and ...65533;l�a�te�s��t �Q�V��L�. settings in ��d�iv�i�d�u�a��l �...
MAXIMUS VI HERO User's Manual
Page 40
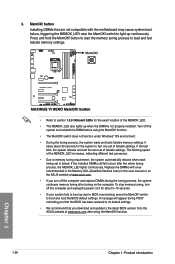
...installed. The blinking speed of failsafe settings. Replace the DIMMs with the motherboard may cause system boot failure, triggering the MEMOK_LED near the MemOK! button Installing DIMMs that you download and update to the latest BIOS version from the ASUS website at www.asus.com. • If you turn... off the computer and unplug the power cord for about 30 seconds for the exact location of failsafe settings. A message will appear during POST reminding you ...
...installed. The blinking speed of failsafe settings. Replace the DIMMs with the motherboard may cause system boot failure, triggering the MEMOK_LED near the MemOK! button Installing DIMMs that you download and update to the latest BIOS version from the ASUS website at www.asus.com. • If you turn... off the computer and unplug the power cord for about 30 seconds for the exact location of failsafe settings. A message will appear during POST reminding you ...

MAXIMUS VI HERO User's Manual
Page 41
With DirectKey, you can enter the BIOS anytime without entering the BIOS) when you press the DirectKey button, your system to go through POST (without having to section 3.8 Boot Menu for details about setting the DirectKey default function. Chapter 1 ASUS MAXIMUS VI HERO 1-27 DirectKey button This feature allows your system will shut down. Ensure to save your...
With DirectKey, you can enter the BIOS anytime without entering the BIOS) when you press the DirectKey button, your system to go through POST (without having to section 3.8 Boot Menu for details about setting the DirectKey default function. Chapter 1 ASUS MAXIMUS VI HERO 1-27 DirectKey button This feature allows your system will shut down. Ensure to save your...

MAXIMUS VI HERO User's Manual
Page 42
... If the steps above do not need to clear the RTC when the system hangs due to re-enter data. You can automatically reset parameter settings to default values. • Due to the chipset behavior, AC power off and on CLRTC jumper default position. Turn OFF the computer and unplug..., which include system setup information such as system passwords. function. To erase the RTC RAM: 1. Shut down the key during the boot process and enter BIOS setup to overclocking. 1.2.7 Jumper Clear RTC RAM (3-pin CLRTC) This jumper allows you to enable C.P.R. Keep the cap on pins 2-3 for about 5-10 ...
... If the steps above do not need to clear the RTC when the system hangs due to re-enter data. You can automatically reset parameter settings to default values. • Due to the chipset behavior, AC power off and on CLRTC jumper default position. Turn OFF the computer and unplug..., which include system setup information such as system passwords. function. To erase the RTC RAM: 1. Shut down the key during the boot process and enter BIOS setup to overclocking. 1.2.7 Jumper Clear RTC RAM (3-pin CLRTC) This jumper allows you to enable C.P.R. Keep the cap on pins 2-3 for about 5-10 ...

MAXIMUS VI HERO User's Manual
Page 52
...;f�e�r�t�o��s�e�c�t�io�n� 5.1 RAID configurations or the manual bundled in the BIOS to create a Serial ATA RAID set using these connectors, set the SATA Mode item in the motherboard support DVD. W��h�e�n��u�s�i�n�g�N�...
...;f�e�r�t�o��s�e�c�t�io�n� 5.1 RAID configurations or the manual bundled in the BIOS to create a Serial ATA RAID set using these connectors, set the SATA Mode item in the motherboard support DVD. W��h�e�n��u�s�i�n�g�N�...

MAXIMUS VI HERO User's Manual
Page 54
... audio capability. • If you want to connect a high-definition or an AC'97 front panel audio module to this connector, set the Front Panel Type item in the BIOS setup to this connector. The S/PDIF module is for an additional Sony/Philips Digital Interface (S/PDIF) port. Front panel audio connector (10...
... audio capability. • If you want to connect a high-definition or an AC'97 front panel audio module to this connector, set the Front Panel Type item in the BIOS setup to this connector. The S/PDIF module is for an additional Sony/Philips Digital Interface (S/PDIF) port. Front panel audio connector (10...

MAXIMUS VI HERO User's Manual
Page 58
... or flashes when data is read from or written to hear system beeps and warnings. • ATX power button/soft-off mode depending on the BIOS settings. The speaker allows you turn on or puts the system in sleep mode. • Hard disk drive activity LED (2-pin HDD_LED) This 2-pin connector is...
... or flashes when data is read from or written to hear system beeps and warnings. • ATX power button/soft-off mode depending on the BIOS settings. The speaker allows you turn on or puts the system in sleep mode. • Hard disk drive activity LED (2-pin HDD_LED) This 2-pin connector is...

MAXIMUS VI HERO User's Manual
Page 60
The OC Panel allows you to perform overclocking without going to the BIOS settings, loading the OS, or using overclocking software utilities. A TPM system also helps enhance the network security, protects digital identities, and ensures platform integrity. TPM connector (...
The OC Panel allows you to perform overclocking without going to the BIOS settings, loading the OS, or using overclocking software utilities. A TPM system also helps enhance the network security, protects digital identities, and ensures platform integrity. TPM connector (...

MAXIMUS VI HERO User's Manual
Page 77
...) One continuous beep followed by three short beeps One continuous beep followed by four short beeps Description VGA detected Quick boot set to enter the BIOS Setup. At power on . Chapter 2 ASUS MAXIMUS VI HERO 2-17 Connect the power cord to a power outlet that all the connections, replace the system case cover. 2. 2.4 Starting up for more...
...) One continuous beep followed by three short beeps One continuous beep followed by four short beeps Description VGA detected Quick boot set to enter the BIOS Setup. At power on . Chapter 2 ASUS MAXIMUS VI HERO 2-17 Connect the power cord to a power outlet that all the connections, replace the system case cover. 2. 2.4 Starting up for more...

MAXIMUS VI HERO User's Manual
Page 79
... a trained service personnel. When downloading or updating the BIOS file, rename it as your operating system. Chapter 3 ASUS MAXIMUS VI HERO 3-1 In normal circumstances, the default BIOS settings apply to most conditions to instability or boot failure. The term "BIOS" in this motherboard. Inappropriate BIOS settings may result to ensure optimal performance. BIOS (Basic Input and Output System) stores system hardware...
... a trained service personnel. When downloading or updating the BIOS file, rename it as your operating system. Chapter 3 ASUS MAXIMUS VI HERO 3-1 In normal circumstances, the default BIOS settings apply to most conditions to instability or boot failure. The term "BIOS" in this motherboard. Inappropriate BIOS settings may result to ensure optimal performance. BIOS (Basic Input and Output System) stores system hardware...
MAXIMUS VI HERO User's Manual
Page 80
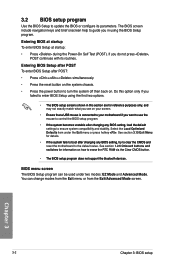
...;,��lo�a��d�t�h�e��d�e�f�a�u�l�t settings to update the BIOS or configure its routines. If�t�h�e��s�y�s�t�e�m���...65533;�IO��S��s�e�t�t�in using the first two options. 3.2 BIOS setup program Use the BIOS Setup to ensure system compatibility and stability. You can be used under the Exit menu or press hotkey...
...;,��lo�a��d�t�h�e��d�e�f�a�u�l�t settings to update the BIOS or configure its routines. If�t�h�e��s�y�s�t�e�m���...65533;�IO��S��s�e�t�t�in using the first two options. 3.2 BIOS setup program Use the BIOS Setup to ensure system compatibility and stability. You can be used under the Exit menu or press hotkey...
MAXIMUS VI HERO User's Manual
Page 81
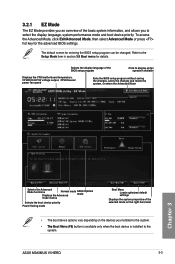
...the display language, system performance mode and boot device priority. The default screen for the advanced BIOS settings. ASUS MAXIMUS VI HERO 3-3 Selects the display language of the BIOS setup program Click to display all fan speeds if available Displays the CPU/motherboard temperature, CPU/5V...Chapter 3 Selects the Advanced Mode functions Displays Normal the Advanced mode ASUS mode Optimal mode menus Selects the boot device priority Power Saving mode Boot Menu Loads optimized default settings Displays the system properties of the basic system information, and allows ...
...the display language, system performance mode and boot device priority. The default screen for the advanced BIOS settings. ASUS MAXIMUS VI HERO 3-3 Selects the display language of the BIOS setup program Click to display all fan speeds if available Displays the CPU/motherboard temperature, CPU/5V...Chapter 3 Selects the Advanced Mode functions Displays Normal the Advanced mode ASUS mode Optimal mode menus Selects the boot device priority Power Saving mode Boot Menu Loads optimized default settings Displays the system properties of the basic system information, and allows ...

MAXIMUS VI HERO User's Manual
Page 82
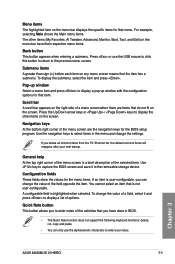
...figure below shows an example of the screen has the following sections for the detailed configurations. Refer to configure the BIOS settings. Menu items Menu bar Configuration fields General help Chapter 3 Submenu item Pop-up window Scroll bar Navigation keys ... Mode. For changing the system boot configuration For configuring options for special functions For selecting the exit options and loading default settings 3-4 Chapter 3: BIOS setup 3.2.2 Advanced Mode The Advanced Mode provides advanced options for experienced end-users to the following main items: Extreme Tweaker...
...figure below shows an example of the screen has the following sections for the detailed configurations. Refer to configure the BIOS settings. Menu items Menu bar Configuration fields General help Chapter 3 Submenu item Pop-up window Scroll bar Navigation keys ... Mode. For changing the system boot configuration For configuring options for special functions For selecting the exit options and loading default settings 3-4 Chapter 3: BIOS setup 3.2.2 Advanced Mode The Advanced Mode provides advanced options for experienced end-users to the following main items: Extreme Tweaker...
MAXIMUS VI HERO User's Manual
Page 83
...copy and paste. • You can change the value of options. Configuration fields These fields show the values for the BIOS setup program. Submenu items A greater than sign (>) before each item on the right side of the selected item. Press... the Up/Down arrow keys or / keys to enter your next startup. To change the settings. Scroll bar A scroll bar appears on any menu screen means that is user-configurable, you to the removable storage... navigation keys for the menu items. If an item is not user-configurable. Chapter 3 ASUS MAXIMUS VI HERO 3-5
...copy and paste. • You can change the value of options. Configuration fields These fields show the values for the BIOS setup program. Submenu items A greater than sign (>) before each item on the right side of the selected item. Press... the Up/Down arrow keys or / keys to enter your next startup. To change the settings. Scroll bar A scroll bar appears on any menu screen means that is user-configurable, you to the removable storage... navigation keys for the menu items. If an item is not user-configurable. Chapter 3 ASUS MAXIMUS VI HERO 3-5
MAXIMUS VI HERO User's Manual
Page 85
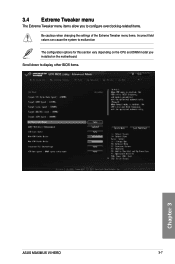
3.4 Extreme Tweaker menu The Extreme Tweaker menu items allow you installed on the motherboard. Scroll down to malfunction The configuration options for this section vary depending on the CPU and DIMM model you to configure overclocking-related items. Be cautious when changing the settings of the Extreme Tweaker menu items. Incorrect field values can cause the system to display other BIOS items. Chapter 3 ASUS MAXIMUS VI HERO 3-7
3.4 Extreme Tweaker menu The Extreme Tweaker menu items allow you installed on the motherboard. Scroll down to malfunction The configuration options for this section vary depending on the CPU and DIMM model you to configure overclocking-related items. Be cautious when changing the settings of the Extreme Tweaker menu items. Incorrect field values can cause the system to display other BIOS items. Chapter 3 ASUS MAXIMUS VI HERO 3-7

MAXIMUS VI HERO User's Manual
Page 127
... Profile From/To USB drive This item allows you to save CMOS profiles from one to the BIOS Flash, and create a profile. ASUS MAXIMUS VI HERO 3-49 Chapter 3 Save to Profile Allows you to load or save the current BIOS settings to eight, press , and then select Yes. Key in a profile number from or to load the...
... Profile From/To USB drive This item allows you to save CMOS profiles from one to the BIOS Flash, and create a profile. ASUS MAXIMUS VI HERO 3-49 Chapter 3 Save to Profile Allows you to load or save the current BIOS settings to eight, press , and then select Yes. Key in a profile number from or to load the...

MAXIMUS VI HERO User's Manual
Page 133
... drive that you want to a USB flash drive. Chapter 3 ASUS MAXIMUS VI HERO 3-55 Ensure to load the BIOS default settings to the USB port. 3. Recovering the BIOS To recover the BIOS: 1. Insert the motherboard support DVD to the optical drive, or the USB flash drive containing the BIOS file to ensure system compatibility and stability. The system requires...
... drive that you want to a USB flash drive. Chapter 3 ASUS MAXIMUS VI HERO 3-55 Ensure to load the BIOS default settings to the USB port. 3. Recovering the BIOS To recover the BIOS: 1. Insert the motherboard support DVD to the optical drive, or the USB flash drive containing the BIOS file to ensure system compatibility and stability. The system requires...
MAXIMUS VI HERO User's Manual
Page 143
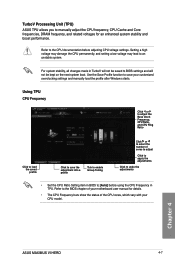
... load the saved profile Click to save your customized overclocking settings and manually load the profile after Windows starts. Chapter 4 ASUS MAXIMUS VI HERO 4-7 Setting a high voltage may damage the CPU permanently, and setting a low voltage may lead to [Auto] before adjusting CPU voltage settings. Refer to the BIOS chapter of your motherboard user manual for an enhanced system...
... load the saved profile Click to save your customized overclocking settings and manually load the profile after Windows starts. Chapter 4 ASUS MAXIMUS VI HERO 4-7 Setting a high voltage may damage the CPU permanently, and setting a low voltage may lead to [Auto] before adjusting CPU voltage settings. Refer to the BIOS chapter of your motherboard user manual for an enhanced system...


