
MAXIMUS VI GENE User's Manual
Page 3
Contents Safety information...vi About this guide...vii MAXIMUS VI GENE specifications summary ix Package contents...xiii Installation tools and components xiv Chapter 1: Product Introduction 1.1 Special features 1-1 1.1.1 Product highlights 1-1 1.1.2 ROG unique gaming features 1-2 1.1.3 ROG exclusive features 1-3 1.1.4 ASUS special features 1-4 1.1.5 ROG rich bundled software 1-4 1.2 Motherboard overview 1-5 1.2.1 Before you proceed 1-5 1.2.2 Motherboard layout 1-6 1.2.3 Central Processing Unit (CPU 1-8 1.2.4 System memory 1-9 1.2.5 Expansion slots...
Contents Safety information...vi About this guide...vii MAXIMUS VI GENE specifications summary ix Package contents...xiii Installation tools and components xiv Chapter 1: Product Introduction 1.1 Special features 1-1 1.1.1 Product highlights 1-1 1.1.2 ROG unique gaming features 1-2 1.1.3 ROG exclusive features 1-3 1.1.4 ASUS special features 1-4 1.1.5 ROG rich bundled software 1-4 1.2 Motherboard overview 1-5 1.2.1 Before you proceed 1-5 1.2.2 Motherboard layout 1-6 1.2.3 Central Processing Unit (CPU 1-8 1.2.4 System memory 1-9 1.2.5 Expansion slots...
MAXIMUS VI GENE User's Manual
Page 13
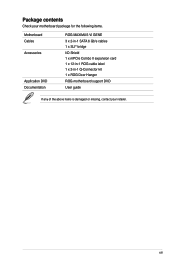
xiii Package contents Check your motherboard package for the following items. Motherboard Cables Accessories Application DVD Documentation ROG MAXIMUS VI GENE 3 x 2-in-1 SATA 6 Gb/s cables 1 x SLI® bridge I/O Shield 1 x mPCIe Combo II expansion card 1 x 12-in-1 ROG cable label 1 x 2-in-1 Q-Connector kit 1 x ROG Door Hanger ROG motherboard support DVD User guide If any of the above items is damaged or missing, contact your retailer.
xiii Package contents Check your motherboard package for the following items. Motherboard Cables Accessories Application DVD Documentation ROG MAXIMUS VI GENE 3 x 2-in-1 SATA 6 Gb/s cables 1 x SLI® bridge I/O Shield 1 x mPCIe Combo II expansion card 1 x 12-in-1 ROG cable label 1 x 2-in-1 Q-Connector kit 1 x ROG Door Hanger ROG motherboard support DVD User guide If any of the above items is damaged or missing, contact your retailer.
MAXIMUS VI GENE User's Manual
Page 15
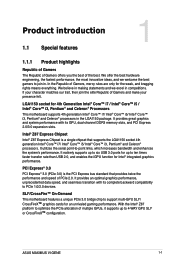
...to ten times faster transfer rate than USB 2.0, and enables the iGPU function for the weak, and bragging rights means everything. Chapter 1 ASUS MAXIMUS VI GENE 1-1 Chapter 1: Product Introduction Product introduction 1.1 Special features 1 1.1.1 Product highlights Republic of Gamers The Republic of Gamers offers you the ... Core™ i7 / Intel® Core™ i5 / Intel® Core™ i3, Pentium® and Celeron® Processors This motherboard supports 4th generation Intel® Core™ i7/ Intel® Core™ i5/ Intel® Core™ i3, Pentium® and Celeron...
...to ten times faster transfer rate than USB 2.0, and enables the iGPU function for the weak, and bragging rights means everything. Chapter 1 ASUS MAXIMUS VI GENE 1-1 Chapter 1: Product Introduction Product introduction 1.1 Special features 1 1.1.1 Product highlights Republic of Gamers The Republic of Gamers offers you the ... Core™ i7 / Intel® Core™ i5 / Intel® Core™ i3, Pentium® and Celeron® Processors This motherboard supports 4th generation Intel® Core™ i7/ Intel® Core™ i5/ Intel® Core™ i3, Pentium® and Celeron...

MAXIMUS VI GENE User's Manual
Page 17
... purely hardware level. Simply select the processor that aims to replace mPCIe and mSATA, designed to , and the motherboard will do the rest. 1.1.3 ROG exclusive features mPCIe Combo II The next evolution of system memory and turns it ...into minimal-loss power delivery. M.2 is purchased separately. Among Intelxzc Z87-based motherboards, only ROG offers fully manual voltage tuning, making the most extreme demands, lasting up to 60A, or double... standard that you want to overclock to optimize SSD performance. Chapter 1 ASUS MAXIMUS VI GENE 1-3
... purely hardware level. Simply select the processor that aims to replace mPCIe and mSATA, designed to , and the motherboard will do the rest. 1.1.3 ROG exclusive features mPCIe Combo II The next evolution of system memory and turns it ...into minimal-loss power delivery. M.2 is purchased separately. Among Intelxzc Z87-based motherboards, only ROG offers fully manual voltage tuning, making the most extreme demands, lasting up to 60A, or double... standard that you want to overclock to optimize SSD performance. Chapter 1 ASUS MAXIMUS VI GENE 1-3
MAXIMUS VI GENE User's Manual
Page 19
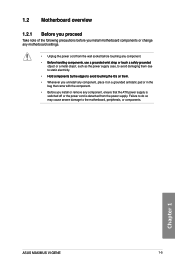
Chapter 1 ASUS MAXIMUS VI GENE 1-5 Failure to do so may cause severe damage to static electricity H��o�ld��c�o�m��p�o�n��e&#...;�u�n�d�e�d� object or a metal object, such as the power supply case, to avoid damaging them due to the motherboard, peripherals, or components. 1.2 Motherboard overview 1.2.1 Before you proceed Take note of the following precautions before touching any component, ensure that the ATX power supply is switched off or...
Chapter 1 ASUS MAXIMUS VI GENE 1-5 Failure to do so may cause severe damage to static electricity H��o�ld��c�o�m��p�o�n��e&#...;�u�n�d�e�d� object or a metal object, such as the power supply case, to avoid damaging them due to the motherboard, peripherals, or components. 1.2 Motherboard overview 1.2.1 Before you proceed Take note of the following precautions before touching any component, ensure that the ATX power supply is switched off or...
MAXIMUS VI GENE User's Manual
Page 23
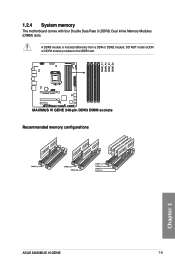
1.2.4 System memory The motherboard comes with four Double Data Rate 3 (DDR3) Dual Inline Memory Modules (DIMM) slots. A DDR3 module is notched differently from a DDR or DDR2 module. Recommended memory configurations Chapter 1 ASUS MAXIMUS VI GENE 1-9 DO NOT install a DDR or DDR2 memory module to the DDR3 slot.
1.2.4 System memory The motherboard comes with four Double Data Rate 3 (DDR3) Dual Inline Memory Modules (DIMM) slots. A DDR3 module is notched differently from a DDR or DDR2 module. Recommended memory configurations Chapter 1 ASUS MAXIMUS VI GENE 1-9 DO NOT install a DDR or DDR2 memory module to the DDR3 slot.
MAXIMUS VI GENE User's Manual
Page 25
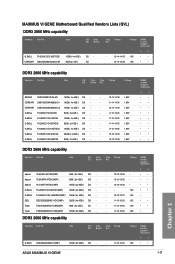
MAXIMUS VI GENE Motherboard Qualified Vendors Lists (QVL) DDR3 3000 MHz capability Vendors Part No. Size SS/ Chip Chip Timing DS Brand NO. Size SS/ DS Apacer 78.BAGFF....(XMP) Size SS/ DS 16GB ( 2x 8GB ) DS Chip Chip Timing Brand NO. - - 11-13-13-35 Voltage 1.65 DIMM socket support (Optional) 2 4 • • ASUS MAXIMUS VI GENE 1-11 Chapter 1 Voltage AVEXIR AVD3U28001204G-4CI 16GB ( 4x 4GB ) DS - - 12-14-14-35 1.65V CORSAIR CMD16GX3M4A2800C11 16GB ( 4x 4GB ) DS - - 11-14-14-35...
MAXIMUS VI GENE Motherboard Qualified Vendors Lists (QVL) DDR3 3000 MHz capability Vendors Part No. Size SS/ Chip Chip Timing DS Brand NO. Size SS/ DS Apacer 78.BAGFF....(XMP) Size SS/ DS 16GB ( 2x 8GB ) DS Chip Chip Timing Brand NO. - - 11-13-13-35 Voltage 1.65 DIMM socket support (Optional) 2 4 • • ASUS MAXIMUS VI GENE 1-11 Chapter 1 Voltage AVEXIR AVD3U28001204G-4CI 16GB ( 4x 4GB ) DS - - 12-14-14-35 1.65V CORSAIR CMD16GX3M4A2800C11 16GB ( 4x 4GB ) DS - - 11-14-14-35...
MAXIMUS VI GENE User's Manual
Page 39
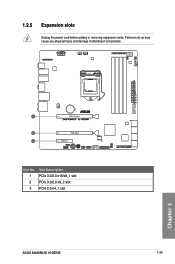
Failure to do so may cause you physical injury and damage motherboard components. 1.2.5 Expansion slots Unplug the power cord before adding or removing expansion cards. Chapter 1 Slot No. 1 2 3 Slot Description PCIe 3.0/2.0 x16/x8_1 slot PCIe 3.0/2.0 x8_2 slot PCIe 2.0 x4_1 slot ASUS MAXIMUS VI GENE 1-25
Failure to do so may cause you physical injury and damage motherboard components. 1.2.5 Expansion slots Unplug the power cord before adding or removing expansion cards. Chapter 1 Slot No. 1 2 3 Slot Description PCIe 3.0/2.0 x16/x8_1 slot PCIe 3.0/2.0 x8_2 slot PCIe 2.0 x4_1 slot ASUS MAXIMUS VI GENE 1-25

MAXIMUS VI GENE User's Manual
Page 41
Chapter 1 ASUS MAXIMUS VI GENE 1-27 1.2.6 Onboard buttons and switches Onboard switches and buttons allow you to reboot the system. Reset button Press the reset button to fine-tune performance ... to a power source indicating that allows you should shut down the system and unplug the power cable before removing or installing any motherboard component. 2. The button also lights up the system. Power-on button The motherboard comes with a power-on a bare or open-case system. This is plugged to enhance system performance. 1.
Chapter 1 ASUS MAXIMUS VI GENE 1-27 1.2.6 Onboard buttons and switches Onboard switches and buttons allow you to reboot the system. Reset button Press the reset button to fine-tune performance ... to a power source indicating that allows you should shut down the system and unplug the power cable before removing or installing any motherboard component. 2. The button also lights up the system. Power-on button The motherboard comes with a power-on a bare or open-case system. This is plugged to enhance system performance. 1.
MAXIMUS VI GENE User's Manual
Page 45
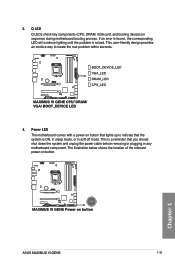
Power LED The motherboard comes with a power-on button. If an error is found , the corresponding LED will continue lighting until the problem is ON, in sleep mode, or ..., DRAM, VGA card, and booting devices) in any motherboard component. This user-friendly design provides an intuitive way to indicate that you should shut down the system and unplug the power cable before removing or plugging in sequence during motherboard booting process. Chapter 1 ASUS MAXIMUS VI GENE 1-31 This is a reminder that the system is solved...
Power LED The motherboard comes with a power-on button. If an error is found , the corresponding LED will continue lighting until the problem is ON, in sleep mode, or ..., DRAM, VGA card, and booting devices) in any motherboard component. This user-friendly design provides an intuitive way to indicate that you should shut down the system and unplug the power cable before removing or plugging in sequence during motherboard booting process. Chapter 1 ASUS MAXIMUS VI GENE 1-31 This is a reminder that the system is solved...
MAXIMUS VI GENE User's Manual
Page 53
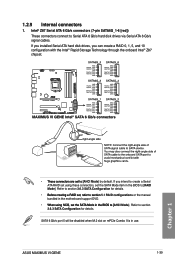
... chipset. Refer to ��[AHCI Mode] by default. SATA 6 Gb/s port 5 will be disabled when M.2 slot on mPCIe Combo II is in the motherboard support DVD. ASUS MAXIMUS VI GENE 1-39 Chapter 1 T��h�e�s�e��c�o�n�n�e�c�t�o�rs��a�r�e�s�...
... chipset. Refer to ��[AHCI Mode] by default. SATA 6 Gb/s port 5 will be disabled when M.2 slot on mPCIe Combo II is in the motherboard support DVD. ASUS MAXIMUS VI GENE 1-39 Chapter 1 T��h�e�s�e��c�o�n�n�e�c�t�o�rs��a�r�e�s�...

MAXIMUS VI GENE User's Manual
Page 55
... the back of the motherboard's high-definition audio capability. • If you connect a high-definition front panel audio module to avail of the system chassis. Digital audio connector (4-1 pin SPDIF_OUT) This connector is for a chassis-mounted front panel audio I /O module cable to this connector to this connector. ASUS MAXIMUS VI GENE 1-41 Chapter 1 • We...
... the back of the motherboard's high-definition audio capability. • If you connect a high-definition front panel audio module to avail of the system chassis. Digital audio connector (4-1 pin SPDIF_OUT) This connector is for a chassis-mounted front panel audio I /O module cable to this connector to this connector. ASUS MAXIMUS VI GENE 1-41 Chapter 1 • We...
MAXIMUS VI GENE User's Manual
Page 57
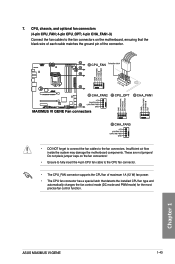
ASUS MAXIMUS VI GENE 1-43 Chapter 1 Do not place jumper caps on the motherboard, ensuring that the black wire of each cable matches the ground pin of the connector. • DO NOT forget to connect the fan cables to ... the fan control mode (DC mode and PWM mode) for the most precise fan control function. Insufficient air flow inside the system may damage the motherboard components. These are not jumpers! 7. CPU, chassis, and optional fan connectors (4-pin CPU_FAN; 4-pin CPU_OPT; 4-pin CHA_FAN1-3) Connect the fan cables to the fan connectors...
ASUS MAXIMUS VI GENE 1-43 Chapter 1 Do not place jumper caps on the motherboard, ensuring that the black wire of each cable matches the ground pin of the connector. • DO NOT forget to connect the fan cables to ... the fan control mode (DC mode and PWM mode) for the most precise fan control function. Insufficient air flow inside the system may damage the motherboard components. These are not jumpers! 7. CPU, chassis, and optional fan connectors (4-pin CPU_FAN; 4-pin CPU_OPT; 4-pin CHA_FAN1-3) Connect the fan cables to the fan connectors...
MAXIMUS VI GENE User's Manual
Page 63
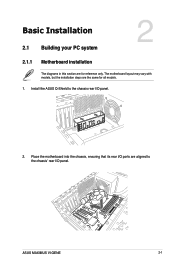
The motherboard layout may vary with models, but the installation steps are the same for reference only. Chapter 2: Basic Installation Basic Installation 2.1 Building your PC system 2 2.1.1 Motherboard installation The diagrams in this section are for all models. 1. Place the motherboard into the chassis, ensuring that its rear I/O ports are aligned to the chassis rear I /O panel. Chapter 2 ASUS MAXIMUS VI GENE 2-1 Install the ASUS Q-Shield to the chassis' rear I /O panel. 2.
The motherboard layout may vary with models, but the installation steps are the same for reference only. Chapter 2: Basic Installation Basic Installation 2.1 Building your PC system 2 2.1.1 Motherboard installation The diagrams in this section are for all models. 1. Place the motherboard into the chassis, ensuring that its rear I/O ports are aligned to the chassis rear I /O panel. Chapter 2 ASUS MAXIMUS VI GENE 2-1 Install the ASUS Q-Shield to the chassis' rear I /O panel. 2.
MAXIMUS VI GENE User's Manual
Page 73
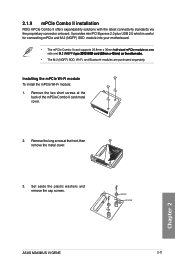
It provides mini PCI Epxress 2.0 plus USB 2.0 which is useful for connecting mPCIe and M.2 (NGFF) SSD module into your motherboard. • The mPCIe Combo II card supports 26.8mm x 30mm h��a�lf�-�s�iz�e�d�&#...;t�h�e�r�s�i�d�e�. • The M.2 (NGFF) SDD, Wi-Fi, and Bluetoorh modules are purchased separately. Chapter 2 ASUS MAXIMUS VI GENE 2-11 Remove the two short screws at the front, then remove the metal cover. 3. Remove the long screw at the back of the mPCIe Combo...
It provides mini PCI Epxress 2.0 plus USB 2.0 which is useful for connecting mPCIe and M.2 (NGFF) SSD module into your motherboard. • The mPCIe Combo II card supports 26.8mm x 30mm h��a�lf�-�s�iz�e�d�&#...;t�h�e�r�s�i�d�e�. • The M.2 (NGFF) SDD, Wi-Fi, and Bluetoorh modules are purchased separately. Chapter 2 ASUS MAXIMUS VI GENE 2-11 Remove the two short screws at the front, then remove the metal cover. 3. Remove the long screw at the back of the mPCIe Combo...
MAXIMUS VI GENE User's Manual
Page 77
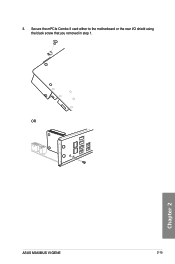
OR Chapter 2 ASUS MAXIMUS VI GENE 2-15 Secure the mPCIe Combo II card either to the motherboard or the rear I/O shield using the black screw that you removed in step 1. 3.
OR Chapter 2 ASUS MAXIMUS VI GENE 2-15 Secure the mPCIe Combo II card either to the motherboard or the rear I/O shield using the black screw that you removed in step 1. 3.
MAXIMUS VI GENE User's Manual
Page 87
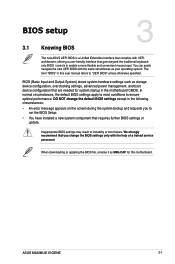
Inappropriate BIOS settings may result to ensure optimal performance. Chapter 3 ASUS MAXIMUS VI GENE 3-1 You can easily navigate the new UEFI BIOS with the same smoothness as M6G.CAP for system startup in the motherboard CMOS. DO NOT change the BIOS settings only with the help of a trained ...; An error message appears on the screen during the system bootup and requests you change the default BIOS settings except in this motherboard. In normal circumstances, the default BIOS settings apply to most conditions to instability or boot failure. We strongly recommend that goes...
Inappropriate BIOS settings may result to ensure optimal performance. Chapter 3 ASUS MAXIMUS VI GENE 3-1 You can easily navigate the new UEFI BIOS with the same smoothness as M6G.CAP for system startup in the motherboard CMOS. DO NOT change the BIOS settings only with the help of a trained ...; An error message appears on the screen during the system bootup and requests you change the default BIOS settings except in this motherboard. In normal circumstances, the default BIOS settings apply to most conditions to instability or boot failure. We strongly recommend that goes...
MAXIMUS VI GENE User's Manual
Page 89
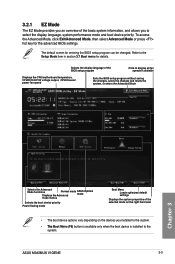
... on the devices you to the Setup Mode item in section 3.7 Boot menu for details. The default screen for the advanced BIOS settings. ASUS MAXIMUS VI GENE 3-3 Refer to select the display language, system performance mode and boot device priority. To access the Advanced Mode, click Exit/Advanced Mode,...can be changed. Selects the display language of the BIOS setup program Click to display all fan speeds if available Displays the CPU/motherboard temperature, CPU/5V/3.3V/12V voltage output, CPU/chassis/ power fan speed Exits the BIOS setup program without saving the changes, saves...
... on the devices you to the Setup Mode item in section 3.7 Boot menu for details. The default screen for the advanced BIOS settings. ASUS MAXIMUS VI GENE 3-3 Refer to select the display language, system performance mode and boot device priority. To access the Advanced Mode, click Exit/Advanced Mode,...can be changed. Selects the display language of the BIOS setup program Click to display all fan speeds if available Displays the CPU/motherboard temperature, CPU/5V/3.3V/12V voltage output, CPU/chassis/ power fan speed Exits the BIOS setup program without saving the changes, saves...
MAXIMUS VI GENE User's Manual
Page 93
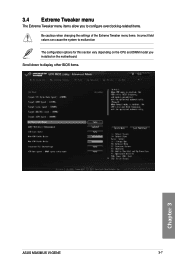
3.4 Extreme Tweaker menu The Extreme Tweaker menu items allow you to configure overclocking-related items. Be cautious when changing the settings of the Extreme Tweaker menu items. Incorrect field values can cause the system to display other BIOS items. Chapter 3 ASUS MAXIMUS VI GENE 3-7 Scroll down to malfunction The configuration options for this section vary depending on the CPU and DIMM model you installed on the motherboard.
3.4 Extreme Tweaker menu The Extreme Tweaker menu items allow you to configure overclocking-related items. Be cautious when changing the settings of the Extreme Tweaker menu items. Incorrect field values can cause the system to display other BIOS items. Chapter 3 ASUS MAXIMUS VI GENE 3-7 Scroll down to malfunction The configuration options for this section vary depending on the CPU and DIMM model you installed on the motherboard.
MAXIMUS VI GENE User's Manual
Page 145
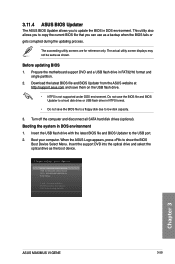
...updating process. Prepare the motherboard support DVD and a USB flash drive in DOS environment 1. Do not save the BIOS file and BIOS Updater to update the BIOS in DOS environment. This utility also allows you to boot using defaults Chapter 3 ASUS MAXIMUS VI GENE 3-59 The succeeding ...utility screens are for reference only. 3.11.4 ASUS BIOS Updater The ASUS BIOS Updater allows you to a hard disk drive or USB flash drive in NTFS format....
...updating process. Prepare the motherboard support DVD and a USB flash drive in DOS environment 1. Do not save the BIOS file and BIOS Updater to update the BIOS in DOS environment. This utility also allows you to boot using defaults Chapter 3 ASUS MAXIMUS VI GENE 3-59 The succeeding ...utility screens are for reference only. 3.11.4 ASUS BIOS Updater The ASUS BIOS Updater allows you to a hard disk drive or USB flash drive in NTFS format....


