User Manual
Page 3
Contents Notices...viii Safety information ix About this guide x Maximus III GENE specifications summary xii Chapter 1: Product introduction 1.1 Welcome 1-1 1.2 Package contents 1-1 1.3 Special features 1-2 1.3.1 Product highlights 1-2 1.3.2 ROG Intelligent Performance & Overclocking features... 1-3 1.3.3 ROG unique features 1-5 1.3.4 ASUS special features 1-6 Chapter 2: Hardware information 2.1 Before you proceed 2-1 2.2 Motherboard overview 2-5 2.2.1 Motherboard layout 2-5 2.2.2 Layout contents 2-6 2.2.3 Placement direction 2-7 2.2.4 Screw holes 2-7 2.3 Central Processing Unit...
Contents Notices...viii Safety information ix About this guide x Maximus III GENE specifications summary xii Chapter 1: Product introduction 1.1 Welcome 1-1 1.2 Package contents 1-1 1.3 Special features 1-2 1.3.1 Product highlights 1-2 1.3.2 ROG Intelligent Performance & Overclocking features... 1-3 1.3.3 ROG unique features 1-5 1.3.4 ASUS special features 1-6 Chapter 2: Hardware information 2.1 Before you proceed 2-1 2.2 Motherboard overview 2-5 2.2.1 Motherboard layout 2-5 2.2.2 Layout contents 2-6 2.2.3 Placement direction 2-7 2.2.4 Screw holes 2-7 2.3 Central Processing Unit...

User Manual
Page 4
... updating your BIOS 3-1 3.1.1 ASUS Update utility 3-1 3.1.2 ASUS EZ Flash 2 utility 3-4 3.1.3 ASUS CrashFree BIOS 3 utility 3-5 3.1.4 ASUS BIOS Updater 3-6 3.2 BIOS ...setup program 3-9 3.2.1 BIOS menu screen 3-10 3.2.2 Menu bar 3-10 3.2.3 Navigation keys 3-10 3.2.4 Menu items 3-11 3.2.5 Submenu items 3-11 3.2.6 Configuration fields 3-11 3.2.7 Pop-up window 3-11 3.2.8 Scroll bar 3-11 3.2.9 General help 3-11 3.3 Extreme Tweaker menu 3-12 3.3.1 CPU Level Up 3-13 3.3.2 Memory Level Up 3-13 3.3.3 Ai Overclock...
... updating your BIOS 3-1 3.1.1 ASUS Update utility 3-1 3.1.2 ASUS EZ Flash 2 utility 3-4 3.1.3 ASUS CrashFree BIOS 3 utility 3-5 3.1.4 ASUS BIOS Updater 3-6 3.2 BIOS ...setup program 3-9 3.2.1 BIOS menu screen 3-10 3.2.2 Menu bar 3-10 3.2.3 Navigation keys 3-10 3.2.4 Menu items 3-11 3.2.5 Submenu items 3-11 3.2.6 Configuration fields 3-11 3.2.7 Pop-up window 3-11 3.2.8 Scroll bar 3-11 3.2.9 General help 3-11 3.3 Extreme Tweaker menu 3-12 3.3.1 CPU Level Up 3-13 3.3.2 Memory Level Up 3-13 3.3.3 Ai Overclock...
User Manual
Page 13
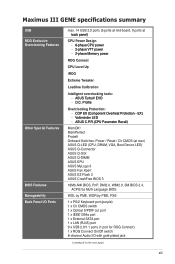
...�O��.�C�.�P��r�o�fi�le� Overclocking Protection: - �C��O�P��E�X��(�C�o�...Maximus III GENE specifications summary USB ROG Exclusive Overclocking Features Other Special Features BIOS Features Manageability Back Panel I/O Ports max. 14 USB 2.0 ports (5 ports at mid-board, 9 ports at rear) ASUS Q-LED (CPU, DRAM, VGA, Boot Device LED) ASUS Q-Connector ASUS Q-Slot ASUS Q-DIMM ASUS EPU ASUS MyLogo 3 ASUS Fan Xpert ASUS EZ Flash 2 ASUS...
...�O��.�C�.�P��r�o�fi�le� Overclocking Protection: - �C��O�P��E�X��(�C�o�...Maximus III GENE specifications summary USB ROG Exclusive Overclocking Features Other Special Features BIOS Features Manageability Back Panel I/O Ports max. 14 USB 2.0 ports (5 ports at mid-board, 9 ports at rear) ASUS Q-LED (CPU, DRAM, VGA, Boot Device LED) ASUS Q-Connector ASUS Q-Slot ASUS Q-DIMM ASUS EPU ASUS MyLogo 3 ASUS Fan Xpert ASUS EZ Flash 2 ASUS...
User Manual
Page 19
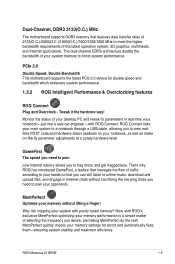
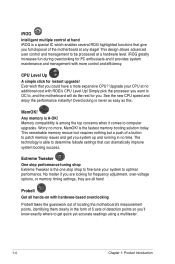
...requirements of the latest operation system, 3D graphics, multimedia, and Internet applications. ROG Maximus III GENE 1-3 MemPerfect Optimize your memory without sacrificing the low ping times you need to ...desire, and letting MemPerfect do the rest! PCIe 2.0 Double Speed; Double Bandwidth This motherboard supports the latest PCIe 2.0 device for errors and automatically fixes them-ensuring system stability...performance. 1.3.2 ROG Intelligent Performance & Overclocking features ROG Connect Plug and Overclock - GameFirst The speed you need to pwn your system memory to boost system...
...requirements of the latest operation system, 3D graphics, multimedia, and Internet applications. ROG Maximus III GENE 1-3 MemPerfect Optimize your memory without sacrificing the low ping times you need to ...desire, and letting MemPerfect do the rest! PCIe 2.0 Double Speed; Double Bandwidth This motherboard supports the latest PCIe 2.0 device for errors and automatically fixes them-ensuring system stability...performance. 1.3.2 ROG Intelligent Performance & Overclocking features ROG Connect Plug and Overclock - GameFirst The speed you need to pwn your system memory to boost system...
User Manual
Page 20
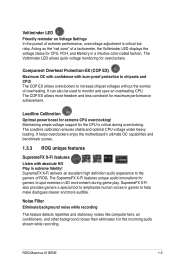
... accurate readings using a multitester. 1-4 Chapter 1: Product Introduction MemOK! This remarkable memory rescue tool requires nothing but a push of the motherboard at any stage! Worry no additional cost with hardware-based overclocking ProbeIt takes the guesswork out of locating the motherboard's measurement points, identifying them clearly in no time. iROG greatly increases fun during...
... accurate readings using a multitester. 1-4 Chapter 1: Product Introduction MemOK! This remarkable memory rescue tool requires nothing but a push of the motherboard at any stage! Worry no additional cost with hardware-based overclocking ProbeIt takes the guesswork out of locating the motherboard's measurement points, identifying them clearly in no time. iROG greatly increases fun during...
User Manual
Page 21
... CPU! It can also be used to the gamers of overheating. ROG Maximus III GENE 1-5 The Voltiminder LED allows quick voltage monitoring for extreme CPU overclocking! Loadline Calibration Optimal power boost for overclockers. Maintaining ample voltage support for CPU, PCH, and Memory in extreme fidelity! It helps overclockers enjoy the motherboard's ultimate OC capabilities and benchmark scores. 1.3.3 ROG...
... CPU! It can also be used to the gamers of overheating. ROG Maximus III GENE 1-5 The Voltiminder LED allows quick voltage monitoring for extreme CPU overclocking! Loadline Calibration Optimal power boost for overclockers. Maintaining ample voltage support for CPU, PCH, and Memory in extreme fidelity! It helps overclockers enjoy the motherboard's ultimate OC capabilities and benchmark scores. 1.3.3 ROG...
User Manual
Page 22
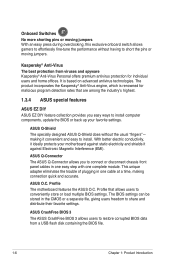
...Profile that are among the industry's highest. 1.3.4 ASUS special features ASUS EZ DIY ASUS EZ DIY feature collection provides you to short the pins or moving jumpers With an easy press during overclocking, this exclusive onboard switch allows gamers to effortlessly fine-tune the performance without the usual...plugging in the CMOS or a separate file, giving users freedom to share and distribute their favorite settings. ASUS O.C. Profile The motherboard features the ASUS O.C. Onboard Switches No more shorting pins or moving jumpers. The BIOS settings can be stored in one complete module....
...Profile that are among the industry's highest. 1.3.4 ASUS special features ASUS EZ DIY ASUS EZ DIY feature collection provides you to short the pins or moving jumpers With an easy press during overclocking, this exclusive onboard switch allows gamers to effortlessly fine-tune the performance without the usual...plugging in the CMOS or a separate file, giving users freedom to share and distribute their favorite settings. ASUS O.C. Profile The motherboard features the ASUS O.C. Onboard Switches No more shorting pins or moving jumpers. The BIOS settings can be stored in one complete module....
User Manual
Page 23
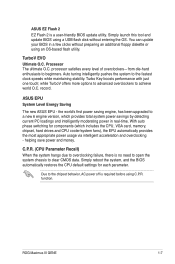
...function. ROG Maximus III GENE 1-7 Simply launch this tool and update BIOS using a USB flash disk without preparing an additional floppy diskette or using C.P.R. You can update your BIOS in real-time. the world's first power saving engine, has been upgraded to overclocking failure, there...to achieve world O.C. With auto phase switching for each parameter. TurboV EVO Ultimate O.C. ASUS EPU System Level Energy Saving The new ASUS EPU - processor satisfies every level of overclockers-from die-hard enthusiasts to the fastest clock speeds while maintaining stability. while TurboV ...
...function. ROG Maximus III GENE 1-7 Simply launch this tool and update BIOS using a USB flash disk without preparing an additional floppy diskette or using C.P.R. You can update your BIOS in real-time. the world's first power saving engine, has been upgraded to overclocking failure, there...to achieve world O.C. With auto phase switching for each parameter. TurboV EVO Ultimate O.C. ASUS EPU System Level Energy Saving The new ASUS EPU - processor satisfies every level of overclockers-from die-hard enthusiasts to the fastest clock speeds while maintaining stability. while TurboV ...
User Manual
Page 30
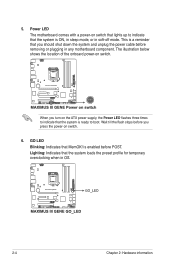
... of the onboard power-on switch. 6. GO LED Blinking: Indicates that the system loads the preset profile for temporary overclocking when in OS. 2-4 Chapter 2: Hardware information Power LED The motherboard comes with a power-on the ATX power supply, the Power LED flashes three times to boot. Wait till the ...switch that lights up to indicate that the system is ready to indicate that the system is ON, in sleep mode, or in any motherboard component. When you should shut down the system and unplug the power cable before removing or plugging in soft‑off mode. This is...
... of the onboard power-on switch. 6. GO LED Blinking: Indicates that the system loads the preset profile for temporary overclocking when in OS. 2-4 Chapter 2: Hardware information Power LED The motherboard comes with a power-on the ATX power supply, the Power LED flashes three times to boot. Wait till the ...switch that lights up to indicate that the system is ready to indicate that the system is ON, in sleep mode, or in any motherboard component. When you should shut down the system and unplug the power cable before removing or plugging in soft‑off mode. This is...
User Manual
Page 40
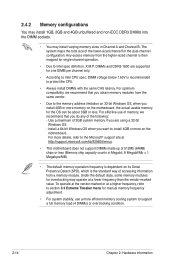
...1.65V is recommended to support a full memory load (4 DIMMs) or overclocking condition. 2-14 Chapter 2: Hardware information Any excess memory from the same vendor. • Due to the memory address limitation on the motherboard, the actual usable memory for the OS can be about 3GB or less...more on its Serial Presence Detect (SPD), which is then mapped for overclocking may install varying memory sizes in Megabit, 8 Megabit/Mb = 1 Megabyte/MB). • The default memory operation frequency is dependent on the motherboard. The system maps the total size of the following: - Under the ...
...1.65V is recommended to support a full memory load (4 DIMMs) or overclocking condition. 2-14 Chapter 2: Hardware information Any excess memory from the same vendor. • Due to the memory address limitation on the motherboard, the actual usable memory for the OS can be about 3GB or less...more on its Serial Presence Detect (SPD), which is then mapped for overclocking may install varying memory sizes in Megabit, 8 Megabit/Mb = 1 Megabyte/MB). • The default memory operation frequency is dependent on the motherboard. The system maps the total size of the following: - Under the ...
User Manual
Page 52
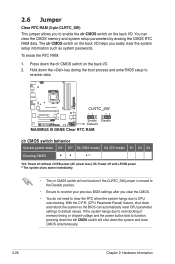
... switch on the back I/O helps you clear the CMOS. • You do not need to clear the RTC when the system hangs due to CPU overclocking. Press down the system and clear CMOS simultaneously. 2-26 Chapter 2: Hardware information S5: Power off without +5VSB power (AC power loss); With the C.P.R. ... re-enter your previous BIOS settings after you easily clear the system setup information such as system passwords. If the system hangs due to overclocking of memory timing or chipset voltage and the power button fails to function, pressing down and reboot the system so the BIOS can clear...
... switch on the back I/O helps you clear the CMOS. • You do not need to clear the RTC when the system hangs due to CPU overclocking. Press down the system and clear CMOS simultaneously. 2-26 Chapter 2: Hardware information S5: Power off without +5VSB power (AC power loss); With the C.P.R. ... re-enter your previous BIOS settings after you easily clear the system setup information such as system passwords. If the system hangs due to overclocking of memory timing or chipset voltage and the power button fails to function, pressing down and reboot the system so the BIOS can clear...
User Manual
Page 54
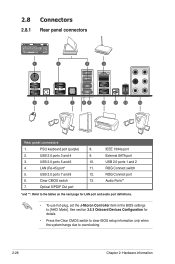
... 3.5.3 Onboard Devices Configuration for LAN port and audio port definitions. • To use hot-plug, set the J-Micron Controller item in the BIOS settings to overclocking. 2-28 Chapter 2: Hardware information
... 3.5.3 Onboard Devices Configuration for LAN port and audio port definitions. • To use hot-plug, set the J-Micron Controller item in the BIOS settings to overclocking. 2-28 Chapter 2: Hardware information
User Manual
Page 58
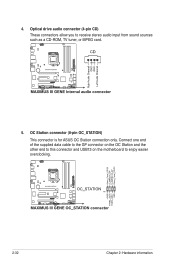
Connect one end of the supplied data cable to the GP connector on the OC Station and the other end to this connector and USB13 on the motherboard to receive stereo audio input from sound sources such as a CD-ROM, TV tuner, or MPEG card. 5. OC Station connector (8-pin OC_STATION) This connector is for ASUS OC Station connection only. 4. Optical drive audio connector (4-pin CD) These connectors allow you to enjoy easier overclocking. 2-32 Chapter 2: Hardware information
Connect one end of the supplied data cable to the GP connector on the OC Station and the other end to this connector and USB13 on the motherboard to receive stereo audio input from sound sources such as a CD-ROM, TV tuner, or MPEG card. 5. OC Station connector (8-pin OC_STATION) This connector is for ASUS OC Station connection only. 4. Optical drive audio connector (4-pin CD) These connectors allow you to enjoy easier overclocking. 2-32 Chapter 2: Hardware information
User Manual
Page 65
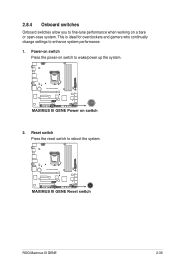
This is ideal for overclockers and gamers who continually change settings to reboot the system. 2.8.4 Onboard switches Onboard switches allow you to fine-tune performance when working on switch to wake/power up the system. 2. Reset switch Press the reset switch to enhance system performance. 1. ROG Maximus III GENE 2-39 Power-on switch Press the power-on a bare or open-case system.
This is ideal for overclockers and gamers who continually change settings to reboot the system. 2.8.4 Onboard switches Onboard switches allow you to fine-tune performance when working on switch to wake/power up the system. 2. Reset switch Press the reset switch to enhance system performance. 1. ROG Maximus III GENE 2-39 Power-on switch Press the power-on a bare or open-case system.
User Manual
Page 66
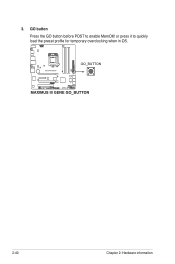
or press it to enable MemOK! 3. GO button Press the GO button before POST to quickly load the preset profile for temporary overclocking when in OS. 2-40 Chapter 2: Hardware information
or press it to enable MemOK! 3. GO button Press the GO button before POST to quickly load the preset profile for temporary overclocking when in OS. 2-40 Chapter 2: Hardware information
User Manual
Page 80
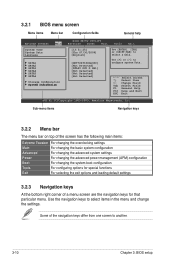
... Sub-menu items Navigation keys 3.2.2 Menu bar The menu bar on top of the screen has the following main items: Extreme Tweaker For changing the overclocking settings Main For changing the basic system configuration Advanced For changing the advanced system settings Power For changing the advanced power management (APM) configuration Boot...
... Sub-menu items Navigation keys 3.2.2 Menu bar The menu bar on top of the screen has the following main items: Extreme Tweaker For changing the overclocking settings Main For changing the basic system configuration Advanced For changing the advanced system settings Power For changing the advanced power management (APM) configuration Boot...
User Manual
Page 82
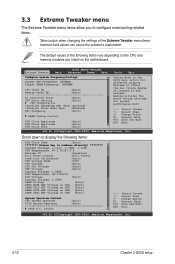
...menu The Extreme Tweaker menu items allow you install on the motherboard. Change Field F1 General Help F10 Save and Exit ESC...depending on CHB [Auto] Spread Spectrum Control CPU Spread Spectrum [Auto] PCIE Spread Spectrum [Auto ASUS O.C. Extreme Tweaker Main BIOS SETUP UTILITY Advanced Power Boot Tools Exit Configure System Frequency/Voltage Target ...CPU Frequency: 2926MHZ Target DRAM Frequency: 1066MHZ CPU Level Up [Auto] Memory Level Up [Auto Ai Overclock Tuner [Auto] CPU Ratio Setting [Auto] CPU Configuration *Intel(R) SpeedStep(TM) Tech [Enabled] *Intel(R) ...
...menu The Extreme Tweaker menu items allow you install on the motherboard. Change Field F1 General Help F10 Save and Exit ESC...depending on CHB [Auto] Spread Spectrum Control CPU Spread Spectrum [Auto] PCIE Spread Spectrum [Auto ASUS O.C. Extreme Tweaker Main BIOS SETUP UTILITY Advanced Power Boot Tools Exit Configure System Frequency/Voltage Target ...CPU Frequency: 2926MHZ Target DRAM Frequency: 1066MHZ CPU Level Up [Auto] Memory Level Up [Auto Ai Overclock Tuner [Auto] CPU Ratio Setting [Auto] CPU Configuration *Intel(R) SpeedStep(TM) Tech [Enabled] *Intel(R) ...
User Manual
Page 83
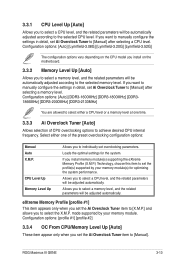
...[Lynnfield-3.52G] The configuration options vary depending on the CPU model you install on the motherboard. 3.3.2 Memory Level Up [Auto] Allows you want to manually configure the settings in detail, set Ai Overclock Tuner to [Manual] after selecting a memory level. If you to the selected CPU ...CPU level or a memory level at one of CPU overclocking options to the selected memory level. Allows you want to manually configure the settings in detail, set Ai Overclock Tuner to [Manual] after selecting a CPU level. ROG Maximus III GENE 3-13 If you to select a memory level, and ...
...[Lynnfield-3.52G] The configuration options vary depending on the CPU model you install on the motherboard. 3.3.2 Memory Level Up [Auto] Allows you want to manually configure the settings in detail, set Ai Overclock Tuner to [Manual] after selecting a memory level. If you to the selected CPU ...CPU level or a memory level at one of CPU overclocking options to the selected memory level. Allows you want to manually configure the settings in detail, set Ai Overclock Tuner to [Manual] after selecting a CPU level. ROG Maximus III GENE 3-13 If you to select a memory level, and ...
User Manual
Page 84
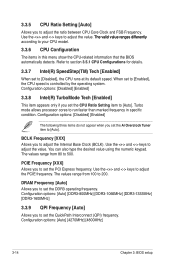
...] 3-14 Chapter 3: BIOS setup When set to [Auto]. Configuration options: [Disabled] [Enabled] The following three items do not appear when you to set the Ai Overclock Tuner item to [Disabled], the CPU runs at its default speed. DRAM Frequency [Auto] Allows you set the DDR3 operating frequency. The values range from...
...] 3-14 Chapter 3: BIOS setup When set to [Auto]. Configuration options: [Disabled] [Enabled] The following three items do not appear when you to set the Ai Overclock Tuner item to [Disabled], the CPU runs at its default speed. DRAM Frequency [Auto] Allows you set the DDR3 operating frequency. The values range from...
User Manual
Page 86
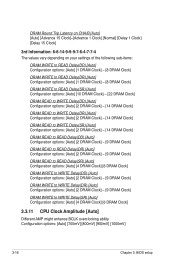
... Clock] DRAM WRITE to WRITE Delay(SR) [Auto] Configuration options: [Auto] [4 DRAM Clock] [6 DRAM Clock] 3.3.11 CPU Clock Amplitude [Auto] Different AMP might enhance BCLK overclocking ability. Configuration options: [Auto] [700mV] [800mV] [900mV] [1000mV] 3-16 Chapter 3: BIOS setup
... Clock] DRAM WRITE to WRITE Delay(SR) [Auto] Configuration options: [Auto] [4 DRAM Clock] [6 DRAM Clock] 3.3.11 CPU Clock Amplitude [Auto] Different AMP might enhance BCLK overclocking ability. Configuration options: [Auto] [700mV] [800mV] [900mV] [1000mV] 3-16 Chapter 3: BIOS setup


