User Manual
Page 3
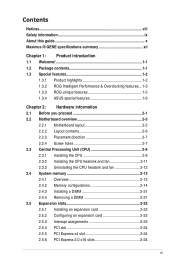
Contents Notices...viii Safety information ix About this guide x Maximus III GENE specifications summary xii Chapter 1: Product introduction 1.1 Welcome 1-1 1.2 Package contents 1-1 1.3 Special features 1-2 1.3.1 Product highlights 1-2 1.3.2 ROG Intelligent Performance & Overclocking features... 1-3 1.3.3 ROG unique features 1-5 1.3.4 ASUS special features 1-6 Chapter 2: Hardware information 2.1 Before you proceed 2-1 2.2 Motherboard overview 2-5 2.2.1 Motherboard layout 2-5 2.2.2 Layout contents 2-6 2.2.3 Placement direction 2-7 2.2.4 Screw holes 2-7 2.3 Central Processing Unit...
Contents Notices...viii Safety information ix About this guide x Maximus III GENE specifications summary xii Chapter 1: Product introduction 1.1 Welcome 1-1 1.2 Package contents 1-1 1.3 Special features 1-2 1.3.1 Product highlights 1-2 1.3.2 ROG Intelligent Performance & Overclocking features... 1-3 1.3.3 ROG unique features 1-5 1.3.4 ASUS special features 1-6 Chapter 2: Hardware information 2.1 Before you proceed 2-1 2.2 Motherboard overview 2-5 2.2.1 Motherboard layout 2-5 2.2.2 Layout contents 2-6 2.2.3 Placement direction 2-7 2.2.4 Screw holes 2-7 2.3 Central Processing Unit...

User Manual
Page 4
... updating your BIOS 3-1 3.1.1 ASUS Update utility 3-1 3.1.2 ASUS EZ Flash 2 utility 3-4 3.1.3 ASUS CrashFree BIOS 3 utility 3-5 3.1.4 ASUS BIOS Updater 3-6 3.2 BIOS ...setup program 3-9 3.2.1 BIOS menu screen 3-10 3.2.2 Menu bar 3-10 3.2.3 Navigation keys 3-10 3.2.4 Menu items 3-11 3.2.5 Submenu items 3-11 3.2.6 Configuration fields 3-11 3.2.7 Pop-up window 3-11 3.2.8 Scroll bar 3-11 3.2.9 General help 3-11 3.3 Extreme Tweaker menu 3-12 3.3.1 CPU Level Up 3-13 3.3.2 Memory Level Up 3-13 3.3.3 Ai Overclock...
... updating your BIOS 3-1 3.1.1 ASUS Update utility 3-1 3.1.2 ASUS EZ Flash 2 utility 3-4 3.1.3 ASUS CrashFree BIOS 3 utility 3-5 3.1.4 ASUS BIOS Updater 3-6 3.2 BIOS ...setup program 3-9 3.2.1 BIOS menu screen 3-10 3.2.2 Menu bar 3-10 3.2.3 Navigation keys 3-10 3.2.4 Menu items 3-11 3.2.5 Submenu items 3-11 3.2.6 Configuration fields 3-11 3.2.7 Pop-up window 3-11 3.2.8 Scroll bar 3-11 3.2.9 General help 3-11 3.3 Extreme Tweaker menu 3-12 3.3.1 CPU Level Up 3-13 3.3.2 Memory Level Up 3-13 3.3.3 Ai Overclock...
User Manual
Page 13
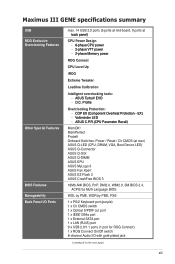
MemPerfect ProbeIt Onboard Switches: Power / Reset / Clr CMOS (at rear) ASUS Q-LED (CPU, DRAM, VGA, Boot Device LED) ASUS Q-Connector ASUS Q-Slot ASUS Q-DIMM ASUS EPU ASUS MyLogo 3 ASUS Fan Xpert ASUS EZ Flash 2 ASUS CrashFree BIOS 3 16Mb AMI BIOS, PnP, DMI2.0, WfM2.0, SM BIOS 2.4, ACPI2.0a Multi...65533;m��e�te�r�R��e�c�a�ll�) MemOK! Maximus III GENE specifications summary USB ROG Exclusive Overclocking Features Other Special Features BIOS Features Manageability Back Panel I /O with gold-plated jack (continued on...
MemPerfect ProbeIt Onboard Switches: Power / Reset / Clr CMOS (at rear) ASUS Q-LED (CPU, DRAM, VGA, Boot Device LED) ASUS Q-Connector ASUS Q-Slot ASUS Q-DIMM ASUS EPU ASUS MyLogo 3 ASUS Fan Xpert ASUS EZ Flash 2 ASUS CrashFree BIOS 3 16Mb AMI BIOS, PnP, DMI2.0, WfM2.0, SM BIOS 2.4, ACPI2.0a Multi...65533;m��e�te�r�R��e�c�a�ll�) MemOK! Maximus III GENE specifications summary USB ROG Exclusive Overclocking Features Other Special Features BIOS Features Manageability Back Panel I /O with gold-plated jack (continued on...
User Manual
Page 19
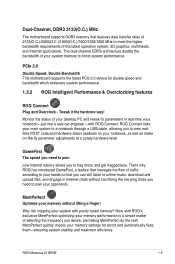
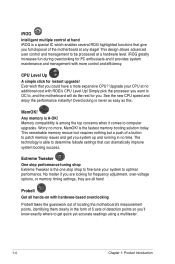
...and bandwidth which enhances system performance. 1.3.2 ROG Intelligent Performance & Overclocking features ROG Connect Plug and Overclock - ROG Maximus III GENE 1-3 Monitor the status of the latest operation system, 3D graphics, multimedia, and Internet applications. Double Bandwidth This motherboard supports the latest PCIe 2.0 device for errors and automatically fixes them... PC and tweak its parameters in Internet chats without lifting a finger! Dual-Channel, DDR3 2133(O.C.) MHz The motherboard supports DDR3 memory that you can still listen to pwn your opponents.
...and bandwidth which enhances system performance. 1.3.2 ROG Intelligent Performance & Overclocking features ROG Connect Plug and Overclock - ROG Maximus III GENE 1-3 Monitor the status of the latest operation system, 3D graphics, multimedia, and Internet applications. Double Bandwidth This motherboard supports the latest PCIe 2.0 device for errors and automatically fixes them... PC and tweak its parameters in Internet chats without lifting a finger! Dual-Channel, DDR3 2133(O.C.) MHz The motherboard supports DDR3 memory that you can still listen to pwn your opponents.
User Manual
Page 20
...for frequency adjustment, over-voltage options, or memory timing settings, they are all hands-on with hardware-based overclocking ProbeIt takes the guesswork out of locating the motherboard's measurement points, identifying them clearly in no time. Any memory is the fastest memory booting solution today. This...you are looking for you system up and running in the form of 5 sets of the motherboard at a hardware level. iROG greatly increases fun during overclocking for instant upgrade! Overclocking is the one stop shop to fine-tune your CPU at no more expansive CPU? The ...
...for frequency adjustment, over-voltage options, or memory timing settings, they are all hands-on with hardware-based overclocking ProbeIt takes the guesswork out of locating the motherboard's measurement points, identifying them clearly in no time. Any memory is the fastest memory booting solution today. This...you are looking for you system up and running in the form of 5 sets of the motherboard at a hardware level. iROG greatly increases fun during overclocking for instant upgrade! Overclocking is the one stop shop to fine-tune your CPU at no more expansive CPU? The ...
User Manual
Page 21
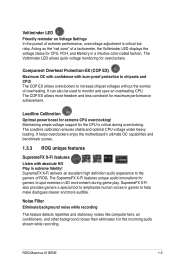
...SupremeFX X-Fi features unique audio innovations for overclockers. SupremeFX X-Fi also provides gamers a special tool to help make dialogues clearer and more freedom and less constraint for the CPU is critical but risky. ROG Maximus III GENE 1-5 The Loadline calibration ensures stable and ... of extreme performance, overvoltage adjustment is critical during game play. The COP EX allows more audible. It helps overclockers enjoy the motherboard's ultimate OC capabilities and benchmark scores. 1.3.3 ROG unique features SupremeFX X-Fi features Listen with burn proof protection ...
...SupremeFX X-Fi features unique audio innovations for overclockers. SupremeFX X-Fi also provides gamers a special tool to help make dialogues clearer and more freedom and less constraint for the CPU is critical but risky. ROG Maximus III GENE 1-5 The Loadline calibration ensures stable and ... of extreme performance, overvoltage adjustment is critical during game play. The COP EX allows more audible. It helps overclockers enjoy the motherboard's ultimate OC capabilities and benchmark scores. 1.3.3 ROG unique features SupremeFX X-Fi features Listen with burn proof protection ...
User Manual
Page 22
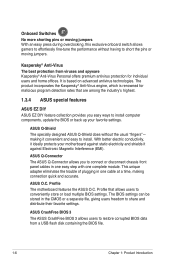
.... making connection quick and accurate. ASUS O.C. ASUS CrashFree BIOS 3 The ASUS CrashFree BIOS 3 allows users to short the pins or moving jumpers With an easy press during overclocking, this exclusive onboard switch allows gamers to effortlessly fine-tune the performance without... the usual "fingers"- Kaspersky® Anti-Virus The best protection from a USB flash disk containing the BIOS file. 1-6 Chapter 1: Product Introduction Profile The motherboard features the ASUS...
.... making connection quick and accurate. ASUS O.C. ASUS CrashFree BIOS 3 The ASUS CrashFree BIOS 3 allows users to short the pins or moving jumpers With an easy press during overclocking, this exclusive onboard switch allows gamers to effortlessly fine-tune the performance without... the usual "fingers"- Kaspersky® Anti-Virus The best protection from a USB flash disk containing the BIOS file. 1-6 Chapter 1: Product Introduction Profile The motherboard features the ASUS...
User Manual
Page 23
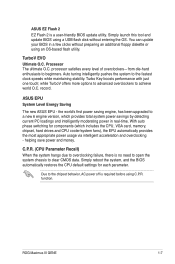
... power saving engine, has been upgraded to clear CMOS data. ROG Maximus III GENE 1-7 ASUS EPU System Level Energy Saving The new ASUS EPU - function. Simply launch this tool and update BIOS using an OS-based flash utility. C.P.R. (CPU Parameter Recall) When the system hangs due to overclocking failure, there is a user-friendly BIOS update utility.
... power saving engine, has been upgraded to clear CMOS data. ROG Maximus III GENE 1-7 ASUS EPU System Level Energy Saving The new ASUS EPU - function. Simply launch this tool and update BIOS using an OS-based flash utility. C.P.R. (CPU Parameter Recall) When the system hangs due to overclocking failure, there is a user-friendly BIOS update utility.
User Manual
Page 30
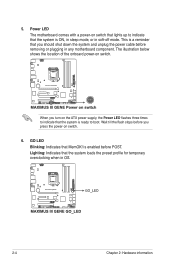
...that you press the power-on switch. GO LED Blinking: Indicates that the system loads the preset profile for temporary overclocking when in OS. 2-4 Chapter 2: Hardware information Power LED The motherboard comes with a power-on the ATX power supply, the Power LED flashes three times to boot. 5. Wait ... before POST. is a reminder that the system is ready to indicate that the system is ON, in sleep mode, or in any motherboard component. Lighting: Indicates that MemOK! This is enabled before you should shut down the system and unplug the power cable before removing or ...
...that you press the power-on switch. GO LED Blinking: Indicates that the system loads the preset profile for temporary overclocking when in OS. 2-4 Chapter 2: Hardware information Power LED The motherboard comes with a power-on the ATX power supply, the Power LED flashes three times to boot. 5. Wait ... before POST. is a reminder that the system is ready to indicate that the system is ON, in sleep mode, or in any motherboard component. Lighting: Indicates that MemOK! This is enabled before you should shut down the system and unplug the power cable before removing or ...
User Manual
Page 40
...Under the default state, some memory modules for one DIMM per channel only. • According to the memory address limitation on the motherboard, the actual usable memory for manual memory frequency adjustment. • For system stability, use of the lower-sized channel for single...-channel operation. • Due to support a full memory load (4 DIMMs) or overclocking condition. 2-14 Chapter 2: Hardware information For optimum compatibility, we recommend that you obtain memory modules from the same vendor. • Due to...
...Under the default state, some memory modules for one DIMM per channel only. • According to the memory address limitation on the motherboard, the actual usable memory for manual memory frequency adjustment. • For system stability, use of the lower-sized channel for single...-channel operation. • Due to support a full memory load (4 DIMMs) or overclocking condition. 2-14 Chapter 2: Hardware information For optimum compatibility, we recommend that you obtain memory modules from the same vendor. • Due to...
User Manual
Page 52
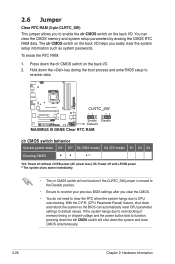
If the system hangs due to overclocking of memory timing or chipset voltage and the power button fails to re-enter data. To erase the RTC RAM: 1. S5: Power off without +5VSB ... switch on the back I/O helps you clear the CMOS. • You do not need to clear the RTC when the system hangs due to CPU overclocking. Press down the system and clear CMOS simultaneously. 2-26 Chapter 2: Hardware information clr CMOS switch behavior System power state G3* S5* S0 (DOS mode) S0...
If the system hangs due to overclocking of memory timing or chipset voltage and the power button fails to re-enter data. To erase the RTC RAM: 1. S5: Power off without +5VSB ... switch on the back I/O helps you clear the CMOS. • You do not need to clear the RTC when the system hangs due to CPU overclocking. Press down the system and clear CMOS simultaneously. 2-26 Chapter 2: Hardware information clr CMOS switch behavior System power state G3* S5* S0 (DOS mode) S0...
User Manual
Page 54
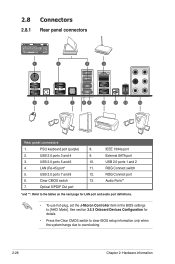
... 3.5.3 Onboard Devices Configuration for LAN port and audio port definitions. • To use hot-plug, set the J-Micron Controller item in the BIOS settings to overclocking. 2-28 Chapter 2: Hardware information USB 2.0 ports 3 and 4 9. 3. PS/2 keyboard port (purple) 8. 2. USB 2.0 ports 7 and 8 12...
... 3.5.3 Onboard Devices Configuration for LAN port and audio port definitions. • To use hot-plug, set the J-Micron Controller item in the BIOS settings to overclocking. 2-28 Chapter 2: Hardware information USB 2.0 ports 3 and 4 9. 3. PS/2 keyboard port (purple) 8. 2. USB 2.0 ports 7 and 8 12...
User Manual
Page 58
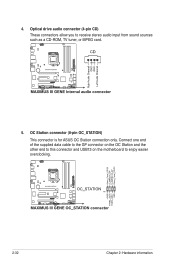
OC Station connector (8-pin OC_STATION) This connector is for ASUS OC Station connection only. Connect one end of the supplied data cable to the GP connector on the OC Station and the other end to this connector and USB13 on the motherboard to receive stereo audio input from sound sources such as a CD-ROM, TV tuner, or MPEG card. 5. 4. Optical drive audio connector (4-pin CD) These connectors allow you to enjoy easier overclocking. 2-32 Chapter 2: Hardware information
OC Station connector (8-pin OC_STATION) This connector is for ASUS OC Station connection only. Connect one end of the supplied data cable to the GP connector on the OC Station and the other end to this connector and USB13 on the motherboard to receive stereo audio input from sound sources such as a CD-ROM, TV tuner, or MPEG card. 5. 4. Optical drive audio connector (4-pin CD) These connectors allow you to enjoy easier overclocking. 2-32 Chapter 2: Hardware information
User Manual
Page 65
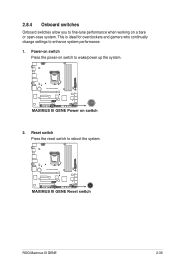
Power-on switch Press the power-on a bare or open-case system. This is ideal for overclockers and gamers who continually change settings to wake/power up the system. 2. Reset switch Press the reset switch to fine-tune performance when working on switch to enhance system performance. 1. 2.8.4 Onboard switches Onboard switches allow you to reboot the system. ROG Maximus III GENE 2-39
Power-on switch Press the power-on a bare or open-case system. This is ideal for overclockers and gamers who continually change settings to wake/power up the system. 2. Reset switch Press the reset switch to fine-tune performance when working on switch to enhance system performance. 1. 2.8.4 Onboard switches Onboard switches allow you to reboot the system. ROG Maximus III GENE 2-39
User Manual
Page 66
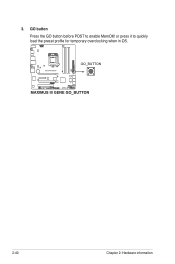
GO button Press the GO button before POST to quickly load the preset profile for temporary overclocking when in OS. 2-40 Chapter 2: Hardware information 3. or press it to enable MemOK!
GO button Press the GO button before POST to quickly load the preset profile for temporary overclocking when in OS. 2-40 Chapter 2: Hardware information 3. or press it to enable MemOK!
User Manual
Page 80
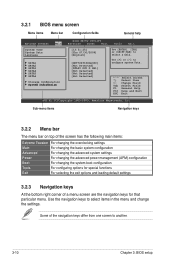
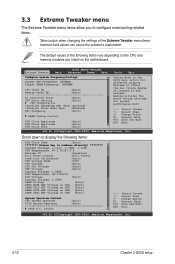
... +- Sub-menu items Navigation keys 3.2.2 Menu bar The menu bar on top of the screen has the following main items: Extreme Tweaker For changing the overclocking settings Main For changing the basic system configuration Advanced For changing the advanced system settings Power For changing the advanced power management (APM) configuration Boot...
... +- Sub-menu items Navigation keys 3.2.2 Menu bar The menu bar on top of the screen has the following main items: Extreme Tweaker For changing the overclocking settings Main For changing the basic system configuration Advanced For changing the advanced system settings Power For changing the advanced power management (APM) configuration Boot...
User Manual
Page 82
...CTRL REF Voltage on CHB [Auto] Spread Spectrum Control CPU Spread Spectrum [Auto] PCIE Spread Spectrum [Auto ASUS O.C. Profile ←→ Select Screen ↑↓ Select Item +- Extreme Tweaker Main BIOS SETUP UTILITY .../Voltage Target CPU Frequency: 2926MHZ Target DRAM Frequency: 1066MHZ CPU Level Up [Auto] Memory Level Up [Auto Ai Overclock Tuner [Auto] CPU Ratio Setting [Auto] CPU Configuration *Intel(R) SpeedStep(TM) Tech [Enabled] *Intel(R) Turbo...Extreme Tweaker menu items allow you install on the motherboard. The default values of freedom to malfunction.
...CTRL REF Voltage on CHB [Auto] Spread Spectrum Control CPU Spread Spectrum [Auto] PCIE Spread Spectrum [Auto ASUS O.C. Profile ←→ Select Screen ↑↓ Select Item +- Extreme Tweaker Main BIOS SETUP UTILITY .../Voltage Target CPU Frequency: 2926MHZ Target DRAM Frequency: 1066MHZ CPU Level Up [Auto] Memory Level Up [Auto Ai Overclock Tuner [Auto] CPU Ratio Setting [Auto] CPU Configuration *Intel(R) SpeedStep(TM) Tech [Enabled] *Intel(R) Turbo...Extreme Tweaker menu items allow you install on the motherboard. The default values of freedom to malfunction.
User Manual
Page 83
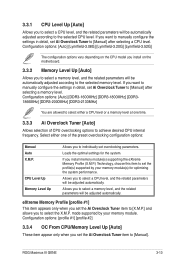
... install on the motherboard. 3.3.2 Memory Level Up [Auto] Allows you to select a memory level, and the related parameters will be automatically adjusted according to the selected CPU level. Configuration options: [profile #1] [profile #2] 3.3.4 OC From CPU/Memory Level Up [Auto] These item appear only when you set overclocking parameters. ROG Maximus III GENE 3-13 If you...
... install on the motherboard. 3.3.2 Memory Level Up [Auto] Allows you to select a memory level, and the related parameters will be automatically adjusted according to the selected CPU level. Configuration options: [profile #1] [profile #2] 3.3.4 OC From CPU/Memory Level Up [Auto] These item appear only when you set overclocking parameters. ROG Maximus III GENE 3-13 If you...
User Manual
Page 84
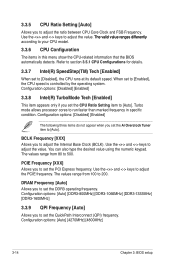
... adjust the Internal Base Clock (BCLK). Configuration options: [Auto] [DDR3-800MHz] [DDR3-1066MHz] [DDR3-1333MHz] [DDR3-1600MHz] 3.3.9 QPI Frequency [Auto] Allows you set the Ai Overclock Tuner item to 500. The values range from 80 to [Auto]. Configuration options: [Disabled] [Enabled] The following three items do not appear when you to...
... adjust the Internal Base Clock (BCLK). Configuration options: [Auto] [DDR3-800MHz] [DDR3-1066MHz] [DDR3-1333MHz] [DDR3-1600MHz] 3.3.9 QPI Frequency [Auto] Allows you set the Ai Overclock Tuner item to 500. The values range from 80 to [Auto]. Configuration options: [Disabled] [Enabled] The following three items do not appear when you to...
User Manual
Page 86
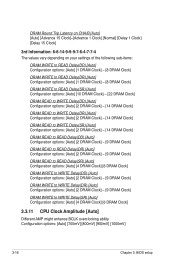
... Clock] DRAM WRITE to WRITE Delay(SR) [Auto] Configuration options: [Auto] [4 DRAM Clock] [6 DRAM Clock] 3.3.11 CPU Clock Amplitude [Auto] Different AMP might enhance BCLK overclocking ability. Configuration options: [Auto] [700mV] [800mV] [900mV] [1000mV] 3-16 Chapter 3: BIOS setup
... Clock] DRAM WRITE to WRITE Delay(SR) [Auto] Configuration options: [Auto] [4 DRAM Clock] [6 DRAM Clock] 3.3.11 CPU Clock Amplitude [Auto] Different AMP might enhance BCLK overclocking ability. Configuration options: [Auto] [700mV] [800mV] [900mV] [1000mV] 3-16 Chapter 3: BIOS setup


