User Manual
Page 6
... 4.4.1 Using ASUS TurboV 4-11 4.4.2 Using ASUS TurboV Auto Tuning Mode 4-12 4.4.3 Using CPU Level UP 4-13 4.4.4 Using ASUS Turbo Key 4-13 4.5 RAID configurations 4-14 4.5.1 RAID definitions 4-14 4.5.2 Installing Serial ATA hard disks 4-15 4.5.3 Setting the RAID item in BIOS 4-15 4.5.4 AMD® Option ROM Utility 4-16 4.6 Creating a RAID driver disk 4-19 4.6.1 Creating a RAID driver disk without entering the OS 4-19 4.6.2 Creating a RAID driver disk in Windows 4-19 4.6.3 Installing the RAID driver during Windows® OS installation....... 4-19 4.6.4 Using a USB floppy disk drive...
... 4.4.1 Using ASUS TurboV 4-11 4.4.2 Using ASUS TurboV Auto Tuning Mode 4-12 4.4.3 Using CPU Level UP 4-13 4.4.4 Using ASUS Turbo Key 4-13 4.5 RAID configurations 4-14 4.5.1 RAID definitions 4-14 4.5.2 Installing Serial ATA hard disks 4-15 4.5.3 Setting the RAID item in BIOS 4-15 4.5.4 AMD® Option ROM Utility 4-16 4.6 Creating a RAID driver disk 4-19 4.6.1 Creating a RAID driver disk without entering the OS 4-19 4.6.2 Creating a RAID driver disk in Windows 4-19 4.6.3 Installing the RAID driver during Windows® OS installation....... 4-19 4.6.4 Using a USB floppy disk drive...
User Manual
Page 39
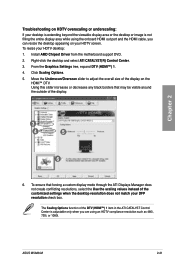
... ATI CATALYST Control Center is not filling the entire display area while using the onboard HDMI out port and the HDMI cable, you are using an HDTV compliance resolution such as 480i, 720i, or 1080i. Install AMD Chipset Driver from the motherboard support DVD. 2. To resize your DFP resolution check box. Chapter 2 Troubleshooting on HDTV overscaling or underscaling: If your desktop is extending beyond the viewable display area or...
... ATI CATALYST Control Center is not filling the entire display area while using the onboard HDMI out port and the HDMI cable, you are using an HDTV compliance resolution such as 480i, 720i, or 1080i. Install AMD Chipset Driver from the motherboard support DVD. 2. To resize your DFP resolution check box. Chapter 2 Troubleshooting on HDTV overscaling or underscaling: If your desktop is extending beyond the viewable display area or...
User Manual
Page 51
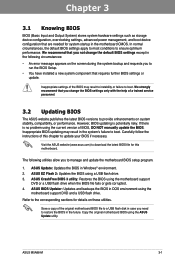
... that you change the default BIOS settings except in the motherboard CMOS. Inappropriate BIOS updating may result to instability or failure to boot. ASUS Update: Updates the BIOS in the system's failure to boot. Chapter 3 ASUS M5A88-M 3-1 Inappropriate settings of this motherboard. If there is potentially risky. However, BIOS updating is no problem using the motherboard support DVD or a USB flash drive when the BIOS file fails or gets corrupted. 4. Carefully follow the instructions of the BIOS may result in Windows® environment. 2. ASUS BIOS Updater: Updates and...
... that you change the default BIOS settings except in the motherboard CMOS. Inappropriate BIOS updating may result to instability or failure to boot. ASUS Update: Updates the BIOS in the system's failure to boot. Chapter 3 ASUS M5A88-M 3-1 Inappropriate settings of this motherboard. If there is potentially risky. However, BIOS updating is no problem using the motherboard support DVD or a USB flash drive when the BIOS file fails or gets corrupted. 4. Carefully follow the instructions of the BIOS may result in Windows® environment. 2. ASUS BIOS Updater: Updates and...
User Manual
Page 52
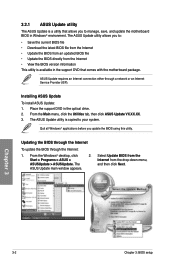
... Next. Chapter 3 3-2 Chapter 3: BIOS setup Updating the BIOS through the Internet To update the BIOS through a network or an Internet Service Provider (ISP). The ASUS Update main window appears. From the Main menu, click the Utilities tab, then click ASUS Update VX.XX.XX. 3. 3.2.1 ASUS Update utility The ASUS Update is a utility that comes with the motherboard package. ASUS Update requires an Internet connection either through the Internet: 1. Start > Programs > ASUS > ASUSUpdate > ASUSUpdate. Place the support DVD in Windows® environment. Quit...
... Next. Chapter 3 3-2 Chapter 3: BIOS setup Updating the BIOS through the Internet To update the BIOS through a network or an Internet Service Provider (ISP). The ASUS Update main window appears. From the Main menu, click the Utilities tab, then click ASUS Update VX.XX.XX. 3. 3.2.1 ASUS Update utility The ASUS Update is a utility that comes with the motherboard package. ASUS Update requires an Internet connection either through the Internet: 1. Start > Programs > ASUS > ASUSUpdate > ASUSUpdate. Place the support DVD in Windows® environment. Quit...
User Manual
Page 56
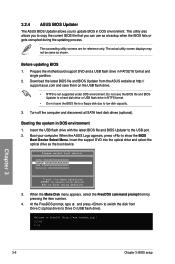
... BIOS Updater to Drive D (USB flash drive). Boot your computer. Turn off the computer and disconnect all SATA hard disk drives (optional). The actual utility screen displays may not be same as shown. Prepare the motherboard support DVD and a USB flash drive in NTFS format. • Do not save them on the USB flash drive. • NTFS is not supported under DOS environment. Insert the USB flash drive with the latest BIOS file and BIOS Updater to boot using defaults 3. Please select boot device: SATA:XXXXXXXXXXXXXXXX CDROM:XXXXXXXXXXXXXXX USB:XXXXXXXXXXXXXXXXX Network...
... BIOS Updater to Drive D (USB flash drive). Boot your computer. Turn off the computer and disconnect all SATA hard disk drives (optional). The actual utility screen displays may not be same as shown. Prepare the motherboard support DVD and a USB flash drive in NTFS format. • Do not save them on the USB flash drive. • NTFS is not supported under DOS environment. Insert the USB flash drive with the latest BIOS file and BIOS Updater to boot using defaults 3. Please select boot device: SATA:XXXXXXXXXXXXXXXX CDROM:XXXXXXXXXXXXXXX USB:XXXXXXXXXXXXXXXXX Network...
User Manual
Page 60
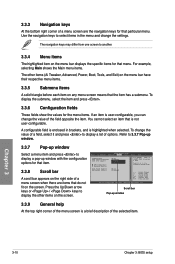
... triangle before each item on the screen. A configurable field is not user-configurable. Use the navigation keys to display a list of the selected item. For example, selecting Main shows the Main menu items. The other items on any menu screen means that menu. Main M5A88-M BIOS Setup Ai Tweaker Advanced Power Boot Suspend Mode ACPI Version Features ACPI APIC support APM Configuration Hardware Monitor Anti Surge Support NB Thermal Protect [Auto] [Disabled] [EDniasbalbelde]d Enabled [Auto] [Disabled] Tools Exit Use [ENTER], [TAB] or [SHIFT-TAB] to...
... triangle before each item on the screen. A configurable field is not user-configurable. Use the navigation keys to display a list of the selected item. For example, selecting Main shows the Main menu items. The other items on any menu screen means that menu. Main M5A88-M BIOS Setup Ai Tweaker Advanced Power Boot Suspend Mode ACPI Version Features ACPI APIC support APM Configuration Hardware Monitor Anti Surge Support NB Thermal Protect [Auto] [Disabled] [EDniasbalbelde]d Enabled [Auto] [Disabled] Tools Exit Use [ENTER], [TAB] or [SHIFT-TAB] to...
User Manual
Page 63
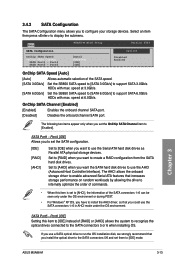
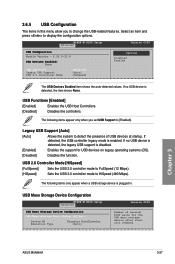
... onboard storage driver to support SATA 6.0Gb/s HDDs with max. Port4 SATA Port5 - Port4 [IDE] Allows you to set the SATA configuration. [IDE] [RAID] [AHCI] Set to [IDE] when you want the SATA hard disk drives to use the SATA connectors 1~6 in AHCI mode under the OS environment or during POST. • For Windows® XP OS, you have to install the AHCI driver, so that you install the optical dirve to the SATA connectors 5/6 and set them to [Enabled]. Chapter 3 ASUS M5A88-M 3-13 Port6 [Auto] [Enabled] [IDE] [IDE] Version 0303 Options Disabled Enabled OnChip SATA Speed [Auto...
... onboard storage driver to support SATA 6.0Gb/s HDDs with max. Port4 SATA Port5 - Port4 [IDE] Allows you to set the SATA configuration. [IDE] [RAID] [AHCI] Set to [IDE] when you want the SATA hard disk drives to use the SATA connectors 1~6 in AHCI mode under the OS environment or during POST. • For Windows® XP OS, you have to install the AHCI driver, so that you install the optical dirve to the SATA connectors 5/6 and set them to [Enabled]. Chapter 3 ASUS M5A88-M 3-13 Port6 [Auto] [Enabled] [IDE] [IDE] Version 0303 Options Disabled Enabled OnChip SATA Speed [Auto...
User Manual
Page 67
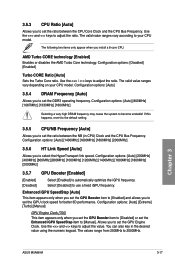
... your CPU model. Configuration options: [Auto] [Extreme] [Turbo] [Manual] GPU Engine Clock [700] This item appears only when you install a 6-core CPU. Chapter 3 ASUS M5A88-M 3-17 The following two items only appear when you set the GPU Booster item to [Disabled] or set the Enhanced iGPU SpeedStep item to [Manual]. Configuration options: [Auto] 3.5.4 DRAM Frequency [Auto] Allows you to set the ratio between the NB (in the desired value using the numeric keypad. Configuration options: [Auto] [800MHz...
... your CPU model. Configuration options: [Auto] [Extreme] [Turbo] [Manual] GPU Engine Clock [700] This item appears only when you install a 6-core CPU. Chapter 3 ASUS M5A88-M 3-17 The following two items only appear when you set the GPU Booster item to [Disabled] or set the Enhanced iGPU SpeedStep item to [Manual]. Configuration options: [Auto] 3.5.4 DRAM Frequency [Auto] Allows you to set the ratio between the NB (in the desired value using the numeric keypad. Configuration options: [Auto] [800MHz...
User Manual
Page 71
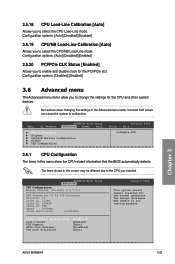
...Main Ai Tweaker M5A88-M BIOS Setup Advanced Power Boot CPU Configuration Chipset Onboard Devices Configuration PCIPnP USB Configuration Tools Version 0303 Exit Configure CPU. 3.6.1 CPU Configuration The items in this menu show the CPU-related information that the BIOS automatically detects. M5A88-M BIOS Setup Advanced CPU Configuration Module Version: OrochiPI 0.0.7.3-1 AMD Phenom(tm) II X4 945 Processor Revision: C2 Cache L1: 512KB Cache L2: 2048KB Cache L3: 6MB Speed : 3000MHz, uCode Patch Level : 0x10000C6 Secure Virtual Machine Mode Cool'n'Quiet C1E Support ASUS Core...
...Main Ai Tweaker M5A88-M BIOS Setup Advanced Power Boot CPU Configuration Chipset Onboard Devices Configuration PCIPnP USB Configuration Tools Version 0303 Exit Configure CPU. 3.6.1 CPU Configuration The items in this menu show the CPU-related information that the BIOS automatically detects. M5A88-M BIOS Setup Advanced CPU Configuration Module Version: OrochiPI 0.0.7.3-1 AMD Phenom(tm) II X4 945 Processor Revision: C2 Cache L1: 512KB Cache L2: 2048KB Cache L3: 6MB Speed : 3000MHz, uCode Patch Level : 0x10000C6 Secure Virtual Machine Mode Cool'n'Quiet C1E Support ASUS Core...
User Manual
Page 73
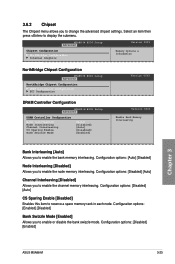
... Controller Configuration ECC Configuration DRAM Controller Configuration M5A88-M BIOS Setup Advanced DRAM Controller Configuration Bank Interleaving Node Interleaving Channel Interleaving CS Sparing Enable Bank Swizzle Mode [Auto] [Disabled] [Auto] [Disabled] [Enabled] Version 0303 Version 0303 Enable Bank Memory Interleaving Bank Interleaving [Auto] Allows you to display the submenu. Configuration options: [Disabled] [Auto] Channel Interleaving [Disabled] Allows you to enable or disable the bank swizzle mode. Configuration options: [Disabled] [Enabled] Chapter 3 ASUS...
... Controller Configuration ECC Configuration DRAM Controller Configuration M5A88-M BIOS Setup Advanced DRAM Controller Configuration Bank Interleaving Node Interleaving Channel Interleaving CS Sparing Enable Bank Swizzle Mode [Auto] [Disabled] [Auto] [Disabled] [Enabled] Version 0303 Version 0303 Enable Bank Memory Interleaving Bank Interleaving [Auto] Allows you to display the submenu. Configuration options: [Disabled] [Auto] Channel Interleaving [Disabled] Allows you to enable or disable the bank swizzle mode. Configuration options: [Disabled] [Enabled] Chapter 3 ASUS...
User Manual
Page 75
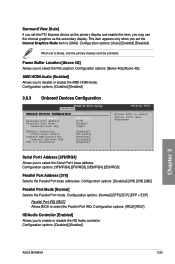
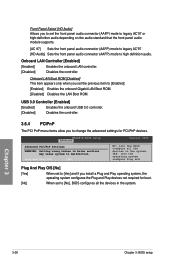
...Configuration options: [Disabled] [Enabled] 3.6.3 Onboard Devices Configuration M5A88-M BIOS Setup Advanced Onboard Devices Configuration Serial Port1 Address Parallel Port Address Parallel Port Mode Parallel Port IRQ [3F8/IRQ4] [378] [Normal] [IRQ7] HDAudio Controller Front Panel Select OnBoard LAN Controller Onboard LAN Boot ROM USB 3.0 Controller [Enabled] [HD Audio] [Enabled] [Disabled] [Enabled] Version 0303 Allows BIOS to select the Parallel Port IRQ. This item appears only when you may use the internal graphics as the secondary display. Configuration options...
...Configuration options: [Disabled] [Enabled] 3.6.3 Onboard Devices Configuration M5A88-M BIOS Setup Advanced Onboard Devices Configuration Serial Port1 Address Parallel Port Address Parallel Port Mode Parallel Port IRQ [3F8/IRQ4] [378] [Normal] [IRQ7] HDAudio Controller Front Panel Select OnBoard LAN Controller Onboard LAN Boot ROM USB 3.0 Controller [Enabled] [HD Audio] [Enabled] [Disabled] [Enabled] Version 0303 Allows BIOS to select the Parallel Port IRQ. This item appears only when you may use the internal graphics as the secondary display. Configuration options...
User Manual
Page 76
...for PCI/PnP devices. Onboard LAN Controller [Enabled] [Enabled] Enables the onboard LAN controller. [Disabled] Disables the controller. Chapter 3 3-26 Chapter 3: BIOS setup Onboard LAN Boot ROM [Disabled] This item appears only when you set the front panel audio connector (AAFP) mode to legacy AC'97 or high-definition audio depending on the audio standard that the front panel audio module supports. [AC 97] Sets the front panel audio connector (AAFP) mode to legacy AC'97 [HD Audio] Sets the front panel audio connector (AAFP) mode to high definition audio. M5A88-M BIOS...
...for PCI/PnP devices. Onboard LAN Controller [Enabled] [Enabled] Enables the onboard LAN controller. [Disabled] Disables the controller. Chapter 3 3-26 Chapter 3: BIOS setup Onboard LAN Boot ROM [Disabled] This item appears only when you set the front panel audio connector (AAFP) mode to legacy AC'97 or high-definition audio depending on the audio standard that the front panel audio module supports. [AC 97] Sets the front panel audio connector (AAFP) mode to legacy AC'97 [HD Audio] Sets the front panel audio connector (AAFP) mode to high definition audio. M5A88-M BIOS...
User Manual
Page 77
.... M5A88-M BIOS Setup Advanced Version 0303 USB Configuration Module Version - 2.24.5-13.4 USB Devices Enabled: None USB Functions [Enabled] Legacy USB Support [Auto] USB 2.0 Controller Mode [HiSpeed] Options Disabled Enabled The USB Devices Enabled item shows the auto-detected values. The following items only appear when a USB storage device is disabled. [Enabled] Enables the support for the USB mass storage device after start unit command. USB Mass Storage Device Configuration M5A88-M BIOS Setup Advanced USB Mass Storage Device Configuration USB Mass Storage Reset Delay...
.... M5A88-M BIOS Setup Advanced Version 0303 USB Configuration Module Version - 2.24.5-13.4 USB Devices Enabled: None USB Functions [Enabled] Legacy USB Support [Auto] USB 2.0 Controller Mode [HiSpeed] Options Disabled Enabled The USB Devices Enabled item shows the auto-detected values. The following items only appear when a USB storage device is disabled. [Enabled] Enables the support for the USB mass storage device after start unit command. USB Mass Storage Device Configuration M5A88-M BIOS Setup Advanced USB Mass Storage Device Configuration USB Mass Storage Reset Delay...
User Manual
Page 78
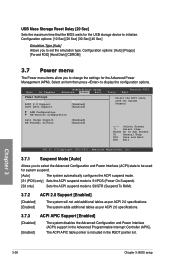
... pointer list. Main Ai Tweaker M5A88-M BIOS Setup Advanced Power Boot Power Settings Suspend Mode [Auto] ACPI 2.0 Support [Enabled] ACPI APIC Support [Enabled] APM Configuration HW Monitor Configuration Anti Surge Support [Enabled] NB Thermal Protect [Enabled] Tools Version 0303 Exit Select the ACPI state used for the Advanced Power Management (APM). Select an item then press to initialize. The ACPI APIC table pointer is included in the Advanced Programmable Interrupt Controller (APIC). Chapter 3 3-28 Chapter 3: BIOS setup Configuration options: [Auto] [Floppy...
... pointer list. Main Ai Tweaker M5A88-M BIOS Setup Advanced Power Boot Power Settings Suspend Mode [Auto] ACPI 2.0 Support [Enabled] ACPI APIC Support [Enabled] APM Configuration HW Monitor Configuration Anti Surge Support [Enabled] NB Thermal Protect [Enabled] Tools Version 0303 Exit Select the ACPI state used for the Advanced Power Management (APM). Select an item then press to initialize. The ACPI APIC table pointer is included in the Advanced Programmable Interrupt Controller (APIC). Chapter 3 3-28 Chapter 3: BIOS setup Configuration options: [Auto] [Floppy...
User Manual
Page 84
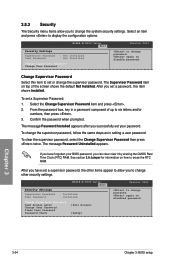
... Installed Change Supervisor Password Change User Passward Version 0303 to change password. After you set your BIOS password, you can clear clear it by erasing the CMOS Real Time Clock (RTC) RAM. The message Password Uninstalled appears. Select an item and press to disable password. The Supervisor Password item on how to erase the RTC RAM. M5A88-M BIOS Setup Boot Security Settings Supervisor Password User Password : Installed : Installed Change Supervisor Password User Access Level Change User Password Clear User Password Password Check [Full Access] [Setup] Version...
... Installed Change Supervisor Password Change User Passward Version 0303 to change password. After you set your BIOS password, you can clear clear it by erasing the CMOS Real Time Clock (RTC) RAM. The message Password Uninstalled appears. Select an item and press to disable password. The Supervisor Password item on how to erase the RTC RAM. M5A88-M BIOS Setup Boot Security Settings Supervisor Password User Password : Installed : Installed Change Supervisor Password User Access Level Change User Password Clear User Password Password Check [Full Access] [Setup] Version...
User Manual
Page 89
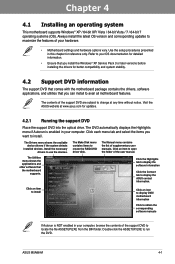
... for better compatibility and system stability. 4.2 Support DVD information The support DVD that comes with the motherboard package contains the drivers, software applications, and utilities that the motherboard supports. Double-click the ASSETUP.EXE to create the RAID/AHCI driver disk. Use the setup procedures presented in your computer, browse the contents of the user manual. Click an item to install Click an icon to display DVD/ motherboard information Click to locate the file ASSETUP...
... for better compatibility and system stability. 4.2 Support DVD information The support DVD that comes with the motherboard package contains the drivers, software applications, and utilities that the motherboard supports. Double-click the ASSETUP.EXE to create the RAID/AHCI driver disk. Use the setup procedures presented in your computer, browse the contents of the user manual. Click an item to install Click an icon to display DVD/ motherboard information Click to locate the file ASSETUP...
User Manual
Page 107
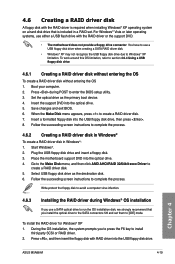
... screen instructions to complete the process. 4.6.2 Creating a RAID driver disk in Windows® To create a RAID driver disk in a RAID set them to enter the BIOS setup utility. 3. Plug the USB floppy disk drive and insert a floppy disk. 3. Press , and then insert the floppy disk with RAID driver into the optical drive. 5. When the Make Disk menu appears, press to section 4.6.4 Using a USB floppy disk drive. 4.6.1 Creating a RAID driver disk without entering the OS To create a RAID driver disk without entering the OS 1. Select USB floppy disk drive as the primary boot device...
... screen instructions to complete the process. 4.6.2 Creating a RAID driver disk in Windows® To create a RAID driver disk in a RAID set them to enter the BIOS setup utility. 3. Plug the USB floppy disk drive and insert a floppy disk. 3. Press , and then insert the floppy disk with RAID driver into the optical drive. 5. When the Make Disk menu appears, press to section 4.6.4 Using a USB floppy disk drive. 4.6.1 Creating a RAID driver disk without entering the OS To create a RAID driver disk without entering the OS 1. Select USB floppy disk drive as the primary boot device...
User Manual
Page 108
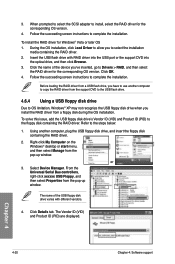
... install the RAID driver for the corresponding OS version. Before loading the RAID driver from a USB flash drive, you have to use another computer, plug the USB floppy disk drive, and insert the floppy disk containing the RAID driver. 2. Select Device Manager. From the Universal Serial Bus controllers, right-click xxxxxx USB Floppy, and then select Properties from the pop-up window. Click OK. 4. or 3. Chapter 4 4-20 Chapter 4: Software support Click the name of the USB floppy disk drive varies with RAID driver into the USB port...
... install the RAID driver for the corresponding OS version. Before loading the RAID driver from a USB flash drive, you have to use another computer, plug the USB floppy disk drive, and insert the floppy disk containing the RAID driver. 2. Select Device Manager. From the Universal Serial Bus controllers, right-click xxxxxx USB Floppy, and then select Properties from the pop-up window. Click OK. 4. or 3. Chapter 4 4-20 Chapter 4: Software support Click the name of the USB floppy disk drive varies with RAID driver into the USB port...
User Manual
Page 111
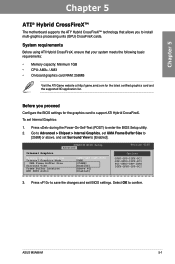
...-board graphics card RAM: 256MB Visit the ATI Game website at http://game.amd.com for the graphics card to support ATI Hybrid CrossFireX. ASUS M5A88-M 5-1 Select OK to save the changes and exit BIOS settings. Go to Advanced > Chipset > Internal Graphics, set UMA Frame Buffer Size to [256M] or above, and set Internal Graphics: 1. To set Surround View to enter the BIOS Setup utility. 2. Press during the Power-On-Self-Test (POST) to [Enabled]. System requirements Before using ATI...
...-board graphics card RAM: 256MB Visit the ATI Game website at http://game.amd.com for the graphics card to support ATI Hybrid CrossFireX. ASUS M5A88-M 5-1 Select OK to save the changes and exit BIOS settings. Go to Advanced > Chipset > Internal Graphics, set UMA Frame Buffer Size to [256M] or above, and set Internal Graphics: 1. To set Surround View to enter the BIOS Setup utility. 2. Press during the Power-On-Self-Test (POST) to [Enabled]. System requirements Before using ATI...
User Manual
Page 112
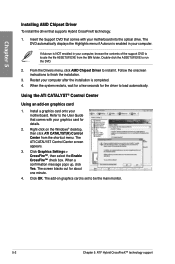
... main monitor. 5-2 Chapter 5: ATI® Hybrid CrossFireX™ technology support The DVD automatically displays the Highlights menu if Autorun is completed. 4. If Autorun is set to the User Guide that supports Hybrid CrossFireX technology: 1. Install a graphics card onto your computer, browse the contents of the support DVD to install it. Chapter 5 Installing AMD Chipset Driver To install the driver that comes with your computer. The add-on graphics card is NOT enabled in your motherboard into the optical drive...
... main monitor. 5-2 Chapter 5: ATI® Hybrid CrossFireX™ technology support The DVD automatically displays the Highlights menu if Autorun is completed. 4. If Autorun is set to the User Guide that supports Hybrid CrossFireX technology: 1. Install a graphics card onto your computer, browse the contents of the support DVD to install it. Chapter 5 Installing AMD Chipset Driver To install the driver that comes with your computer. The add-on graphics card is NOT enabled in your motherboard into the optical drive...


