

User Manual
Page 1
M4N98TD EVO Motherboard
M4N98TD EVO Motherboard
User Manual
Page 3
Contents Contents...iii Notices ...vii Safety information...viii About this guide...ix M4N98TD EVO specifications summary xi Chapter 1: Product introduction 1.1 Welcome!...1-1 1.2 Package contents 1-1 1.3 Special features 1-2 1.3.1 Product highlights 1-2 1.3.2 ASUS unique features 1-3 Chapter 2: Hardware information 2.1 Before you proceed 2-1 2.2 Motherboard overview 2-2 2.2.1 Motherboard layout 2-2 2.2.2 Layout contents 2-3 2.2.3 Placement direction 2-4 2.2.4 Screw holes 2-4 2.3 Central Processing Unit (CPU 2-5 2.3.1 Installing the CPU 2-5 2.3.2 Installing the ...
Contents Contents...iii Notices ...vii Safety information...viii About this guide...ix M4N98TD EVO specifications summary xi Chapter 1: Product introduction 1.1 Welcome!...1-1 1.2 Package contents 1-1 1.3 Special features 1-2 1.3.1 Product highlights 1-2 1.3.2 ASUS unique features 1-3 Chapter 2: Hardware information 2.1 Before you proceed 2-1 2.2 Motherboard overview 2-2 2.2.1 Motherboard layout 2-2 2.2.2 Layout contents 2-3 2.2.3 Placement direction 2-4 2.2.4 Screw holes 2-4 2.3 Central Processing Unit (CPU 2-5 2.3.1 Installing the CPU 2-5 2.3.2 Installing the ...
User Manual
Page 7
... are designed to operate this unit not expressly approved by one or more of the monitor to radio communications. DO NOT throw the motherboard in municipal waste. Check local regulations for a Class B digital device, pursuant to enable proper reuse of the FCC Rules. This ... Statement This device complies with Part 15 of Chemicals) regulatory framework, we published the chemical substances in our products at ASUS REACH website at http://green.asus.com/english/REACH.htm. However, there is required to the following measures: • Reorient or relocate the receiving antenna...
... are designed to operate this unit not expressly approved by one or more of the monitor to radio communications. DO NOT throw the motherboard in municipal waste. Check local regulations for a Class B digital device, pursuant to enable proper reuse of the FCC Rules. This ... Statement This device complies with Part 15 of Chemicals) regulatory framework, we published the chemical substances in our products at ASUS REACH website at http://green.asus.com/english/REACH.htm. However, there is required to the following measures: • Reorient or relocate the receiving antenna...
User Manual
Page 8
...away from connectors, slots, sockets and circuitry. • Avoid dust, humidity, and temperature extremes. Operation safety • Before installing the motherboard and adding devices on a stable surface. • If you are not damaged. Contact a qualified service technician or your area. If you...product, ensure all power cables are connected. If you add a device. • Before connecting or removing signal cables from the motherboard, ensure that the power cables for the devices are unplugged before the signal cables are unplugged. • Seek professional assistance before...
...away from connectors, slots, sockets and circuitry. • Avoid dust, humidity, and temperature extremes. Operation safety • Before installing the motherboard and adding devices on a stable surface. • If you are not damaged. Contact a qualified service technician or your area. If you...product, ensure all power cables are connected. If you add a device. • Before connecting or removing signal cables from the motherboard, ensure that the power cables for the devices are unplugged before the signal cables are unplugged. • Seek professional assistance before...
User Manual
Page 9
... it supports. • Chapter 2: Hardware information This chapter lists the hardware setup procedures that you need when installing and configuring the motherboard. ASUS websites The ASUS website provides updated information on the motherboard. • Chapter 3: BIOS setup This chapter tells how to perform when installing system components. Optional documentation Your product package may have...
... it supports. • Chapter 2: Hardware information This chapter lists the hardware setup procedures that you need when installing and configuring the motherboard. ASUS websites The ASUS website provides updated information on the motherboard. • Chapter 3: BIOS setup This chapter tells how to perform when installing system components. Optional documentation Your product package may have...

User Manual
Page 15
Before you for buying an ASUS® M4N98TD EVO motherboard! ASUS M4N98TD EVO 1-1 Actual product specifications may vary with the list below. 1.2 Package contents Check your package with different models. Thank you start installing the motherboard, and hardware devices on it another standout in the long line of the above items is damaged or missing, contact your retailer. •...
Before you for buying an ASUS® M4N98TD EVO motherboard! ASUS M4N98TD EVO 1-1 Actual product specifications may vary with the list below. 1.2 Package contents Check your package with different models. Thank you start installing the motherboard, and hardware devices on it another standout in the long line of the above items is damaged or missing, contact your retailer. •...
User Manual
Page 16
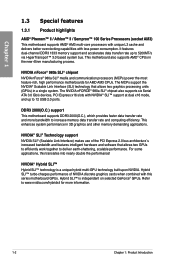
... chipset NVIDIA nForce® 980a SLI® media and communication processors (MCPs) power the most feature-rich, high performance motherboards for more bandwidth to deliver earth-shattering, scalable performance. This enhances system performance in the new 45nm manufacturing process. NVIDIA... use of NVIDIA discrete graphics cards when combined with this translates into nearly double the performance! DDR3 2000(O.C.) support This motherboard supports DDR3 2000(O.C.), which provides faster data transfer rate and more information. 1-2 Chapter 1: Product Introduction Refer to www....
... chipset NVIDIA nForce® 980a SLI® media and communication processors (MCPs) power the most feature-rich, high performance motherboards for more bandwidth to deliver earth-shattering, scalable performance. This enhances system performance in the new 45nm manufacturing process. NVIDIA... use of NVIDIA discrete graphics cards when combined with this translates into nearly double the performance! DDR3 2000(O.C.) support This motherboard supports DDR3 2000(O.C.), which provides faster data transfer rate and more information. 1-2 Chapter 1: Product Introduction Refer to www....

User Manual
Page 17
... consumption. 8+1 Phase Power Design To fully unleash the next-generation AM3 CPU's potential, the ASUS M4N98TD EVO motherboard has adopted a brand new 8-phase VRM power design. ASUS M4N98TD EVO 1-3 Furthermore, high quality power components can be carried away by different climate conditions in real...-time-helping save power and money! Fan Xpert ASUS Fan Xpert intelligently allows you to adjust both ...
... consumption. 8+1 Phase Power Design To fully unleash the next-generation AM3 CPU's potential, the ASUS M4N98TD EVO motherboard has adopted a brand new 8-phase VRM power design. ASUS M4N98TD EVO 1-3 Furthermore, high quality power components can be carried away by different climate conditions in real...-time-helping save power and money! Fan Xpert ASUS Fan Xpert intelligently allows you to adjust both ...

User Manual
Page 18
... makes overclock with just a simple switch or hot key. Refer to the motherboard. ASUS Q-Connector ASUS Q-Connector allows you to overclock without performing complicated BIOS changes. Update your system booting success. Worry no time. ASUS EZ Flash 2 ASUS EZ Flash 2 is an ASUS exclusive OS that can boost performances without entering the OS. Simply press the...
... makes overclock with just a simple switch or hot key. Refer to the motherboard. ASUS Q-Connector ASUS Q-Connector allows you to overclock without performing complicated BIOS changes. Update your system booting success. Worry no time. ASUS EZ Flash 2 ASUS EZ Flash 2 is an ASUS exclusive OS that can boost performances without entering the OS. Simply press the...
User Manual
Page 19
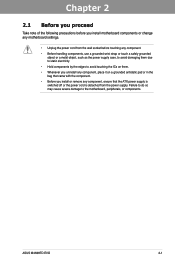
Chapter 2: Chapter 2 Hardware information 2.1 Before you proceed Take note of the following precautions before you install motherboard components or change any motherboard settings. • Unplug the power cord from the wall socket before touching any component. • Before handling components, use a...edges to the motherboard, peripherals, or components. Failure to do so may cause severe damage to avoid touching the ICs on a grounded antistatic pad or in the bag that the ATX power supply is switched off or the power cord is detached from the power supply. ASUS M4N98TD EVO 2-1
Chapter 2: Chapter 2 Hardware information 2.1 Before you proceed Take note of the following precautions before you install motherboard components or change any motherboard settings. • Unplug the power cord from the wall socket before touching any component. • Before handling components, use a...edges to the motherboard, peripherals, or components. Failure to do so may cause severe damage to avoid touching the ICs on a grounded antistatic pad or in the bag that the ATX power supply is switched off or the power cord is detached from the power supply. ASUS M4N98TD EVO 2-1
User Manual
Page 20
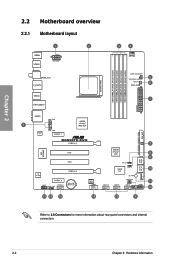
2.2 Motherboard overview 2.2.1 Motherboard layout Chapter 2 Refer to 2.8 Connectors for more information about rear panel connectors and internal connectors. 2-2 Chapter 2: Hardware information
2.2 Motherboard overview 2.2.1 Motherboard layout Chapter 2 Refer to 2.8 Connectors for more information about rear panel connectors and internal connectors. 2-2 Chapter 2: Hardware information
User Manual
Page 22
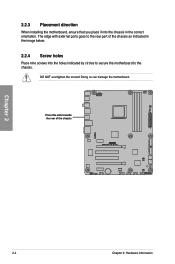
DO NOT overtighten the screws! 2.2.3 Placement direction When installing the motherboard, ensure that you place it into the holes indicated by circles to secure the motherboard to the chassis. Place this side towards the rear of the chassis as indicated in the image below. 2.2.4 Screw holes Place nine screws into the chassis in the correct orientation. Doing so can damage the motherboard. The edge with external ports goes to the rear part of the chassis Chapter 2 2-4 Chapter 2: Hardware information
DO NOT overtighten the screws! 2.2.3 Placement direction When installing the motherboard, ensure that you place it into the holes indicated by circles to secure the motherboard to the chassis. Place this side towards the rear of the chassis as indicated in the image below. 2.2.4 Screw holes Place nine screws into the chassis in the correct orientation. Doing so can damage the motherboard. The edge with external ports goes to the rear part of the chassis Chapter 2 2-4 Chapter 2: Hardware information
User Manual
Page 23
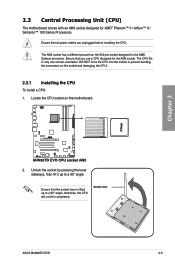
... the CPU. Ensure that you use a CPU designed for the AM3 socket. otherwise, the CPU will not fit in only one correct orientation. Socket lever ASUS M4N98TD EVO 2-5 Locate the CPU socket on the socket and damaging the CPU! 2.3.1 Installing the CPU To install a CPU: 1. Chapter 2 2. The AM3 socket has a ...The CPU fits in completely. Unlock the socket by pressing the lever sideways, then lift it up to prevent bending the connectors on the motherboard. 2.3 Central Processing Unit (CPU) The motherboard comes with an AM3 socket designed for the AMD Opteron processor.
... the CPU. Ensure that you use a CPU designed for the AM3 socket. otherwise, the CPU will not fit in only one correct orientation. Socket lever ASUS M4N98TD EVO 2-5 Locate the CPU socket on the socket and damaging the CPU! 2.3.1 Installing the CPU To install a CPU: 1. Chapter 2 2. The AM3 socket has a ...The CPU fits in completely. Unlock the socket by pressing the lever sideways, then lift it up to prevent bending the connectors on the motherboard. 2.3 Central Processing Unit (CPU) The motherboard comes with an AM3 socket designed for the AMD Opteron processor.

User Manual
Page 25
...CPU, ensuring that the heatsink fits properly on the retention module base. • The retention module base is already installed on the motherboard upon purchase. • You do not match the CPU documentation, follow the latter. Ensure that a Thermal Interface Material is properly ...fan assembly should come with installation instructions for the CPU, heatsink, and the retention mechanism. To install the CPU heatsink and fan: 1. ASUS M4N98TD EVO 2-7 2.3.2 Installing the CPU heatsink and fan The AMD® AM3 processor requires a specially designed heatsink and fan assembly to the CPU...
...CPU, ensuring that the heatsink fits properly on the retention module base. • The retention module base is already installed on the motherboard upon purchase. • You do not match the CPU documentation, follow the latter. Ensure that a Thermal Interface Material is properly ...fan assembly should come with installation instructions for the CPU, heatsink, and the retention mechanism. To install the CPU heatsink and fan: 1. ASUS M4N98TD EVO 2-7 2.3.2 Installing the CPU heatsink and fan The AMD® AM3 processor requires a specially designed heatsink and fan assembly to the CPU...
User Manual
Page 27
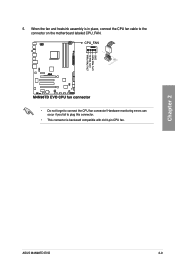
Chapter 2 ASUS M4N98TD EVO 2-9 When the fan and heatsink assembly is backward compatible with old 3-pin CPU fan. 5. Hardware monitoring errors can occur if you fail to plug this connector. • This connector is in place, connect the CPU fan cable to the connector on the motherboard labeled CPU_FAN. • Do not forget to connect the CPU fan connector!
Chapter 2 ASUS M4N98TD EVO 2-9 When the fan and heatsink assembly is backward compatible with old 3-pin CPU fan. 5. Hardware monitoring errors can occur if you fail to plug this connector. • This connector is in place, connect the CPU fan cable to the connector on the motherboard labeled CPU_FAN. • Do not forget to connect the CPU fan connector!
User Manual
Page 28
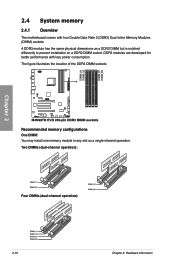
... install one memory module in any slot as a DDR2 DIMM but is notched differently to prevent installation on a DDR2 DIMM socket. 2.4 System memory 2.4.1 Overview The motherboard comes with less power consumption.
... install one memory module in any slot as a DDR2 DIMM but is notched differently to prevent installation on a DDR2 DIMM socket. 2.4 System memory 2.4.1 Overview The motherboard comes with less power consumption.
User Manual
Page 29
... memory modules from a memory module. Use a maximum of 512Mb (64MB) chips or less (Memory chip capacity counts in Channel A and Channel B. Chapter 2 ASUS M4N98TD EVO 2-11 For more memory on the motherboard. 2.4.2 Memory configurations You may install 1GB, 2GB and 4GB unbuffered ECC and non‑ECC DDR3 DIMMs into the DIMM sockets. •...
... memory modules from a memory module. Use a maximum of 512Mb (64MB) chips or less (Memory chip capacity counts in Channel A and Channel B. Chapter 2 ASUS M4N98TD EVO 2-11 For more memory on the motherboard. 2.4.2 Memory configurations You may install 1GB, 2GB and 4GB unbuffered ECC and non‑ECC DDR3 DIMMs into the DIMM sockets. •...
User Manual
Page 31
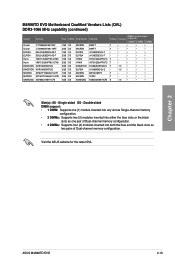
Single-sided DS - Visit the ASUS website for the latest QVL. D9KPT D9KPT J1108EDSE-DJ-F J1108EDSE-DJ-F H5TQ1G83AFPG7C H5TQ1G83AFPG7C D1288JEKAPGA7U J1108BABG-DJ-E 8ZF22 ... • • • • • • • • • • • • • • Side(s): SS - M4N98TD EVO Motherboard Qualified Vendors Lists (QVL) DDR3-1066 MHz capability (continued) Vendor Part No. Double-sided DIMM support: • 1 DIMM: Supports one (1) module inserted into any slot...ELPIDA MICRON MICRON SAMSUNG Chip NO. Chapter 2 ASUS M4N98TD EVO 2-13
Single-sided DS - Visit the ASUS website for the latest QVL. D9KPT D9KPT J1108EDSE-DJ-F J1108EDSE-DJ-F H5TQ1G83AFPG7C H5TQ1G83AFPG7C D1288JEKAPGA7U J1108BABG-DJ-E 8ZF22 ... • • • • • • • • • • • • • • Side(s): SS - M4N98TD EVO Motherboard Qualified Vendors Lists (QVL) DDR3-1066 MHz capability (continued) Vendor Part No. Double-sided DIMM support: • 1 DIMM: Supports one (1) module inserted into any slot...ELPIDA MICRON MICRON SAMSUNG Chip NO. Chapter 2 ASUS M4N98TD EVO 2-13
User Manual
Page 32
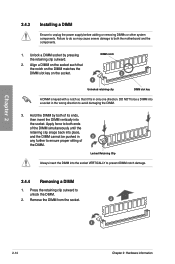
... on the DIMM matches the DIMM slot key on the socket such that it fits in only one direction. Unlock a DIMM socket by both the motherboard and the components. 1. Hold the DIMM by pressing the retaining clip outward. 2. Apply force to both ends of the DIMM. 3 Locked Retaining Clip Always insert...
... on the DIMM matches the DIMM slot key on the socket such that it fits in only one direction. Unlock a DIMM socket by both the motherboard and the components. 1. Hold the DIMM by pressing the retaining clip outward. 2. Apply force to both ends of the DIMM. 3 Locked Retaining Clip Always insert...
User Manual
Page 33
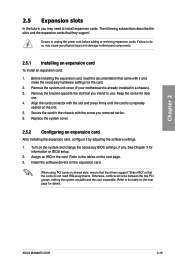
...removed earlier. 6. Before installing the expansion card, read the documentation that you intend to the chassis with the screw you physical injury and damage motherboard components. 2.5.1 Installing an expansion card To install an expansion card: 1. Keep the screw for later use . Install the software drivers for the ... the slots and the expansion cards that the cards do so may need IRQ assignments. Turn on the next page. 3. ASUS M4N98TD EVO 2-15 Failure to the tables on the system and change the necessary BIOS settings, if any. Secure the card to use . 4.
...removed earlier. 6. Before installing the expansion card, read the documentation that you intend to the chassis with the screw you physical injury and damage motherboard components. 2.5.1 Installing an expansion card To install an expansion card: 1. Keep the screw for later use . Install the software drivers for the ... the slots and the expansion cards that the cards do so may need IRQ assignments. Turn on the next page. 3. ASUS M4N98TD EVO 2-15 Failure to the tables on the system and change the necessary BIOS settings, if any. Secure the card to use . 4.


