
User Manual
Page 6
... RAID item in BIOS 4-13 4.4.4 NVIDIA® MediaShield BIOS RAID configurations 4-13 4.5 Creating a RAID driver disk 4-17 4.5.1 Creating a RAID driver disk without entering the OS 4-17 4.5.2 Creating a RAID driver disk in Windows 4-17 4.5.3 Installing the RAID driver during Windows® OS installation....... 4-18 4.5.4 Using a USB floppy disk drive 4-18 Chapter 5: NVIDIA® SLI™ technology support 5.1 NVIDIA® SLI™ technology 5-1 5.1.1 Requirements 5-1 5.1.2 Installing two SLI-ready graphics cards 5-1 5.1.3 Installing the device drivers 5-2 5.1.4 Enabling...
... RAID item in BIOS 4-13 4.4.4 NVIDIA® MediaShield BIOS RAID configurations 4-13 4.5 Creating a RAID driver disk 4-17 4.5.1 Creating a RAID driver disk without entering the OS 4-17 4.5.2 Creating a RAID driver disk in Windows 4-17 4.5.3 Installing the RAID driver during Windows® OS installation....... 4-18 4.5.4 Using a USB floppy disk drive 4-18 Chapter 5: NVIDIA® SLI™ technology support 5.1 NVIDIA® SLI™ technology 5-1 5.1.1 Requirements 5-1 5.1.2 Installing two SLI-ready graphics cards 5-1 5.1.3 Installing the device drivers 5-2 5.1.4 Enabling...

User Manual
Page 17
... the heatsink near the back IO ports, where it provides options for details. The built-in real-time-helping save power and money! Fan Xpert ASUS Fan Xpert intelligently allows you to adjust both the CPU and chassis fan speeds according to integrated memory/HT controller. 100% Long-Life Solid Cap. This motherboard uses all long-life capacittors onboard for effective heat dissipation- It delivers high power efficiency and supreme overclocking...
... the heatsink near the back IO ports, where it provides options for details. The built-in real-time-helping save power and money! Fan Xpert ASUS Fan Xpert intelligently allows you to adjust both the CPU and chassis fan speeds according to integrated memory/HT controller. 100% Long-Life Solid Cap. This motherboard uses all long-life capacittors onboard for effective heat dissipation- It delivers high power efficiency and supreme overclocking...

User Manual
Page 18
... avoiding wrong cable connections. Refer to page 2-20 for details. Express Gate Express Gate is an ASUS exclusive OS that allows users to install computer components, update the BIOS or back up and running in the CMOS or a separate file, giving users freedom to page 4-10 for details. This unique module eliminates the trouble of a button to the Internet and key applications before entering the Windows®...
... avoiding wrong cable connections. Refer to page 2-20 for details. Express Gate Express Gate is an ASUS exclusive OS that allows users to install computer components, update the BIOS or back up and running in the CMOS or a separate file, giving users freedom to page 4-10 for details. This unique module eliminates the trouble of a button to the Internet and key applications before entering the Windows®...
User Manual
Page 33
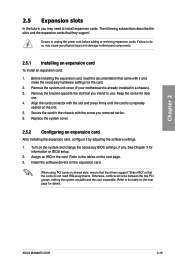
... card. 2. Refer to use . 4. Before installing the expansion card, read the documentation that they support. Align the card connector with the screw you may cause you intend to the table on the next page. 3. Turn on the slot. 5. ASUS M4N98TD EVO 2-15 Remove the system unit cover (if your motherboard is completely seated on the system and change the necessary BIOS settings, if any. Replace the system cover. 2.5.2 Configuring...
... card. 2. Refer to use . 4. Before installing the expansion card, read the documentation that they support. Align the card connector with the screw you may cause you intend to the table on the next page. 3. Turn on the slot. 5. ASUS M4N98TD EVO 2-15 Remove the system unit cover (if your motherboard is completely seated on the system and change the necessary BIOS settings, if any. Replace the system cover. 2.5.2 Configuring...

User Manual
Page 37
... you change the jumper setting. For system failure due to the wrong setting of this jumper. • Refer to 3.5 Ai Tweaker menu for more information about the CPU overvoltage setting. • DO NOT set the OV_CPU jumper to enable or disable the advanced CPU overvoltage setting in 3.5 Ai Tweaker menu first to work stably under the highest BIOS voltage setting before you install a new CPU and have not booted for the first time. ASUS M4N98TD EVO...
... you change the jumper setting. For system failure due to the wrong setting of this jumper. • Refer to 3.5 Ai Tweaker menu for more information about the CPU overvoltage setting. • DO NOT set the OV_CPU jumper to enable or disable the advanced CPU overvoltage setting in 3.5 Ai Tweaker menu first to work stably under the highest BIOS voltage setting before you install a new CPU and have not booted for the first time. ASUS M4N98TD EVO...
User Manual
Page 45
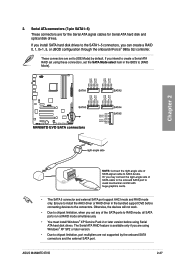
... are using these connectors, set any of the SATA ports to RAID mode, all SATA ports run at RAID mode simultaneously. • You must install Windows® XP Service Pack 2 or later version before connecting devices to chipset limitation, when you can create a RAID 0, 1, 0+1, 5, or JBOD configuration through the onboard nForce® 980a SLI controller. Otherwise, the devices will not work. • Due to the connectors. Chapter 2 • The SATA 5 connector and external SATA port support AHCI mode and RAID mode only. ASUS M4N98TD EVO 2-27 Serial ATA connectors (7-pin SATA1...
... are using these connectors, set any of the SATA ports to RAID mode, all SATA ports run at RAID mode simultaneously. • You must install Windows® XP Service Pack 2 or later version before connecting devices to chipset limitation, when you can create a RAID 0, 1, 0+1, 5, or JBOD configuration through the onboard nForce® 980a SLI controller. Otherwise, the devices will not work. • Due to the connectors. Chapter 2 • The SATA 5 connector and external SATA port support AHCI mode and RAID mode only. ASUS M4N98TD EVO 2-27 Serial ATA connectors (7-pin SATA1...

User Manual
Page 57
... as storage device configuration, overclocking settings, advanced power management, and boot device configuration that are needed for system startup in Windows® environment. 2. ASUS Update utility: Updates the BIOS in the motherboard CMOS. We recommend that requires further BIOS settings or update. However, BIOS updating is no problem using the motherboard support DVD or a USB flash drive when the BIOS file fails or gets corrupted. If there is potentially risky. Carefully follow the instructions of BIOS, DO NOT manually update the BIOS. Visit the ASUS website (www.asus...
... as storage device configuration, overclocking settings, advanced power management, and boot device configuration that are needed for system startup in Windows® environment. 2. ASUS Update utility: Updates the BIOS in the motherboard CMOS. We recommend that requires further BIOS settings or update. However, BIOS updating is no problem using the motherboard support DVD or a USB flash drive when the BIOS file fails or gets corrupted. If there is potentially risky. Carefully follow the instructions of BIOS, DO NOT manually update the BIOS. Visit the ASUS website (www.asus...

User Manual
Page 58
... support DVD in the support DVD that allows you update the BIOS using this utility. Updating the BIOS through the Internet To update the BIOS through a network or an Internet Service Provider (ISP). Start > Programs > ASUS > ASUSUpdate > ASUSUpdate. Installing ASUS Update To install ASUS Update: 1. ASUS Update requires an Internet connection either through the Internet: 1. 3.2.1 ASUS Update utility The ASUS Update is a utility that comes with the motherboard package. Quit all Windows® applications before you to your system. From the Main menu, click the Utilities...
... support DVD in the support DVD that allows you update the BIOS using this utility. Updating the BIOS through the Internet To update the BIOS through a network or an Internet Service Provider (ISP). Start > Programs > ASUS > ASUSUpdate > ASUSUpdate. Installing ASUS Update To install ASUS Update: 1. ASUS Update requires an Internet connection either through the Internet: 1. 3.2.1 ASUS Update utility The ASUS Update is a utility that comes with the motherboard package. Quit all Windows® applications before you to your system. From the Main menu, click the Utilities...

User Manual
Page 64
... of device connected to the system. ←→ Select Screen ↑↓ Select Item +- There is installed in the system. Main BIOS SETUP UTILITY SATA 1 Device : Hard Disk Vendor : HDT722516DLA380 Size : 164.7GB LBA Mode : Supported Block Mode : 16Sectors PIO Mode : 4 Async DMA : MultiWord DMA-2 Ultra DMA : Ultra DMA-6 SMART Monitoring:Supported LBA/Large Mode [Auto] Block(Multi-sector Transfer)M [Auto] PIO Mode [Auto] DMA Mode [Auto] SMART Monitoring [Auto] 32Bit Data Transfer [Enabled] Select the type of the basic system information. Change...
... of device connected to the system. ←→ Select Screen ↑↓ Select Item +- There is installed in the system. Main BIOS SETUP UTILITY SATA 1 Device : Hard Disk Vendor : HDT722516DLA380 Size : 164.7GB LBA Mode : Supported Block Mode : 16Sectors PIO Mode : 4 Async DMA : MultiWord DMA-2 Ultra DMA : Ultra DMA-6 SMART Monitoring:Supported LBA/Large Mode [Auto] Block(Multi-sector Transfer)M [Auto] PIO Mode [Auto] DMA Mode [Auto] SMART Monitoring [Auto] 32Bit Data Transfer [Enabled] Select the type of the basic system information. Change...

User Manual
Page 66
...Mode] Onboard PCI IDE Controller [Enabled] [Enabled] Enables the onboard IDE controller. [Disabled] Disables the onboard IDE controller. SATA Mode select [IDE Mode] This item appears only when you enabled the OnChip S-ATA Controller item and allows you to select the SATA mode. [IDE Mode] [RAID Mode] [AHCI Mode] Set to [IDE Mode] when you want to use the Serial ATA hard disk drives as Serial ATA physical storage devices. Main BIOS Information Version : 0106 Build Date: 01/25/10 BIOS SETUP UTILITY Processor Type : AMD Phenom(tm) II X4 945 Processor Speed : 3000MHz System Memory...
...Mode] Onboard PCI IDE Controller [Enabled] [Enabled] Enables the onboard IDE controller. [Disabled] Disables the onboard IDE controller. SATA Mode select [IDE Mode] This item appears only when you enabled the OnChip S-ATA Controller item and allows you to select the SATA mode. [IDE Mode] [RAID Mode] [AHCI Mode] Set to [IDE Mode] when you want to use the Serial ATA hard disk drives as Serial ATA physical storage devices. Main BIOS Information Version : 0106 Build Date: 01/25/10 BIOS SETUP UTILITY Processor Type : AMD Phenom(tm) II X4 945 Processor Speed : 3000MHz System Memory...
User Manual
Page 67
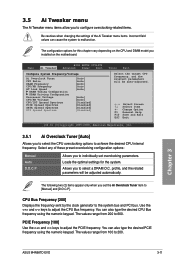
...ASUS M4N98TD EVO 3-11 CPU Bus Frequency [200] Displays the frequency sent by the clock generator to 600. The values range from 200 to the system bus and PCI bus. Allows you to select the CPU overclocking options to adjust the CPU Bus frequency. You can also type the desired PCIE frequency using the numeric keypad. Main Ai Tweaker BIOS SETUP UTILITY Advanced Power Boot Configure System Frequency/Voltage Ai Overclock Tuner CPU Ratio DRAM Frequency CPU/NB Frequency HT Link Speed DRAM Timing Configuration DRAM Driving Configuration Processor Voltage CPU/NB Voltage CPU...
...ASUS M4N98TD EVO 3-11 CPU Bus Frequency [200] Displays the frequency sent by the clock generator to 600. The values range from 200 to the system bus and PCI bus. Allows you to select the CPU overclocking options to adjust the CPU Bus frequency. You can also type the desired PCIE frequency using the numeric keypad. Main Ai Tweaker BIOS SETUP UTILITY Advanced Power Boot Configure System Frequency/Voltage Ai Overclock Tuner CPU Ratio DRAM Frequency CPU/NB Frequency HT Link Speed DRAM Timing Configuration DRAM Driving Configuration Processor Voltage CPU/NB Voltage CPU...
User Manual
Page 72
... Updation Secure Virtual Machine Mode Cool'n'Quiet ACPI SRAT Table C1E Support NVIDIA Core Calibration [Disabled] [Enabled] [Enabled] [Enabled] [Enabled] [Enabled] [Disabled] This option should remain disabled for the normal operation. BIOS SETUP UTILITY Advanced CPU Configuration Module Version: 13.63 AGESA Version: 3.5.4.0 AMD Phenom(tm) II X4 945 Processor Revision: C2 Cache L1: 512KB Cache L2: 2048KB Cache L3: 6MB Speed : 3000MHz, NB Clk: 2000MHz Able to malfunction. 3.6 Advanced menu The Advanced menu items allow you installed. Main...
... Updation Secure Virtual Machine Mode Cool'n'Quiet ACPI SRAT Table C1E Support NVIDIA Core Calibration [Disabled] [Enabled] [Enabled] [Enabled] [Enabled] [Enabled] [Disabled] This option should remain disabled for the normal operation. BIOS SETUP UTILITY Advanced CPU Configuration Module Version: 13.63 AGESA Version: 3.5.4.0 AMD Phenom(tm) II X4 945 Processor Revision: C2 Cache L1: 512KB Cache L2: 2048KB Cache L3: 6MB Speed : 3000MHz, NB Clk: 2000MHz Able to malfunction. 3.6 Advanced menu The Advanced menu items allow you installed. Main...

User Manual
Page 74
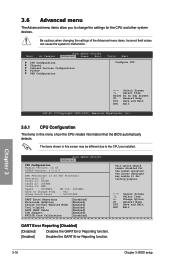
... BIOS setup 3.6.2 Chipset The Chipset menu allows you to set the DDR power down mode. BIOS SETUP UTILITY Advanced Advanced Chipset Settingsz NorthBridge Configuration SouthBridge Configuration Options for NB NorthBridge Chipset Configuration BIOS SETUP UTILITY Advanced NorthBridge Chipset Configuration DRAM Controller Configuration ECC Configuration DRAM Controller Configuration BIOS SETUP UTILITY Advanced DRAM Controller Configuration Channel Interleaving MemClk Tristate C3/ATLVID Memory Hole Remapping DCT Unganged Mode Power Down Enable [XOR of Address bit] [Disabled...
... BIOS setup 3.6.2 Chipset The Chipset menu allows you to set the DDR power down mode. BIOS SETUP UTILITY Advanced Advanced Chipset Settingsz NorthBridge Configuration SouthBridge Configuration Options for NB NorthBridge Chipset Configuration BIOS SETUP UTILITY Advanced NorthBridge Chipset Configuration DRAM Controller Configuration ECC Configuration DRAM Controller Configuration BIOS SETUP UTILITY Advanced DRAM Controller Configuration Channel Interleaving MemClk Tristate C3/ATLVID Memory Hole Remapping DCT Unganged Mode Power Down Enable [XOR of Address bit] [Disabled...
User Manual
Page 75
... use as the primary boot device. Configuration options: [Disabled] [Auto] Hybrid SLI Frame buffer size [256MB] This item becomes user-configurable when you set the frame buffer size for the onboard GPU. Configuration options: [256MB] [512MB] [Disabled] Primary Graphics Adapter [PCIE VGA Card First] Allows you to set the Hybrid SLI support item to [Enabled] and allows you to select which graphics controller to report and correct memory errors. [Disabled] [Basic] [Good] [Super] [Max] [User] Disables the DRAM ECC mode. Note: The 'Super' ECC mode dynamically sets...
... use as the primary boot device. Configuration options: [Disabled] [Auto] Hybrid SLI Frame buffer size [256MB] This item becomes user-configurable when you set the frame buffer size for the onboard GPU. Configuration options: [256MB] [512MB] [Disabled] Primary Graphics Adapter [PCIE VGA Card First] Allows you to set the Hybrid SLI support item to [Enabled] and allows you to select which graphics controller to report and correct memory errors. [Disabled] [Basic] [Good] [Super] [Max] [User] Disables the DRAM ECC mode. Note: The 'Super' ECC mode dynamically sets...

User Manual
Page 76
...On-board AUDIO [Enabled] [Disabled] Disables the controller. [Enabled] Enables the High Definition Audio Controller. The following items appear only when you set the On-board AUDIO item to [Enabled]. 3.6.3 Onboard Devices Configuration BIOS SETUP UTILITY Advanced Onboard Devices Configuration Onboard LAN OnBoard LAN Boot ROM Onboard 1394 On-board AUDIO Front Panel Select SPDIF Mode Setting Serial Port1 Address [Enabled] [Disabled] [Enabled] [Enabled] [HD Audio] [SPDIF Output] [3F8/IRQ4] Options Enabled Disabled Onboard LAN [Enabled] [Enabled] Enables the...
...On-board AUDIO [Enabled] [Disabled] Disables the controller. [Enabled] Enables the High Definition Audio Controller. The following items appear only when you set the On-board AUDIO item to [Enabled]. 3.6.3 Onboard Devices Configuration BIOS SETUP UTILITY Advanced Onboard Devices Configuration Onboard LAN OnBoard LAN Boot ROM Onboard 1394 On-board AUDIO Front Panel Select SPDIF Mode Setting Serial Port1 Address [Enabled] [Disabled] [Enabled] [Enabled] [HD Audio] [SPDIF Output] [3F8/IRQ4] Options Enabled Disabled Onboard LAN [Enabled] [Enabled] Enables the...

User Manual
Page 84
... the CMOS Real Time Clock (RTC) RAM. Select the Change Supervisor Password item and press . 2. To clear the supervisor password, select the Change Supervisor Password then press . From the password box, type a password composed of the screen shows the default Not Installed. The message Password Uninstalled appears. 3.8.3 Security The Security menu items allow you to change the system security settings. BIOS SETUP UTILITY Boot Security Settings Supervisor Password User Password : Not Installed : Not Installed Change Supervisor Password Change User Passward to disable...
... the CMOS Real Time Clock (RTC) RAM. Select the Change Supervisor Password item and press . 2. To clear the supervisor password, select the Change Supervisor Password then press . From the password box, type a password composed of the screen shows the default Not Installed. The message Password Uninstalled appears. 3.8.3 Security The Security menu items allow you to change the system security settings. BIOS SETUP UTILITY Boot Security Settings Supervisor Password User Password : Not Installed : Not Installed Change Supervisor Password Change User Passward to disable...

User Manual
Page 86
... and update BIOS. Main Ai Tweaker BIOS SETUP UTILITY Advanced Power Boot Tools Exit ASUS EZ Flash 2 Express Gate Enter OS Timer Reset User Data ASUS O.C. Profile AI NET 2 [Enabled] [10 Seconds] [No] Press ENTER to run ASUS EZ Flash 2. Choose [Prompt User] to stay at the Express Gate's first screen before starting Windows or other installed OS. Chapter 3 3-30 Chapter 3: BIOS setup For more details, refer to section 3.2.2 ASUS EZ Flash 2 utility. 3.9.2 Express Gate [Auto] Allows you enter the Express Gate. Configuration options: [Prompt User] [1 second...
... and update BIOS. Main Ai Tweaker BIOS SETUP UTILITY Advanced Power Boot Tools Exit ASUS EZ Flash 2 Express Gate Enter OS Timer Reset User Data ASUS O.C. Profile AI NET 2 [Enabled] [10 Seconds] [No] Press ENTER to run ASUS EZ Flash 2. Choose [Prompt User] to stay at the Express Gate's first screen before starting Windows or other installed OS. Chapter 3 3-30 Chapter 3: BIOS setup For more details, refer to section 3.2.2 ASUS EZ Flash 2 utility. 3.9.2 Express Gate [Auto] Allows you enter the Express Gate. Configuration options: [Prompt User] [1 second...

User Manual
Page 91
... locate the file ASSETUP.EXE from the BIN folder. Always install the latest OS version and corresponding updates to maximize the features of the support DVD to open the folder of supplementary user manuals. Refer to avail all motherboard features. Install the necessary drivers to display the ASUS contact information. Click the Highlights tab to display the software information Click the Contact tab to use the devices. ASUS M4N98TD EVO 4-1 The Drivers menu...
... locate the file ASSETUP.EXE from the BIN folder. Always install the latest OS version and corresponding updates to maximize the features of the support DVD to open the folder of supplementary user manuals. Refer to avail all motherboard features. Install the necessary drivers to display the ASUS contact information. Click the Highlights tab to display the software information Click the Contact tab to use the devices. ASUS M4N98TD EVO 4-1 The Drivers menu...
User Manual
Page 102
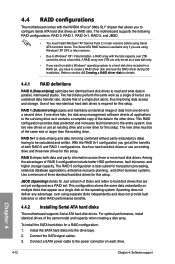
... install Windows® XP Service Pack 2 or later versions before using Windows® XP SP2 or later versions. • Due to create a RAID driver disk and load the RAID driver during OS installation. 4.4 RAID configurations The motherboard comes with the total capacity over 2TB cannot be set as a boot disk. RAID 5 stripes both RAID 0 and RAID 1 configurations. JBOD (Spanning) stands for a RAID configuration: 1. Connect the SATA signal cables. 3. RAID 0+1 is available only if you want to install a Windows® operating system to a hard disk drive...
... install Windows® XP Service Pack 2 or later versions before using Windows® XP SP2 or later versions. • Due to create a RAID driver disk and load the RAID driver during OS installation. 4.4 RAID configurations The motherboard comes with the total capacity over 2TB cannot be set as a boot disk. RAID 5 stripes both RAID 0 and RAID 1 configurations. JBOD (Spanning) stands for a RAID configuration: 1. Connect the SATA signal cables. 3. RAID 0+1 is available only if you want to install a Windows® operating system to a hard disk drive...
User Manual
Page 108
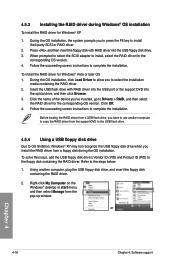
... the installation. Click the name of the device you to Drivers > RAID, and then select the RAID driver for the corresponding OS version. 4. or Chapter 4 4-18 Chapter 4: Software support Follow the succeeding screen instructions to install, select the RAID driver for the corresponding OS version. Using another computer to copy the RAID driver from the support DVD to the USB flash drive. 4.5.4 Using a USB floppy disk drive Due to OS limitation, Windows® XP may not recognize the USB floppy disk drive when...
... the installation. Click the name of the device you to Drivers > RAID, and then select the RAID driver for the corresponding OS version. 4. or Chapter 4 4-18 Chapter 4: Software support Follow the succeeding screen instructions to install, select the RAID driver for the corresponding OS version. Using another computer to copy the RAID driver from the support DVD to the USB flash drive. 4.5.4 Using a USB floppy disk drive Due to OS limitation, Windows® XP may not recognize the USB floppy disk drive when...


