
User Manual
Page 31
Version 1.19(ASUS V2.07(03.11.24BB)) Copyright (C) 2002 American Megatrends, Inc. Reading flash ..... ok A:\> 當 BIOS DOS 31 BIOS 2.1 使用 AFUDOS BIOS AFUDOS DOS BIOS BIOS 程式。AFUDOS BIOS BIOS BIOS 程式 BIOS 程式。 1.2MB BIOS 1 AFUDOS 程式(afudos. done Write to file...... All rights reserved. exe 2 DOS afudos /o[filename filename A:\>afudos /oOLDBIOS1.rom 3. 按下 afudos /oOLDBIOS1.rom AMI Firmware Update Utility -
Version 1.19(ASUS V2.07(03.11.24BB)) Copyright (C) 2002 American Megatrends, Inc. Reading flash ..... ok A:\> 當 BIOS DOS 31 BIOS 2.1 使用 AFUDOS BIOS AFUDOS DOS BIOS BIOS 程式。AFUDOS BIOS BIOS BIOS 程式 BIOS 程式。 1.2MB BIOS 1 AFUDOS 程式(afudos. done Write to file...... All rights reserved. exe 2 DOS afudos /o[filename filename A:\>afudos /oOLDBIOS1.rom 3. 按下 afudos /oOLDBIOS1.rom AMI Firmware Update Utility -

User Manual
Page 32
更新 BIOS 程式 AFUDOS BIOS 程式。 1 tw.asus.com BIOS 片中。 BIOS BIOS 2. 將 AFUDOS.EXE BIOS 3 DOS afudos /i[filename filename BIOS 程式。 A:\>afudos /iP5B-VM DO.ROM 4. Do not turn off power during flash BIOS Reading file ....... done Reading flash ...... done Reading flash ...... done Verifying flash .... AFUDOS BIOS 程式。 A:\>afudos...
更新 BIOS 程式 AFUDOS BIOS 程式。 1 tw.asus.com BIOS 片中。 BIOS BIOS 2. 將 AFUDOS.EXE BIOS 3 DOS afudos /i[filename filename BIOS 程式。 A:\>afudos /iP5B-VM DO.ROM 4. Do not turn off power during flash BIOS Reading file ....... done Reading flash ...... done Reading flash ...... done Verifying flash .... AFUDOS BIOS 程式。 A:\>afudos...

User Manual
Page 33
.../13/2006 Flash Type - 2.2 使用 AwardBIOS Flash BIOS AwardBIOS Flash AwardBIOS Flash 程式(AWDFLASH.EXE BIOS AwardBIOS Flash BIOS 程式。 1 http://tw.asus.com BIOS M2N-VM HDMI.bin FAT 32/16 格式的 USB BIOS 2 CD/DVD AwardBIOS Flash BIOS 3 DOS 4. 當 A BIOS 檔案與 AwardBIOS Flash 5 A awdflash 並按...
.../13/2006 Flash Type - 2.2 使用 AwardBIOS Flash BIOS AwardBIOS Flash AwardBIOS Flash 程式(AWDFLASH.EXE BIOS AwardBIOS Flash BIOS 程式。 1 http://tw.asus.com BIOS M2N-VM HDMI.bin FAT 32/16 格式的 USB BIOS 2 CD/DVD AwardBIOS Flash BIOS 3 DOS 4. 當 A BIOS 檔案與 AwardBIOS Flash 5 A awdflash 並按...

User Manual
Page 34
... Write OK No Update Write Fail Warning: Don't Turn Off Power Or Reset System! 在更新 BIOS 9 Flash Complete BIOS F1 AwardBIOS Flash Utility for ASUS V1.14 (C) Phoenix Technologies Ltd. 7 BIOS N BIOS 8 BIOS BIOS AwardBIOS Flash Utility for ASUS V1.14 (C) Phoenix Technologies Ltd. PMC Pm49FL004T LPC/FWH File Name to Continue Write OK F1 Reset...
... Write OK No Update Write Fail Warning: Don't Turn Off Power Or Reset System! 在更新 BIOS 9 Flash Complete BIOS F1 AwardBIOS Flash Utility for ASUS V1.14 (C) Phoenix Technologies Ltd. 7 BIOS N BIOS 8 BIOS BIOS AwardBIOS Flash Utility for ASUS V1.14 (C) Phoenix Technologies Ltd. PMC Pm49FL004T LPC/FWH File Name to Continue Write OK F1 Reset...

User Manual
Page 4
... 3.5.9 PCI Spread Spectrum 3-18 3.5.10 AI Clock Skew for the first time 2-39 2.9 Turning off the computer 2-39 Chapter 3: BIOS setup 3.1 Knowing BIOS 3-1 3.2 Updating BIOS 3-1 3.2.1 ASUS Update utility 3-2 3.2.2 ASUS EZ Flash 2 utility 3-4 3.2.3 ASUS CrashFree BIOS 3 utility 3-5 3.3 BIOS setup program 3-6 3.3.1 BIOS menu screen 3-6 3.3.2 Menu bar 3-6 3.3.3 Navigation keys 3-7 3.3.4 Menu items 3-7 3.3.5 Submenu items 3-7 3.3.6 Configuration fields 3-7 3.3.7 Pop-up window 3-7 3.3.8 Scroll bar 3-7 3.3.9 General help...
... 3.5.9 PCI Spread Spectrum 3-18 3.5.10 AI Clock Skew for the first time 2-39 2.9 Turning off the computer 2-39 Chapter 3: BIOS setup 3.1 Knowing BIOS 3-1 3.2 Updating BIOS 3-1 3.2.1 ASUS Update utility 3-2 3.2.2 ASUS EZ Flash 2 utility 3-4 3.2.3 ASUS CrashFree BIOS 3 utility 3-5 3.3 BIOS setup program 3-6 3.3.1 BIOS menu screen 3-6 3.3.2 Menu bar 3-6 3.3.3 Navigation keys 3-7 3.3.4 Menu items 3-7 3.3.5 Submenu items 3-7 3.3.6 Configuration fields 3-7 3.3.7 Pop-up window 3-7 3.3.8 Scroll bar 3-7 3.3.9 General help...
User Manual
Page 6
Contents 4.4.3 Setting the RAID item in BIOS 4-14 4.4.4 NVIDIA® MediaShield BIOS RAID configurations 4-15 4.5 Creating a RAID driver disk 4-21 4.5.1 Creating a RAID driver disk without entering the OS 4-21 4.5.2 Creating a RAID/SATA driver disk in Windows 4-21 ...
Contents 4.4.3 Setting the RAID item in BIOS 4-14 4.4.4 NVIDIA® MediaShield BIOS RAID configurations 4-15 4.5 Creating a RAID driver disk 4-21 4.5.1 Creating a RAID driver disk without entering the OS 4-21 4.5.2 Creating a RAID/SATA driver disk in Windows 4-21 ...

User Manual
Page 9
...to the following parts: • Chapter 1: Product introduction This chapter describes the features of the switches, jumpers, and connectors on ASUS hardware and software products. Where to find more information Refer to perform when installing system components. ix About this guide is organized ...How this guide This user guide contains the information you have been added by your dealer. Refer to change system settings through the BIOS Setup menus. These documents are also provided. • Chapter 4: Software support This chapter describes the contents of the standard package....
...to the following parts: • Chapter 1: Product introduction This chapter describes the features of the switches, jumpers, and connectors on ASUS hardware and software products. Where to find more information Refer to perform when installing system components. ix About this guide is organized ...How this guide This user guide contains the information you have been added by your dealer. Refer to change system settings through the BIOS Setup menus. These documents are also provided. • Chapter 4: Software support This chapter describes the contents of the standard package....

User Manual
Page 12
... tuning from 200MHz up to 600MHz at 1MHz increment Overclocking protection: - ASUS CrashFree BIOS 3 - M4N82 Deluxe specifications summary USB ASUS unique features Special features ASUS exclusive overclocking features Back panel I /O ports (continued on the next page) xii AI Overclocking (intelligent CPU frequency tuner) - ASUS AI Nap ASUS Express Gate ASUS Quiet Thermal Solutions: - vDIMM: 35-step DRAM voltage control -
... tuning from 200MHz up to 600MHz at 1MHz increment Overclocking protection: - ASUS CrashFree BIOS 3 - M4N82 Deluxe specifications summary USB ASUS unique features Special features ASUS exclusive overclocking features Back panel I /O ports (continued on the next page) xii AI Overclocking (intelligent CPU frequency tuner) - ASUS AI Nap ASUS Express Gate ASUS Quiet Thermal Solutions: - vDIMM: 35-step DRAM voltage control -

User Manual
Page 13
xiii M4N82 Deluxe specifications summary Internal I/O connectors BIOS features Manageability Support DVD contents Form factor 3 x USB connectors support additional 6 USB ports 1 x IDE connector 1 x COM connector 5 x SATA connectors 1 x CPU Fan connector 2 x Chassis Fan connectors 1 x... connector System Panel (Q-Connector) 8-pin ATX 12V Power connector 8 Mb Flash ROM, AMI BIOS, PnP, DMI 2.0, WfM 2.0, SM BIOS 2.5, ACPI 2.0a WOL by PME, WOR by PME, WOR by Ring, PXE Drivers Express Gate ASUS PC Probe II ASUS Update ASUS AI Suite Anti-virus software (OEM version) ATX form factor: 12 in x 9.6 in...
xiii M4N82 Deluxe specifications summary Internal I/O connectors BIOS features Manageability Support DVD contents Form factor 3 x USB connectors support additional 6 USB ports 1 x IDE connector 1 x COM connector 5 x SATA connectors 1 x CPU Fan connector 2 x Chassis Fan connectors 1 x... connector System Panel (Q-Connector) 8-pin ATX 12V Power connector 8 Mb Flash ROM, AMI BIOS, PnP, DMI 2.0, WfM 2.0, SM BIOS 2.5, ACPI 2.0a WOL by PME, WOR by PME, WOR by Ring, PXE Drivers Express Gate ASUS PC Probe II ASUS Update ASUS AI Suite Anti-virus software (OEM version) ATX form factor: 12 in x 9.6 in...
User Manual
Page 18
...of connecting the system panel cables one at a time and avoiding wrong cable connections. The Heat Pipe design is a user-friendly BIOS update utility. Q-Fan 2 ASUS Q-Fan 2 technology intelligently adjusts both CPU fan and chassis fan speeds according to system loading to ensure quiet, cool and efficient operation... of the innovative heat pipe design on this motherboard is that allows users to conveniently store or load multiple BIOS settings. ASUS O.C. The BIOS settings can be stored in the CMOS or a separate file, giving users freedom to share and distribute their favorite settings...
...of connecting the system panel cables one at a time and avoiding wrong cable connections. The Heat Pipe design is a user-friendly BIOS update utility. Q-Fan 2 ASUS Q-Fan 2 technology intelligently adjusts both CPU fan and chassis fan speeds according to system loading to ensure quiet, cool and efficient operation... of the innovative heat pipe design on this motherboard is that allows users to conveniently store or load multiple BIOS settings. ASUS O.C. The BIOS settings can be stored in the CMOS or a separate file, giving users freedom to share and distribute their favorite settings...

User Manual
Page 19
... OS; C.P.R. (CPU Parameter Recall) The C.P.R. ASUS M4N82 Deluxe 1-5 This easy OC tool allows you to overclock without interrupting ongoing work or games-with just a few clicks away. Chapter 1 1.3.3 ASUS intelligent performance and overclocking features TurboV Feel the adrenaline rush of the motherboard BIOS allows automatic re-setting to the BIOS default settings in case the system...
... OS; C.P.R. (CPU Parameter Recall) The C.P.R. ASUS M4N82 Deluxe 1-5 This easy OC tool allows you to overclock without interrupting ongoing work or games-with just a few clicks away. Chapter 1 1.3.3 ASUS intelligent performance and overclocking features TurboV Feel the adrenaline rush of the motherboard BIOS allows automatic re-setting to the BIOS default settings in case the system...

User Manual
Page 31
...is dependent on 32-bit Windows OS, when you do any of the lower-sized channel for one DIMM per channel only. M4N82 Deluxe Motherboard Qualified Vendors Lists (QVL) DDR2-1200 MHz capability Vendor OCZ Part No. The system maps the total size of the ...2) DS N/A Heat-Sink Package 5(6-56-75-5-5-5-15) 2.1 • • ASUS M4N82 Deluxe 2-11 Under the default state, some memory modules for better overclocking capability. • Always install DIMMs with the same CAS latency. Timing DIMM (BIOS) DIMM socket Voltage support (Optional) A* B* 2GB (Kit of accessing information from...
...is dependent on 32-bit Windows OS, when you do any of the lower-sized channel for one DIMM per channel only. M4N82 Deluxe Motherboard Qualified Vendors Lists (QVL) DDR2-1200 MHz capability Vendor OCZ Part No. The system maps the total size of the ...2) DS N/A Heat-Sink Package 5(6-56-75-5-5-5-15) 2.1 • • ASUS M4N82 Deluxe 2-11 Under the default state, some memory modules for better overclocking capability. • Always install DIMMs with the same CAS latency. Timing DIMM (BIOS) DIMM socket Voltage support (Optional) A* B* 2GB (Kit of accessing information from...

User Manual
Page 32
Chapter 2 M4N82 Deluxe Motherboard Qualified Vendors Lists (QVL) DDR2-1066 MHz capability Vendor Part No. Size SS/ DS Chip Brand Chip NO. Timing Dimm (Bios) Socket Voltage support A* B* C* Apacer BoxP/N:CH.02GAF.C0KK2 (78.0AG9S.9KF) 2GB (Kit of 2) DS N/A Heat-Sink Package 5-5-5-15 ••• Apacer BoxP/N:CH....
Chapter 2 M4N82 Deluxe Motherboard Qualified Vendors Lists (QVL) DDR2-1066 MHz capability Vendor Part No. Size SS/ DS Chip Brand Chip NO. Timing Dimm (Bios) Socket Voltage support A* B* C* Apacer BoxP/N:CH.02GAF.C0KK2 (78.0AG9S.9KF) 2GB (Kit of 2) DS N/A Heat-Sink Package 5-5-5-15 ••• Apacer BoxP/N:CH....

User Manual
Page 33
...-25A ELPIDA E5108AJBG-8E-E ELPIDA E5108AJBG-8E-E KINGSTON D1288TPFCGL25U N/A Heat-Sink Package V59C1 512804QBF25 ELPIDA E5108AJBG-8E-E N/A Heat-Sink Package N/A Heat-Sink Package Timing Dimm (Bios) 5 5 5 4 Voltage 1.9 Socket support A* B* C 4-4-4-12 2.10 ••• 5-5-5-18 1.80 ••• 5-5-5-18 1.80 ••• 4 2.2 •••...15 1.8 ••• 4 2.0 ••• 1.8 ••• 1.8 ••• 2.3-2.35 • • 2.0 ••• ASUS M4N82 Deluxe 2-13
...-25A ELPIDA E5108AJBG-8E-E ELPIDA E5108AJBG-8E-E KINGSTON D1288TPFCGL25U N/A Heat-Sink Package V59C1 512804QBF25 ELPIDA E5108AJBG-8E-E N/A Heat-Sink Package N/A Heat-Sink Package Timing Dimm (Bios) 5 5 5 4 Voltage 1.9 Socket support A* B* C 4-4-4-12 2.10 ••• 5-5-5-18 1.80 ••• 5-5-5-18 1.80 ••• 4 2.2 •••...15 1.8 ••• 4 2.0 ••• 1.8 ••• 1.8 ••• 2.3-2.35 • • 2.0 ••• ASUS M4N82 Deluxe 2-13

User Manual
Page 34
Timing Dimm (Bios) Socket Voltage support A* B* C* KINGSTON KVR800D2N5/2G 2GB DS ELPIDA E1108ACBG-8E-E 1.8 ••• KINGSTON KVR800D2N6/4G 4GB DS ELPIDA E2108ABSE-8G-E ••• ... DS S-POWER 10YR9N3 5(5-5-5-15) ••• UMAX D48002GP1-73BEB 2GB DS UMAX U2S24D30TP-8E 800-5-5-5-15 ••• 2-14 Chapter 2: Hardware information Chapter 2 M4N82 Deluxe Motherboard Qualified Vendors Lists (QVL) DDR2-800 MHz capability (continued) Vendor Part No. Size SS/ DS Chip Brand Chip NO.
Timing Dimm (Bios) Socket Voltage support A* B* C* KINGSTON KVR800D2N5/2G 2GB DS ELPIDA E1108ACBG-8E-E 1.8 ••• KINGSTON KVR800D2N6/4G 4GB DS ELPIDA E2108ABSE-8G-E ••• ... DS S-POWER 10YR9N3 5(5-5-5-15) ••• UMAX D48002GP1-73BEB 2GB DS UMAX U2S24D30TP-8E 800-5-5-5-15 ••• 2-14 Chapter 2: Hardware information Chapter 2 M4N82 Deluxe Motherboard Qualified Vendors Lists (QVL) DDR2-800 MHz capability (continued) Vendor Part No. Size SS/ DS Chip Brand Chip NO.

User Manual
Page 35
...APACER N/A N/A N/A N/A N/A N/A ELPIDA G.Skill AM4B5708JQJS7E AM4B5808CQJS7E AM4B5808CQJS7E 64M8CFEG 64M8CFEG Heat-Sink Package Heat-Sink Package Heat-Sink Package Heat-Sink Package E5108AE-6E-E D264M8GCF Timing Dimm (Bios) Voltage 5 5 5 N/A N/A N/A N/A 3 2.2 3 2.2 3 2.2 3 2.2 5 1.7-1.9 5-5-5-15 1.8 N/A Heat-Sink Package 5-5-5-15 N/A Heat-Sink Package N/A Heat... 1.8 1.8 1.7-1.9 1.8 1.8 1.8 1.8 1.8 1.8 1.8 1.8 1.8 1.8 1.8 1.8 1.85 1.85 1.8 1.8 1.8 Socket support A* B* C ••• ••• ••• ASUS M4N82 Deluxe 2-15
...APACER N/A N/A N/A N/A N/A N/A ELPIDA G.Skill AM4B5708JQJS7E AM4B5808CQJS7E AM4B5808CQJS7E 64M8CFEG 64M8CFEG Heat-Sink Package Heat-Sink Package Heat-Sink Package Heat-Sink Package E5108AE-6E-E D264M8GCF Timing Dimm (Bios) Voltage 5 5 5 N/A N/A N/A N/A 3 2.2 3 2.2 3 2.2 3 2.2 5 1.7-1.9 5-5-5-15 1.8 N/A Heat-Sink Package 5-5-5-15 N/A Heat-Sink Package N/A Heat... 1.8 1.8 1.7-1.9 1.8 1.8 1.8 1.8 1.8 1.8 1.8 1.8 1.8 1.8 1.8 1.8 1.85 1.85 1.8 1.8 1.8 Socket support A* B* C ••• ••• ••• ASUS M4N82 Deluxe 2-15

User Manual
Page 38
...screw you removed earlier. 6. Install the software drivers for later use . Refer to the tables on the system and change the necessary BIOS settings, if any. Otherwise, conflicts will arise between the two PCI groups, making the system unstable and the card inoperable. When ...using PCI cards on BIOS setup. 2. See Chapter 3 for details. 2-18 Chapter 2: Hardware information Chapter 2 2.5 Expansion slots In the future, you may cause you physical...
...screw you removed earlier. 6. Install the software drivers for later use . Refer to the tables on the system and change the necessary BIOS settings, if any. Otherwise, conflicts will arise between the two PCI groups, making the system unstable and the card inoperable. When ...using PCI cards on BIOS setup. 2. See Chapter 3 for details. 2-18 Chapter 2: Hardware information Chapter 2 2.5 Expansion slots In the future, you may cause you physical...

User Manual
Page 42
... failure due to pins 2-3. Plug the power cord and turn off is required to overclocking. Shut down the key during the boot process and enter BIOS setup to clear the Real Time Clock (RTC) RAM in CMOS, which include system setup information such as system passwords. Chapter 2 To erase the RTC... turn ON the computer. 4. Clear RTC RAM (3-pin CLRTC) This jumper allows you to re-enter data. Hold down and reboot the system so the BIOS can clear the CMOS memory of date, time, and system setup parameters by erasing the CMOS RTC RAM data.
... failure due to pins 2-3. Plug the power cord and turn off is required to overclocking. Shut down the key during the boot process and enter BIOS setup to clear the Real Time Clock (RTC) RAM in CMOS, which include system setup information such as system passwords. Chapter 2 To erase the RTC... turn ON the computer. 4. Clear RTC RAM (3-pin CLRTC) This jumper allows you to re-enter data. Hold down and reboot the system so the BIOS can clear the CMOS memory of date, time, and system setup parameters by erasing the CMOS RTC RAM data.
User Manual
Page 43
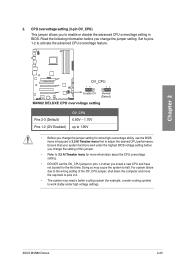
...system to pins 1-2 when you change the jumper setting for extra-high overvoltage ability, use the BIOS items introduced in BIOS. Ensure that your system functions well under high voltage settings. ASUS M4N82 Deluxe 2-23 Doing so may need a better cooling system (for the first time. Set to pins... information before you install a new CPU and have not booted for example, a water-cooling system) to work stably under the highest BIOS voltage setting before you to enable or disable the advanced CPU overvoltage setting in 3.5 Ai Tweaker menu first to activate the advanced CPU ...
...system to pins 1-2 when you change the jumper setting for extra-high overvoltage ability, use the BIOS items introduced in BIOS. Ensure that your system functions well under high voltage settings. ASUS M4N82 Deluxe 2-23 Doing so may need a better cooling system (for the first time. Set to pins... information before you install a new CPU and have not booted for example, a water-cooling system) to work stably under the highest BIOS voltage setting before you to enable or disable the advanced CPU overvoltage setting in 3.5 Ai Tweaker menu first to activate the advanced CPU ...

User Manual
Page 44
... the external SATA port. • To enable external SATA port hot-plugging, set the SATA Mode Select item in the BIOS settings to [SATA Mode] (or [IDE Mode], depending on the BIOS version). Coaxial S/PDIF out port 8. 3. LAN (RJ-45) port 10. 5. See section 3.4.2 Storage Configuration for details. 2-24 Chapter 2: Hardware information... not supported by the external SATA port. • The external SATA port will be disabled if you set the SATA Mode Select item in the BIOS settings to [AHCI Mode], and then reboot the system.
... the external SATA port. • To enable external SATA port hot-plugging, set the SATA Mode Select item in the BIOS settings to [SATA Mode] (or [IDE Mode], depending on the BIOS version). Coaxial S/PDIF out port 8. 3. LAN (RJ-45) port 10. 5. See section 3.4.2 Storage Configuration for details. 2-24 Chapter 2: Hardware information... not supported by the external SATA port. • The external SATA port will be disabled if you set the SATA Mode Select item in the BIOS settings to [AHCI Mode], and then reboot the system.


