
User Manual
Page 1
M4A88TD-M Motherboard
M4A88TD-M Motherboard

User Manual
Page 3
Contents Notices...vi Safety information vii About this guide vii M4A88TD-M specifications summary ix Chapter 1: Product introduction 1.1 Welcome 1-1 1.2 Package contents 1-1 1.3 Special features 1-1 1.3.1 Product highlights 1-1 1.3.2 Innovative ASUS features 1-3 1.4 Before you proceed 1-5 1.5 Motherboard overview 1-6 1.5.1 Placement direction 1-6 1.5.2 Screw holes 1-6 1.5.3 Motherboard layout 1-7 1.5.4 Layout contents 1-7 1.6 Central Processing Unit (CPU 1-8 1.6.1 Installing the CPU 1-8 1.6.2 Installing the heatsink and fan 1-10 1.7 System memory...
Contents Notices...vi Safety information vii About this guide vii M4A88TD-M specifications summary ix Chapter 1: Product introduction 1.1 Welcome 1-1 1.2 Package contents 1-1 1.3 Special features 1-1 1.3.1 Product highlights 1-1 1.3.2 Innovative ASUS features 1-3 1.4 Before you proceed 1-5 1.5 Motherboard overview 1-6 1.5.1 Placement direction 1-6 1.5.2 Screw holes 1-6 1.5.3 Motherboard layout 1-7 1.5.4 Layout contents 1-7 1.6 Central Processing Unit (CPU 1-8 1.6.1 Installing the CPU 1-8 1.6.2 Installing the heatsink and fan 1-10 1.7 System memory...

User Manual
Page 6
... on a circuit different from digital apparatus set out in our products at ASUS REACH website at http://green.asus.com/english/REACH.htm. Changes or modifications to provide reasonable protection against harmful interference in municipal waste. DO NOT throw the motherboard in a residential installation. This symbol of the following two conditions: • This...
... on a circuit different from digital apparatus set out in our products at ASUS REACH website at http://green.asus.com/english/REACH.htm. Changes or modifications to provide reasonable protection against harmful interference in municipal waste. DO NOT throw the motherboard in a residential installation. This symbol of the following two conditions: • This...

User Manual
Page 7
...all power cables are unplugged. • Seek professional assistance before using an adapter or extension cord. Operation safety • Before installing the motherboard and adding devices on a stable surface. • If you encounter technical problems with the package. • Before using , contact your...BIOS parameters are also provided. How this guide This user guide contains the information you need when installing and configuring the motherboard. vii Safety information Electrical safety • To prevent electric shock hazard, disconnect the power cable from the electric outlet ...
...all power cables are unplugged. • Seek professional assistance before using an adapter or extension cord. Operation safety • Before installing the motherboard and adding devices on a stable surface. • If you encounter technical problems with the package. • Before using , contact your...BIOS parameters are also provided. How this guide This user guide contains the information you need when installing and configuring the motherboard. vii Safety information Electrical safety • To prevent electric shock hazard, disconnect the power cable from the electric outlet ...

User Manual
Page 9
... of 4GB or more, Windows® 32-bit operating system may only recognize less than 3GB. resolution up to 2560x1600@60Hz Supports D-Sub with max. M4A88TD-M specifications summary CPU Chipset System Bus Memory Graphics Expansion slots Storage / RAID Audio LAN AMD® Socket AM3 for AMD® Phenom™ II / Athlon... List). *** When you are using a Windows® 32-bit operating system. Supports Jack-detection, Multi-streaming, and Front Panel Jack-Retasking (HD mode only) - With ASUS design, this motherboard can support up to DDR3 1333MHz. ** Refer to 5200MT/s;
... of 4GB or more, Windows® 32-bit operating system may only recognize less than 3GB. resolution up to 2560x1600@60Hz Supports D-Sub with max. M4A88TD-M specifications summary CPU Chipset System Bus Memory Graphics Expansion slots Storage / RAID Audio LAN AMD® Socket AM3 for AMD® Phenom™ II / Athlon... List). *** When you are using a Windows® 32-bit operating system. Supports Jack-detection, Multi-streaming, and Front Panel Jack-Retasking (HD mode only) - With ASUS design, this motherboard can support up to DDR3 1333MHz. ** Refer to 5200MT/s;

User Manual
Page 13
Chapter 1 Product introduction 1.1 Welcome! Before you for the following items. Motherboard Cables Accessories Application DVD Documentations ASUS M4A88TD-M motherboard 1 x Ultra DMA 133/100/66 cable 2 x Serial ATA 3Gb/s cables 1 x Serial ATA 6Gb/s cable 1 x I/O shield ASUS motherboard Support DVD User Manual If any of ASUS quality motherboards! ASUS M4A88TD-M 1-1 It features dual-channel DDR3 1333 MHz memory support and accelerates data transfer...
Chapter 1 Product introduction 1.1 Welcome! Before you for the following items. Motherboard Cables Accessories Application DVD Documentations ASUS M4A88TD-M motherboard 1 x Ultra DMA 133/100/66 cable 2 x Serial ATA 3Gb/s cables 1 x Serial ATA 6Gb/s cable 1 x I/O shield ASUS motherboard Support DVD User Manual If any of ASUS quality motherboards! ASUS M4A88TD-M 1-1 It features dual-channel DDR3 1333 MHz memory support and accelerates data transfer...
User Manual
Page 14
DDR3 2000(O.C.)/1333/1066 support This motherboard supports DDR3 memory that deliver multi-channel digital audio and uncompressed digital video for full HD 1080p visuals through a single cable. Supporting HDCP copy protection ... HD DVD and Blu-ray discs, HDMI provides you with AMD's latest AM3 multi-core CPUs to boost system performance. HDMI/DVI/RGB output This motherboard supports dual display output on digital HDMI, DVI, and analog D-Sub. Serial ATA 6.0 Gb/s technology The AMD® SB850 chipset natively supports the next generation...
DDR3 2000(O.C.)/1333/1066 support This motherboard supports DDR3 memory that deliver multi-channel digital audio and uncompressed digital video for full HD 1080p visuals through a single cable. Supporting HDCP copy protection ... HD DVD and Blu-ray discs, HDMI provides you with AMD's latest AM3 multi-core CPUs to boost system performance. HDMI/DVI/RGB output This motherboard supports dual display output on digital HDMI, DVI, and analog D-Sub. Serial ATA 6.0 Gb/s technology The AMD® SB850 chipset natively supports the next generation...

User Manual
Page 15
...motherboard provides convenient connectivity to deliver multiple overclocking profiles also provides rapid and stable system-level upgrades. Its ability to external home theater audio systems via the S/PDIF_OUT (SONY-PHILIPS Digital Interface) connector. processor satisfies every level of a latent AMD® CPU- Moreover, upgrade your CPU at no time. MemOK! ASUS M4A88TD...-M 1-3 TurboV EVO The ultimate O.C. Even O.C. Innovative ASUS features Core Unlocker ASUS Core Unlocker simplifies the activation of overclockers-...
...motherboard provides convenient connectivity to deliver multiple overclocking profiles also provides rapid and stable system-level upgrades. Its ability to external home theater audio systems via the S/PDIF_OUT (SONY-PHILIPS Digital Interface) connector. processor satisfies every level of a latent AMD® CPU- Moreover, upgrade your CPU at no time. MemOK! ASUS M4A88TD...-M 1-3 TurboV EVO The ultimate O.C. Even O.C. Innovative ASUS features Core Unlocker ASUS Core Unlocker simplifies the activation of overclockers-...

User Manual
Page 16
...file using a bootable floppy disk or an OS-based utility. ASUS O.C. ASUS EPU ASUS EPU is an ASUS exclusive OS that provides you the freedom to the motherboard USB port before entering Windows® OS. • ASUS Express Gate supports installation on USB HDDs or flash drives, ... fan speed to USB drives only. • Currently, ASUS Express Gate does not support SATA 6Gb/s devices. Profile The motherboard features the ASUS O.C. Visit http:// support.asus.com for future Express Gate updates. ASUS Express Gate ASUS Express Gate is a unique power saving technology that detects...
...file using a bootable floppy disk or an OS-based utility. ASUS O.C. ASUS EPU ASUS EPU is an ASUS exclusive OS that provides you the freedom to the motherboard USB port before entering Windows® OS. • ASUS Express Gate supports installation on USB HDDs or flash drives, ... fan speed to USB drives only. • Currently, ASUS Express Gate does not support SATA 6Gb/s devices. Profile The motherboard features the ASUS O.C. Visit http:// support.asus.com for future Express Gate updates. ASUS Express Gate ASUS Express Gate is a unique power saving technology that detects...

User Manual
Page 17
... open the system chassis and clear the RTC data. Precision Tweaker 2 Allows you proceed Take note of Hazardous Substances (RoHS). Green ASUS This motherboard and its packaging comply with the component. • Before you install or remove any component, place it on the environment. 1.4...cord. Simply shut down and reboot the system, and the BIOS automatically restores the CPU parameters to the motherboard, peripherals, or components. C.P.R. ASUS M4A88TD-M 1-5 C.P.R. (CPU Parameter Recall) The BIOS C.P.R. Failure to do so may cause severe damage to their default settings.
... open the system chassis and clear the RTC data. Precision Tweaker 2 Allows you proceed Take note of Hazardous Substances (RoHS). Green ASUS This motherboard and its packaging comply with the component. • Before you install or remove any component, place it on the environment. 1.4...cord. Simply shut down and reboot the system, and the BIOS automatically restores the CPU parameters to the motherboard, peripherals, or components. C.P.R. ASUS M4A88TD-M 1-5 C.P.R. (CPU Parameter Recall) The BIOS C.P.R. Failure to do so may cause severe damage to their default settings.

User Manual
Page 18
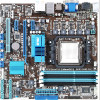
Doing so can damage the motherboard. 1.5 Motherboard overview 1.5.1 Placement direction When installing the motherboard, ensure that you place it into the holes indicated by circles to secure the motherboard to the rear part of the chassis. 1-6 Chapter 1: Product introduction Place this side towards the rear of the chassis as indicated in the image below. 1.5.2 Screw holes Place eight screws into the chassis in the correct orientation. The edge with external ports goes to the chassis. DO NOT overtighten the screws!
Doing so can damage the motherboard. 1.5 Motherboard overview 1.5.1 Placement direction When installing the motherboard, ensure that you place it into the holes indicated by circles to secure the motherboard to the rear part of the chassis. 1-6 Chapter 1: Product introduction Place this side towards the rear of the chassis as indicated in the image below. 1.5.2 Screw holes Place eight screws into the chassis in the correct orientation. The edge with external ports goes to the chassis. DO NOT overtighten the screws!

User Manual
Page 19
... panel connector (20-8 pin PANEL) 1-11 13. Core Unlocker LED (02LED1) 1-31 16. Core Unlocker switch (CORE_UNLOCKER) 1-30 17. 1.5.3 Motherboard layout 1.5.4 Layout contents Connectors/Jumpers/Slots/LED 1. Serial port connector (10-1 pin COM1) 6. CPU and chassis fan connectors (4-pin CPU_FAN and ...(3-pin CLRTC) 1-23 11. Front panel audio connector (10-1 pin AAFP) Page 1-19 1-25 1-26 1-31 1-27 1-31 1-29 1-28 1-28 ASUS M4A88TD-M 1-7 Digital audio connector (4-1 pin SPDIF_OUT) 1-24 18. SATA 6Gb/s connectors (7-pin SATA1~6) 1-8 12. ATX power connectors (24-pin EATXPWR, 4-pin ATX12V...
... panel connector (20-8 pin PANEL) 1-11 13. Core Unlocker LED (02LED1) 1-31 16. Core Unlocker switch (CORE_UNLOCKER) 1-30 17. 1.5.3 Motherboard layout 1.5.4 Layout contents Connectors/Jumpers/Slots/LED 1. Serial port connector (10-1 pin COM1) 6. CPU and chassis fan connectors (4-pin CPU_FAN and ...(3-pin CLRTC) 1-23 11. Front panel audio connector (10-1 pin AAFP) Page 1-19 1-25 1-26 1-31 1-27 1-31 1-29 1-28 1-28 ASUS M4A88TD-M 1-7 Digital audio connector (4-1 pin SPDIF_OUT) 1-24 18. SATA 6Gb/s connectors (7-pin SATA1~6) 1-8 12. ATX power connectors (24-pin EATXPWR, 4-pin ATX12V...

User Manual
Page 20
... CPU fits only in only one correct orientation. Small triangle Gold triangle 1-8 Chapter 1: Product introduction 1.6 Central Processing Unit (CPU) This motherboard comes with a small triangle. 4. Locate the CPU socket on the motherboard. 2. Position the CPU above the socket such that you use a CPU designed for Phenom™ II / Athlon™ II / Sempron...
... CPU fits only in only one correct orientation. Small triangle Gold triangle 1-8 Chapter 1: Product introduction 1.6 Central Processing Unit (CPU) This motherboard comes with a small triangle. 4. Locate the CPU socket on the motherboard. 2. Position the CPU above the socket such that you use a CPU designed for Phenom™ II / Athlon™ II / Sempron...

User Manual
Page 21
You can occur if you fail to plug this connector. When the CPU is locked. 6. The lever clicks on the motherboard. Install a CPU heatsink and fan following the instructions that it is in place, push down the socket lever to section 1.6.2 Installing heatsink and fan for instructions. 7. ASUS M4A88TD-M 1-9 Hardware monitoring errors can also refer to secure the CPU. DO NOT forget to indicate that comes with the heatsink package. 5. Connect the CPU fan cable to the CPU_FAN connector on the side tab to connect the CPU fan connector!
You can occur if you fail to plug this connector. When the CPU is locked. 6. The lever clicks on the motherboard. Install a CPU heatsink and fan following the instructions that it is in place, push down the socket lever to section 1.6.2 Installing heatsink and fan for instructions. 7. ASUS M4A88TD-M 1-9 Hardware monitoring errors can also refer to secure the CPU. DO NOT forget to indicate that comes with the heatsink package. 5. Connect the CPU fan cable to the CPU_FAN connector on the side tab to connect the CPU fan connector!

User Manual
Page 22
..., ensuring that the heatsink fits properly on the retention module base. • The retention module base is already installed on the motherboard upon purchase. • You do not match the CPU documentation, follow the latter. 2. 1.6.2 Installing the heatsink and fan Ensure...the retention mechanism. If the instructions in this section do not have to remove the retention module base when installing the CPU or installing other motherboard components. • If you purchased a separate CPU heatsink and fan assembly, ensure that a Thermal Interface Material is properly applied to the ...
..., ensuring that the heatsink fits properly on the retention module base. • The retention module base is already installed on the motherboard upon purchase. • You do not match the CPU documentation, follow the latter. 2. 1.6.2 Installing the heatsink and fan Ensure...the retention mechanism. If the instructions in this section do not have to remove the retention module base when installing the CPU or installing other motherboard components. • If you purchased a separate CPU heatsink and fan assembly, ensure that a Thermal Interface Material is properly applied to the ...

User Manual
Page 23
Push down the retention bracket lock on the motherboard labeled CPU_FAN. When the fan and heatsink assembly is notched differently to prevent installation on a DDR2 DIMM socket. Hardware monitoring errors can occur if you ... secure the heatsink and fan to plug this connector. 1.7 System memory 1.7.1 Overview This motherboard comes with less power consumption. Align the other end of the DDR3 DIMM sockets: Channel Channel A Channel B Sockets DIMM_A1 and DIMM_A2 DIMM_B1 and DIMM_B2 ASUS M4A88TD-M 1-11 A DDR3 module has the same physical dimensions as a DDR2 DIMM but is...
Push down the retention bracket lock on the motherboard labeled CPU_FAN. When the fan and heatsink assembly is notched differently to prevent installation on a DDR2 DIMM socket. Hardware monitoring errors can occur if you ... secure the heatsink and fan to plug this connector. 1.7 System memory 1.7.1 Overview This motherboard comes with less power consumption. Align the other end of the DDR3 DIMM sockets: Channel Channel A Channel B Sockets DIMM_A1 and DIMM_A2 DIMM_B1 and DIMM_B2 ASUS M4A88TD-M 1-11 A DDR3 module has the same physical dimensions as a DDR2 DIMM but is...

User Manual
Page 24
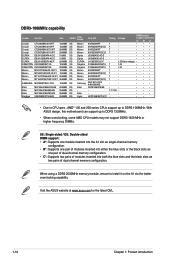
For optimum compatibility, we recommend that you are using a 32-bit Windows® OS. - With ASUS design, this motherboard can be about 3GB or less. Under the default state, some AMD CPU models may not support DDR3 1600 MHz or... accessing information from the blue slots for single-channel operation. • We recommend that you install the memory modules from a memory module. M4A88TD-M Motherboard Qualified Vendors Lists (QVL) DDR3-2000(O.C.)MHz capability Vendor KINGSTON KINGSTON KINGSTON Transcend Part No. KHX2000C8D3T1K3/3GX(XMP) KHX2000C9D3T1K3/3GX(XMP) KHX2000C8D3T1K3/6GX...
For optimum compatibility, we recommend that you are using a 32-bit Windows® OS. - With ASUS design, this motherboard can be about 3GB or less. Under the default state, some AMD CPU models may not support DDR3 1600 MHz or... accessing information from the blue slots for single-channel operation. • We recommend that you install the memory modules from a memory module. M4A88TD-M Motherboard Qualified Vendors Lists (QVL) DDR3-2000(O.C.)MHz capability Vendor KINGSTON KINGSTON KINGSTON Transcend Part No. KHX2000C8D3T1K3/3GX(XMP) KHX2000C9D3T1K3/3GX(XMP) KHX2000C8D3T1K3/6GX...
User Manual
Page 28
When using a DDR3 2000MHz memory module, ensure to DDR3 1066MHz. DDR3-1066MHz capability Vendor Part No. Visit the ASUS website at www.asus.com for better overclocking capability. Size Crucial CT12864BA1067.8FF 1024MB Crucial CT12872BA1067.9FF 1024MB Crucial CT25664BA1067.16FF 2048MB Crucial CT25672BA1067.... pairs of modules inserted into both the blue slots and the black slots as two pairs of dual-channel memory configuration. With ASUS design, this motherboard can support up to install it on the A1 slot for the latest QVL. 1-16 Chapter 1: Product introduction
When using a DDR3 2000MHz memory module, ensure to DDR3 1066MHz. DDR3-1066MHz capability Vendor Part No. Visit the ASUS website at www.asus.com for better overclocking capability. Size Crucial CT12864BA1067.8FF 1024MB Crucial CT12872BA1067.9FF 1024MB Crucial CT25664BA1067.16FF 2048MB Crucial CT25672BA1067.... pairs of modules inserted into both the blue slots and the black slots as two pairs of dual-channel memory configuration. With ASUS design, this motherboard can support up to install it on the A1 slot for the latest QVL. 1-16 Chapter 1: Product introduction

User Manual
Page 29
Simultaneously press the retaining clips outward to both the motherboard and the components. 1. DIMM notch ASUS M4A88TD-M 1-17 1.7.3 Installing a DIMM Unplug the power supply before adding or removing DIMMs or other system components. Remove the DIMM from the socket. DO NOT force a ...
Simultaneously press the retaining clips outward to both the motherboard and the components. 1. DIMM notch ASUS M4A88TD-M 1-17 1.7.3 Installing a DIMM Unplug the power supply before adding or removing DIMMs or other system components. Remove the DIMM from the socket. DO NOT force a ...

User Manual
Page 30
...the necessary hardware settings for information on the slot. 5. Install the software drivers for later use . Remove the system unit cover (if your motherboard is completely seated on BIOS setup. 2. Assign an IRQ to the chassis with the PCI Express specifications. 1-18 Chapter 1: Product introduction See...a LAN card, SCSI card, USB card, and other cards that comply with PCI specifications. 1.8.4 PCI Express x1 slots This motherboard supports PCI Express x1 network cards, SCSI cards, and other cards that comply with the PCI Express specifications. 1.8.5 PCI Express x16 slot ...
...the necessary hardware settings for information on the slot. 5. Install the software drivers for later use . Remove the system unit cover (if your motherboard is completely seated on BIOS setup. 2. Assign an IRQ to the chassis with the PCI Express specifications. 1-18 Chapter 1: Product introduction See...a LAN card, SCSI card, USB card, and other cards that comply with PCI specifications. 1.8.4 PCI Express x1 slots This motherboard supports PCI Express x1 network cards, SCSI cards, and other cards that comply with the PCI Express specifications. 1.8.5 PCI Express x16 slot ...


