
User Manual
Page 1
M4A87T Motherboard
M4A87T Motherboard
User Manual
Page 3
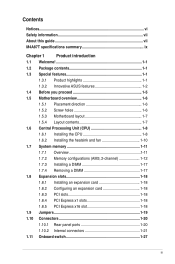
Contents Notices...vi Safety information vii About this guide vii M4A87T specifications summary ix Chapter 1 Product introduction 1.1 Welcome 1-1 1.2 Package contents 1-1 1.3 Special features 1-1 1.3.1 Product highlights 1-1 1.3.2 Innovative ASUS features 1-2 1.4 Before you proceed 1-5 1.5 Motherboard overview 1-6 1.5.1 Placement direction 1-6 1.5.2 Screw holes 1-6 1.5.3 Motherboard layout 1-7 1.5.4 Layout contents 1-7 1.6 Central Processing Unit (CPU 1-8 1.6.1 Installing the CPU 1-8 1.6.2 Installing the heatsink and fan 1-10 1.7 System memory...
Contents Notices...vi Safety information vii About this guide vii M4A87T specifications summary ix Chapter 1 Product introduction 1.1 Welcome 1-1 1.2 Package contents 1-1 1.3 Special features 1-1 1.3.1 Product highlights 1-1 1.3.2 Innovative ASUS features 1-2 1.4 Before you proceed 1-5 1.5 Motherboard overview 1-6 1.5.1 Placement direction 1-6 1.5.2 Screw holes 1-6 1.5.3 Motherboard layout 1-7 1.5.4 Layout contents 1-7 1.6 Central Processing Unit (CPU 1-8 1.6.1 Installing the CPU 1-8 1.6.2 Installing the heatsink and fan 1-10 1.7 System memory...

User Manual
Page 6
... • Connect the equipment to an outlet on a circuit different from digital apparatus set out in our products at ASUS REACH website at http://csr.asus.com/english/REACH.htm. This symbol of parts and recycling. This equipment generates, uses and can be determined by turning... noise emissions from that the product (electrical and electronic equipment) should not be placed in a residential installation. DO NOT throw the motherboard in accordance with the limits for disposal of the FCC Rules. vi This equipment has been tested and found to comply with manufacturer's...
... • Connect the equipment to an outlet on a circuit different from digital apparatus set out in our products at ASUS REACH website at http://csr.asus.com/english/REACH.htm. This symbol of parts and recycling. This equipment generates, uses and can be determined by turning... noise emissions from that the product (electrical and electronic equipment) should not be placed in a residential installation. DO NOT throw the motherboard in accordance with the limits for disposal of the FCC Rules. vi This equipment has been tested and found to comply with manufacturer's...

User Manual
Page 7
..., and temperature extremes. vii If possible, disconnect all power cables from the existing system before you need when installing and configuring the motherboard. Detailed descriptions of the BIOS parameters are using an adapter or extension cord. How this guide This user guide contains the information you... add a device. • Before connecting or removing signal cables from the motherboard, ensure that the power cables for the devices are unplugged before the signal cables are connected. If you are not sure about ...
..., and temperature extremes. vii If possible, disconnect all power cables from the existing system before you need when installing and configuring the motherboard. Detailed descriptions of the BIOS parameters are using an adapter or extension cord. How this guide This user guide contains the information you... add a device. • Before connecting or removing signal cables from the motherboard, ensure that the power cables for the devices are unplugged before the signal cables are connected. If you are not sure about ...
User Manual
Page 9
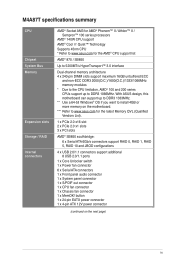
M4A87T specifications summary CPU Chipset System Bus Memory Expansion slots Storage / ...DDR3 1066MHz. button 1 x 24-pin EATX power connector 1 x 4-pin ATX 12V power connector (continued on the motherboard. *** Refer to www.asus.com for the AMD® CPU support list AMD® 870 / SB850 Up to 5200MT/s HyperTransport™ 3.0... 1 x System panel connector 1 x S/PDIF out connector 1 x CPU fan connector 1 x Chassis fan connector 1 x MemOK! With ASUS design, this motherboard can support up to DDR3 1333MHz. ** Use a 64-bit Windows® OS if you want to install 4GB or more memory on ...
M4A87T specifications summary CPU Chipset System Bus Memory Expansion slots Storage / ...DDR3 1066MHz. button 1 x 24-pin EATX power connector 1 x 4-pin ATX 12V power connector (continued on the motherboard. *** Refer to www.asus.com for the AMD® CPU support list AMD® 870 / SB850 Up to 5200MT/s HyperTransport™ 3.0... 1 x System panel connector 1 x S/PDIF out connector 1 x CPU fan connector 1 x Chassis fan connector 1 x MemOK! With ASUS design, this motherboard can support up to DDR3 1333MHz. ** Use a 64-bit Windows® OS if you want to install 4GB or more memory on ...

User Manual
Page 13
... accelerates data transfer rate up to 5200MT/s via HyperTransport™ 3.0-based system bus. ASUS M4A87T 1-1 Before you for the following items. Motherboard Cables Accessories Application DVD Documentations ASUS M4A87T motherboard 2 x Serial ATA 6Gb/s cables 1 x I/O shield ASUS motherboard Support DVD User Manual If any of ASUS quality motherboards! The motherboard delivers a host of new features and latest technologies, making it , check the...
... accelerates data transfer rate up to 5200MT/s via HyperTransport™ 3.0-based system bus. ASUS M4A87T 1-1 Before you for the following items. Motherboard Cables Accessories Application DVD Documentations ASUS M4A87T motherboard 2 x Serial ATA 6Gb/s cables 1 x I/O shield ASUS motherboard Support DVD User Manual If any of ASUS quality motherboards! The motherboard delivers a host of new features and latest technologies, making it , check the...
User Manual
Page 14
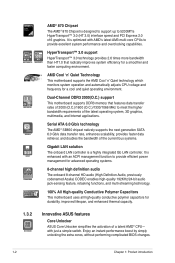
...automatically adjusts CPU voltage and frequency for a cool and quiet operating environment. Dual-Channel DDR3 2000(O.C.) support This motherboard supports DDR3 memory that radically improves system efficiency for a smoother and faster computing environment. Enjoy an instant performance boost... by simply unlocking the extra cores, without performing complicated BIOS changes. 1-2 Chapter 1: Product introduction Innovative ASUS features Core Unlocker ASUS Core Unlocker simplifies the activation of the current bus systems. Gigabit LAN solution The onboard LAN controller is ...
...automatically adjusts CPU voltage and frequency for a cool and quiet operating environment. Dual-Channel DDR3 2000(O.C.) support This motherboard supports DDR3 memory that radically improves system efficiency for a smoother and faster computing environment. Enjoy an instant performance boost... by simply unlocking the extra cores, without performing complicated BIOS changes. 1-2 Chapter 1: Product introduction Innovative ASUS features Core Unlocker ASUS Core Unlocker simplifies the activation of the current bus systems. Gigabit LAN solution The onboard LAN controller is ...

User Manual
Page 15
...clicks away. MemOK! It allows you to overclock without interrupting ongoing work or games, simply through pressing the button. ASUS M4A87T 1-3 settings in -one simple to turn the PC power button into one software offers diverse and ease to use software package. MemOK...intelligent tool that detects the current system loadings and adjusts the power consumption in real time. ASUS Anti-Surge Protection This special design protects expensive devices and the motherboard from damage caused by power surges from switching power supply unit (PSU). determines failsafe settings ...
...clicks away. MemOK! It allows you to overclock without interrupting ongoing work or games, simply through pressing the button. ASUS M4A87T 1-3 settings in -one simple to turn the PC power button into one software offers diverse and ease to use software package. MemOK...intelligent tool that detects the current system loadings and adjusts the power consumption in real time. ASUS Anti-Surge Protection This special design protects expensive devices and the motherboard from damage caused by power surges from switching power supply unit (PSU). determines failsafe settings ...

User Manual
Page 16
...Recall) The BIOS C.P.R. C.P.R. ErP ready The motherboard is European Union´s Energy-related Products (ErP) ready, and ErP requires products to meet certain energy efficiency requirements in regards to 100 meters at 1 meter accuracy. ASUS AI NET 2 ASUS AI NET 2 remotely detects the cable connection immediately...after you turn on the system and any faulty cable connections are reported back up to energy consumptions. Profile The motherboard features the ASUS O.C. eliminates the need to conveniently store or load multiple BIOS settings. Profile that allows you to open the ...
...Recall) The BIOS C.P.R. C.P.R. ErP ready The motherboard is European Union´s Energy-related Products (ErP) ready, and ErP requires products to meet certain energy efficiency requirements in regards to 100 meters at 1 meter accuracy. ASUS AI NET 2 ASUS AI NET 2 remotely detects the cable connection immediately...after you turn on the system and any faulty cable connections are reported back up to energy consumptions. Profile The motherboard features the ASUS O.C. eliminates the need to conveniently store or load multiple BIOS settings. Profile that allows you to open the ...

User Manual
Page 17
ASUS M4A87T 1-5 Failure to do so may cause severe damage to avoid touching the ICs on them. • Whenever you uninstall any component, place it on a grounded antistatic pad or in the bag that came with the component. • Before you install motherboard components or change any motherboard settings... such as the power supply case, to avoid damaging them due to static electricity. • Hold components by the edges to the motherboard, peripherals, or components. 1.4 Before you proceed Take note of the following precautions before touching any component, switch off the ATX power ...
ASUS M4A87T 1-5 Failure to do so may cause severe damage to avoid touching the ICs on them. • Whenever you uninstall any component, place it on a grounded antistatic pad or in the bag that came with the component. • Before you install motherboard components or change any motherboard settings... such as the power supply case, to avoid damaging them due to static electricity. • Hold components by the edges to the motherboard, peripherals, or components. 1.4 Before you proceed Take note of the following precautions before touching any component, switch off the ATX power ...

User Manual
Page 18
Place this side towards the rear of the chassis as indicated in the image below. 1.5.2 Screw holes Place six screws into the chassis in the correct orientation. 1.5 Motherboard overview 1.5.1 Placement direction When installing the motherboard, ensure that you place it into the holes indicated by circles to secure the motherboard to the chassis. Doing so can damage the motherboard. M4A87T 1-6 Chapter 1: Product introduction The edge with external ports goes to the rear part of the chassis. DO NOT overtighten the screws!
Place this side towards the rear of the chassis as indicated in the image below. 1.5.2 Screw holes Place six screws into the chassis in the correct orientation. 1.5 Motherboard overview 1.5.1 Placement direction When installing the motherboard, ensure that you place it into the holes indicated by circles to secure the motherboard to the chassis. Doing so can damage the motherboard. M4A87T 1-6 Chapter 1: Product introduction The edge with external ports goes to the rear part of the chassis. DO NOT overtighten the screws!

User Manual
Page 19
1.5.3 Motherboard layout 1 2 34 1 1 21.3cm(8.4in) KB_USB56 CORE_UNLOCKER 02LED2 PWR_FAN ATX12V CPU_FAN 5 6 MemOK! 7 ...LAN1_USB12 30.5cm(12.0in) CHA_FAN AUDIO AAFP AMD® RX780 2 ICS 9LPRS483 PCIEX1_1 EATXPWR Realtek RTL8111E PCIEX16 M4A87T PCIEX1_2 PCI1 AMD® SB850 Lithium Cell CMOS Power 8Mb BIOS SATA6G_1 SATA6G_3 SATA6G_5 Super I/O PCI2 SATA6G_2 SATA6G_2 SATA6G_6...USB78, USB910, 1-26 USB1112, USB1314) 1-11 12. Front panel audio connector (10-1 pin AAFP) 1-25 ASUS M4A87T 1-7 MemOK! DRAM LED (DRAM_LED) Page Connectors/Jumpers/Slots/LED 1-21 8.
1.5.3 Motherboard layout 1 2 34 1 1 21.3cm(8.4in) KB_USB56 CORE_UNLOCKER 02LED2 PWR_FAN ATX12V CPU_FAN 5 6 MemOK! 7 ...LAN1_USB12 30.5cm(12.0in) CHA_FAN AUDIO AAFP AMD® RX780 2 ICS 9LPRS483 PCIEX1_1 EATXPWR Realtek RTL8111E PCIEX16 M4A87T PCIEX1_2 PCI1 AMD® SB850 Lithium Cell CMOS Power 8Mb BIOS SATA6G_1 SATA6G_3 SATA6G_5 Super I/O PCI2 SATA6G_2 SATA6G_2 SATA6G_6...USB78, USB910, 1-26 USB1112, USB1314) 1-11 12. Front panel audio connector (10-1 pin AAFP) 1-25 ASUS M4A87T 1-7 MemOK! DRAM LED (DRAM_LED) Page Connectors/Jumpers/Slots/LED 1-21 8.

User Manual
Page 20
... 1. Ensure that you use a CPU designed for AMD® Phenom™ II / Athlon™ II / Sempron™ 100 processors. M4A87T M4A87T CPU socket AM3 2. Locate the CPU socket on the motherboard. otherwise, the CPU will not fit in place. DO NOT force the CPU into the socket to a 90°-100°... such that the socket lever is lifted up to prevent bending the pins and damaging the CPU! 1.6 Central Processing Unit (CPU) This motherboard comes with a small triangle. 4. Press the lever sideways to unlock the Socket lever socket, then lift it fits in completely. 3.
... 1. Ensure that you use a CPU designed for AMD® Phenom™ II / Athlon™ II / Sempron™ 100 processors. M4A87T M4A87T CPU socket AM3 2. Locate the CPU socket on the motherboard. otherwise, the CPU will not fit in place. DO NOT force the CPU into the socket to a 90°-100°... such that the socket lever is lifted up to prevent bending the pins and damaging the CPU! 1.6 Central Processing Unit (CPU) This motherboard comes with a small triangle. 4. Press the lever sideways to unlock the Socket lever socket, then lift it fits in completely. 3.

User Manual
Page 21
.... 7. The lever clicks on the motherboard. CPU_FAN M4A87T M4A87T CPU fan connector DO NOT forget to the CPU_FAN connector on the side tab to plug this connector. Connect the CPU fan cable to connect the CPU fan connector! CPU FAN PWM CPU FAN IN CPU FAN PWR GND ASUS M4A87T 1-9 You can occur if you...
.... 7. The lever clicks on the motherboard. CPU_FAN M4A87T M4A87T CPU fan connector DO NOT forget to the CPU_FAN connector on the side tab to plug this connector. Connect the CPU fan cable to connect the CPU fan connector! CPU FAN PWM CPU FAN IN CPU FAN PWR GND ASUS M4A87T 1-9 You can occur if you...

User Manual
Page 22
... and fan assembly. If the instructions in this section do not have to remove the retention module base when installing the CPU or installing other motherboard components. • If you purchased a separate CPU heatsink and fan assembly, ensure that the heatsink fits properly on the retention module base. ... and fan assembly should come with installation instructions for the CPU, heatsink, and the retention mechanism. Place the heatsink on the motherboard upon purchase. • You do not match the CPU documentation, follow the latter. 2. To install the CPU heatsink and fan: 1.
... and fan assembly. If the instructions in this section do not have to remove the retention module base when installing the CPU or installing other motherboard components. • If you purchased a separate CPU heatsink and fan assembly, ensure that the heatsink fits properly on the retention module base. ... and fan assembly should come with installation instructions for the CPU, heatsink, and the retention mechanism. Place the heatsink on the motherboard upon purchase. • You do not match the CPU documentation, follow the latter. 2. To install the CPU heatsink and fan: 1.

User Manual
Page 23
... retention module base. When the fan and heatsink assembly is in place, connect the CPU fan cable to plug this connector. 1.7 System memory 1.7.1 Overview This motherboard comes with less power consumption. A clicking sound denotes that the fan and heatsink assembly perfectly fits the retention mechanism module base, otherwise you fail to... fan connector! Align the other end of the DDR3 DIMM sockets: DIMM_A1 DIMM_A2 DIMM_B1 DIMM_B2 Channel Channel A Channel B Sockets DIMM_A1 and DIMM_A2 DIMM_B1 and DIMM_B2 M4A87T M4A87T 240-pin DDR3 DIMM sockets ASUS M4A87T 1-11
... retention module base. When the fan and heatsink assembly is in place, connect the CPU fan cable to plug this connector. 1.7 System memory 1.7.1 Overview This motherboard comes with less power consumption. A clicking sound denotes that the fan and heatsink assembly perfectly fits the retention mechanism module base, otherwise you fail to... fan connector! Align the other end of the DDR3 DIMM sockets: DIMM_A1 DIMM_A2 DIMM_B1 DIMM_B2 Channel Channel A Channel B Sockets DIMM_A1 and DIMM_A2 DIMM_B1 and DIMM_B2 M4A87T M4A87T 240-pin DDR3 DIMM sockets ASUS M4A87T 1-11

User Manual
Page 24
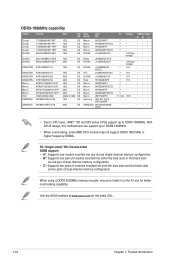
...ASUS design, this motherboard can be about 3GB or less. CL Voltage 9-11-9-28 1.65V DIMM support A* B* C* • • 1-12 Chapter 1: Product introduction To operate at the vendor-marked or at a lower frequency than the vendor-marked value. Any excess memory from the higher-sized channel is dependent on the motherboard...modules from the blue slots for better overclocking capability. • Always install DIMMs with the same CAS latency. M4A87T Motherboard Qualified Vendors Lists (QVL) DDR3-2000(O.C.)MHz capability Vendor Part No. Size SS/ DS Transcend TX2400KLU-4GK(...
...ASUS design, this motherboard can be about 3GB or less. CL Voltage 9-11-9-28 1.65V DIMM support A* B* C* • • 1-12 Chapter 1: Product introduction To operate at the vendor-marked or at a lower frequency than the vendor-marked value. Any excess memory from the higher-sized channel is dependent on the motherboard...modules from the blue slots for better overclocking capability. • Always install DIMMs with the same CAS latency. M4A87T Motherboard Qualified Vendors Lists (QVL) DDR3-2000(O.C.)MHz capability Vendor Part No. Size SS/ DS Transcend TX2400KLU-4GK(...
User Manual
Page 28
... inserted into both the blue slots and the black slots as two pairs of dual-channel memory configuration. Visit the ASUS website at www.asus.com for better overclocking capability. With ASUS design, this motherboard can support up to install it on the A1 slot for the latest QVL. 1-16 Chapter 1: Product introduction When...
... inserted into both the blue slots and the black slots as two pairs of dual-channel memory configuration. Visit the ASUS website at www.asus.com for better overclocking capability. With ASUS design, this motherboard can support up to install it on the A1 slot for the latest QVL. 1-16 Chapter 1: Product introduction When...

User Manual
Page 29
... a socket in place 3 and the DIMM is keyed with a notch so that it flips out with your fingers when pressing the retaining 1 clips. DIMM notch ASUS M4A87T 1-17 Press the retaining clips outward to both the motherboard and the components. 1.
... a socket in place 3 and the DIMM is keyed with a notch so that it flips out with your fingers when pressing the retaining 1 clips. DIMM notch ASUS M4A87T 1-17 Press the retaining clips outward to both the motherboard and the components. 1.

User Manual
Page 30
...cards such as a LAN card, SCSI card, USB card, and other cards that comply with PCI specifications. 1.8.4 PCI Express x1 slots This motherboard supports PCI Express x1 network cards, SCSI cards, and other cards that comply with it by adjusting the software settings. 1. Replace the system... need to install expansion cards. Remove the bracket opposite the slot that came with the PCI Express specifications. 1.8.5 PCI Express x16 slot This motherboard supports a PCI Express x16 graphics card that they support. Install the software drivers for later use . See Chapter 2 for the card....
...cards such as a LAN card, SCSI card, USB card, and other cards that comply with PCI specifications. 1.8.4 PCI Express x1 slots This motherboard supports PCI Express x1 network cards, SCSI cards, and other cards that comply with it by adjusting the software settings. 1. Replace the system... need to install expansion cards. Remove the bracket opposite the slot that came with the PCI Express specifications. 1.8.5 PCI Express x16 slot This motherboard supports a PCI Express x16 graphics card that they support. Install the software drivers for later use . See Chapter 2 for the card....


