
User Manual
Page 4
... Link Speed 3-13 3.5.7 CPU/NB Frequency 3-13 3.5.8 Memory Configuration 3-14 3.5.9 DRAM Timing Configuration 3-15 3.5.10 Processor Voltage 3-16 3.5.11 CPU/NB Voltage 3-16 3.5.12 CPU VDDA Voltage 3-17 3.5.13 DRAM Voltage ... Turning off the computer 2-37 Chapter 3: BIOS set up 3.1 Knowing BIOS 3-1 3.2 Updating BIOS 3-1 3.2.1 ASUS Update utility 3-2 3.2.2 Creating a bootable floppy disk 3-4 3.2.3 ASUS EZ Flash 2 utility 3-5 3.2.4 ASUS CrashFree BIOS 3 utility 3-6 3.3 BIOS setup program 3-7 3.3.1 BIOS menu screen 3-7 3.3.2 Menu bar...3-7 3.3.3 Navigation...
... Link Speed 3-13 3.5.7 CPU/NB Frequency 3-13 3.5.8 Memory Configuration 3-14 3.5.9 DRAM Timing Configuration 3-15 3.5.10 Processor Voltage 3-16 3.5.11 CPU/NB Voltage 3-16 3.5.12 CPU VDDA Voltage 3-17 3.5.13 DRAM Voltage ... Turning off the computer 2-37 Chapter 3: BIOS set up 3.1 Knowing BIOS 3-1 3.2 Updating BIOS 3-1 3.2.1 ASUS Update utility 3-2 3.2.2 Creating a bootable floppy disk 3-4 3.2.3 ASUS EZ Flash 2 utility 3-5 3.2.4 ASUS CrashFree BIOS 3 utility 3-6 3.3 BIOS setup program 3-7 3.3.1 BIOS menu screen 3-7 3.3.2 Menu bar...3-7 3.3.3 Navigation...
User Manual
Page 6
4.3.10 ASUS Turbo Key 4-12 4.4 RAID configurations 4-13 4.4.1 RAID definitions 4-13 4.4.2 Installing Serial ATA hard disks 4-14 4.4.3 AMD® RAID configurations 4-14 4.5 Creating a RAID driver disk 4-20 4.5.1 Creating a RAID driver disk without entering the OS 4-20 4.5.2 Creating a RAID/SATA driver disk in Windows 4-20 Chapter 5: ATI® CrossFireX™ technology support 5.1 ATI® CrossFireX...
4.3.10 ASUS Turbo Key 4-12 4.4 RAID configurations 4-13 4.4.1 RAID definitions 4-13 4.4.2 Installing Serial ATA hard disks 4-14 4.4.3 AMD® RAID configurations 4-14 4.5 Creating a RAID driver disk 4-20 4.5.1 Creating a RAID driver disk without entering the OS 4-20 4.5.2 Creating a RAID/SATA driver disk in Windows 4-20 Chapter 5: ATI® CrossFireX™ technology support 5.1 ATI® CrossFireX...
User Manual
Page 11
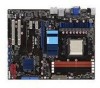
...PCI 2.2 slots Integrated ATI Radeon™ HD3300 GPU SidePort Memory - Supports Microsoft DirectX 10, OpenGL 2.0, Shader Model 4.0 - Hardware Decode Acceleration for H.264, VC-1, and MPEG-2..., Multi-Streaming, and Front Panel Jack-Retasking - We recommend using a Windows® 32-bit OS. ** Refer to www.asus.com for the memory QVL (Qualified Vendors Lists). 2 x PCIe 2.0 ...x16 slots, supporting ATI CrossFireX™ technology, at back I/O - Hybrid CrossFireX™ Support - M4A78T-E...
...PCI 2.2 slots Integrated ATI Radeon™ HD3300 GPU SidePort Memory - Supports Microsoft DirectX 10, OpenGL 2.0, Shader Model 4.0 - Hardware Decode Acceleration for H.264, VC-1, and MPEG-2..., Multi-Streaming, and Front Panel Jack-Retasking - We recommend using a Windows® 32-bit OS. ** Refer to www.asus.com for the memory QVL (Qualified Vendors Lists). 2 x PCIe 2.0 ...x16 slots, supporting ATI CrossFireX™ technology, at back I/O - Hybrid CrossFireX™ Support - M4A78T-E...
User Manual
Page 48
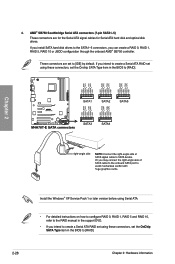
... BIOS to the RAID manual in the support DVD. • If you can create a RAID 0, RAID 1, RAID 5, RAID 10 or JBOD configuration through the onboard AMD® SB750 controller. Chapter 2 2-28 Install the Windows® XP Service Pack 1 or later version before using Serial ATA. • For detailed instructions on how to...
... BIOS to the RAID manual in the support DVD. • If you can create a RAID 0, RAID 1, RAID 5, RAID 10 or JBOD configuration through the onboard AMD® SB750 controller. Chapter 2 2-28 Install the Windows® XP Service Pack 1 or later version before using Serial ATA. • For detailed instructions on how to...
User Manual
Page 61
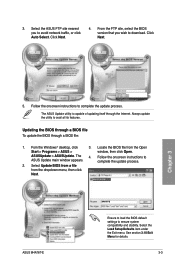
.... M4A78T-E.ROM ASUS M4A78T-E M4A78T-E Ensure to load the BIOS default settings to complete the update process. 2. Select the ASUS FTP site nearest you wish to avail all its features. Follow the onscreen instructions to avoid network traffic, or click Auto Select. Fom the Windows®... the BIOS version that you to complete the update process. See section 3.10 Exit Menu for details. 3-3 The ASUS Update utility is capable of updating itself through a BIOS file: 1. The ASUS Update main window appears. 4. Locate the BIOS file from the dropdown menu, then click ...
.... M4A78T-E.ROM ASUS M4A78T-E M4A78T-E Ensure to load the BIOS default settings to complete the update process. 2. Select the ASUS FTP site nearest you wish to avail all its features. Follow the onscreen instructions to avoid network traffic, or click Auto Select. Fom the Windows®... the BIOS version that you to complete the update process. See section 3.10 Exit Menu for details. 3-3 The ASUS Update utility is capable of updating itself through a BIOS file: 1. The ASUS Update main window appears. 4. Locate the BIOS file from the dropdown menu, then click ...

User Manual
Page 92
...settings. Profile This item allows you enter the Express Gate environment after clearing its settings. 3.9.3 ASUS O.C. Load From: [Default-Profile] [Uninstalled] [Blank] Start O.C. Choose [Prompt User] to...you save the setting to stay at the Express Gate's first screen before starting Windows or other installed OS. Add Your CMOS Profile. Press to disable the Reset... browsing history. PROFILE Configuration O.C. Chapter 3 3-34 Chapter 3: BIOS setup Enter OS Timer [10 Seconds] Sets countdown duration that the system waits at the first screen of Express Gate for ...
...settings. Profile This item allows you enter the Express Gate environment after clearing its settings. 3.9.3 ASUS O.C. Load From: [Default-Profile] [Uninstalled] [Blank] Start O.C. Choose [Prompt User] to...you save the setting to stay at the Express Gate's first screen before starting Windows or other installed OS. Add Your CMOS Profile. Press to disable the Reset... browsing history. PROFILE Configuration O.C. Chapter 3 3-34 Chapter 3: BIOS setup Enter OS Timer [10 Seconds] Sets countdown duration that the system waits at the first screen of Express Gate for ...

User Manual
Page 94
... items, and save or discard your changes, the program prompts you with a message asking if you press , a confirmation window appears. 3.10 Exit menu The Exit menu items allow you select this option, a confirmation window appears. Pressing does not immediately exit this operation. Select one of the parameters on even when the PC is...
... items, and save or discard your changes, the program prompts you with a message asking if you press , a confirmation window appears. 3.10 Exit menu The Exit menu items allow you select this option, a confirmation window appears. Pressing does not immediately exit this operation. Select one of the parameters on even when the PC is...

User Manual
Page 104
... Press the power button again to enable AI Nap function. 3. Using ASUS AI Nap 1. After installing ASUS AI Suite from the motherboard support DVD, double-click the ASUS Q-Button icon in the Windows notification area to minimize the power consumption of your computer whenever you to... launch the Q-Button user interface. 2. 4.3.8 ASUS AI Nap ASUS AI Nap allows you are away. Chapter 4 4-10 Chapter ...
... Press the power button again to enable AI Nap function. 3. Using ASUS AI Nap 1. After installing ASUS AI Suite from the motherboard support DVD, double-click the ASUS Q-Button icon in the Windows notification area to minimize the power consumption of your computer whenever you to... launch the Q-Button user interface. 2. 4.3.8 ASUS AI Nap ASUS AI Nap allows you are away. Chapter 4 4-10 Chapter ...

User Manual
Page 106
...effect. You can also load personal profiles saved in the Q-Button user interface. Install ASUS AI Suite from the motherboard support DVD. 2. Select Turbo Key to enter ASUS AI Nap mode after Windows start-up. 3. Press the power button again to keep the power button as a ... default is "Rocket Mode". Using ASUS Turbo Key Press the power button on your computer. Click Apply for detailed software configuration. 4-12 Chapter 4: Software support Chapter 4 Press and hold the power button for ASUS TurboV configurations. 4. 4.3.10 ASUS Turbo Key ASUS Turbo Key allows the user to ...
...effect. You can also load personal profiles saved in the Q-Button user interface. Install ASUS AI Suite from the motherboard support DVD. 2. Select Turbo Key to enter ASUS AI Nap mode after Windows start-up. 3. Press the power button again to keep the power button as a ... default is "Rocket Mode". Using ASUS Turbo Key Press the power button on your computer. Click Apply for detailed software configuration. 4-12 Chapter 4: Software support Chapter 4 Press and hold the power button for ASUS TurboV configurations. 4. 4.3.10 ASUS Turbo Key ASUS Turbo Key allows the user to ...
User Manual
Page 107
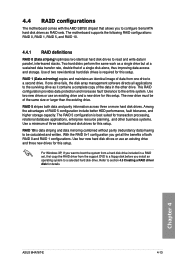
... stripes both RAID 0 and RAID 1 configurations. The motherboard supports the following RAID configurations: RAID 0, RAID 1, RAID 5, and RAID 10. 4.4.1 RAID definitions RAID 0 (Data striping) optimizes ...two identical hard disk drives to the entire system. With the RAID 0+1 configuration you want to a selected hard disk drive. For Windows...configuration include better HDD performance, fault tolerance, and higher storage capacity. Chapter 4 ASUS M4A78T-E 4-13 The new drive must be calculated and written. The RAID 5 configuration...
... stripes both RAID 0 and RAID 1 configurations. The motherboard supports the following RAID configurations: RAID 0, RAID 1, RAID 5, and RAID 10. 4.4.1 RAID definitions RAID 0 (Data striping) optimizes ...two identical hard disk drives to the entire system. With the RAID 0+1 configuration you want to a selected hard disk drive. For Windows...configuration include better HDD performance, fault tolerance, and higher storage capacity. Chapter 4 ASUS M4A78T-E 4-13 The new drive must be calculated and written. The RAID 5 configuration...

