User Manual
Page 6
4.3.10 ASUS Turbo Key 4-12 4.4 RAID configurations 4-13 4.4.1 RAID definitions 4-13 4.4.2 Installing Serial ATA hard disks 4-14 4.4.3 AMD®... Windows 4-20 Chapter 5: ATI® CrossFireX™ technology support 5.1 ATI® CrossFireX™ technology 5-1 5.1.1 Requirements 5-1 5.1.2 Before you begin 5-1 5.1.3 Installing CrossFireX™ graphics cards 5-2 5.1.4 Installing the device drivers 5-3 5.1.5 Enabling the ATI® CrossFireX™ technology 5-3 5.2 ATI® Hybrid CrossFireX 5-5 5.2.1 System requirements 5-5 5.2.2 Before you proceed 5-5...
4.3.10 ASUS Turbo Key 4-12 4.4 RAID configurations 4-13 4.4.1 RAID definitions 4-13 4.4.2 Installing Serial ATA hard disks 4-14 4.4.3 AMD®... Windows 4-20 Chapter 5: ATI® CrossFireX™ technology support 5.1 ATI® CrossFireX™ technology 5-1 5.1.1 Requirements 5-1 5.1.2 Before you begin 5-1 5.1.3 Installing CrossFireX™ graphics cards 5-2 5.1.4 Installing the device drivers 5-3 5.1.5 Enabling the ATI® CrossFireX™ technology 5-3 5.2 ATI® Hybrid CrossFireX 5-5 5.2.1 System requirements 5-5 5.2.2 Before you proceed 5-5...

User Manual
Page 7
.../TV technician for compliance could void the user's authority to operate this unit not expressly approved by one or more of the monitor to the graphics card is no guarantee that interference will not occur in a particular installation. vii Canadian Department of Communications Statement This digital apparatus does not exceed the Class...
.../TV technician for compliance could void the user's authority to operate this unit not expressly approved by one or more of the monitor to the graphics card is no guarantee that interference will not occur in a particular installation. vii Canadian Department of Communications Statement This digital apparatus does not exceed the Class...
User Manual
Page 9
... motherboard package and the software. • Chapter 5: ATI® CrossFireX™ support This chapter describes the ATI® CrossFireX™ feature and shows the graphics card ...installation procedures. About this guide is organized This guide contains the following sources for additional information and for product and software updates. 1. Detailed descriptions of the BIOS parameters are not part of the switches, jumpers, and connectors on ASUS hardware and software products. ASUS websites The ASUS website provides updated information on the motherboard...
... motherboard package and the software. • Chapter 5: ATI® CrossFireX™ support This chapter describes the ATI® CrossFireX™ feature and shows the graphics card ...installation procedures. About this guide is organized This guide contains the following sources for additional information and for product and software updates. 1. Detailed descriptions of the BIOS parameters are not part of the switches, jumpers, and connectors on ASUS hardware and software products. ASUS websites The ASUS website provides updated information on the motherboard...
User Manual
Page 16
... with combined output for blisteringly-fast frame rates unleashing the graphics performance Visit www.amd.com for DDR2 to 5200MT/s via HyperTransport™ 3.0 based system bus. This is optimized with the ASUS vision of up to provide excellent system performance and overclocking ...HDMI provides you with onboard GPU and discrete graphics card ATI Hybrid CrossFireX™ technology is designed to support up to just 1.5 V for full HD 1080p visuals through a single cable. Dual-Channel DDR3 1600 (O.C.) The motherboard supports DDR3 memory that delivers multi-channel audio ...
... with combined output for blisteringly-fast frame rates unleashing the graphics performance Visit www.amd.com for DDR2 to 5200MT/s via HyperTransport™ 3.0 based system bus. This is optimized with the ASUS vision of up to provide excellent system performance and overclocking ...HDMI provides you with onboard GPU and discrete graphics card ATI Hybrid CrossFireX™ technology is designed to support up to just 1.5 V for full HD 1080p visuals through a single cable. Dual-Channel DDR3 1600 (O.C.) The motherboard supports DDR3 memory that delivers multi-channel audio ...

User Manual
Page 38
... PCI Express x16 slot with the PCI Express specifications. Refer to the motherboard connector labeled CHA_FAN1/2 for the connector location. 2-18 Chapter 2: Hardware information If you install multiple graphics cards, we recommend that comply with a maximum speed of PCI Express card you plug the rear chassis fan cable to the figure below for the...
... PCI Express x16 slot with the PCI Express specifications. Refer to the motherboard connector labeled CHA_FAN1/2 for the connector location. 2-18 Chapter 2: Hardware information If you install multiple graphics cards, we recommend that comply with a maximum speed of PCI Express card you plug the rear chassis fan cable to the figure below for the...

User Manual
Page 115
.... 5. For Windows XP, go to Control Panel > Add/Remove Programs. For Windows Vista, go to install multi-graphics processing units (GPU) graphics cards. To uninstall all current applications. 2. ASUS M4A78T-E 5-1 Chapter 5 Chapter 5 5.1 ATI® CrossFireX™ technology The motherboard supports the ATI® CrossFireX™ technology that your power supply unit (PSU) can provide at http...
.... 5. For Windows XP, go to Control Panel > Add/Remove Programs. For Windows Vista, go to install multi-graphics processing units (GPU) graphics cards. To uninstall all current applications. 2. ASUS M4A78T-E 5-1 Chapter 5 Chapter 5 5.1 ATI® CrossFireX™ technology The motherboard supports the ATI® CrossFireX™ technology that your power supply unit (PSU) can provide at http...

User Manual
Page 116
...for better thermal environment. • Install only the identical CrossFireX-ready graphics cards that the connector is for reference purpose only and may not exactly match your motherboard has more than two PCIEX16 slots, refer to the goldfingers on the ... Ensure that are properly seated on each graphics card. If your motherboard. 1. Ensure that the cards are ATI®-certified. CrossFireX bridge CrossFireX goldfingers 5-2 Chapter 5: ATI® CrossFireX™ technology support Prepare two CrossFireX-ready graphics cards. 2. Align and firmly insert the CrossFireX...
...for better thermal environment. • Install only the identical CrossFireX-ready graphics cards that the connector is for reference purpose only and may not exactly match your motherboard has more than two PCIEX16 slots, refer to the goldfingers on the ... Ensure that are properly seated on each graphics card. If your motherboard. 1. Ensure that the cards are ATI®-certified. CrossFireX bridge CrossFireX goldfingers 5-2 Chapter 5: ATI® CrossFireX™ technology support Prepare two CrossFireX-ready graphics cards. 2. Align and firmly insert the CrossFireX...
User Manual
Page 117
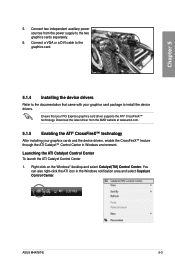
.... 6. Right-click on the Windows® desktop and select Catalyst(TM) Control Center. Connect a VGA or a DVI cable to the graphics card. 5.1.4 Installing the device drivers Refer to install the device drivers. ASUS M4A78T-E 5-3 Connect two independent auxiliary power sources from the AMD website at www.amd.com. 5.1.5 Enabling the ATI® CrossFireX™...
.... 6. Right-click on the Windows® desktop and select Catalyst(TM) Control Center. Connect a VGA or a DVI cable to the graphics card. 5.1.4 Installing the device drivers Refer to install the device drivers. ASUS M4A78T-E 5-3 Connect two independent auxiliary power sources from the AMD website at www.amd.com. 5.1.5 Enabling the ATI® CrossFireX™...

User Manual
Page 118
Click Go to continue to act as the display GPU. 3. From the Graphics Adapter list, select the graphics card to the Catalyst Control Center Advanced View window. Select Enable CrossFireX. 4. Enabling CrossFireX technology 1. The Catalyst Control Center Setup Assistant appears when the system detects the existance of multi-graphics cards. In the Catalyst Control Center window, click Graphics Settings > CrossFireX > Configure. 2. Click Apply, and then click OK to exit 1 the window. 2 3 4 5-4 Chapter 5: ATI® CrossFireX™ technology support Chapter 5 2.
Click Go to continue to act as the display GPU. 3. From the Graphics Adapter list, select the graphics card to the Catalyst Control Center Advanced View window. Select Enable CrossFireX. 4. Enabling CrossFireX technology 1. The Catalyst Control Center Setup Assistant appears when the system detects the existance of multi-graphics cards. In the Catalyst Control Center window, click Graphics Settings > CrossFireX > Configure. 2. Click Apply, and then click OK to exit 1 the window. 2 3 4 5-4 Chapter 5: ATI® CrossFireX™ technology support Chapter 5 2.

User Manual
Page 119
...ASUS M4A78T-E 5-5 Select Advanced > Chipset > RS780D Configuration > Internal Graphics Configuration, set UMA Frame Buffer Size to [Enabled]. Chapter 5 5.2 ATI® Hybrid CrossFireX™ The motherboard supports the ATI® Hybrid CrossFire™ technology that allows you to install multi-graphics processing units (GPU) CrossFireX cards...capacity: Minimum 1GB • CPU: AM3 • On-board graphics card RAM: 256MB Visit the ATI Game website at http://game.amd.com for the latest certified graphics card and the supported 3D application list. 5.2.2 Before you proceed Configure ...
...ASUS M4A78T-E 5-5 Select Advanced > Chipset > RS780D Configuration > Internal Graphics Configuration, set UMA Frame Buffer Size to [Enabled]. Chapter 5 5.2 ATI® Hybrid CrossFireX™ The motherboard supports the ATI® Hybrid CrossFire™ technology that allows you to install multi-graphics processing units (GPU) CrossFireX cards...capacity: Minimum 1GB • CPU: AM3 • On-board graphics card RAM: 256MB Visit the ATI Game website at http://game.amd.com for the latest certified graphics card and the supported 3D application list. 5.2.2 Before you proceed Configure ...
User Manual
Page 120
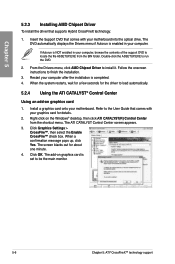
Insert the Support DVD that comes with your computer. Install a graphics card onto your motherboard into the optical drive. Right-click on graphics card 1. From the Drivers menu, click AMD Chipset Driver to be the main monitor. 5-6 Chapter 5: ATI® CrossFireX™ technology support Click Graphics Settings > CrossFire™, then select the Enable CrossFire™ check box...
Insert the Support DVD that comes with your computer. Install a graphics card onto your motherboard into the optical drive. Right-click on graphics card 1. From the Drivers menu, click AMD Chipset Driver to be the main monitor. 5-6 Chapter 5: ATI® CrossFireX™ technology support Click Graphics Settings > CrossFire™, then select the Enable CrossFire™ check box...

User Manual
Page 121
... about one minute. 3. Click OK. Click OK. 4. Click Display Settings. Chapter 5 Using the onboard graphics card 1. ASUS M4A78T-E 5-7 Restart the system. Right-click on -board graphics cards at same time and want to set to be the main monitor. The onboard graphics card is my main monitor and Extend the desktop onto this monitor. The ATI CATALYST Control...
... about one minute. 3. Click OK. Click OK. 4. Click Display Settings. Chapter 5 Using the onboard graphics card 1. ASUS M4A78T-E 5-7 Restart the system. Right-click on -board graphics cards at same time and want to set to be the main monitor. The onboard graphics card is my main monitor and Extend the desktop onto this monitor. The ATI CATALYST Control...

User Manual
Page 122
Follow steps 1 to complete the process of setting up the onboard graphics card as your main monitor. 5-8 Chapter 5: ATI® CrossFireX™ technology support Click OK, and then Yes from the confirmation window. 3. From the ATI CATALYST(R) Control Center screen, click Display Manager > Graphics Adapter. Follow steps 6 to step 8 on Using the onboard graphics card to 3 on Using the onboard graphics card. 2. Chapter 5 1. Select ATI Radeon HD 3200 Graphics [Gabbs, G HW173].
Follow steps 1 to complete the process of setting up the onboard graphics card as your main monitor. 5-8 Chapter 5: ATI® CrossFireX™ technology support Click OK, and then Yes from the confirmation window. 3. From the ATI CATALYST(R) Control Center screen, click Display Manager > Graphics Adapter. Follow steps 6 to step 8 on Using the onboard graphics card to 3 on Using the onboard graphics card. 2. Chapter 5 1. Select ATI Radeon HD 3200 Graphics [Gabbs, G HW173].


