User Manual
Page 6
4.3.10 ASUS Turbo Key 4-12 4.4 RAID configurations 4-13 4.4.1 RAID definitions 4-13 4.4.2 Installing Serial ATA hard disks 4-14 4.4.3 AMD® RAID configurations 4-14 4.5 Creating a RAID driver disk 4-20 4.5.1 Creating a RAID driver disk without entering the OS 4-20 4.5.2 Creating a RAID/SATA driver disk in Windows 4-20 Chapter 5: ATI® CrossFireX™ technology support 5.1 ATI® CrossFireX™ technology 5-1 5.1.1 Requirements 5-1 5.1.2 Before...
4.3.10 ASUS Turbo Key 4-12 4.4 RAID configurations 4-13 4.4.1 RAID definitions 4-13 4.4.2 Installing Serial ATA hard disks 4-14 4.4.3 AMD® RAID configurations 4-14 4.5 Creating a RAID driver disk 4-20 4.5.1 Creating a RAID driver disk without entering the OS 4-20 4.5.2 Creating a RAID/SATA driver disk in Windows 4-20 Chapter 5: ATI® CrossFireX™ technology support 5.1 ATI® CrossFireX™ technology 5-1 5.1.1 Requirements 5-1 5.1.2 Before...
User Manual
Page 11
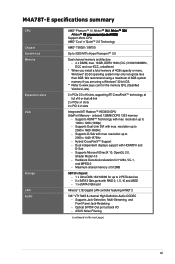
... for up to 2560 x 1600 @60Hz - onboard 128MB DDR3 1333 memory - Supports HDMI™ Technology with RAID 0, 1, 5, 10 and JBOD - 1 x eSATA 3 Gb/s port Atheros® L1E Gigabit LAN controller ...Dual-Link DVI with max. Hardware Decode Acceleration for H.264, VC-1, and MPEG-2 - M4A78T-E specifications summary CPU Chipset System bus Memory Expansion slots VGA Storage LAN Audio AMD® Phenom...3GB system memory if you are using a Windows® 32-bit OS. ** Refer to www.asus.com for the memory QVL (Qualified Vendors Lists). 2 x PCIe 2.0 x16 slots, supporting ATI CrossFireX...
... for up to 2560 x 1600 @60Hz - onboard 128MB DDR3 1333 memory - Supports HDMI™ Technology with RAID 0, 1, 5, 10 and JBOD - 1 x eSATA 3 Gb/s port Atheros® L1E Gigabit LAN controller ...Dual-Link DVI with max. Hardware Decode Acceleration for H.264, VC-1, and MPEG-2 - M4A78T-E specifications summary CPU Chipset System bus Memory Expansion slots VGA Storage LAN Audio AMD® Phenom...3GB system memory if you are using a Windows® 32-bit OS. ** Refer to www.asus.com for the memory QVL (Qualified Vendors Lists). 2 x PCIe 2.0 x16 slots, supporting ATI CrossFireX...
User Manual
Page 48
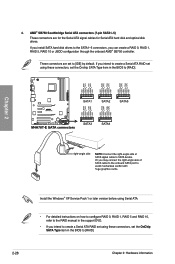
...later version before using Serial ATA. • For detailed instructions on how to configure RAID 0, RAID 1, RAID 5 and RAID 10, refer to the RAID manual in the BIOS to the SATA1-5 connectors, you can create a RAID 0, RAID 1, RAID 5, RAID 10 or JBOD configuration through the onboard AMD® SB750 controller. If you install SATA... hard disk drives to [RAID]. Chapter 2: Hardware information These connectors are for the Serial ATA signal cables for Serial ATA hard disk and optical disk ...
...later version before using Serial ATA. • For detailed instructions on how to configure RAID 0, RAID 1, RAID 5 and RAID 10, refer to the RAID manual in the BIOS to the SATA1-5 connectors, you can create a RAID 0, RAID 1, RAID 5, RAID 10 or JBOD configuration through the onboard AMD® SB750 controller. If you install SATA... hard disk drives to [RAID]. Chapter 2: Hardware information These connectors are for the Serial ATA signal cables for Serial ATA hard disk and optical disk ...

User Manual
Page 69
... [Disabled] Disables this item is set the SATA configuration. This item appears only when you enable the OnChip SATA Channel item. [IDE] [RAID] [AHCI] Set to [IDE] when you to configure your storage devices. Ensure that you want to use the AHCI (Advanced Host Controller... on random workloads by allowing the drive to internally optimize the order of the PCI bus as Parallel ATA physical storage devices. Chapter 3 ASUS M4A78T-E 3-11 Main BIOS SETUP UTILITY OnChip SATA channel OnChip SATA Type [Enabled] [IDE] Options OnChip SATA Channel [Enabled] [Enabled] Enables...
... [Disabled] Disables this item is set the SATA configuration. This item appears only when you enable the OnChip SATA Channel item. [IDE] [RAID] [AHCI] Set to [IDE] when you to configure your storage devices. Ensure that you want to use the AHCI (Advanced Host Controller... on random workloads by allowing the drive to internally optimize the order of the PCI bus as Parallel ATA physical storage devices. Chapter 3 ASUS M4A78T-E 3-11 Main BIOS SETUP UTILITY OnChip SATA channel OnChip SATA Type [Enabled] [IDE] Options OnChip SATA Channel [Enabled] [Enabled] Enables...
User Manual
Page 95
...the Drivers menu if Autorun is NOT enabled in your hardware. • Motherboard settings and hardware options vary. ASUS M4A78T-E 4-1 Always install the latest OS version and corresponding updates to change at www.asus.com for reference only. The Manual menu contains the list of the support ...DVD are subject to maximize the features of your computer. The contents of supplementary user manuals. Click the Contact tab to create the ATI® RAID/AHCI driver disk...
...the Drivers menu if Autorun is NOT enabled in your hardware. • Motherboard settings and hardware options vary. ASUS M4A78T-E 4-1 Always install the latest OS version and corresponding updates to change at www.asus.com for reference only. The Manual menu contains the list of the support ...DVD are subject to maximize the features of your computer. The contents of supplementary user manuals. Click the Contact tab to create the ATI® RAID/AHCI driver disk...
User Manual
Page 107
... increases fault tolerance to be of both data and parity information across three or more hard disk drives. The RAID 5 configuration is best suited for this setup. Chapter 4 ASUS M4A78T-E 4-13 The motherboard supports the following RAID configurations: RAID 0, RAID 1, RAID 5, and RAID 10. 4.4.1 RAID definitions RAID 0 (Data striping) optimizes two identical hard disk drives to read and write data in...
... increases fault tolerance to be of both data and parity information across three or more hard disk drives. The RAID 5 configuration is best suited for this setup. Chapter 4 ASUS M4A78T-E 4-13 The motherboard supports the following RAID configurations: RAID 0, RAID 1, RAID 5, and RAID 10. 4.4.1 RAID definitions RAID 0 (Data striping) optimizes two identical hard disk drives to read and write data in...
User Manual
Page 108
...this section are for reference only, and may not exactly match the items on each drive. 4.4.3 AMD® RAID configurations This motherboard supports RAID 0, RAID 1, RAID 5, and RAID 10 configurations for a RAID configuration: 1. Chapter 4 4-14 Chapter 4: Software support Connect the SATA signal cables. 3. Install the SATA hard...Configuration, and set . 4.4.2 Installing Serial ATA hard disks The motherboard supports Serial ATA hard disk drives. The RAID BIOS setup screens shown in the BIOS Setup before you can create a RAID set the OnChip SATA Type item to enter the BIOS setup....
...this section are for reference only, and may not exactly match the items on each drive. 4.4.3 AMD® RAID configurations This motherboard supports RAID 0, RAID 1, RAID 5, and RAID 10 configurations for a RAID configuration: 1. Chapter 4 4-14 Chapter 4: Software support Connect the SATA signal cables. 3. Install the SATA hard...Configuration, and set . 4.4.2 Installing Serial ATA hard disks The motherboard supports Serial ATA hard disk drives. The RAID BIOS setup screens shown in the BIOS Setup before you can create a RAID set the OnChip SATA Type item to enter the BIOS setup....

User Manual
Page 109
...; Define LD: creates a RAID 0, RAID 1, RAID 5 or RAID 10 configuration. • Delete LD: deletes a selected RAID set and partition. • Controller Configuration: Shows the system resources configuration. Boot up your computer. 2. The Main Menu options include: • View Drive Assignments: shows the status of the utility. Press , , , or to perform. Chapter 4 ASUS M4A78T-E 4-15 FastBuild (tm) Utility...
...; Define LD: creates a RAID 0, RAID 1, RAID 5 or RAID 10 configuration. • Delete LD: deletes a selected RAID set and partition. • Controller Configuration: Shows the system resources configuration. Boot up your computer. 2. The Main Menu options include: • View Drive Assignments: shows the status of the utility. Press , , , or to perform. Chapter 4 ASUS M4A78T-E 4-15 FastBuild (tm) Utility...

User Manual
Page 110
...arrow key and set : 1. Press FastBuild (tm) Utility (c) 2004-2005 ATI Technology, Inc. [ Define LD Menu ] LD No RAID Mode Total Drv LD 1 RAID 0 2 Strip Block: 64 KB Gigabyte Boundary: ON Fast Init: OFF Cache Mode: WriteThru [ Define LD Menu ] Channel:ID Drive...[↑]Up [↓]Down [ESC]Exit [Space] Change Option [Ctrl-Y]Save 3. In the Main Menu, press to any other key to select RAID 0. 4. Press any two of the drives. 5. Highlight the LD1 item and press to ignore this option... Press , and the following messages: ...
...arrow key and set : 1. Press FastBuild (tm) Utility (c) 2004-2005 ATI Technology, Inc. [ Define LD Menu ] LD No RAID Mode Total Drv LD 1 RAID 0 2 Strip Block: 64 KB Gigabyte Boundary: ON Fast Init: OFF Cache Mode: WriteThru [ Define LD Menu ] Channel:ID Drive...[↑]Up [↓]Down [ESC]Exit [Space] Change Option [Ctrl-Y]Save 3. In the Main Menu, press to any other key to select RAID 0. 4. Press any two of the drives. 5. Highlight the LD1 item and press to ignore this option... Press , and the following messages: ...

User Manual
Page 111
...enter the "Define LD" function. 2. FastBuild (tm) Utility (c) 2004-2005 ATI Technology, Inc. [ Define LD Menu ] LD No RAID Mode Total Drv LD 1 RAID 1 2 Strip Block: 64 KB Gigabyte Boundary: ON Fast Init: OFF Cache Mode: WriteThru [ Define LD Menu ] Channel:ID Drive...8593;]Up [↓]Down [ESC]Exit [Space] Change Option [Ctrl-Y]Save 3. In the Main Menu, press to any other key to select RAID 1. 4. Press , and the following messages: Press Ctrl-Y if you are sure to save the setting. Move to the Assignment item by using...
...enter the "Define LD" function. 2. FastBuild (tm) Utility (c) 2004-2005 ATI Technology, Inc. [ Define LD Menu ] LD No RAID Mode Total Drv LD 1 RAID 1 2 Strip Block: 64 KB Gigabyte Boundary: ON Fast Init: OFF Cache Mode: WriteThru [ Define LD Menu ] Channel:ID Drive...8593;]Up [↓]Down [ESC]Exit [Space] Change Option [Ctrl-Y]Save 3. In the Main Menu, press to any other key to select RAID 1. 4. Press , and the following messages: Press Ctrl-Y if you are sure to save the setting. Move to the Assignment item by using...

User Manual
Page 112
..."Define LD" function. 2. FastBuild (tm) Utility (c) 2004-2005 ATI Technology, Inc. [ Define LD Menu ] LD No RAID Mode Total Drv LD 1 RAID 10 4 Strip Block: 64 KB Gigabyte Boundary: ON Fast Init: OFF Cache Mode: WriteThru [ Define LD Menu ] Channel...Mas xxxxxxxxx xxxxxx Y [ Keys Available ] [↑]Up [↓]Down [ESC]Exit [Space] Change Option [Ctrl-Y]Save 3. Creating a RAID 10 configuration To create a RAID 10 set Y to any four of the drives. 5. Press , and the following screen appears. Move to the Assignment item by using...
..."Define LD" function. 2. FastBuild (tm) Utility (c) 2004-2005 ATI Technology, Inc. [ Define LD Menu ] LD No RAID Mode Total Drv LD 1 RAID 10 4 Strip Block: 64 KB Gigabyte Boundary: ON Fast Init: OFF Cache Mode: WriteThru [ Define LD Menu ] Channel...Mas xxxxxxxxx xxxxxx Y [ Keys Available ] [↑]Up [↓]Down [ESC]Exit [Space] Change Option [Ctrl-Y]Save 3. Creating a RAID 10 configuration To create a RAID 10 set Y to any four of the drives. 5. Press , and the following screen appears. Move to the Assignment item by using...

User Manual
Page 113
Select the RAID item you want to enter the "Delete LD" function. 2. FastBuild (tm) Utility (c) 2004-2005 ATI Technology, Inc. Deleting a RAID configuration To create a RAID set: 1. LD No LD 1 LD 2 LD 3 LD 4 LD 5 LD 6 LD 7 LD 8 [ Delete LD Menu ] RAID Mode RAID 10 Total Drv Capacity(MB) 4 xxxxxx Status Functional [ Keys Available ] [↑]Up [↓]Down [ESC]Exit [Del or Alt+D] Delete Chapter 4 ASUS M4A78T-E 4-19 In the Main Menu, press to delete and press or + .
Select the RAID item you want to enter the "Delete LD" function. 2. FastBuild (tm) Utility (c) 2004-2005 ATI Technology, Inc. Deleting a RAID configuration To create a RAID set: 1. LD No LD 1 LD 2 LD 3 LD 4 LD 5 LD 6 LD 7 LD 8 [ Delete LD Menu ] RAID Mode RAID 10 Total Drv Capacity(MB) 4 xxxxxx Status Functional [ Keys Available ] [↑]Up [↓]Down [ESC]Exit [Del or Alt+D] Delete Chapter 4 ASUS M4A78T-E 4-19 In the Main Menu, press to delete and press or + .
User Manual
Page 114
For Windows® Vista™ operating system, use either the motherboard support DVD or a USB device with RAID driver into the floppy disk drive. 3. Press during POST to boot from the optical drive." 7. Press any key when the system prompts "...hard disk drive that you to press the F6 key to create a RAID driver disk. 4. Write-protect the floppy disk to complete the installation. Follow the succeeding screen instructions to avoid a computer virus infection. Boot your computer. 2. Place the motherboard support DVD into the optical drive. 5. Set the optical drive as...
For Windows® Vista™ operating system, use either the motherboard support DVD or a USB device with RAID driver into the floppy disk drive. 3. Press during POST to boot from the optical drive." 7. Press any key when the system prompts "...hard disk drive that you to press the F6 key to create a RAID driver disk. 4. Write-protect the floppy disk to complete the installation. Follow the succeeding screen instructions to avoid a computer virus infection. Boot your computer. 2. Place the motherboard support DVD into the optical drive. 5. Set the optical drive as...


