
User Manual
Page 5
... 3.6.3 Onboard Devices Configuration 3-22 3.6.4 USB Configuration 3-23 3.6.5 PCIPnP...3-24 3.7 Power menu 3-25 3.7.1 Suspend Mode 3-25 3.7.2 Repost Video on S3 Resume 3-25 3.7.3 ACPI 2.0 Support 3-25 3.7.4 ACPI APIC Support 3-25 3.7.5 APM Configuration 3-26 3.7.6 Hardware Monitor 3-27 3.8 Boot menu 3-29 3.8.1 Boot Device Priority 3-29 3.8.2 Boot Settings Configuration 3-30 3.8.3 Security...3-31 3.9 Tools menu 3-33 3.9.1 ASUS EZ Flash 2 3-33 3.9.2 Express...
... 3.6.3 Onboard Devices Configuration 3-22 3.6.4 USB Configuration 3-23 3.6.5 PCIPnP...3-24 3.7 Power menu 3-25 3.7.1 Suspend Mode 3-25 3.7.2 Repost Video on S3 Resume 3-25 3.7.3 ACPI 2.0 Support 3-25 3.7.4 ACPI APIC Support 3-25 3.7.5 APM Configuration 3-26 3.7.6 Hardware Monitor 3-27 3.8 Boot menu 3-29 3.8.1 Boot Device Priority 3-29 3.8.2 Boot Settings Configuration 3-30 3.8.3 Security...3-31 3.9 Tools menu 3-33 3.9.1 ASUS EZ Flash 2 3-33 3.9.2 Express...
User Manual
Page 59
... potentially risky. Refer to boot. Chapter 3 ASUS M4A78T-E 3-1 We recommend that you not change the default BIOS settings except in the following utilities allow you need to manage and update the motherboard BIOS setup program. 1. Carefully follow the instructions of this motherboard. Copy the original motherboard BIOS using a USB flash disk or the motherboard support DVD when the...
... potentially risky. Refer to boot. Chapter 3 ASUS M4A78T-E 3-1 We recommend that you not change the default BIOS settings except in the following utilities allow you need to manage and update the motherboard BIOS setup program. 1. Carefully follow the instructions of this motherboard. Copy the original motherboard BIOS using a USB flash disk or the motherboard support DVD when the...
User Manual
Page 63
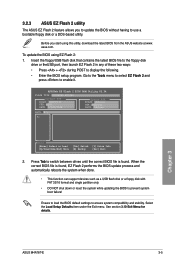
... Tools menu to select EZ Flash 2 and press to prevent system boot failure! Chapter 3 ASUS M4A78T-E 3-5 Select the Load Setup Defaults item under the Exit menu. To update the BIOS using this utility, download the latest BIOS from the ASUS website at www. When the correct BIOS file is found , EZ... Flash 2 performs the BIOS update process and automatically reboots the system when done. • This function can support devices such as a USB flash disk or a floppy disk with FAT...
... Tools menu to select EZ Flash 2 and press to prevent system boot failure! Chapter 3 ASUS M4A78T-E 3-5 Select the Load Setup Defaults item under the Exit menu. To update the BIOS using this utility, download the latest BIOS from the ASUS website at www. When the correct BIOS file is found , EZ... Flash 2 performs the BIOS update process and automatically reboots the system when done. • This function can support devices such as a USB flash disk or a floppy disk with FAT...
User Manual
Page 76
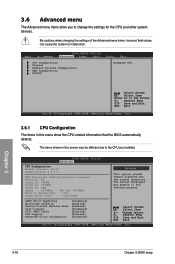
... different due to the CPU you to malfunction. 3.6 Advanced menu The Advanced menu items allow you installed. BIOS SETUP UTILITY Main Ai Tweaker Advanced Power Boot Tools Exit CPU Configuration Chipset Onboard Devices Configuration USB Configuration PCIPnP Configure CPU.
... different due to the CPU you to malfunction. 3.6 Advanced menu The Advanced menu items allow you installed. BIOS SETUP UTILITY Main Ai Tweaker Advanced Power Boot Tools Exit CPU Configuration Chipset Onboard Devices Configuration USB Configuration PCIPnP Configure CPU.

User Manual
Page 81
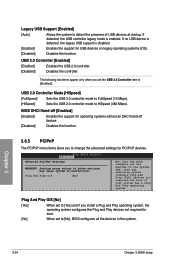
... [Enabled]. BIOS SETUP UTILITY Advanced USB Configuration Module Version - 2.24.3-13.4 USB Devices Enabled None USB Support Legacy USB Support USB 2.0 Controller USB 2.0 Controller Mode BIOS EHCI Hand-Off [Enabled] [Enabled] [Enabled] [HiSpeed] [Enabled] Enable support for all USB ports. The USB Devices Enabled item shows the auto-detected values. Chapter 3 ASUS M4A78T-E 3-23 Onboard LAN Boot ROM [Disabled] [Enabled] Enables...
... [Enabled]. BIOS SETUP UTILITY Advanced USB Configuration Module Version - 2.24.3-13.4 USB Devices Enabled None USB Support Legacy USB Support USB 2.0 Controller USB 2.0 Controller Mode BIOS EHCI Hand-Off [Enabled] [Enabled] [Enabled] [HiSpeed] [Enabled] Enable support for all USB ports. The USB Devices Enabled item shows the auto-detected values. Chapter 3 ASUS M4A78T-E 3-23 Onboard LAN Boot ROM [Disabled] [Enabled] Enables...
User Manual
Page 82
... item to change the advanced settings for USB devices on legacy operating systems (OS). [Disabled] Disables the function. YES: lets the operating system configure Plug and Play (PnP) devices not required for boot. [No] When set to [Yes] and if you install a Plug and Play ... Play devices not required for boot if your system has a Plug and Play operating system. The following two items appear only when you to [Enabled]. USB 2.0 Controller Mode [HiSpeed] [FullSpeed] Sets the USB 2.0 controller mode to FullSpeed (12 Mbps). [HiSpeed] Sets the USB 2.0 controller mode to detect...
... item to change the advanced settings for USB devices on legacy operating systems (OS). [Disabled] Disables the function. YES: lets the operating system configure Plug and Play (PnP) devices not required for boot. [No] When set to [Yes] and if you install a Plug and Play ... Play devices not required for boot if your system has a Plug and Play operating system. The following two items appear only when you to [Enabled]. USB 2.0 Controller Mode [HiSpeed] [FullSpeed] Sets the USB 2.0 controller mode to FullSpeed (12 Mbps). [HiSpeed] Sets the USB 2.0 controller mode to detect...

User Manual
Page 93
... [Disabled] Enables or disables checking of the Atheros LAN cable during POST. ASUS M4A78T-E 3-35 BIOS checks the Atheros LAN cable during the Power-On Self-Test (POST). Profile Utility ...[Up/Down/Home/End] Move [B] Backup [Esc] Exit • This function can support devices such as a USB flash disk or a floppy disk with FAT 32/16 format and single partition only. • DO NOT shut ...cable during the Power-On Self-Test (POST). It takes 3 to 10 seconds to prevent the system boot failure! • We recommend that you update the BIOS file only coming from the same memory/CPU ...
... [Disabled] Enables or disables checking of the Atheros LAN cable during POST. ASUS M4A78T-E 3-35 BIOS checks the Atheros LAN cable during the Power-On Self-Test (POST). Profile Utility ...[Up/Down/Home/End] Move [B] Backup [Esc] Exit • This function can support devices such as a USB flash disk or a floppy disk with FAT 32/16 format and single partition only. • DO NOT shut ...cable during the Power-On Self-Test (POST). It takes 3 to 10 seconds to prevent the system boot failure! • We recommend that you update the BIOS file only coming from the same memory/CPU ...
User Manual
Page 100
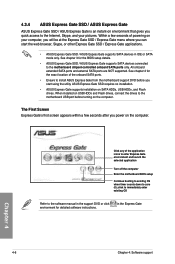
...booting to existing OS when timer counts down to the motherboard chipset-controlled onboard SATA ports only. in the support DVD or click environment for detailed software instructions. ASUS Express Gate SSD requires no installation. • ASUS Express Gate supports installation on the computer. When installed on USB...supported. click to immediately enter existing OS Refer to the motherboard USB port before you start the web browser, Skype, or other Express Gate SSD / Express Gate applications. • ASUS Express Gate SSD / ASUS Expess Gate supports SATA devices in IDE or SATA mode...
...booting to existing OS when timer counts down to the motherboard chipset-controlled onboard SATA ports only. in the support DVD or click environment for detailed software instructions. ASUS Express Gate SSD requires no installation. • ASUS Express Gate supports installation on the computer. When installed on USB...supported. click to immediately enter existing OS Refer to the motherboard USB port before you start the web browser, Skype, or other Express Gate SSD / Express Gate applications. • ASUS Express Gate SSD / ASUS Expess Gate supports SATA devices in IDE or SATA mode...
User Manual
Page 114
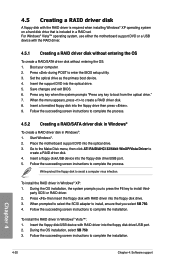
... RAID driver into the optical drive. 3. Chapter 4 4-20 Chapter 4: Software support Place the motherboard support DVD into the floppy disk drive/USB port. 2. When the menu appears, press to complete the process. Follow the succeeding screen instructions to boot from the optical drive." 7. Press then insert the floppy disk with RAID driver into...
... RAID driver into the optical drive. 3. Chapter 4 4-20 Chapter 4: Software support Place the motherboard support DVD into the floppy disk drive/USB port. 2. When the menu appears, press to complete the process. Follow the succeeding screen instructions to boot from the optical drive." 7. Press then insert the floppy disk with RAID driver into...


