
User Manual
Page 1
Motherboard M4A78-HTPC Series
Motherboard M4A78-HTPC Series
User Manual
Page 3
Contents Contents...iii Notices...vi Safety information vii About this guide vii M4A78-HTPC specifications summary ix Chapter 1 Product introduction 1.1 Welcome 1-1 1.2 Package contents 1-1 1.3 Special features 1-1 1.3.1 Product highlights 1-1 1.3.2 Innovative ASUS features 1-2 1.4 Before you proceed 1-4 1.5 Motherboard overview 1-5 1.5.1 Placement direction 1-5 1.5.2 Screw holes 1-5 1.5.3 Motherboard layout 1-6 1.5.4 Layout contents 1-6 1.6 Central Processing Unit (CPU 1-7 1.6.1 Installing the CPU 1-7 1.6.2 Installing the heatsink and fan 1-8 1.7 System...
Contents Contents...iii Notices...vi Safety information vii About this guide vii M4A78-HTPC specifications summary ix Chapter 1 Product introduction 1.1 Welcome 1-1 1.2 Package contents 1-1 1.3 Special features 1-1 1.3.1 Product highlights 1-1 1.3.2 Innovative ASUS features 1-2 1.4 Before you proceed 1-4 1.5 Motherboard overview 1-5 1.5.1 Placement direction 1-5 1.5.2 Screw holes 1-5 1.5.3 Motherboard layout 1-6 1.5.4 Layout contents 1-6 1.6 Central Processing Unit (CPU 1-7 1.6.1 Installing the CPU 1-7 1.6.2 Installing the heatsink and fan 1-8 1.7 System...

User Manual
Page 6
... and found to enable proper reuse of Chemicals) regulatory framework, we published the chemical substances in our products at ASUS REACH website at http://green.asus.com/english/REACH.htm. If this equipment. This product has been designed to comply with the limits for disposal ...placed in the Radio Interference Regulations of the Canadian Department of the FCC Rules. This symbol of electronic products. DO NOT throw the motherboard in municipal waste. DO NOT throw the mercury-containing button cell battery in municipal waste. This class B digital apparatus complies with FCC...
... and found to enable proper reuse of Chemicals) regulatory framework, we published the chemical substances in our products at ASUS REACH website at http://green.asus.com/english/REACH.htm. If this equipment. This product has been designed to comply with the limits for disposal ...placed in the Radio Interference Regulations of the Canadian Department of the FCC Rules. This symbol of electronic products. DO NOT throw the motherboard in municipal waste. DO NOT throw the mercury-containing button cell battery in municipal waste. This class B digital apparatus complies with FCC...

User Manual
Page 7
...8226; Chapter 1: Product introduction This chapter describes the features of the BIOS parameters are not damaged. Operation safety • Before installing the motherboard and adding devices on it may become wet. • Place the product on a stable surface. • If you are using, contact... the power cable from the electrical outlet before relocating the system. • When adding or removing devices to or from the motherboard, ensure that all power cables are unplugged. • Seek professional assistance before the signal cables are connected. These devices could interrupt...
...8226; Chapter 1: Product introduction This chapter describes the features of the BIOS parameters are not damaged. Operation safety • Before installing the motherboard and adding devices on it may become wet. • Place the product on a stable surface. • If you are using, contact... the power cable from the electrical outlet before relocating the system. • When adding or removing devices to or from the motherboard, ensure that all power cables are unplugged. • Seek professional assistance before the signal cables are connected. These devices could interrupt...
User Manual
Page 13
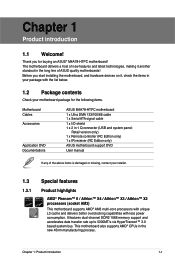
...controller (RC Edition only) 1 x IR receiver (RC Edition only) ASUS motherboard support DVD User manual If any of the above items is damaged or missing, contact your motherboard package for buying an ASUS® M4A78-HTPC motherboard! Chapter 1: Product introduction 1-1 This motherboard also ...in 1 Q-connector (USB and system panel; Chapter 1 Product introduction 1.1 Welcome! Before you for the following items. Motherboard Cables Accessories Application DVD Documentations ASUS M4A78-HTPC motherboard 1 x Ultra DMA 133/100/66 cable 1 x Serial ATA signal cable 1 x I/O shield 1 x 2 ...
...controller (RC Edition only) 1 x IR receiver (RC Edition only) ASUS motherboard support DVD User manual If any of the above items is damaged or missing, contact your motherboard package for buying an ASUS® M4A78-HTPC motherboard! Chapter 1: Product introduction 1-1 This motherboard also ...in 1 Q-connector (USB and system panel; Chapter 1 Product introduction 1.1 Welcome! Before you for the following items. Motherboard Cables Accessories Application DVD Documentations ASUS M4A78-HTPC motherboard 1 x Ultra DMA 133/100/66 cable 1 x Serial ATA signal cable 1 x I/O shield 1 x 2 ...
User Manual
Page 14
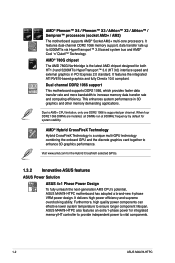
... per channel. Dual channel DDR2 1066 support This motherboard supports DDR2 1066, which provides faster data transfer rate and more bandwidth to enhance 3D graphics performance. Due to vital components. 1-2 ASUS M4A78-HTPC Visit www.amd.com for system stability. This... for the Hybrid CrossfireX selected GPUs. 1.3.2 Innovative ASUS features ASUS Power Solution ASUS 4+1 Phase Power Design To fully unleash the next-generation AM3 CPU's potential, ASUS M4A78-HTPC motherboard has adopted a brand-new 4-phase VRM power design. ASUS M4A78-HTPC also features an extra 1-phase power for both...
... per channel. Dual channel DDR2 1066 support This motherboard supports DDR2 1066, which provides faster data transfer rate and more bandwidth to enhance 3D graphics performance. Due to vital components. 1-2 ASUS M4A78-HTPC Visit www.amd.com for system stability. This... for the Hybrid CrossfireX selected GPUs. 1.3.2 Innovative ASUS features ASUS Power Solution ASUS 4+1 Phase Power Design To fully unleash the next-generation AM3 CPU's potential, ASUS M4A78-HTPC motherboard has adopted a brand-new 4-phase VRM power design. ASUS M4A78-HTPC also features an extra 1-phase power for both...

User Manual
Page 15
...energy efficiency. With the reduction in the BIOS to the 4-pin audio power connector. ASUS Tranquil Mode is supported by AM3/AM2+ CPU only. Chapter 1: Product introduction 1-3 For RC Edition: Use the bundled remote controller to use the RCA audio output function in Windows... time depends on motherboards, effectively reduces electrical noise and ensures the purity of sounds. ASUS Home Theater Gate The ASUS Home Theater Gate, specially designed for the HTPC series, allows you intend to launch the ASUS Home Theater Gate and start media applications. ASUS HTPC Features Absolute Pitch ...
...energy efficiency. With the reduction in the BIOS to the 4-pin audio power connector. ASUS Tranquil Mode is supported by AM3/AM2+ CPU only. Chapter 1: Product introduction 1-3 For RC Edition: Use the bundled remote controller to use the RCA audio output function in Windows... time depends on motherboards, effectively reduces electrical noise and ensures the purity of sounds. ASUS Home Theater Gate The ASUS Home Theater Gate, specially designed for the HTPC series, allows you intend to launch the ASUS Home Theater Gate and start media applications. ASUS HTPC Features Absolute Pitch ...

User Manual
Page 16
..., in sleep mode, or in any component, switch off mode. The illustration below shows the location of the following precautions before you install motherboard components or change any motherboard settings. • Unplug the power cord from the wall socket before removing or plugging in soft-off the ATX power supply and detach... you uninstall any component, place it on a grounded antistatic pad or in the bag that came with a standby power LED that lights up to the motherboard, peripherals, or components. 1.4 Before you proceed Take note of the onboard LED. 1-4 ASUS M4A78-HTPC
..., in sleep mode, or in any component, switch off mode. The illustration below shows the location of the following precautions before you install motherboard components or change any motherboard settings. • Unplug the power cord from the wall socket before removing or plugging in soft-off the ATX power supply and detach... you uninstall any component, place it on a grounded antistatic pad or in the bag that came with a standby power LED that lights up to the motherboard, peripherals, or components. 1.4 Before you proceed Take note of the onboard LED. 1-4 ASUS M4A78-HTPC

User Manual
Page 17
Doing so can damage the motherboard. Chapter 1: Product introduction 1-5 Place this side towards the rear of the chassis as indicated in the image below. 1.5.2 Screw holes Place eight screws into the chassis in the correct orientation. 1.5 Motherboard overview 1.5.1 Placement direction When installing the motherboard, ensure that you place it into the holes indicated by circles to secure the motherboard to the chassis. The edge with external ports goes to the rear part of the chassis. Do not overtighten the screws!
Doing so can damage the motherboard. Chapter 1: Product introduction 1-5 Place this side towards the rear of the chassis as indicated in the image below. 1.5.2 Screw holes Place eight screws into the chassis in the correct orientation. 1.5 Motherboard overview 1.5.1 Placement direction When installing the motherboard, ensure that you place it into the holes indicated by circles to secure the motherboard to the chassis. The edge with external ports goes to the rear part of the chassis. Do not overtighten the screws!

User Manual
Page 18
... drive audio in connector (4-pin CD) 13. Digital audio connector (4-1 pin SPDIF_OUT) Page 1-22 1-7 1-21 1-10 1-24 1-23 1-4 1-17 1-25 1-26 1-26 1-27 1-28 1-27 1-6 ASUS M4A78-HTPC ATX power connectors (24-pin EATXPWR, 4-pin ATX12V) 2. System panel connector (10-1 pin PANEL) 10. 1.5.3 Motherboard layout 1.5.4 Layout contents Connectors/Jumpers/Slots 1.
... drive audio in connector (4-pin CD) 13. Digital audio connector (4-1 pin SPDIF_OUT) Page 1-22 1-7 1-21 1-10 1-24 1-23 1-4 1-17 1-25 1-26 1-26 1-27 1-28 1-27 1-6 ASUS M4A78-HTPC ATX power connectors (24-pin EATXPWR, 4-pin ATX12V) 2. System panel connector (10-1 pin PANEL) 10. 1.5.3 Motherboard layout 1.5.4 Layout contents Connectors/Jumpers/Slots 1.

User Manual
Page 19
1.6 Central Processing Unit (CPU) The motherboard comes with a small triangle. 4. Position the CPU above the socket such that the socket lever is not compatible with AMD® Opteron™ processors. Socket ... CPU fits only in place. Small triangle Gold triangle Chapter 1: Product introduction 1-7 Locate the CPU socket on this motherboard. 1.6.1 Installing the CPU To install a CPU: 1. Do not install an Opteron™ processor on the motherboard. 2. Carefully insert the CPU into the socket to 90°-100° angle, otherwise the CPU will...
1.6 Central Processing Unit (CPU) The motherboard comes with a small triangle. 4. Position the CPU above the socket such that the socket lever is not compatible with AMD® Opteron™ processors. Socket ... CPU fits only in place. Small triangle Gold triangle Chapter 1: Product introduction 1-7 Locate the CPU socket on this motherboard. 1.6.1 Installing the CPU To install a CPU: 1. Do not install an Opteron™ processor on the motherboard. 2. Carefully insert the CPU into the socket to 90°-100° angle, otherwise the CPU will...
User Manual
Page 20
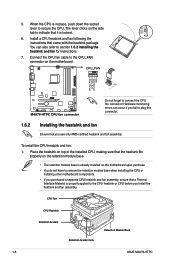
... CPU heatsink and fan following the instructions that you install the heatsink and fan assembly. Do not forget to the CPU_FAN connector on the motherboard. Place the heatsink on top of the installed CPU, making sure that the heatsink fits properly on the retention module base. • ... can occur if you fail to secure the CPU. CPU Fan CPU Heatsink Retention bracket Retention bracket lock Retention Module Base 1-8 ASUS M4A78-HTPC Hardware monitoring errors can also refer to the CPU heatsink or CPU before you use only AMD-certified heatsink and fan assembly. Connect...
... CPU heatsink and fan following the instructions that you install the heatsink and fan assembly. Do not forget to the CPU_FAN connector on the motherboard. Place the heatsink on top of the installed CPU, making sure that the heatsink fits properly on the retention module base. • ... can occur if you fail to secure the CPU. CPU Fan CPU Heatsink Retention bracket Retention bracket lock Retention Module Base 1-8 ASUS M4A78-HTPC Hardware monitoring errors can also refer to the CPU heatsink or CPU before you use only AMD-certified heatsink and fan assembly. Connect...

User Manual
Page 21
... 1: Product introduction 1-9 Ensure that the retention bracket is in place. Do not forget to the module base. 5. Push down the retention bracket lock on the motherboard labeled CPU_FAN. Align the other end of the retention bracket to plug this section do not match the CPU documentation, follow the latter. 2. When the...
... 1: Product introduction 1-9 Ensure that the retention bracket is in place. Do not forget to the module base. 5. Push down the retention bracket lock on the motherboard labeled CPU_FAN. Align the other end of the retention bracket to plug this section do not match the CPU documentation, follow the latter. 2. When the...

User Manual
Page 22
...two Double Data Rate 2 (DDR2) Dual Inline Memory Modules (DIMM) sockets. 1.7 System memory 1.7.1 Overview The motherboard comes with the same CAS latency. The system maps the total size of memory, we recommend that you install 4GB...For optimum compatibility, we recommend that you obtain memory modules from the higher-sized channel is dependent on the motherboard, the actual usable memory for the dual-channel configuration. The figure illustrates the location of the DDR2 DIMM ...compared to support a full memory load (4 DIMMs) or overclocking condition. 1-10 ASUS M4A78-HTPC
...two Double Data Rate 2 (DDR2) Dual Inline Memory Modules (DIMM) sockets. 1.7 System memory 1.7.1 Overview The motherboard comes with the same CAS latency. The system maps the total size of memory, we recommend that you install 4GB...For optimum compatibility, we recommend that you obtain memory modules from the higher-sized channel is dependent on the motherboard, the actual usable memory for the dual-channel configuration. The figure illustrates the location of the DDR2 DIMM ...compared to support a full memory load (4 DIMMs) or overclocking condition. 1-10 ASUS M4A78-HTPC

User Manual
Page 23
... DDR2 1066 DIMM is supported per channel. When four DDR2 1066 DIMMs are installed, all DIMMs run at 800Mhz frequency by default for system stability. M4A78-HTPC Motherboard Qualified Vendors Lists (QVL) DDR2-1066MHz capability Vendor Part No. Chapter 1: Product introduction 1-11
... DDR2 1066 DIMM is supported per channel. When four DDR2 1066 DIMMs are installed, all DIMMs run at 800Mhz frequency by default for system stability. M4A78-HTPC Motherboard Qualified Vendors Lists (QVL) DDR2-1066MHz capability Vendor Part No. Chapter 1: Product introduction 1-11

User Manual
Page 27
... the break on the socket. 1 Unlocked retaining clip 2 DDR2 DIMM notch 1 A DDR2 DIMM is properly seated. Simultaneously press the retaining clips outward to both the motherboard and the components. 1.
... the break on the socket. 1 Unlocked retaining clip 2 DDR2 DIMM notch 1 A DDR2 DIMM is properly seated. Simultaneously press the retaining clips outward to both the motherboard and the components. 1.

User Manual
Page 28
...1-16 ASUS M4A78-HTPC Assign an IRQ to do not need to the table on the next page for details. 1.8.3 PCI slot The PCI slot supports cards such as a LAN card, SCSI card, USB card, and other cards that comply with PCI specifications. 1.8.4 PCI Express x1 slots This motherboard supports...BIOS setup. 2. When using PCI cards on the slot. 5. 1.8 Expansion slots In the future, you may cause you physical injury and damage motherboard components. 1.8.1 Installing an expansion card To install an expansion card: 1. The following sub‑sections describe the slots and the expansion cards that ...
...1-16 ASUS M4A78-HTPC Assign an IRQ to do not need to the table on the next page for details. 1.8.3 PCI slot The PCI slot supports cards such as a LAN card, SCSI card, USB card, and other cards that comply with PCI specifications. 1.8.4 PCI Express x1 slots This motherboard supports...BIOS setup. 2. When using PCI cards on the slot. 5. 1.8 Expansion slots In the future, you may cause you physical injury and damage motherboard components. 1.8.1 Installing an expansion card To install an expansion card: 1. The following sub‑sections describe the slots and the expansion cards that ...

User Manual
Page 33
... (HDMI™) 1. 4. To ensure that may be visible around the outside of the display on the HDMI™ DTV. Install AMD Chipset Driver from the motherboard support DVD. 2. Move the Underscan/Overscan slider to adjust the overall size of the display. 3 4 5 6 6. The Scaling Options function of the customized settings when the...
... (HDMI™) 1. 4. To ensure that may be visible around the outside of the display on the HDMI™ DTV. Install AMD Chipset Driver from the motherboard support DVD. 2. Move the Underscan/Overscan slider to adjust the overall size of the display. 3 4 5 6 6. The Scaling Options function of the customized settings when the...

User Manual
Page 34
DO NOT place jumper caps on the motherboard, making sure that the black wire of each cable matches the ground pin of 1A~2.22A (26.64W max.) at +12V. 1.10.2 Internal connectors 1. These ... the system may damage the motherboard components. CPU, Chassis and Power Fan connectors (4-pin CPU_FAN, 3-pin CHA_FAN1-2, 3-pin PWR_FAN) The fan connectors support cooling fans of 350mA~740mA (8.88W max.) or a total of the connector. Only the CPU_FAN and CHA_FAN1-2 connectors support the ASUS Q FAN 2 feature. 1-22 ASUS M4A78-HTPC Do not forget to connect...
DO NOT place jumper caps on the motherboard, making sure that the black wire of each cable matches the ground pin of 1A~2.22A (26.64W max.) at +12V. 1.10.2 Internal connectors 1. These ... the system may damage the motherboard components. CPU, Chassis and Power Fan connectors (4-pin CPU_FAN, 3-pin CHA_FAN1-2, 3-pin PWR_FAN) The fan connectors support cooling fans of 350mA~740mA (8.88W max.) or a total of the connector. Only the CPU_FAN and CHA_FAN1-2 connectors support the ASUS Q FAN 2 feature. 1-22 ASUS M4A78-HTPC Do not forget to connect...

User Manual
Page 36
Connect the blue connector to the motherboard's IDE connector, then select one of the following modes to match the covered hole on each Ultra DMA 133 / 100 / 66 signal cable: blue, black, .... IDE connector (40-1 pin PRI_IDE) The onboard IDE connector is set as "Cable-Select", ensure that all other device jumpers have the same setting. 1-24 ASUS M4A78-HTPC This prevents incorrect insertion when you connect the IDE cable. • Use the 80-conductor IDE cable for Ultra DMA 133/100/66 signal cable...
Connect the blue connector to the motherboard's IDE connector, then select one of the following modes to match the covered hole on each Ultra DMA 133 / 100 / 66 signal cable: blue, black, .... IDE connector (40-1 pin PRI_IDE) The onboard IDE connector is set as "Cable-Select", ensure that all other device jumpers have the same setting. 1-24 ASUS M4A78-HTPC This prevents incorrect insertion when you connect the IDE cable. • Use the 80-conductor IDE cable for Ultra DMA 133/100/66 signal cable...


