User Manual
Page 20
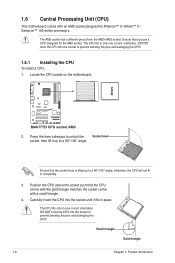
DO NOT force the CPU into the socket to a 90°-100° angle; M4A77TD M4A77TD CPU socket AM3 2. The CPU fits only in only one correct orientation. The CPU fits in one correct orientation. Ensure that the socket lever is .... Carefully insert the CPU into the socket to a 90°-100° angle. Press the lever sideways to unlock the Socket lever socket, then lift it fits in completely. 3. 1.6 Central Processing Unit (CPU) This motherboard comes with a small triangle. 4. The AM3 socket has a different pinout from the AM2+/AM2 socket. Small triangle...
DO NOT force the CPU into the socket to a 90°-100° angle; M4A77TD M4A77TD CPU socket AM3 2. The CPU fits only in only one correct orientation. The CPU fits in one correct orientation. Ensure that the socket lever is .... Carefully insert the CPU into the socket to a 90°-100° angle. Press the lever sideways to unlock the Socket lever socket, then lift it fits in completely. 3. 1.6 Central Processing Unit (CPU) This motherboard comes with a small triangle. 4. The AM3 socket has a different pinout from the AM2+/AM2 socket. Small triangle...

User Manual
Page 28
... the socket. 1-16 Chapter 1: Product introduction Align a DIMM on the socket. 2 DIMM notch 1 1 Unlocked retaining clip A DIMM is properly seated. Failure to do so can cause severe damage to unlock a DIMM socket. 2. Firmly insert the DIMM into a socket to unlock the DIMM. 2 Support the DIMM lightly with extra force. 1 DIMM notch 2. DO NOT... break on the socket such that it flips out with your fingers when pressing the retaining 1 clips. Press the retaining clips outward to both the motherboard and the components. 1.
... the socket. 1-16 Chapter 1: Product introduction Align a DIMM on the socket. 2 DIMM notch 1 1 Unlocked retaining clip A DIMM is properly seated. Failure to do so can cause severe damage to unlock a DIMM socket. 2. Firmly insert the DIMM into a socket to unlock the DIMM. 2 Support the DIMM lightly with extra force. 1 DIMM notch 2. DO NOT... break on the socket such that it flips out with your fingers when pressing the retaining 1 clips. Press the retaining clips outward to both the motherboard and the components. 1.


