User Manual
Page 2
..., stored in a retrieval system, or translated into any language in any form or by any means, except documentation kept by ASUS; ASUS PROVIDES THIS MANUAL "AS IS" WITHOUT WARRANTY OF ANY KIND, EITHER EXPRESS OR IMPLIED, INCLUDING BUT NOT LIMITED TO THE IMPLIED WARRANTIES OR CONDITIONS... if: (1) the product is repaired, modified or altered, unless such repair, modification of ASUSTeK COMPUTER INC. ("ASUS"). Products and corporate names appearing in this manual, including the products and software described in writing by the purchaser for identification or explanation and to the owners' ...
..., stored in a retrieval system, or translated into any language in any form or by any means, except documentation kept by ASUS; ASUS PROVIDES THIS MANUAL "AS IS" WITHOUT WARRANTY OF ANY KIND, EITHER EXPRESS OR IMPLIED, INCLUDING BUT NOT LIMITED TO THE IMPLIED WARRANTIES OR CONDITIONS... if: (1) the product is repaired, modified or altered, unless such repair, modification of ASUSTeK COMPUTER INC. ("ASUS"). Products and corporate names appearing in this manual, including the products and software described in writing by the purchaser for identification or explanation and to the owners' ...

User Manual
Page 5
... 4.5.3 APM Configuration 4-27 4.5.4 Hardware Monitor 4-29 4.6 Boot menu 4-31 4.6.1 Boot Device Priority 4-31 4.6.2 Removable Drives 4-31 4.6.3 Boot Settings Configuration 4-32 4.6.4 Security 4-33 4.7 Tools menu 4-35 4.7.1 ASUS EZ Flash 2 4-35 4.7.2 Express Gate 4-36 4.8 Exit menu 4-37 Chapter 5: Software support 5.1 Installing an operating system 5-1 5.2 Support DVD information 5-1 5.2.1 Running the support DVD 5-1 5.2.2 Drivers menu...
... 4.5.3 APM Configuration 4-27 4.5.4 Hardware Monitor 4-29 4.6 Boot menu 4-31 4.6.1 Boot Device Priority 4-31 4.6.2 Removable Drives 4-31 4.6.3 Boot Settings Configuration 4-32 4.6.4 Security 4-33 4.7 Tools menu 4-35 4.7.1 ASUS EZ Flash 2 4-35 4.7.2 Express Gate 4-36 4.8 Exit menu 4-37 Chapter 5: Software support 5.1 Installing an operating system 5-1 5.2 Support DVD information 5-1 5.2.1 Running the support DVD 5-1 5.2.2 Drivers menu...

User Manual
Page 8
...the grounding circuit. • Make sure that your power supply is broken, do not try to fix it , carefully read all the manuals that the product (electrical, electronic equipment, and mercury-containing button cell battery) should not be placed in municipal waste. This symbol of the ...product in any damage, contact your dealer immediately. • To avoid short circuits, keep paper clips, screws, and staples away from the motherboard, ensure that the power cables for disposal of the electrical outlet you are unplugged. • Seek professional assistance before you are not sure ...
...the grounding circuit. • Make sure that your power supply is broken, do not try to fix it , carefully read all the manuals that the product (electrical, electronic equipment, and mercury-containing button cell battery) should not be placed in municipal waste. This symbol of the ...product in any damage, contact your dealer immediately. • To avoid short circuits, keep paper clips, screws, and staples away from the motherboard, ensure that the power cables for disposal of the electrical outlet you are unplugged. • Seek professional assistance before you are not sure ...

User Manual
Page 10
... yourself when trying to help you complete a task. IMPORTANT: Instructions that you perform certain tasks properly, take note of the following symbols used in this manual. NOTE: Tips and additional information to complete a task. Example: At the DOS prompt, type the command line: awdflash� M�3�N�7�2�D�...
... yourself when trying to help you complete a task. IMPORTANT: Instructions that you perform certain tasks properly, take note of the following symbols used in this manual. NOTE: Tips and additional information to complete a task. Example: At the DOS prompt, type the command line: awdflash� M�3�N�7�2�D�...
User Manual
Page 11
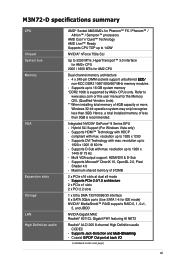
...Microsoft® DirectX 10, OpenGL 2.0, Pixel Shader 4.0 - Refer to 16 GB system memory *DDR2 1066 is recommended. resolution up to www.asus.com or this user manual for the Memory QVL (Qualified Vendors Lists). ** When installing total memory of 512MB 2 x PCIe x16 slots at dual x8 mode - ... modules - resolution up to 1920 x 1200 - Supports HDMI™ Technology with HDCP compliant with max. resolution up to 5200 MT/s; M3N72-D specifications summary CPU Chipset System bus Memory VGA Expansion slots Storage LAN High Definition audio AMD® Socket AM2/AM2+ for Phenom™...
...Microsoft® DirectX 10, OpenGL 2.0, Pixel Shader 4.0 - Refer to 16 GB system memory *DDR2 1066 is recommended. resolution up to www.asus.com or this user manual for the Memory QVL (Qualified Vendors Lists). ** When installing total memory of 512MB 2 x PCIe x16 slots at dual x8 mode - ... modules - resolution up to 1920 x 1200 - Supports HDMI™ Technology with HDCP compliant with max. resolution up to 5200 MT/s; M3N72-D specifications summary CPU Chipset System bus Memory VGA Expansion slots Storage LAN High Definition audio AMD® Socket AM2/AM2+ for Phenom™...
User Manual
Page 55
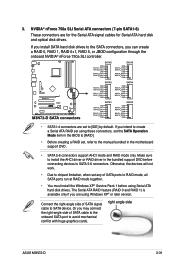
...the SATA connectors, you may connect the right-angle side of SATA cable to the onboard SATA port to the manual bundled in the bundled support DVD before using Windows XP® or later version. Make sure to [IDE] ... the devices will not work. • Due to chipset limitation, when set to install the AHCI driver or RAID driver in the motherboard support DVD. • SATA 5-6 connectors support AHCI mode and RAID mode only. Or you can create a RAID 0, RAID 1, RAID... Windows XP® Service Pack 1 before connecting devices to SATA device. right angle side ASUS M3N72-D 2-31 3.
...the SATA connectors, you may connect the right-angle side of SATA cable to the onboard SATA port to the manual bundled in the bundled support DVD before using Windows XP® or later version. Make sure to [IDE] ... the devices will not work. • Due to chipset limitation, when set to install the AHCI driver or RAID driver in the motherboard support DVD. • SATA 5-6 connectors support AHCI mode and RAID mode only. Or you can create a RAID 0, RAID 1, RAID... Windows XP® Service Pack 1 before connecting devices to SATA device. right angle side ASUS M3N72-D 2-31 3.

User Manual
Page 86
... [Auto] [Mode 0] [Mode 1] [Mode 2] [Mode 3] [Mode 4] UDMA Mode [Auto] Disables or sets the UDMA mode. Select [Manual] to manually enter the IDE hard disk drive parameters. If no IDE device is successful, the BIOS automatically fills in the system. There is installed select [None...]. These values are not user‑configurable. Configuration options: [None] [Auto] [Manual] 4-14 Chapter 4: BIOS setup Main Phoenix-Award BIOS CMOS Setup Utility Primary IDE Master Select Menu PIO Mode UDMA Mode [Auto] [Auto...
... [Auto] [Mode 0] [Mode 1] [Mode 2] [Mode 3] [Mode 4] UDMA Mode [Auto] Disables or sets the UDMA mode. Select [Manual] to manually enter the IDE hard disk drive parameters. If no IDE device is successful, the BIOS automatically fills in the system. There is installed select [None...]. These values are not user‑configurable. Configuration options: [None] [Auto] [Manual] 4-14 Chapter 4: BIOS setup Main Phoenix-Award BIOS CMOS Setup Utility Primary IDE Master Select Menu PIO Mode UDMA Mode [Auto] [Auto...

User Manual
Page 87
... Shows the number of the hard disk cylinders. This item is not configurable. Make sure to set the IDE Primary Master/Slave to [Manual]. This item is not configurable. ASUS M3N72-D 4-15 This is not configurable. Configuration options: [CHS] [LBA] [Large] [Auto] Before attempting to configure a hard disk drive, make sure you set...
... Shows the number of the hard disk cylinders. This item is not configurable. Make sure to set the IDE Primary Master/Slave to [Manual]. This item is not configurable. ASUS M3N72-D 4-15 This is not configurable. Configuration options: [CHS] [LBA] [Large] [Auto] Before attempting to configure a hard disk drive, make sure you set...
User Manual
Page 90
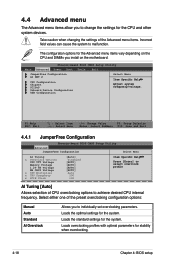
...the settings of CPU overclocking options to achieve desired CPU internal frequency. Select either one of the preset overclocking configuration options: Manual Auto Standard AI Overclock Allows you to change the settings for the CPU and other system devices. Loads the optimal settings for.... Loads overclocking profiles with optimal parameters for the Advanced menu items vary depending on the CPU and DIMMs you install on the motherboard. The configuration options for stability when overclocking. 4-18 Chapter 4: BIOS setup 4.4 Advanced menu The Advanced menu items allow you to...
...the settings of CPU overclocking options to achieve desired CPU internal frequency. Select either one of the preset overclocking configuration options: Manual Auto Standard AI Overclock Allows you to change the settings for the CPU and other system devices. Loads the optimal settings for.... Loads overclocking profiles with optimal parameters for the Advanced menu items vary depending on the CPU and DIMMs you install on the motherboard. The configuration options for stability when overclocking. 4-18 Chapter 4: BIOS setup 4.4 Advanced menu The Advanced menu items allow you to...
User Manual
Page 91
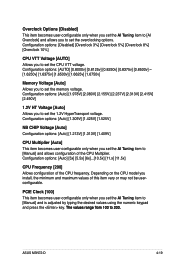
...[Auto] [1.978V] [2.080V] [2.155V] [2.237V] [2.313V] [2.415V] [2.490V] 1.2V HT Voltage [Auto] Allows you set the AI Tuning item to [Manual] and allows configuration of the CPU Multiplier. Configuration options: [Auto] [1.309V] [1.425V] [1.525V] NB CHIP Voltage [Auto] Configuration options: [Auto] [1.213V... the AI Tuning item to [AI Overclock] and allows you install, the minimum and maximum values of this item vary or may not be userconfigurable. ASUS M3N72-D 4-19 Configuration options: [AUTO] [0.8000v] [0.8125v] [0.8250v] [0.8375v] [0.8500v] ~ [1.6250v] [1.6375v] [1.6500v] [1.6625v] [1.6750v...
...[Auto] [1.978V] [2.080V] [2.155V] [2.237V] [2.313V] [2.415V] [2.490V] 1.2V HT Voltage [Auto] Allows you set the AI Tuning item to [Manual] and allows configuration of the CPU Multiplier. Configuration options: [Auto] [1.309V] [1.425V] [1.525V] NB CHIP Voltage [Auto] Configuration options: [Auto] [1.213V... the AI Tuning item to [AI Overclock] and allows you install, the minimum and maximum values of this item vary or may not be userconfigurable. ASUS M3N72-D 4-19 Configuration options: [AUTO] [0.8000v] [0.8125v] [0.8250v] [0.8375v] [0.8500v] ~ [1.6250v] [1.6375v] [1.6500v] [1.6625v] [1.6750v...

User Manual
Page 92
... Menu Timing Mode x Memory clock Frequency Memory Hole Remapping [Auto] Auto [Enabled] Item Specific Help Auto, no user limit MaxMemClk, limit by Memory clock value Manual, use Memory Clock value 4-20 Chapter 4: BIOS setup
... Menu Timing Mode x Memory clock Frequency Memory Hole Remapping [Auto] Auto [Enabled] Item Specific Help Auto, no user limit MaxMemClk, limit by Memory clock value Manual, use Memory Clock value 4-20 Chapter 4: BIOS setup
User Manual
Page 93
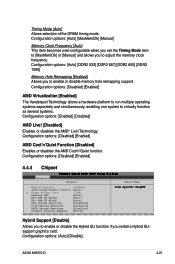
Technology. ASUS M3N72-D 4-21 Configuration options: [Auto] [Disable]. Timing Mode [Auto] Allows selection of the DRAM timing mode. Configuration options: [Auto] [DDR2 533] [DDR2 667] [DDR2 800] [DDR2 ... [Disable] Allows you to enable or disable the Hybrid SLI function if you to enable or disable memory hole remapping support. Configuration options: [Auto] [MaxMemClk] [Manual] Memory Clock Frequency [Auto] This item becomes user-configurable when you set the Timing Mode item to [MaxMemClk] or...
Technology. ASUS M3N72-D 4-21 Configuration options: [Auto] [Disable]. Timing Mode [Auto] Allows selection of the DRAM timing mode. Configuration options: [Auto] [DDR2 533] [DDR2 667] [DDR2 800] [DDR2 ... [Disable] Allows you to enable or disable the Hybrid SLI function if you to enable or disable memory hole remapping support. Configuration options: [Auto] [MaxMemClk] [Manual] Memory Clock Frequency [Auto] This item becomes user-configurable when you set the Timing Mode item to [MaxMemClk] or...
User Manual
Page 94
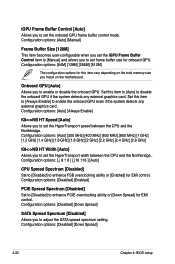
...[Enabled] PCIE Spread Spectrum [Disabled] Set to [Disabled] to set the HyperTransport width between the CPU and the Northbridge. Configuration options: [Auto] [Manual] Frame Buffer Size [128M] This item becomes user-configurable when you set frame buffer size for EMI control. Onboard GPU [Auto] Allows you to ...set the iGPU Frame Buffer Control item to [Manual] and allows you to enable or disable the onboard GPU. Set this item vary depending on the total memory size you install on the motherboard. Configuration options: [Auto] [Always Enable] K8NB HT Speed [Auto] ...
...[Enabled] PCIE Spread Spectrum [Disabled] Set to [Disabled] to set the HyperTransport width between the CPU and the Northbridge. Configuration options: [Auto] [Manual] Frame Buffer Size [128M] This item becomes user-configurable when you set frame buffer size for EMI control. Onboard GPU [Auto] Allows you to ...set the iGPU Frame Buffer Control item to [Manual] and allows you to enable or disable the onboard GPU. Set this item vary depending on the total memory size you install on the motherboard. Configuration options: [Auto] [Always Enable] K8NB HT Speed [Auto] ...
User Manual
Page 95
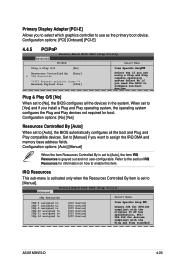
... Device] [PCI Device] [PCI Device] [PCI Device] [PCI Device] Item Specific Help Legacy ISA for devices compliant with the Plug and Play standard ASUS M3N72-D 4-23 Refer to the section IRQ Resources for devices compliant with the original PC AT bus specification, PCI/ ISA PnP for information on how to... enable this item. When set to [Auto], the BIOS automatically configures all the devices in the system. Configuration options: [Auto] [Manual] When the item Resources Controlled By is set to [Auto], the item IRQ Resources is set to [No], the BIOS configures all the boot...
... Device] [PCI Device] [PCI Device] [PCI Device] [PCI Device] Item Specific Help Legacy ISA for devices compliant with the Plug and Play standard ASUS M3N72-D 4-23 Refer to the section IRQ Resources for devices compliant with the original PC AT bus specification, PCI/ ISA PnP for information on how to... enable this item. When set to [Auto], the BIOS automatically configures all the devices in the system. Configuration options: [Auto] [Manual] When the item Resources Controlled By is set to [Auto], the item IRQ Resources is set to [No], the BIOS configures all the boot...

User Manual
Page 118
You can also find this user guide. 5-6 Chapter 5: Software support Install the Adobe® Acrobat® Reader from the Utilities menu before opening a user manual file. 5.2.6 ASUS Contact information Click the Contact tab to open the folder of the user manual. Click an item to display the ASUS contact information. Most user manual files are in Portable Document Format (PDF). 5.2.5 Manual menu The Manual menu contains a list of this information on the inside front cover of supplementary user manuals.
You can also find this user guide. 5-6 Chapter 5: Software support Install the Adobe® Acrobat® Reader from the Utilities menu before opening a user manual file. 5.2.6 ASUS Contact information Click the Contact tab to open the folder of the user manual. Click an item to display the ASUS contact information. Most user manual files are in Portable Document Format (PDF). 5.2.5 Manual menu The Manual menu contains a list of this information on the inside front cover of supplementary user manuals.
User Manual
Page 145
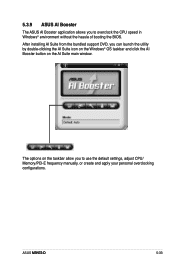
... on the taskbar allow you to use the default settings, adjust CPU/ Memory/PCI-E frequency manually, or create and apply your personal overclocking configurations. ASUS M��3�N�7�2�-D� 5-33 5.3.9 ASUS AI Booster The ASUS AI Booster application allows you to overclock the CPU speed in WIndows® environment without the...
... on the taskbar allow you to use the default settings, adjust CPU/ Memory/PCI-E frequency manually, or create and apply your personal overclocking configurations. ASUS M��3�N�7�2�-D� 5-33 5.3.9 ASUS AI Booster The ASUS AI Booster application allows you to overclock the CPU speed in WIndows® environment without the...

User Manual
Page 152
... connection. Click OK to enable WiFi and establish the wireless connection. • If you use a network cable connected directly to configure the static IP settings manually. • If you use wireless, click Setup for the WiFi option. DHCP). If this is the case, you don't need to press the "Refresh" button...
... connection. Click OK to enable WiFi and establish the wireless connection. • If you use a network cable connected directly to configure the static IP settings manually. • If you use wireless, click Setup for the WiFi option. DHCP). If this is the case, you don't need to press the "Refresh" button...
User Manual
Page 155
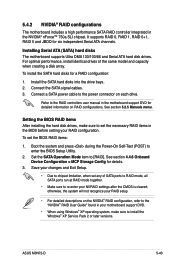
... your RAID configuration. Installing Serial ATA (SATA) hard disks The motherboard supports Ultra DMA 133/100/66 and Serial ATA hard disk drives. It supports RAID 0, RAID 1, RAID 0+1, RAID 5 and JBOD for details. 3. ASUS M3N72-D 5-43 For optimal performance, install identical drives of SATA ports to...configuration, refer to the "NVIDIA® RAID User Guide" found in the NVIDIA® nForce™ 750a SLI chipset. See section 5.2.5 Manuals menu. Connect the SATA signal cables. 3. Setting the BIOS RAID items After installing the hard disk drives, make sure to install the ...
... your RAID configuration. Installing Serial ATA (SATA) hard disks The motherboard supports Ultra DMA 133/100/66 and Serial ATA hard disk drives. It supports RAID 0, RAID 1, RAID 0+1, RAID 5 and JBOD for details. 3. ASUS M3N72-D 5-43 For optimal performance, install identical drives of SATA ports to...configuration, refer to the "NVIDIA® RAID User Guide" found in the NVIDIA® nForce™ 750a SLI chipset. See section 5.2.5 Manuals menu. Connect the SATA signal cables. 3. Setting the BIOS RAID items After installing the hard disk drives, make sure to install the ...


