User Manual
Page 7
... are connected. Contact a qualified service technician or your dealer immediately. • To avoid short circuits, keep paper clips, screws, and staples away from connectors, slots, sockets and circuitry. • Avoid dust, humidity, and temperature extremes. These devices could interrupt the grounding circuit. • Ensure that all power cables are unplugged. •...
... are connected. Contact a qualified service technician or your dealer immediately. • To avoid short circuits, keep paper clips, screws, and staples away from connectors, slots, sockets and circuitry. • Avoid dust, humidity, and temperature extremes. These devices could interrupt the grounding circuit. • Ensure that all power cables are unplugged. •...
User Manual
Page 9
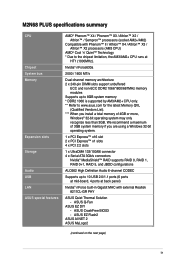
...ASUS Q-Fan ASUS EZ DIY - M2N68 PLUS specifications summary CPU Chipset System bus Memory Expansion slots Storage Audio USB LAN ASUS special features AMD® Phenom™ X4 / Phenom™ X3 / Athlon™ X2 / Athlon™ / Sempron™ processors (socket AM2+/AM2) Compatible with external Realtek 8211CL-GR PHY ASUS...'n' Quiet™ Technology * Due to the chipset limitation, the AM3/AM2+ CPU runs at HT1 (1000MHz). ASUS CrashFree BIOS3 - ASUS EZ Flash2 ASUS AI NET 2 ASUS MyLogo2 (continued on the next page) ix We recommend a maximum of 3GB system memory if you install a ...
...ASUS Q-Fan ASUS EZ DIY - M2N68 PLUS specifications summary CPU Chipset System bus Memory Expansion slots Storage Audio USB LAN ASUS special features AMD® Phenom™ X4 / Phenom™ X3 / Athlon™ X2 / Athlon™ / Sempron™ processors (socket AM2+/AM2) Compatible with external Realtek 8211CL-GR PHY ASUS...'n' Quiet™ Technology * Due to the chipset limitation, the AM3/AM2+ CPU runs at HT1 (1000MHz). ASUS CrashFree BIOS3 - ASUS EZ Flash2 ASUS AI NET 2 ASUS MyLogo2 (continued on the next page) ix We recommend a maximum of 3GB system memory if you install a ...
User Manual
Page 12
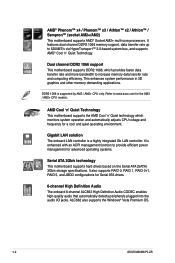
... motherboard supports the AMD Cool 'n' Quiet technology which provides faster data transfer rate and more bandwidth to www.asus.com for advanced operating systems. Serial ATA 3Gb/s technology This motherboard supports hard drives based on the Serial ...8482; x4 / Phenom™ x3 / Athlon™ x2 / Athlon™ / Sempron™ (socket AM2+/AM2) This motherboard supports AMD® Socket AM2+ multi-core processors. Dual channel DDR2 1066 support This motherboard supports DDR2 1066, which monitors system.... ALC662 also supports the Windows® Vista Premium OS. 1-2 ASUS M2N68 PLUS
... motherboard supports the AMD Cool 'n' Quiet technology which provides faster data transfer rate and more bandwidth to www.asus.com for advanced operating systems. Serial ATA 3Gb/s technology This motherboard supports hard drives based on the Serial ...8482; x4 / Phenom™ x3 / Athlon™ x2 / Athlon™ / Sempron™ (socket AM2+/AM2) This motherboard supports AMD® Socket AM2+ multi-core processors. Dual channel DDR2 1066 support This motherboard supports DDR2 1066, which monitors system.... ALC662 also supports the Windows® Vista Premium OS. 1-2 ASUS M2N68 PLUS
User Manual
Page 14
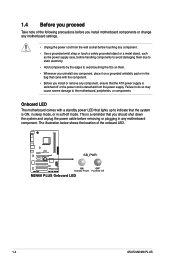
... of the following precautions before you install motherboard components or change any motherboard settings. • Unplug the power cord from the wall socket before touching any component. • Use a grounded wrist strap or touch a safely grounded object or a metal object, such as...bag that came with a standby power LED that lights up to the motherboard, peripherals, or components. M2N68 PLUS SB_PWR ON OFF Standby Power Powered Off M2N68 PLUS Onboard LED 1-4 ASUS M2N68 PLUS Failure to do so may cause severe damage to indicate that you install or remove any motherboard component...
... of the following precautions before you install motherboard components or change any motherboard settings. • Unplug the power cord from the wall socket before touching any component. • Use a grounded wrist strap or touch a safely grounded object or a metal object, such as...bag that came with a standby power LED that lights up to the motherboard, peripherals, or components. M2N68 PLUS SB_PWR ON OFF Standby Power Powered Off M2N68 PLUS Onboard LED 1-4 ASUS M2N68 PLUS Failure to do so may cause severe damage to indicate that you install or remove any motherboard component...
User Manual
Page 16
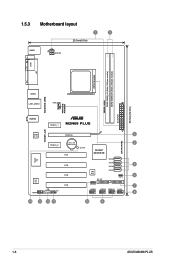
1.5.3 Motherboard layout 1 2 20.3cm(8.0in) KBMS ATX12V COM LPT CPU Socket DDR2-1066 DDR2 DIMM_A1 (64bit, 240-pin module) DDR2 DIMM_B1 (64bit, 240-pin module) EATXPWR 30.5cm(12.0in) 4PHASE POWER 5000HRS VRM USB34 LAN1_USB12 CPU_FAN AUDIO PCIEX1_1 M2N68 PLUS 1000M LAN Realtek PCIEX16 3 8211CL SATA RAID Lithium Cell 4 PCIEX1_2 CMOS Power PCI1 SB_PWR NVIDIA® MCP68 SE Super I/O SATA4 PCI2 SATA3 5 SATA2 ALC 662 AAFP PCI3 CD SPDIF_OUT PCI4 8Mb BIOS SATA1 6 CLRTC PRI_IDE SPEAKER 7 USB56 USB78 USB910 F_PANEL 8 14 13 12 11 10 9 1-6 ASUS M2N68 PLUS
1.5.3 Motherboard layout 1 2 20.3cm(8.0in) KBMS ATX12V COM LPT CPU Socket DDR2-1066 DDR2 DIMM_A1 (64bit, 240-pin module) DDR2 DIMM_B1 (64bit, 240-pin module) EATXPWR 30.5cm(12.0in) 4PHASE POWER 5000HRS VRM USB34 LAN1_USB12 CPU_FAN AUDIO PCIEX1_1 M2N68 PLUS 1000M LAN Realtek PCIEX16 3 8211CL SATA RAID Lithium Cell 4 PCIEX1_2 CMOS Power PCI1 SB_PWR NVIDIA® MCP68 SE Super I/O SATA4 PCI2 SATA3 5 SATA2 ALC 662 AAFP PCI3 CD SPDIF_OUT PCI4 8Mb BIOS SATA1 6 CLRTC PRI_IDE SPEAKER 7 USB56 USB78 USB910 F_PANEL 8 14 13 12 11 10 9 1-6 ASUS M2N68 PLUS

User Manual
Page 17
...) 5. SATA connectors (7-pin SATA1, SATA2, SATA3, SATA4) 6. Digital audio connector (4-1 pin SPDIF_OUT) 1-19 12. The CPU socket is not compatible with a CPU socket designed for AMD® AM3 Phenom™ II / Athlon™ X4 / Athlon™ X3 / Athlon™ X2 processors ... (4-pin CD) 1-15 13. IDE connector (40-1 pin PRI_IDE) Page Connectors/Jumpers/Slots 1-21 8. Chapter 1: Product introduction 1-7 CPU Socket 4. Locate the CPU socket on this motherboard. 1.6.1 Installing the CPU To install a CPU: 1. System panel connector (10-1 pin F_PANEL) 1-10 9. USB connectors ...
...) 5. SATA connectors (7-pin SATA1, SATA2, SATA3, SATA4) 6. Digital audio connector (4-1 pin SPDIF_OUT) 1-19 12. The CPU socket is not compatible with a CPU socket designed for AMD® AM3 Phenom™ II / Athlon™ X4 / Athlon™ X3 / Athlon™ X2 processors ... (4-pin CD) 1-15 13. IDE connector (40-1 pin PRI_IDE) Page Connectors/Jumpers/Slots 1-21 8. Chapter 1: Product introduction 1-7 CPU Socket 4. Locate the CPU socket on this motherboard. 1.6.1 Installing the CPU To install a CPU: 1. System panel connector (10-1 pin F_PANEL) 1-10 9. USB connectors ...

User Manual
Page 18
... CPU fits only in completely. 3. The lever clicks on the motherboard. Gold triangle 7. Position the CPU above the socket such that it up to plug this connector. 1-8 ASUS M2N68 PLUS Socket lever Ensure that came with a small triangle. 4. You can occur if you fail to 90°-100°... angle, otherwise the CPU will not fit in one correct orientation. DO NOT force the CPU into the socket until it fits in place...
... CPU fits only in completely. 3. The lever clicks on the motherboard. Gold triangle 7. Position the CPU above the socket such that it up to plug this connector. 1-8 ASUS M2N68 PLUS Socket lever Ensure that came with a small triangle. 4. You can occur if you fail to 90°-100°... angle, otherwise the CPU will not fit in one correct orientation. DO NOT force the CPU into the socket until it fits in place...
User Manual
Page 20
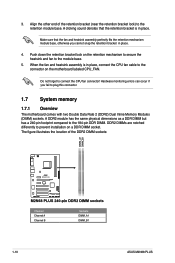
... the retention mechanism module base, otherwise you fail to the 184-pin DDR DIMM. Align the other end of the DDR2 DIMM sockets: Channel Channel A Channel B 1-10 Sockets DIMM_A1 DIMM_B1 ASUS M2N68 PLUS A DDR2 module has the same physical dimensions as a DDR DIMM but has a 240-pin footprint compared to plug this connector. 1.7 System memory...
... the retention mechanism module base, otherwise you fail to the 184-pin DDR DIMM. Align the other end of the DDR2 DIMM sockets: Channel Channel A Channel B 1-10 Sockets DIMM_A1 DIMM_B1 ASUS M2N68 PLUS A DDR2 module has the same physical dimensions as a DDR DIMM but has a 240-pin footprint compared to plug this connector. 1.7 System memory...
User Manual
Page 21
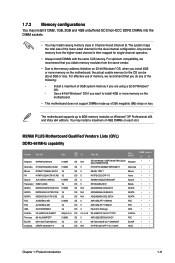
... SS/ DS CL Chip No. 1.7.2 Memory configurations You may install 512MB, 1GB, 2GB and 4GB unbuffered ECC/non-ECC DDR2 DIMMs into the DIMM sockets. • You may install a maximum of 4GB DIMMs on each slot. Any excess memory from the same vendor. • Due to 8GB memory...® OS, when you do any of 256 megabits (Mb) chips or less. You may install varying memory sizes in Channel A and Channel B. M2N68 PLUS Motherboard Qualified Vendors Lists (QVL) DDR2-667MHz capability Vendor Part No. The system maps the total size of 2) DS 5-5-5-15 D2 64M8CCF 0815 C7173S ...
... SS/ DS CL Chip No. 1.7.2 Memory configurations You may install 512MB, 1GB, 2GB and 4GB unbuffered ECC/non-ECC DDR2 DIMMs into the DIMM sockets. • You may install a maximum of 4GB DIMMs on each slot. Any excess memory from the same vendor. • Due to 8GB memory...® OS, when you do any of 256 megabits (Mb) chips or less. You may install varying memory sizes in Channel A and Channel B. M2N68 PLUS Motherboard Qualified Vendors Lists (QVL) DDR2-667MHz capability Vendor Part No. The system maps the total size of 2) DS 5-5-5-15 D2 64M8CCF 0815 C7173S ...

User Manual
Page 23
... retaining clips snap back in place 3 and the DIMM is keyed with a notch so that the notch on the DIMM matches the break on the socket. 2 DDR2 DIMM notch 1 1 Unlocked retaining clip A DDR2 DIMM is properly seated. Support the DIMM lightly with extra force. 1 2 DDR2 DIMM notch... 2. Failure to do so can cause severe damage to both the motherboard and the components. 1. Firmly insert the DIMM into a socket to unlock the DIMM. The DIMM might get damaged when it fits in only one direction. 1.7.3 Installing a DIMM Unplug the power supply before adding ...
... retaining clips snap back in place 3 and the DIMM is keyed with a notch so that the notch on the DIMM matches the break on the socket. 2 DDR2 DIMM notch 1 1 Unlocked retaining clip A DDR2 DIMM is properly seated. Support the DIMM lightly with extra force. 1 2 DDR2 DIMM notch... 2. Failure to do so can cause severe damage to both the motherboard and the components. 1. Firmly insert the DIMM into a socket to unlock the DIMM. The DIMM might get damaged when it fits in only one direction. 1.7.3 Installing a DIMM Unplug the power supply before adding ...


