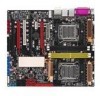
L1N64 WS Pro English user manual E3014
Page 3
Contents Notices...vii Safety information viii About this guide ix L1N64-SLI WS specifications summary xi Chapter 1: Product introduction 1.1 Welcome 1-1 1.2 Special features 1-2 1.2.1 Product highlights 1-2 1.2.2 ASUS Special features 1-4 Chapter 2: Hardware information 2.1 Before you proceed 2-1 2.2 Motherboard overview 2-2 2.2.1 Placement direction 2-2 2.2.2 Screw holes 2-2 2.2.3 Motherboard layout 2-3 2.2.4 Layout contents 2-4 2.3 Central Processing Unit (CPU 2-6 2.3.1 Installing the CPU 2-6 2.3.2 Installing the heatsink and fan 2-9 2.3.3 Installing the...
L1N64 WS Pro English user manual E3014
Page 11
... Supports two identical NVIDIA® SLI™-ready graphics cards 2x NVIDIA® MCP55PXE supports: - 1 x IDE connector for up to two Ultra DMA 133/100 devices - 12 x Serial ATA 3.0 Gb/s connectors support twelve Serial ATA devices - L1N64-SLI WS specifications summary CPU Chipset System bus... Memory Expansion slots Scalable Link Interface (SLI™) Storage LAN High Definition Audio IEEE 1394 USB Supports 2 AMD Atholon™ ...
L1N64 WS Pro English user manual E3014
Page 12
... Recall) - vCore: Adjustable CPU voltage at 1 MHz increment ASUS 8-Phase Power Design for each VRM Q-Fan 2 ASUS Heat-pipe Thermal solution Multi-language BIOS SATA on the Go CrashFree BIOS 3 1 x PS/2 keyboard port (purple) 1 x PS/2 mouse port (green) 1 x ...Stepless Frequency Selection(SFS) allows FSB tuning from 100 MHz to 400 MHz at 1 MHz increment - vDIMM: 25-step DRAM voltage control - L1N64-SLI WS specifications summary ASUS special features Performance ASUS special features Thermal ASUS special features Life Rear panel Internal connectors Intelligent overclocking tools: -
L1N64 WS Pro English user manual E3014
Page 13
L1N64-SLI WS specifications summary BIOS features 8 Mb AMI BIOS, PnP, DMI 2.0, WfM2.0, SM BIOS 2.3 Manageability WOL by PME, WOR by PME, PXE, AI NET 2, Chassis Intrusion Power requirements ATX power supply (with 24-pin and 4-pin 12 V plugs) ATX 12 V 2.0 compliant Support CD contents Device drivers BIOS flash utility under DOS ASUS PC Probe II ASUS Update NVIDIA® RAID Form factor CEB form factor: 12 in x 10.5 in (30.5 cm x 26.7 cm) *Specifications are subject to change without notice. xiii
L1N64 WS Pro English user manual E3014
Page 16
Chapter summary 1 1.1 Welcome 1-1 1.2 Special features 1-2 ASUS L1N64-SLI WS
L1N64 WS Pro English user manual E3014
Page 17
Before you for buying an ASUS® L1N64-SLI WS motherboard! The motherboard delivers a host of new features and latest technologies, making it , check the items in the long line of ASUS quality motherboards! ASUS L1N64-SLI WS 1- Thank you start installing the motherboard, and hardware devices on it another standout in your package with the list below. 1.1 Welcome!
L1N64 WS Pro English user manual E3014
Page 19
...page 2-26 for details. USB 2.0 technology The motherboard implements the Universal Serial Bus (USB) 2.0 specification, dramatically increasing the connection speed from the 12 Mbps bandwidth on the rear panel) provide smart setup, and hot-plug function. ASUS L1N64-SLI WS 1- Leveraging these Serial ATA 3.0 Gb/s features is... the latest I /II technology and SATA-On-The-Go The motherboard fully supports the Serial ATA II 3.0 Gb/s technology through the Serial ATA interfaces and the NVIDIA® nForce® 680a SLI™ chipset. IEEE 1394a support The IEEE 1394a interface provides high...
L1N64 WS Pro English user manual E3014
Page 22
Chapter summary 2 2.1 Before you proceed 2-1 2.2 Motherboard overview 2-2 2.3 Central Processing Unit (CPU 2-6 2.4 System memory 2-13 2.5 Expansion slots 2-16 2.6 Jumper 2-20 2.7 Connectors 2-21 ASUS L1N64-SLI WS
L1N64 WS Pro English user manual E3014
Page 23
... that the ATX power supply is switched off mode. The illustration below shows the location of the following precautions before you install motherboard components or change any motherboard settings. • Unplug the power cord from the wall socket before touching any component. • Use a grounded wrist strap... case, before removing or plugging in soft‑off or the power cord is detached from the power supply. L1N64-SLI WS SB_PWR L1N64-SLI WS Onboard LED ON Standby Power OFF Powered Off ASUS L1N64-SLI WS 2- 2.1 Before you proceed Take note of the onboard LED.
L1N64 WS Pro English user manual E3014
Page 24
... goes to the rear part of the chassis L1N64-SLI WS 2- Chapter 2: Hardware information Do not overtighten the screws! Doing so can cause you place it . Place this side towards the rear of the chassis as indicated in the correct orientation. 2.2 Motherboard overview Before you install the motherboard, study the configuration of your chassis to...
L1N64 WS Pro English user manual E3014
Page 27
... button/soft-off button (2-pin PWR) • Reset button (2-pin RESET) Page 2-23 2-23 2-25 2-26 2-26 2-27 2-28 2-28 2-29 2-30 2-30 2-31 2-32 ASUS L1N64-SLI WS 2- CPU, chassis, power, and Heat-pipe Fan connectors (4-pin CPU0_FAN, 4-pin CPU1_FAN, 3-pin HP_FAN1~3, 3-pin CHA_FAN1~4, 3-pin SPS_FAN1) 7.
L1N64 WS Pro English user manual E3014
Page 28
... PnP cap/socket contacts/motherboard components. ASUS will not boot up. 2- Chapter 2: Hardware information Contact your retailer immediately if the PnP cap is missing, or if you and the load lever is on your left. • When installing only one CPU, always install the CPU on the motherboard. CPU1 CPU0 L1N64-SLI WS L1N64-SLI WS CPU Socket •...
L1N64 WS Pro English user manual E3014
Page 29
Gold triangle mark ASUS L1N64-SLI WS 2- Retention tab A Load lever PnP cap This side of B the socket box should fit into the CPU notches. Lift the load plate with your thumb ...
L1N64 WS Pro English user manual E3014
Page 31
To install the CPU heatsink and fan: 1. ASUS L1N64-SLI WS 2- If the instructions in this section do not have to remove the retention module base when installing the CPU or installing other motherboard components. • If you purchased a separate CPU heatsink and fan assembly, make sure that you install the heatsink and fan ... module base is properly applied to ensure optimum thermal condition and performance. Make sure that a Thermal Interface Material is already installed on the motherboard upon purchase. • You do not match the CPU documentation, follow the latter.
L1N64 WS Pro English user manual E3014
Page 33
... FAN PWM CPU1 FAN IN CPU1 FAN PWR GND L1N64-SLI WS L1N64-SLI WS CPU fan connectors Do not forget to plug this connector. 6. ASUS L1N64-SLI WS 2-11 Hardware monitoring errors can occur if you have installed a second CPU, then connect the fan cable to the connector on the motherboard labeled CPU0_FAN. Repeat steps 1 to 5 to install the other...
L1N64 WS Pro English user manual E3014
Page 35
... DIMM_A1 and DIMM_B1 slots only. • Always use memory modules with four Double Data Rate 2 (DDR2) Dual Inline Memory Modules (DIMM) sockets. ASUS L1N64-SLI WS 2-13 2.4 System memory 2.4.1 Overview The motherboard comes with same memory size and frequency. • For dual-channel memory configuration, the DDR2 DIMMs can be installed in DIMM_A1 and DIMM_A2...
L1N64 WS Pro English user manual E3014
Page 37
... the DIMM lightly with extra force. 2. Simultaneously press the retaining clips outward to both the motherboard and the components. Unlock a DIMM socket by pressing the retaining clips outward. 2. Remove the DIMM from the socket. 2 1 DDR2 DIMM notch ASUS L1N64-SLI WS 2-15 Do not force a DIMM into the socket until the retaining clips snap back...
L1N64 WS Pro English user manual E3014
Page 41
• Connect a rear chassis fan to the chassis (CHA_FAN1 or CHA_FAN2) connector when using two graphics cards for details. See page 2-25 for better thermal environment. See page 2-27 for details. • In single card mode, you may use either the blue or black slot for PCI Express x16 graphics cards. • We recommend that you provide sufficient power when running NVIDIA® SLI™ mode. ASUS L1N64-SLI WS 2-19
L1N64 WS Pro English user manual E3014
Page 42
... system setup parameters by erasing the CMOS RTC RAM data. Remove the onboard battery. 3. Keep the cap on CLRTC jumper default position. L1N64-SLI WS CLRTC 12 23 Normal (Default) L1N64-SLI WS Clear RTC RAM Clear RTC • Make sure to re-enter your previous BIOS settings after you to clear the Real Time Clock...