

User Guide
Page 26
...-45) port 8. Serial (COM1) port 6. CPU sockets 2. RJ-45 port for iKVM 3. 2.2.5 Layout contents Slots/Soocket 1. PCI Express x 16 slot (x16/x8 link) 6. Clear RTC RAM (CLRTC1) 2.
...-45) port 8. Serial (COM1) port 6. CPU sockets 2. RJ-45 port for iKVM 3. 2.2.5 Layout contents Slots/Soocket 1. PCI Express x 16 slot (x16/x8 link) 6. Clear RTC RAM (CLRTC1) 2.

User Guide
Page 43
... remove the cap on pins 2-3 for about 5-10 seconds, then move the jumper again to clear the CMOS RTC RAM data. ASUS KCMR-D12 2-25 Clear RTC RAM (CLRTC1) This jumper allows you to pins 1-2. 3. Turn OFF the computer and unplug the power cord. 2. Plug the power cord and turn ON the computer. 4.... After the CMOS clearance, reinstall the battery. Move the jumper cap from pins 1-2 (default) to re-enter data. The onboard button cell battery powers the RAM data in CMOS. Hold down the key during the boot process and enter BIOS setup to pins 2-3. You can clear the CMOS memory of date...
... remove the cap on pins 2-3 for about 5-10 seconds, then move the jumper again to clear the CMOS RTC RAM data. ASUS KCMR-D12 2-25 Clear RTC RAM (CLRTC1) This jumper allows you to pins 1-2. 3. Turn OFF the computer and unplug the power cord. 2. Plug the power cord and turn ON the computer. 4.... After the CMOS clearance, reinstall the battery. Move the jumper cap from pins 1-2 (default) to re-enter data. The onboard button cell battery powers the RAM data in CMOS. Hold down the key during the boot process and enter BIOS setup to pins 2-3. You can clear the CMOS memory of date...
User Guide
Page 65
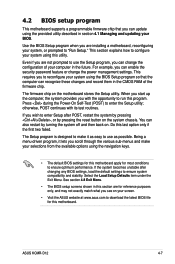
... Being a menu-driven program, it as possible. See section 4.8 Exit Menu. • The BIOS setup screens shown in this motherboard apply for this program. ASUS KCMR-D12 4-7 If the system becomes unstable after POST, restart the system by pressing , or by turning the system off and then back on your screen. •... you to reconfigure your system using the BIOS Setup program so that the computer can recognize these changes and record them in the CMOS RAM of your computer in the future. Even if you are for this section are not prompted to use as easy to use the Setup...
... Being a menu-driven program, it as possible. See section 4.8 Exit Menu. • The BIOS setup screens shown in this motherboard apply for this program. ASUS KCMR-D12 4-7 If the system becomes unstable after POST, restart the system by pressing , or by turning the system off and then back on your screen. •... you to reconfigure your system using the BIOS Setup program so that the computer can recognize these changes and record them in the CMOS RAM of your computer in the future. Even if you are for this section are not prompted to use as easy to use the Setup...

User Guide
Page 78
...] [327.7us] [655.4us] [1.31ms] [2.62ms] [5.24ms] [10.49ms] [20.97ms] [42.00ms] [84.00ms] Data Cache BG Scrub [Disabled] Allows the L1 Data Cache ram to enable or disable the 4-Bit ECC Mode. ECC Configuration Advanced BIOS SETUP UTILITY CEPCUC BCroindfigeurCahtiposnet Configuration CPU REVISION CEuCrCreMnotdeC SI Freque ncy CurDrReAnMtEMCeCmoErnyabFlree quen...
...] [327.7us] [655.4us] [1.31ms] [2.62ms] [5.24ms] [10.49ms] [20.97ms] [42.00ms] [84.00ms] Data Cache BG Scrub [Disabled] Allows the L1 Data Cache ram to enable or disable the 4-Bit ECC Mode. ECC Configuration Advanced BIOS SETUP UTILITY CEPCUC BCroindfigeurCahtiposnet Configuration CPU REVISION CEuCrCreMnotdeC SI Freque ncy CurDrReAnMtEMCeCmoErnyabFlree quen...
User Guide
Page 79
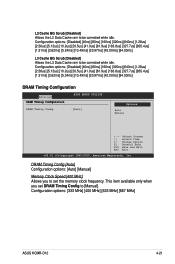
...be corrected while idle. Configuration options: [333 MHz] [400 MHz] [533 MHz] [667 MHz] ASUS KCMR-D12 4-21 L2 Cache BG Scrub [Disabled] Allows the L2 Data Cache ram to [Manual]. Manual Memory Frequency Memory Mode Demand Scrubbing Patrol Scrubbing Throttling - Closed Loop Throttling - DRAM....4us] [1.31ms] [2.62ms] [5.24ms] [10.49ms] [20.97ms] [42.00ms] [84.00ms] L3 Cache BG Scrub [Disabled] Allows the L3 Data Cache ram to set DRAM Timing Config to be corrected while idle. Configuration options: [Disabled] [40ns] [80ns] [160ns] [320ns] [640ns] [1.28us] [2.56us] [5.12us...
...be corrected while idle. Configuration options: [333 MHz] [400 MHz] [533 MHz] [667 MHz] ASUS KCMR-D12 4-21 L2 Cache BG Scrub [Disabled] Allows the L2 Data Cache ram to [Manual]. Manual Memory Frequency Memory Mode Demand Scrubbing Patrol Scrubbing Throttling - Closed Loop Throttling - DRAM....4us] [1.31ms] [2.62ms] [5.24ms] [10.49ms] [20.97ms] [42.00ms] [84.00ms] L3 Cache BG Scrub [Disabled] Allows the L3 Data Cache ram to set DRAM Timing Config to be corrected while idle. Configuration options: [Disabled] [40ns] [80ns] [160ns] [320ns] [640ns] [1.28us] [2.56us] [5.12us...

User Guide
Page 93
Select the Change Supervisor Password item and press . 2. ASUS KCMR-D12 4-35 Change Supervisor Password Change User Password ←→ Select Screen ↑... on how to disable password. After you set a Supervisor Password: 1. again to erase the RTC RAM. To set a password, this item to set your BIOS password, you can clear it by erasing the CMOS Real... Time Clock (RTC) RAM. Confirm the password when prompted. See section 2.6 Jumper for information on top of at least six letters and/...
Select the Change Supervisor Password item and press . 2. ASUS KCMR-D12 4-35 Change Supervisor Password Change User Password ←→ Select Screen ↑... on how to disable password. After you set a Supervisor Password: 1. again to erase the RTC RAM. To set a password, this item to set your BIOS password, you can clear it by erasing the CMOS Real... Time Clock (RTC) RAM. Confirm the password when prompted. See section 2.6 Jumper for information on top of at least six letters and/...

User Guide
Page 96
... you select this option or if you select this operation. ←→ Select Screen ↑↓ Select Item Enter Go to the CMOS RAM. Pressing does not immediately exit this option, a confirmation appears. Load Setup Defaults This option allows you selected are saved to Sub Screen F1 ...a message asking if you made and restore the previously saved values. After selecting this menu. An onboard backup battery sustains the CMOS RAM so it stays on the Setup menus. Exit and Discard Changes Select this option from the legend bar to fields other changes before saving...
... you select this option or if you select this operation. ←→ Select Screen ↑↓ Select Item Enter Go to the CMOS RAM. Pressing does not immediately exit this option, a confirmation appears. Load Setup Defaults This option allows you selected are saved to Sub Screen F1 ...a message asking if you made and restore the previously saved values. After selecting this menu. An onboard backup battery sustains the CMOS RAM so it stays on the Setup menus. Exit and Discard Changes Select this option from the legend bar to fields other changes before saving...