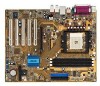
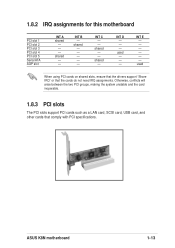
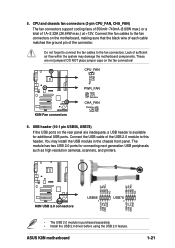
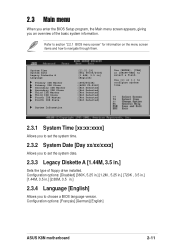
K8N User's manual for English Version E1868
Page 12
... solution. Thank you start installing the motherboard, and hardware devices on it another standout in your motherboard package for buying the ASUS® K8N motherboard! Before you for the following items. ASUS K8N motherboard ASUS motherboard support CD 1 x Ultra DMA 133/100/66 cables 2 x Serial ATA cables 1 x Floppy disk cable I/O shield Bag of extra jumper... you ahead in the world of the above items is damaged or missing, contact your retailer. 1-2 Chapter 1: Product introduction The motherboard combines the powers of ASUS quality motherboards!
K8N User's manual for English Version E1868
Page 13
... x86-64 technology. This processor is a 32-bit processor that enhance hard disk performance and data backup protection without the cost of ownership and development. ASUS K8N motherboard 1-3 1.3 Special features 1.3.1 Product Highlights Latest processor technology The motherboard supports the AMD Athlon™ 64 and AMD Sempron™ desktop processors. The AMD Sempron...
K8N User's manual for English Version E1868
Page 15
... as the power supply case, before handling components to the motherboard, peripherals, and/or components. 1.4 Before you proceed Take note of the onboard LED. ® K8N K8N Onboard LED SB_PWR ON Standby Power OFF Powered Off ASUS K8N motherboard 1-5
K8N User's manual for English Version E1868
Page 17
Place this side towards the rear of the chassis as indicated in the image below. 1.5.3 Screw holes Place nine (9) screws into the chassis in the correct orientation. Doing so may damage the motherboard. Do not overtighten the screws! The edge with external ports goes to the chassis. 1.5.2 Placement direction When installing the motherboard, make sure that you place it into the holes indicated by circles to secure the motherboard to the rear part of the chassis R K8N ASUS K8N motherboard 1-7
K8N User's manual for English Version E1868
Page 19
... in one correct orientation. Carefully insert the CPU into the socket to 90°-100° angle, otherwise the CPU does not fit in place. ASUS K8N motherboard 1-9 Unlock the socket by pressing the lever sideways, then lift it fits in completely. 3. Locate the 754-pin ZIF socket on the side tab...
K8N User's manual for English Version E1868
Page 21
...Vendors List The following table lists the PC3200 (DDR400) memory modules that have been tested and qualified for this motherboard. Visit the ASUS website (www.asus.com) for the latest DDR 400 QVL for use with this motherboard. Double-Sided DIMMs Size 256MB 512MB 256MB 512MB 256MB 512MB ...256MB 512MB 512MB 256MB 512MB 256MB 512MB 256MB 256MB 256MB 512MB 256MB 512MB 256MB 512MB 256MB 512MB 256MB 512MB ASUS K8N motherboard 1-11 Table 1 Memory configurations Number of DIMMs 1 1 1 1 1 1 2 2 2 2 2 2 2 2 2 2 2 2 3 3 3 3 3 3 3 3 DIMM1 Single ...
K8N User's manual for English Version E1868
Page 23
... B - shared - - used When using PCI cards on shared slots, ensure that the drivers support "Share IRQ" or that comply with PCI specifications. shared - INT D - - - INT E - - - - - - ASUS K8N motherboard 1-13 INT C - - used - - - 1.8.2 IRQ assignments for this motherboard PCI slot 1 PCI slot 2 PCI slot 3 PCI slot 4 PCI slot 5 Serial ATA AGP slot INT A shared...
K8N User's manual for English Version E1868
Page 25
... the jumper default position. ASUS K8N motherboard 1-15 1.9 Jumpers 1. Move the jumper cap from pins 1-2 (default) to pins 1-2. 3. Hold down and reboot the system so BIOS can clear the CMOS memory of date, time, and system setup parameters by the onboard button cell battery. CLRTC ® 12 23 K8N K8N Clear RTC RAM jumper...
K8N User's manual for English Version E1868
Page 27
... player or other devices. 3. In 4-channel, 6-channel and 8-channel mode, the function of this jack becomes Front Speaker Out. 8. This Mic (pink) port connects a microphone. ASUS K8N motherboard 1-17 Parallel port. This Rear Speaker (gray) port connects to the side speakers in an 8-channel audio configuration. 6. Microphone port. Line Out port. Side...
K8N User's manual for English Version E1868
Page 29
...near the blue connector on the UltraATA cable is removed to prevent incorrect insertion when using ribbon cables with pin 5 plug). ® K8N FLOPPY PIN 1 NOTE: Orient the red markings on the floppy ribbon cable to the floppy drive. (Pin 5 is intentional. ®...zigzag) on the UltraATA cable connector. After connecting one end to the motherboard, connect the other end to PIN 1. PIN 1 2. K8N Floppy disk drive connector ASUS K8N motherboard 1-19 IDE connectors (40-1 pin PRI_IDE, SEC_IDE) This connector supports the provided UltraATA133 IDE hard disk ribbon cable. Floppy disk drive...
K8N User's manual for English Version E1868
Page 31
USB header (10-1 pin USB56, USB78) If the USB ports on the fan connectors! USB+5V USB_P8USB_P8+ GND NC USB+5V USB_P6USB_P6+ GND NC ® K8N K8N USB 2.0 connectors USB56 1 USB78 1 USB+5V USB_P5USB_P5+ GND • The USB 2.0 module is available for connecting next generation USB peripherals such as high resolution...on the motherboard, making sure that the black wire of each cable matches the ground pin of the USB 2.0 module to the fan connectors. ASUS K8N motherboard USB+5V USB_P7USB_P7+ GND 1-21 Lack of 1A~2.22A (26.64W max.) at +12V. 5. CPU_FAN Rotation +12V GND ®...
K8N User's manual for English Version E1868
Page 33
... connectors support the thin Serial ATA cables for playing or editing audio files. +5V J2B1 J2CX MIDI_OUT J2CY J2B2 MIDI_IN ® K8N K8N Game connector GAME +5V J1B1 J1CX GND GND J1CY J1B2 +5V The GAME/MIDI module is available, connect the GAME/MIDI cable..., faster than the standard parallel ATA with 133MB/s (Ultra ATA/133). ® K8N K8N SATA connector SATA2 SATA1 GND RSATA_RXP2 RSATA_RXN2 GND RSATA_TXN2 RSATA_TXP2 GND GND RSATA_RXP1 RSATA_RXN1 GND RSATA_TXN1 RSATA_TXP1 GND ASUS K8N motherboard 1-23 If a GAME/MIDI module is purchased separately. 10. The current Serial...
K8N User's manual for English Version E1868
Page 35
Detailed descriptions of the BIOS parameters are also provided. Chapter 2 This chapter tells how to change system settings through the BIOS Setup menus. BIOS information ASUS K8N motherboard 2-1
K8N User's manual for English Version E1868
Page 37
... for reference only. done Writing flash .... 0x0008CC00 (9%) DO NOT shutdown or reset the system while updating the BIOS! Visit the ASUS website (www.asus.com) to update the BIOS To update the BIOS using the AFUDOS.EXE utility: 1. c. Boot the system from the support ...CD to a bootable floppy disk. All rights reserved. ASUS K8N motherboard 2-3 At the DOS prompt, type the command line: afudos /i[filename] where [filename] means the latest (or original) BIOS file that ...
K8N User's manual for English Version E1868
Page 39
...the system. 3. appears. • If the correct BIOS file is not writeprotected. All rights reserved. Visit the ASUS website (www.asus.com) to rename the downloaded BIOS file as K8N.ROM. Make sure to download the latest BIOS file for floppy... • If there is displayed. To launch ...so it is complete, the utility returns to the DOS prompt. 2.1.4 Using ASUS EZ Flash to update the BIOS The ASUS EZ Flash feature allows you to easily update the BIOS without having to the floppy disk. ASUS K8N motherboard 2-5 To update the BIOS using a DOS-based utility. Starting BIOS...
K8N User's manual for English Version E1868
Page 41
... process is detected, the following screen message appears. Checking for floppy... Bad BIOS checksum. Reading file "K8N.ROM". Doing so may cause system boot failure! 2. Visit ASUS website (www.asus.com) to download the latest BIOS file. ASUS K8N motherboard 2-7 Completed. Boot the system. 2. Start flashing... Starting BIOS recovery... Checking for floppy... To recover the...
K8N User's manual for English Version E1868
Page 43
Some of a menu screen are the navigation keys for that particular menu. ASUS K8N motherboard 2-9 Sub-menu items Navigation keys 2.2.2 Menu bar The menu bar on top of the screen has the following main items: Main Advanced Power Boot ... At the bottom right corner of the navigation keys differ from one screen to another. Use the navigation keys to select items in ] [English] : [ST320413A] : [ASUS CD-S340] : [Not Detected] : [Not Detected] Use [ENTER], [TAB] or [SHIFT-TAB] to configure system time. Use [+] or [-] to select a field. 2.2.1 BIOS menu screen Menu...
K8N User's manual for English Version E1868
Page 45
...menu screen" for information on the menu screen items and how to select a field. Configuration options: [Français] [German] [English] ASUS K8N motherboard 2-11 Use [+] or [-] to configure system time. 2.3.1 System Time [xx:xx:xxxx] Allows you to set the system time. ... options: [Disabled] [360K, 5.25 in.] [1.2M , 5.25 in.] [720K , 3.5 in.] [1.44M, 3.5 in.] [2.88M, 3.5 in ] [English] : [ST320413A] :[ASUS CD-S340] :[Not Detected] :[Not Detected] :[Not Detected] :[Not Detected] :[Not Detected] :[Not Detected] Use [ENTER], [TAB] or [SHIFT-TAB] to navigate through them. ...
K8N User's manual for English Version E1868
Page 47
... Data Transfer [Disabled] Enables or disables 32-bit data transfer. System Memory Displays the auto-detected system memory. PIO Mode [Auto] Selects the PIO mode. ASUS K8N motherboard 2-13 AMI BIOS Version : 08.00.09 Build Date : 03/31/04 Processor Type Speed Count : AMD Athlon(tm) 64 Processor 3200+ : 2000MHz : 1 System...
K8N User's manual for English Version E1868
Page 49
... operating frequency. FID/VID Change [Auto] When set the processor frequency multiplier. Configuration options: [Auto] [Manual] Processor Frequency Multiplier [xxxxMhz] Allows you to become unstable! ASUS K8N motherboard 2-15 Selecting a very high CPU frequency may cause the system to set to adjust the values. If this item to 75 MHz. AGP Overclock...