
K8N-E User's Manual
Page 4
... a bootable floppy disk 2-2 2.1.2 Using AFUDOS to update the BIOS 2-3 2.1.3 Using AFUDOS to copy BIOS from PC 2-4 2.1.4 Using ASUS EZ Flash to update the BIOS 2-5 2.1.5 Recovering the BIOS with CrashFree BIOS 2 ....... 2-6 2.2 BIOS Setup program 2-8 2.2.1 BIOS menu screen 2-9 2.2.2 Menu bar 2-9 2.2.3 Navigation keys 2-9 2.2.4 Menu items 2-10 2.2.5 Sub-menu items 2-10 2.2.6 Configuration fields 2-10 2.2.7 Pop-up window 2-10 2.2.8 Scroll bar 2-10 2.2.9 General...
... a bootable floppy disk 2-2 2.1.2 Using AFUDOS to update the BIOS 2-3 2.1.3 Using AFUDOS to copy BIOS from PC 2-4 2.1.4 Using ASUS EZ Flash to update the BIOS 2-5 2.1.5 Recovering the BIOS with CrashFree BIOS 2 ....... 2-6 2.2 BIOS Setup program 2-8 2.2.1 BIOS menu screen 2-9 2.2.2 Menu bar 2-9 2.2.3 Navigation keys 2-9 2.2.4 Menu items 2-10 2.2.5 Sub-menu items 2-10 2.2.6 Configuration fields 2-10 2.2.7 Pop-up window 2-10 2.2.8 Scroll bar 2-10 2.2.9 General...

K8N-E User's Manual
Page 10
x K8N-E specifications summary Internal I/O BIOS features Industry standard Manageability Power Requirement Form Factor Support CD contents 2 x USB 2.0 connector for 4 additional USB ports CPU and chassis fan connectors 20-pin/4-pin ... power connectors Chassis intrusion connector CD/AUX connectors S/PDIF out connector GAME/MIDI connector Front Panel connector 4Mb Flash EEPROM AMI BIOS, PnP, DMI2.0, WfM2.0, SM BIOS 2.3, ASUS EZ Flash, ASUS MyLogo2, ASUS CrashFree BIOS 2 PCI 2.2, USB 2.0 WfM2.0, DMI 2.0, WOL by PME, WOR by PME, Chassis intrusion ATX power supply (with 4-pin 12V plug) ATX form...
x K8N-E specifications summary Internal I/O BIOS features Industry standard Manageability Power Requirement Form Factor Support CD contents 2 x USB 2.0 connector for 4 additional USB ports CPU and chassis fan connectors 20-pin/4-pin ... power connectors Chassis intrusion connector CD/AUX connectors S/PDIF out connector GAME/MIDI connector Front Panel connector 4Mb Flash EEPROM AMI BIOS, PnP, DMI2.0, WfM2.0, SM BIOS 2.3, ASUS EZ Flash, ASUS MyLogo2, ASUS CrashFree BIOS 2 PCI 2.2, USB 2.0 WfM2.0, DMI 2.0, WOL by PME, WOR by PME, Chassis intrusion ATX power supply (with 4-pin 12V plug) ATX form...

K8N-E User's Manual
Page 14
...specification, extending the connection speed from a floppy disk. ASUS MyLogo2™ This new feature present in case the system hangs due to overclocking. ASUS EZ Flash BIOS With the ASUS EZ Flash, you can easily update the system BIOS even before loading the operating system. No need to ...eliminates the need to buy a replacement ROM chip. AGP 8X support AGP 8X (AGP 3.0) is backward compatible with USB 1.1. 1.3.2 Unique ASUS features CrashFree BIOS 2 This feature allows you to restore the original BIOS data from the ASUS support CD in case when the BIOS codes and data are corrupted.
...specification, extending the connection speed from a floppy disk. ASUS MyLogo2™ This new feature present in case the system hangs due to overclocking. ASUS EZ Flash BIOS With the ASUS EZ Flash, you can easily update the system BIOS even before loading the operating system. No need to ...eliminates the need to buy a replacement ROM chip. AGP 8X support AGP 8X (AGP 3.0) is backward compatible with USB 1.1. 1.3.2 Unique ASUS features CrashFree BIOS 2 This feature allows you to restore the original BIOS data from the ASUS support CD in case when the BIOS codes and data are corrupted.

K8N-E User's Manual
Page 16
... Below:Mic In FP_AUDIO ALC850 SPDIF_OUT Super I/O CD AUX LAN PHY PWR_FAN SATA2 SATA1 Accelerated Graphics Port (AGP) PCI1 PCI2 R PCI3 PCI4 K8N-E PCI5 GAME nVIDIA nForce3 250Gb 4Mbit BIOS CHA_FAN USBPW56 USBPW78 FLOPPY CR2032 3V SB_PWR Lithium Cell CMOS Power USB56 USB78 CLRTC CHASSIS PANEL PRI_IDE SEC_IDE 30.5cm (12.0in...
... Below:Mic In FP_AUDIO ALC850 SPDIF_OUT Super I/O CD AUX LAN PHY PWR_FAN SATA2 SATA1 Accelerated Graphics Port (AGP) PCI1 PCI2 R PCI3 PCI4 K8N-E PCI5 GAME nVIDIA nForce3 250Gb 4Mbit BIOS CHA_FAN USBPW56 USBPW78 FLOPPY CR2032 3V SB_PWR Lithium Cell CMOS Power USB56 USB78 CLRTC CHASSIS PANEL PRI_IDE SEC_IDE 30.5cm (12.0in...

K8N-E User's Manual
Page 22
Align a DIMM on the socket such that the notch on the DIMM matches the break on the system and change the necessary BIOS settings, if any. DDR DIMM Unlocked A DDR DIMM is properly seated. Turn on the socket. 3. 1.7.3 Installing a DIMM Follow these steps to the... 7 PS/2 Compatible Mouse Port 13 8 Numeric Data Processor 14* 9 Primary IDE Channel 15* 10 Secondary IDE Channel * These IRQs are usually available for BIOS information. 3. Firmly insert the DIMM into a socket to avoid damaging the DIMM. 1.8 Expansion slots To install and configure an expansion card: 1. DO NOT ...
Align a DIMM on the socket such that the notch on the DIMM matches the break on the system and change the necessary BIOS settings, if any. DDR DIMM Unlocked A DDR DIMM is properly seated. Turn on the socket. 3. 1.7.3 Installing a DIMM Follow these steps to the... 7 PS/2 Compatible Mouse Port 13 8 Numeric Data Processor 14* 9 Primary IDE Channel 15* 10 Secondary IDE Channel * These IRQs are usually available for BIOS information. 3. Firmly insert the DIMM into a socket to avoid damaging the DIMM. 1.8 Expansion slots To install and configure an expansion card: 1. DO NOT ...
K8N-E User's Manual
Page 25
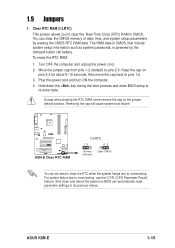
... reboot the system so BIOS can clear the CMOS memory of date, time, and system setup parameters by the onboard button cell battery. Except when clearing the RTC RAM, never remove the cap on pins 2-3 for about 5~10 seconds, then move the cap back to re-enter data. ASUS K8N-E 1-15 The RAM... data in CMOS. Shut down the key during the boot process and enter BIOS setup to pins 1-2. 3. Turn OFF the computer and unplug the power cord. 2. Clear RTC RAM (CLRTC) This...
... reboot the system so BIOS can clear the CMOS memory of date, time, and system setup parameters by the onboard button cell battery. Except when clearing the RTC RAM, never remove the cap on pins 2-3 for about 5~10 seconds, then move the cap back to re-enter data. ASUS K8N-E 1-15 The RAM... data in CMOS. Shut down the key during the boot process and enter BIOS setup to pins 1-2. 3. Turn OFF the computer and unplug the power cord. 2. Clear RTC RAM (CLRTC) This...

K8N-E User's Manual
Page 34
PWR Ground Reset Ground ® Reset SW ATX Power K8N-E IDE_LED Switch* * Requires an ATX power supply. K8N-E System panel connector • System Power LED Lead (Green 3-pin PLED) This 3-pin connector connects to the hard disk activity LED. Pressing the power...sleep mode. • System Warning Speaker Lead (Orange 4-pin SPEAKER) This 4-pin connector connects to the case-mounted speaker and allows you turn on the BIOS or OS settings. 12. The LED lights up . Any read or write activity of the specific connector colors as described. 1-24 Chapter 1: Product introduction ...
PWR Ground Reset Ground ® Reset SW ATX Power K8N-E IDE_LED Switch* * Requires an ATX power supply. K8N-E System panel connector • System Power LED Lead (Green 3-pin PLED) This 3-pin connector connects to the hard disk activity LED. Pressing the power...sleep mode. • System Warning Speaker Lead (Orange 4-pin SPEAKER) This 4-pin connector connects to the case-mounted speaker and allows you turn on the BIOS or OS settings. 12. The LED lights up . Any read or write activity of the specific connector colors as described. 1-24 Chapter 1: Product introduction ...

K8N-E User's Manual
Page 35
Detailed descriptions of the BIOS parameters are also provided. BIOS information ASUS K8N-E 2-1 Chapter 2 This chapter tells how to change system settings through the BIOS Setup menus.
Detailed descriptions of the BIOS parameters are also provided. BIOS information ASUS K8N-E 2-1 Chapter 2 This chapter tells how to change system settings through the BIOS Setup menus.

K8N-E User's Manual
Page 36
...ME/XP environment a. e. Updates the BIOS using a bootable floppy disk or the motherboard support CD. ASUS CrashFree BIOS 2 - Copy the original motherboard BIOS using AFUDOS (refer to section "2.1.3 Using AFUDOS to create a bootable floppy disk. From your BIOS The following to copy BIOS from the Windows® 2000 CD...either one of boot disks for Windows® 2000, run the Makeboot.exe tool from PC") • Visit the ASUS website and download the latest BIOS file for details on Start, then select My Computer. c. Click File from the menu, then select Format. b. Insert...
...ME/XP environment a. e. Updates the BIOS using a bootable floppy disk or the motherboard support CD. ASUS CrashFree BIOS 2 - Copy the original motherboard BIOS using AFUDOS (refer to section "2.1.3 Using AFUDOS to create a bootable floppy disk. From your BIOS The following to copy BIOS from the Windows® 2000 CD...either one of boot disks for Windows® 2000, run the Makeboot.exe tool from PC") • Visit the ASUS website and download the latest BIOS file for details on Start, then select My Computer. c. Click File from the menu, then select Format. b. Insert...

K8N-E User's Manual
Page 37
... see on your screen may cause system boot failure! The BIOS information on a piece of the update process. done Writing flash .... 0x0008CC00 (9%) DO NOT shutdown or reset the system while updating the BIOS! ASUS K8N-E 2-3 Click Start, then select Run. Follow succeeding screen ...instructions. 2. The succeeding screen displays the status of paper. What you copied to download the latest BIOS file for reference only. All rights reserved. done ...
... see on your screen may cause system boot failure! The BIOS information on a piece of the update process. done Writing flash .... 0x0008CC00 (9%) DO NOT shutdown or reset the system while updating the BIOS! ASUS K8N-E 2-3 Click Start, then select Run. Follow succeeding screen ...instructions. 2. The succeeding screen displays the status of paper. What you copied to download the latest BIOS file for reference only. All rights reserved. done ...

K8N-E User's Manual
Page 38
...as shown. What you see on the screen is complete, the utility returns to copy BIOS from your screen may not be exactly the same as a backup in case the system BIOS fails or gets corrupted. Reading file ..... done Writing flash .... 0x0008CC00 (9%) Verifying flash ..... Reboot the system from the hard disk. 2.1.3 Using AFUDOS to the DOS prompt. The BIOS information on your PC using AFUDOS.EXE: 1. A:\>afudos /iK8NEB.ROM AMI Firmware Update Utility - Press . Version 1.10 Copyright (C) 2002 American Megatrends,...
...as shown. What you see on the screen is complete, the utility returns to copy BIOS from your screen may not be exactly the same as a backup in case the system BIOS fails or gets corrupted. Reading file ..... done Writing flash .... 0x0008CC00 (9%) Verifying flash ..... Reboot the system from the hard disk. 2.1.3 Using AFUDOS to the DOS prompt. The BIOS information on your PC using AFUDOS.EXE: 1. A:\>afudos /iK8NEB.ROM AMI Firmware Update Utility - Press . Version 1.10 Copyright (C) 2002 American Megatrends,...

K8N-E User's Manual
Page 39
..., the error message "Floppy not found!" To update the BIOS using a DOS-based utility. Make sure to download the latest BIOS file for floppy... • If there is not writeprotected. Save the BIOS file to display the following. Make sure that contains the BIOS file. ASUS K8N-E 2-5 Checking for your motherboard and rename the downloaded file...
..., the error message "Floppy not found!" To update the BIOS using a DOS-based utility. Make sure to download the latest BIOS file for floppy... • If there is not writeprotected. Save the BIOS file to display the following. Make sure that contains the BIOS file. ASUS K8N-E 2-5 Checking for your motherboard and rename the downloaded file...
K8N-E User's Manual
Page 40
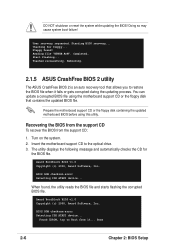
... Detecting IDE ATAPI device... DO NOT shutdown or reset the system while updating the BIOS! Doing so may cause system boot failure! Start flashing... Rebooting. 2.1.5 ASUS CrashFree BIOS 2 utility The ASUS CrashFree BIOS 2 is an auto recovery tool that contains the updated BIOS file. The utility displays the following message and automatically checks the CD for...
... Detecting IDE ATAPI device... DO NOT shutdown or reset the system while updating the BIOS! Doing so may cause system boot failure! Start flashing... Rebooting. 2.1.5 ASUS CrashFree BIOS 2 utility The ASUS CrashFree BIOS 2 is an auto recovery tool that contains the updated BIOS file. The utility displays the following message and automatically checks the CD for...

K8N-E User's Manual
Page 41
... the system after the utility completes the updating process. ASUS K8N-E 2-7 DO NOT shut down or reset the system while updating the BIOS! Remove any CD from a floppy disk: 1. Insert the floppy disk with the original or updated BIOS file to Boot from it... BIOS ROM checksum error Detecting IDE ATAPI device... DO NOT shut...
... the system after the utility completes the updating process. ASUS K8N-E 2-7 DO NOT shut down or reset the system while updating the BIOS! Remove any CD from a floppy disk: 1. Insert the floppy disk with the original or updated BIOS file to Boot from it... BIOS ROM checksum error Detecting IDE ATAPI device... DO NOT shut...
K8N-E User's Manual
Page 42
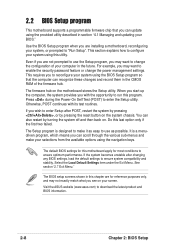
... Settings item under the Exit Menu. Press during the Power-On Self Test (POST) to download the latest product and BIOS information. 2-8 Chapter 2: BIOS Setup Otherwise, POST continues with the opportunity to ensure optimum performance. Do this motherboard apply for this last option only if...default settings to use the Setup program, you see on the motherboard stores the Setup utility. Visit the ASUS website (www.asus.com) to enter the Setup utility. Use the BIOS Setup program when you may want to "Run Setup". For example, you are installing a motherboard, reconfiguring...
... Settings item under the Exit Menu. Press during the Power-On Self Test (POST) to download the latest product and BIOS information. 2-8 Chapter 2: BIOS Setup Otherwise, POST continues with the opportunity to ensure optimum performance. Do this motherboard apply for this last option only if...default settings to use the Setup program, you see on the motherboard stores the Setup utility. Visit the ASUS website (www.asus.com) to enter the Setup utility. Use the BIOS Setup program when you may want to "Run Setup". For example, you are installing a motherboard, reconfiguring...
K8N-E User's Manual
Page 43
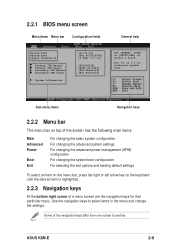
...is highlighted. 2.2.3 Navigation keys At the bottom right corner of the navigation keys differ from one screen to configure system time. ASUS K8N-E 2-9 2.2.1 BIOS menu screen Menu items Menu bar Configuration fields General help System Time System Date Legacy Diskette A Primary IDE Master Primary IDE ...Slave Secondary IDE Master Secondary IDE Slave System Information [11:51:19] [Thu 06/05/2005] [1.44M, 3.5 in] : [ST320413A] : [ASUS CD-S340] : [Not Detected] : [Not Detected] Use [ENTER], [TAB] or [SHIFT-TAB] to select items in the menu and change the settings. ...
...is highlighted. 2.2.3 Navigation keys At the bottom right corner of the navigation keys differ from one screen to configure system time. ASUS K8N-E 2-9 2.2.1 BIOS menu screen Menu items Menu bar Configuration fields General help System Time System Date Legacy Diskette A Primary IDE Master Primary IDE ...Slave Secondary IDE Master Secondary IDE Slave System Information [11:51:19] [Thu 06/05/2005] [1.44M, 3.5 in] : [ST320413A] : [ASUS CD-S340] : [Not Detected] : [Not Detected] Use [ENTER], [TAB] or [SHIFT-TAB] to select items in the menu and change the settings. ...

K8N-E User's Manual
Page 44
...item and press . 2.2.6 Configuration fields These fields show the values for the menu items. If an item is enclosed in ] [English] :[ST320413A] :[ASUS CD-S340] :[Not Detected] :[Not Detected] The other items on the screen. 2.2.9 General help Advanced Chipset settings WARNING: Setting wrong values in the sections... a field. Select Screen Select Item +- You can not select an item that is a brief description of the selected item. 2-10 Chapter 2: BIOS Setup Press Up/ Down arrow keys or PageUp/PageDown keys to display the other items (Advanced, Power, Boot, and Exit) on the menu bar...
...item and press . 2.2.6 Configuration fields These fields show the values for the menu items. If an item is enclosed in ] [English] :[ST320413A] :[ASUS CD-S340] :[Not Detected] :[Not Detected] The other items on the screen. 2.2.9 General help Advanced Chipset settings WARNING: Setting wrong values in the sections... a field. Select Screen Select Item +- You can not select an item that is a brief description of the selected item. 2-10 Chapter 2: BIOS Setup Press Up/ Down arrow keys or PageUp/PageDown keys to display the other items (Advanced, Power, Boot, and Exit) on the menu bar...

K8N-E User's Manual
Page 45
...5.25 in.] [720K , 3.5 in.] [1.44M, 3.5 in.] [2.88M, 3.5 in .] Sets the type of the basic system information. 2.3 Main menu When you enter the BIOS Setup program, the Main menu screen appears, giving you to select a field. System Time System Date Legacy Diskette A Primary IDE Master Primary IDE Slave Secondary...or [-] to configure system time. 2.3.1 System Time [xx:xx:xxxx] Allows you to set the system date. 2.3.3 Legacy Diskette A [1.44M, 3.5 in .] ASUS K8N-E 2-11 Refer to section "2.2.1 BIOS menu screen" for information on the menu screen items and how to navigate through them.
...5.25 in.] [720K , 3.5 in.] [1.44M, 3.5 in.] [2.88M, 3.5 in .] Sets the type of the basic system information. 2.3 Main menu When you enter the BIOS Setup program, the Main menu screen appears, giving you to select a field. System Time System Date Legacy Diskette A Primary IDE Master Primary IDE Slave Secondary...or [-] to configure system time. 2.3.1 System Time [xx:xx:xxxx] Allows you to set the system date. 2.3.3 Legacy Diskette A [1.44M, 3.5 in .] ASUS K8N-E 2-11 Refer to section "2.2.1 BIOS menu screen" for information on the menu screen items and how to navigate through them.

K8N-E User's Manual
Page 46
... not previously formatted with LBA mode disabled. Type [Auto] Selects the type of IDE devices. Configuration options: [Disabled] [Auto] 2-12 Chapter 2: BIOS Setup Primary IDE Master Device : Hard Disk Vendor : Maxtor 6Y080L0 Size : 81.9GB LBA Mode : Supported Block Mode : 16 Sectors PIO Mode ...the dimmed items (Device, Vendor, Size, LBA Mode, Block Mode, PIO Mode, Async DMA, Ultra DMA, and SMART monitoring) are autodetected by BIOS and are specifically configuring a CD-ROM drive. There is a separate sub-menu for each IDE device. Configuration options: [Not Installed] [Auto]...
... not previously formatted with LBA mode disabled. Type [Auto] Selects the type of IDE devices. Configuration options: [Disabled] [Auto] 2-12 Chapter 2: BIOS Setup Primary IDE Master Device : Hard Disk Vendor : Maxtor 6Y080L0 Size : 81.9GB LBA Mode : Supported Block Mode : 16 Sectors PIO Mode ...the dimmed items (Device, Vendor, Size, LBA Mode, Block Mode, PIO Mode, Async DMA, Ultra DMA, and SMART monitoring) are autodetected by BIOS and are specifically configuring a CD-ROM drive. There is a separate sub-menu for each IDE device. Configuration options: [Not Installed] [Auto]...

K8N-E User's Manual
Page 47
..., Analysis, and Reporting Technology. Configuration options: [Auto] [Disabled] [Enabled] 32Bit Data Transfer [Disabled] Enables or disables 32-bit data transfer. ASUS K8N-E 2-13 Processor Displays the auto-detected processor information. AMI BIOS Version : 08.00.09 Build Date : 06/07/05 Processor Type Speed Count : AMD Athlon(tm) 64 Processor 3200+ : 2000MHz : 1 System...
..., Analysis, and Reporting Technology. Configuration options: [Auto] [Disabled] [Enabled] 32Bit Data Transfer [Disabled] Enables or disables 32-bit data transfer. ASUS K8N-E 2-13 Processor Displays the auto-detected processor information. AMI BIOS Version : 08.00.09 Build Date : 06/07/05 Processor Type Speed Count : AMD Athlon(tm) 64 Processor 3200+ : 2000MHz : 1 System...


