
User Guide
Page 4
... Creating a bootable floppy disk 4-1 4.1.2 Updating the BIOS 4-2 4.1.3 Saving the current BIOS file 4-4 4.1.4 ASUS CrashFree BIOS 2 utility 4-5 4.1.5 ASUS EZ Flash utility 4-7 4.1.6 ASUS Update utility 4-8 4.2 BIOS setup program 4-11 4.2.1 BIOS menu screen 4-12 4.2.2 Menu bar 4-12 4.2.3 ...Legend bar 4-13 4.2.4 Menu items 4-13 4.2.5 Sub-menu items 4-13 4.2.6 Configuration fields 4-13 4.2.7 Pop-up window 4-14 4.2.8 General...
... Creating a bootable floppy disk 4-1 4.1.2 Updating the BIOS 4-2 4.1.3 Saving the current BIOS file 4-4 4.1.4 ASUS CrashFree BIOS 2 utility 4-5 4.1.5 ASUS EZ Flash utility 4-7 4.1.6 ASUS Update utility 4-8 4.2 BIOS setup program 4-11 4.2.1 BIOS menu screen 4-12 4.2.2 Menu bar 4-12 4.2.3 ...Legend bar 4-13 4.2.4 Menu items 4-13 4.2.5 Sub-menu items 4-13 4.2.6 Configuration fields 4-13 4.2.7 Pop-up window 4-14 4.2.8 General...
User Guide
Page 44
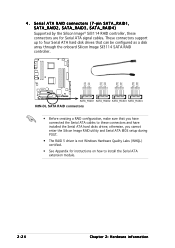
... four Serial ATA hard disk drives that can be configured as a disk array through the onboard Silicon Image Sil3114 SATA RAID controller. ® K8N-DL SATA_RAID1 SATA_RAID2 SATA_RAID3 SATA_RAID4 K8N-DL SATA RAID connectors • Before creating a RAID configuration, make sure that you cannot enter the Silicon Image RAID utility and Serial ATA BIOS...
... four Serial ATA hard disk drives that can be configured as a disk array through the onboard Silicon Image Sil3114 SATA RAID controller. ® K8N-DL SATA_RAID1 SATA_RAID2 SATA_RAID3 SATA_RAID4 K8N-DL SATA RAID connectors • Before creating a RAID configuration, make sure that you cannot enter the Silicon Image RAID utility and Serial ATA BIOS...

User Guide
Page 54
...less than four seconds lets the system enter the soft-off mode regardless of the BIOS setting. The power supply should turn off after Windows® shuts down. Pressing the power switch for details. 3-2 Chapter 3: Powering up 3.2 Powering off the computer 3.2.1 Using the ...OS shut down function If you are using Windows® XP: 1. Refer to shut down the computer. 3. Click the T u r n O f f button to section "4.5 Power Menu" in Chapter 4 for...
...less than four seconds lets the system enter the soft-off mode regardless of the BIOS setting. The power supply should turn off after Windows® shuts down. Pressing the power switch for details. 3-2 Chapter 3: Powering up 3.2 Powering off the computer 3.2.1 Using the ...OS shut down function If you are using Windows® XP: 1. Refer to shut down the computer. 3. Click the T u r n O f f button to section "4.5 Power Menu" in Chapter 4 for...

User Guide
Page 57
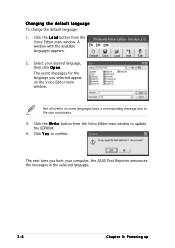
The Winbond Voice Editor screen appears. ASUS K8N-DL 3-5 The default language setting is English. Launching the Voice Editor You can install this application from the Windows® desktop by clicking S t a r t > All Programs > Winbond Voice Editor > Voice Editor. POST Events Default Messages Playing the default ...side of the screen, then click the Play button. To avoid conflicts, do not run the Winbond Voice Editor while running the ASUS PC Probe application. You can launch the program from the support CD. 3.3.2 Winbond Voice Editor The Winbond Voice Editor software allows ...
The Winbond Voice Editor screen appears. ASUS K8N-DL 3-5 The default language setting is English. Launching the Voice Editor You can install this application from the Windows® desktop by clicking S t a r t > All Programs > Winbond Voice Editor > Voice Editor. POST Events Default Messages Playing the default ...side of the screen, then click the Play button. To avoid conflicts, do not run the Winbond Voice Editor while running the ASUS PC Probe application. You can launch the program from the support CD. 3.3.2 Winbond Voice Editor The Winbond Voice Editor software allows ...
User Guide
Page 58
... the available languages appears. 2. Click the W r i t e button from the Voice Editor main window. Not all events on the Voice Editor main window. The event messages for the language you boot your desired language, then click O p e n. Click Y e s to update the EEPROM. ...4. The next time you selected appear on some languages have a corresponding message due to file size constraints. 3. Select your computer, the ASUS Post ...
... the available languages appears. 2. Click the W r i t e button from the Voice Editor main window. Not all events on the Voice Editor main window. The event messages for the language you boot your desired language, then click O p e n. Click Y e s to update the EEPROM. ...4. The next time you selected appear on some languages have a corresponding message due to file size constraints. 3. Select your computer, the ASUS Post ...
User Guide
Page 59
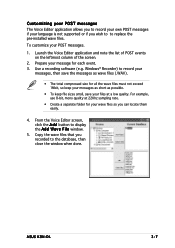
... the messages as possible. • To keep your messages as short as wave files (.WAV). • The total compressed size for each event. 3. ASUS K8N-DL 3-7 Windows® Recorder) to record your language is not supported or if you wish to to replace the pre-installed wave files. From the Voice Editor... screen, click the A d d button to the database, then close the window when done. Launch the Voice Editor application and note the list of POST events on the leftmost column of the screen. 2. For example, use 8-bit...
... the messages as possible. • To keep your messages as short as wave files (.WAV). • The total compressed size for each event. 3. ASUS K8N-DL 3-7 Windows® Recorder) to record your language is not supported or if you wish to to replace the pre-installed wave files. From the Voice Editor... screen, click the A d d button to the database, then close the window when done. Launch the Voice Editor application and note the list of POST events on the leftmost column of the screen. 2. For example, use 8-bit...

User Guide
Page 60
...the wave files at a lower quality • Do not include seldom-used events like FDD Detection, IDE HDD Detection, etc. 3-8 Chapter 3: Powering up A window appears prompting you to 8 for the event, then click on the space next to compress the file and copy into the EEPROM. 13. f l h extension... allowable size, do any or all of the following: • Shorten your configuration. 11. The file you that appears. Click Y e s on the Voice Editor main window, then click the E d i t button. Type a file name with an . Click the W r i t e button to it. 8. If you receive an error ...
...the wave files at a lower quality • Do not include seldom-used events like FDD Detection, IDE HDD Detection, etc. 3-8 Chapter 3: Powering up A window appears prompting you to 8 for the event, then click on the space next to compress the file and copy into the EEPROM. 13. f l h extension... allowable size, do any or all of the following: • Shorten your configuration. 11. The file you that appears. Click Y e s on the Voice Editor main window, then click the E d i t button. Type a file name with an . Click the W r i t e button to it. 8. If you receive an error ...
User Guide
Page 63
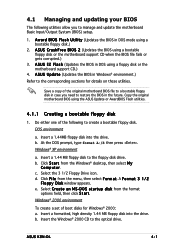
... environment a. c. e. DOS environment a. Insert a 1.44MB floppy disk into the drive. ASUS K8N-DL 4-1 A w a r d B I O S 2 (Updates the BIOS using a bootable floppy disk.) 2. Do either one of the following utilities allow you need to restore the BIOS in Windows® environment.) Refer to the corresponding sections for Windows® 2000: a. Select the 3 1/2 Floppy Drive icon. D O S s t a r t u p d i s k from the format...
... environment a. c. e. DOS environment a. Insert a 1.44MB floppy disk into the drive. ASUS K8N-DL 4-1 A w a r d B I O S 2 (Updates the BIOS using a bootable floppy disk.) 2. Do either one of the following utilities allow you need to restore the BIOS in Windows® environment.) Refer to the corresponding sections for Windows® 2000: a. Select the 3 1/2 Floppy Drive icon. D O S s t a r t u p d i s k from the format...

User Guide
Page 70
...5-3 for the U t i l i t i e s screen menu. 3. This utility is copied to your system. Place the support CD in Windows® environment. The D r i v e r s menu appears. 2. The ASUS Update utility is available in the support CD that allows you to manage, save, and update the motherboard BIOS in the optical drive. X X . ...either through a network or an Internet Service Provider (ISP). X X. The ASUS Update utility allows you update the BIOS using this utility. 4-8 Chapter 4: BIOS setup Quit all Windows® applications before you to: • Save the current BIOS file &#...
...5-3 for the U t i l i t i e s screen menu. 3. This utility is copied to your system. Place the support CD in Windows® environment. The D r i v e r s menu appears. 2. The ASUS Update utility is available in the support CD that allows you to manage, save, and update the motherboard BIOS in the optical drive. X X . ...either through a network or an Internet Service Provider (ISP). X X. The ASUS Update utility allows you update the BIOS using this utility. 4-8 Chapter 4: BIOS setup Quit all Windows® applications before you to: • Save the current BIOS file &#...

User Guide
Page 71
The ASUS Update main window appears. 2. N e x t. Select the ASUS FTP site t h e I O S f r o m 3. Click N e x t. Launch the ASUS Update utility from the nearest you to avoid network drop-down menu, then click traffic, or click A u t o S e l e c t. Select U p d a t e B I n t e r n e t option from the Windows® desktop by clicking S t a r t > P r o g r a m s > A S U S > A S U S U p d a t e > A S U S U p d a t e. ASUS K8N-DL 4-9 Updating the BIOS through the Internet To update the BIOS through the Internet: 1.
The ASUS Update main window appears. 2. N e x t. Select the ASUS FTP site t h e I O S f r o m 3. Click N e x t. Launch the ASUS Update utility from the nearest you to avoid network drop-down menu, then click traffic, or click A u t o S e l e c t. Select U p d a t e B I n t e r n e t option from the Windows® desktop by clicking S t a r t > P r o g r a m s > A S U S > A S U S U p d a t e > A S U S U p d a t e. ASUS K8N-DL 4-9 Updating the BIOS through the Internet To update the BIOS through the Internet: 1.
User Guide
Page 72
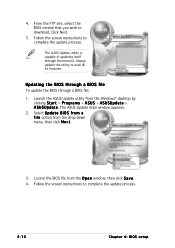
...FTP site, select the BIOS version that you wish to complete the update process. Launch the ASUS Update utility from the O p e n window, then click S a v e. 4. Follow the screen instructions to avail all its features. ...Click Next. 5. Always update the utility to complete the update process. 4-10 Chapter 4: BIOS setup The ASUS Update main window appears. 2. Locate the BIOS file from the Windows® desktop by clicking S t a r t > P r o g r a m s > A S U S > A S U S U p d a t e > A S U S U p d a t e. Select U p d a t e B I O S f r o m a f i l e...
...FTP site, select the BIOS version that you wish to complete the update process. Launch the ASUS Update utility from the O p e n window, then click S a v e. 4. Follow the screen instructions to avail all its features. ...Click Next. 5. Always update the utility to complete the update process. 4-10 Chapter 4: BIOS setup The ASUS Update main window appears. 2. Locate the BIOS file from the Windows® desktop by clicking S t a r t > P r o g r a m s > A S U S > A S U S U p d a t e > A S U S U p d a t e. Select U p d a t e B I O S f r o m a f i l e...
User Guide
Page 75
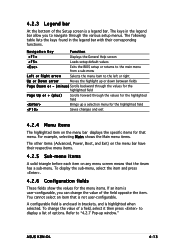
...-menu. Refer to navigate through the values for the highlighted field Page Up or + (plus) Scrolls forward through the various setup menus. ASUS K8N-DL 4-13 For example, selecting M a i n shows the Main menu items. The other items (Advanced, Power, Boot, and Exit) ... between fields P a g e D o w n o r - ( m i n u s ) Scrolls backward through the values for the highlighted field Brings up window." A configurable field is not user-configurable. Navigation Key Function Displays the General Help screen Loads setup default values Exits the BIOS setup or returns to...
...-menu. Refer to navigate through the values for the highlighted field Page Up or + (plus) Scrolls forward through the various setup menus. ASUS K8N-DL 4-13 For example, selecting M a i n shows the Main menu items. The other items (Advanced, Power, Boot, and Exit) ... between fields P a g e D o w n o r - ( m i n u s ) Scrolls backward through the values for the highlighted field Brings up window." A configurable field is not user-configurable. Navigation Key Function Displays the General Help screen Loads setup default values Exits the BIOS setup or returns to...
User Guide
Page 76
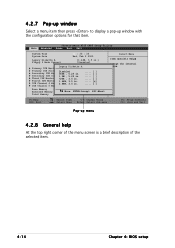
4.2.7 Pop-up window Select a menu item then press to display a pop-up menu 4.2.8 General help At the top right corner of the menu screen is a brief description of ... ESC: Exit ↑↓ : Select Item →←: Select Menu -/+: Change Value Enter: Select Sub-menu F5: Setup Defaults F10: Save and Exit Pop-up window with the configuration options for that item.
4.2.7 Pop-up window Select a menu item then press to display a pop-up menu 4.2.8 General help At the top right corner of the menu screen is a brief description of ... ESC: Exit ↑↓ : Select Item →←: Select Menu -/+: Change Value Enter: Select Sub-menu F5: Setup Defaults F10: Save and Exit Pop-up window with the configuration options for that item.
User Guide
Page 107
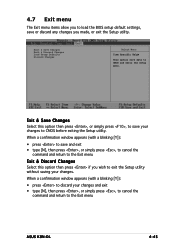
4.7 Exit menu The Exit menu items allow you to the Exit menu ASUS K8N-DL 4-45 When a confirmation window appears (with a blinking [Y]): • press to save and exit • type [N], then press , or simply press , to cancel the command and return to the Exit ... press , to cancel the command and return to load the BIOS setup default settings, save data to CMOS and exits the setup menu. When a confirmation window appears (with a blinking [Y]): • press to discard your changes. Exit & Save Changes Select this option then press if you made, or exit the Setup utility...
4.7 Exit menu The Exit menu items allow you to the Exit menu ASUS K8N-DL 4-45 When a confirmation window appears (with a blinking [Y]): • press to save and exit • type [N], then press , or simply press , to cancel the command and return to the Exit ... press , to cancel the command and return to load the BIOS setup default settings, save data to CMOS and exits the setup menu. When a confirmation window appears (with a blinking [Y]): • press to discard your changes. Exit & Save Changes Select this option then press if you made, or exit the Setup utility...
User Guide
Page 108
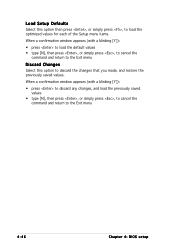
Load Setup Defaults Select this option to the Exit menu 4-46 Chapter 4: BIOS setup When a confirmation window appears (with a blinking [Y]): • press to load the default values • type [N], then press , or simply press , to cancel the command and return to... menu Discard Changes Select this option then press , or simply press , to load the optimized values for each of the Setup menu items. When a confirmation window appears (with a blinking [Y]): • press to discard any changes, and load the previously saved values • type [N], then press , or simply press , to ...
Load Setup Defaults Select this option to the Exit menu 4-46 Chapter 4: BIOS setup When a confirmation window appears (with a blinking [Y]): • press to load the default values • type [N], then press , or simply press , to cancel the command and return to... menu Discard Changes Select this option then press , or simply press , to load the optimized values for each of the Setup menu items. When a confirmation window appears (with a blinking [Y]): • press to discard any changes, and load the previously saved values • type [N], then press , or simply press , to ...


