User Guide
Page 7
... problems with the package. • Before using , contact your local power company. • If the power supply is set to the correct voltage in any damage, contact your retailer. Contact a qualified service technician or your power supply is broken, do not try to fix it may become wet. &#...8226; Place the product on it, carefully read all cables are correctly connected and the power cables are not damaged. These devices could interrupt the ...
... problems with the package. • Before using , contact your local power company. • If the power supply is set to the correct voltage in any damage, contact your retailer. Contact a qualified service technician or your power supply is broken, do not try to fix it may become wet. &#...8226; Place the product on it, carefully read all cables are correctly connected and the power cables are not damaged. These devices could interrupt the ...
User Guide
Page 11
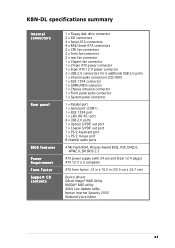
K8N-DL specifications summary Internal connectors Rear panel BIOS features Power Requirement Form Factor Support CD contents 1 x Floppy disk drive connector 2 x IDE connectors 4 x Serial ATA connectors 4 x RAID Serial ATA connectors 2 x CPU fan connectors 2 x front fan connector 2 x rear fan connector 1 x Chipset fan connector 1 x 24-pin ATX power connector 1 x 8-pin ATX 12 V power...PS/2 mouse port 8-channel audio ports 4 Mb Flash ROM, Phoenix-Award BIOS, PnP, DMI2.0, WfM2.0, SM BIOS 2.3 ATX power supply (with 24-pin and 8-pin 12 V plugs) ATX 12 V 2.0 compliant ATX form factor: 12 in x 10.5 in...
K8N-DL specifications summary Internal connectors Rear panel BIOS features Power Requirement Form Factor Support CD contents 1 x Floppy disk drive connector 2 x IDE connectors 4 x Serial ATA connectors 4 x RAID Serial ATA connectors 2 x CPU fan connectors 2 x front fan connector 2 x rear fan connector 1 x Chipset fan connector 1 x 24-pin ATX power connector 1 x 8-pin ATX 12 V power...PS/2 mouse port 8-channel audio ports 4 Mb Flash ROM, Phoenix-Award BIOS, PnP, DMI2.0, WfM2.0, SM BIOS 2.3 ATX power supply (with 24-pin and 8-pin 12 V plugs) ATX 12 V 2.0 compliant ATX form factor: 12 in x 10.5 in...
User Guide
Page 18
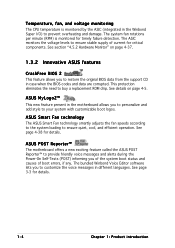
... ASIC monitors the voltage levels to ensure stable supply of boot errors, if any. ASUS POST Reporter™ The motherboard offers a new exciting feature called the ASUS POST Reporter™ to provide friendly voice messages and alerts during the Power-On Self-Tests (POST) informing you to ...your system with customizable boot logos. This protection eliminates the need to ensure quiet, cool, and efficient operation. See details on page 4-37. 1.3.2 Innovative ASUS features CrashFree BIOS 2 This feature ...
... ASIC monitors the voltage levels to ensure stable supply of boot errors, if any. ASUS POST Reporter™ The motherboard offers a new exciting feature called the ASUS POST Reporter™ to provide friendly voice messages and alerts during the Power-On Self-Tests (POST) informing you to ...your system with customizable boot logos. This protection eliminates the need to ensure quiet, cool, and efficient operation. See details on page 4-37. 1.3.2 Innovative ASUS features CrashFree BIOS 2 This feature ...
User Guide
Page 21
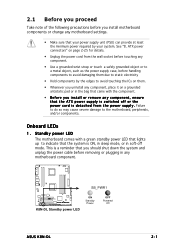
.... • Use a grounded wrist strap or touch a safely grounded object or to a metal object, such as the power supply case, before handling components to avoid damaging them due to the motherboard, peripherals, and/or components. Failure to do so ...Take note of the following precautions before you should shut down the system and unplug the power cable before removing or plugging in soft-off or the p o w e r c o r d i s d e t a c h e d f r o m t h e p o w e r s u p p l y . See "8. SB_PWR1 ® K8N-DL K8N-DL Standby power LED ON Standby Power OFF Powered Off ASUS K8N-DL 2-1
.... • Use a grounded wrist strap or touch a safely grounded object or to a metal object, such as the power supply case, before handling components to avoid damaging them due to the motherboard, peripherals, and/or components. Failure to do so ...Take note of the following precautions before you should shut down the system and unplug the power cable before removing or plugging in soft-off or the p o w e r c o r d i s d e t a c h e d f r o m t h e p o w e r s u p p l y . See "8. SB_PWR1 ® K8N-DL K8N-DL Standby power LED ON Standby Power OFF Powered Off ASUS K8N-DL 2-1
User Guide
Page 33
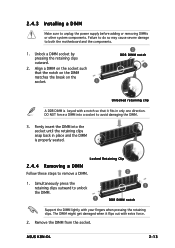
...is keyed with a notch so that it flips out with your fingers when pressing the retaining clips. Remove the DIMM from the socket. ASUS K8N-DL 2-13 Unlock a DIMM socket by pressing the retaining clips outward. 2. DO NOT force a DIMM into the socket until the retaining ...2. 2.4.3 Installing a DIMM Make sure to both the motherboard and the components. 1. Failure to do so may cause severe damage to unplug the power supply before adding or removing DIMMs or other system components. Locked Retaining Clip 2.4.4 Removing a DIMM Follow these steps to remove a DIMM. 2 1. The...
...is keyed with a notch so that it flips out with your fingers when pressing the retaining clips. Remove the DIMM from the socket. ASUS K8N-DL 2-13 Unlock a DIMM socket by pressing the retaining clips outward. 2. DO NOT force a DIMM into the socket until the retaining ...2. 2.4.3 Installing a DIMM Make sure to both the motherboard and the components. 1. Failure to do so may cause severe damage to unplug the power supply before adding or removing DIMMs or other system components. Locked Retaining Clip 2.4.4 Removing a DIMM Follow these steps to remove a DIMM. 2 1. The...

User Guide
Page 38
.... KBPWR1 1 2 +5V (Default) 2 3 +5VSB ® K8N-DL K8N-DL Keyboard power setting 3 . 1394 controller setting (3-pin 1394_EN1) This jumper allows you to activate the 1394 feature. ® K8N-DL K8N-DL 1394 function setting 1394_EN 12 23 Enable (Default) Disable 2-18 Chapter ...2: Hardware information Set this jumper to pins 2-3 (+5VSB) to enable or disable the keyboard wake-up the computer when you to wake up feature. This feature requires an ATX power supply that can supply...
.... KBPWR1 1 2 +5V (Default) 2 3 +5VSB ® K8N-DL K8N-DL Keyboard power setting 3 . 1394 controller setting (3-pin 1394_EN1) This jumper allows you to activate the 1394 feature. ® K8N-DL K8N-DL 1394 function setting 1394_EN 12 23 Enable (Default) Disable 2-18 Chapter ...2: Hardware information Set this jumper to pins 2-3 (+5VSB) to enable or disable the keyboard wake-up the computer when you to wake up feature. This feature requires an ATX power supply that can supply...
User Guide
Page 47
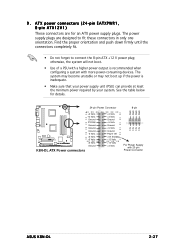
.... The system may become unstable or may not boot up if the power is recommended when configuring a system with 20-pin Power Connector 12V 12V ASUS K8N-DL 2-27 The power supply plugs are for details. 24-pin Power Connector 8-pin GND GND GND GND ® K8N-DL +3 Volts -12 Volts Ground PSON# Ground Ground Ground -5 Volts +5 Volts +5 Volts +5 Volts...
.... The system may become unstable or may not boot up if the power is recommended when configuring a system with 20-pin Power Connector 12V 12V ASUS K8N-DL 2-27 The power supply plugs are for details. 24-pin Power Connector 8-pin GND GND GND GND ® K8N-DL +3 Volts -12 Volts Ground PSON# Ground Ground Ground -5 Volts +5 Volts +5 Volts +5 Volts...
User Guide
Page 50
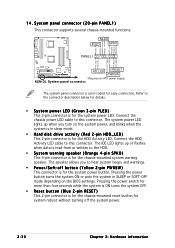
...5V Ground Ground Speaker PANEL1 HD_LED+ HD_LED- 14. PWR GND Reset GND ® K8N-DL HD_LED RESET PWRSW * Requires an ATX power supply. The speaker allows you turn on the BIOS settings. Pressing the power button turns the system ON or puts the system in SLEEP or SOFT-OFF mode.... Connect the HDD Activity LED cable to the connector description below for details. • System power LED (Green 3-pin PLED) This 3-pin connector is for the system power LED. K8N-DL System panel connector The system panel connector is for system reboot without turning off button (Yellow 2-...
...5V Ground Ground Speaker PANEL1 HD_LED+ HD_LED- 14. PWR GND Reset GND ® K8N-DL HD_LED RESET PWRSW * Requires an ATX power supply. The speaker allows you turn on the BIOS settings. Pressing the power button turns the system ON or puts the system in SLEEP or SOFT-OFF mode.... Connect the HDD Activity LED cable to the connector description below for details. • System power LED (Green 3-pin PLED) This 3-pin connector is for the system power LED. K8N-DL System panel connector The system panel connector is for system reboot without turning off button (Yellow 2-...

User Guide
Page 53
... in the following order: a. ASUS K8N-DL 3-1 Be sure that is equipped with "green" standards or if it has a "power standby" feature, the monitor LED may have failed a power-on , hold down the key to a power outlet that all the connections, replace the system case cover. 2. External SCSI devices (starting with ATX power supplies, the system LED lights...
... in the following order: a. ASUS K8N-DL 3-1 Be sure that is equipped with "green" standards or if it has a "power standby" feature, the monitor LED may have failed a power-on , hold down the key to a power outlet that all the connections, replace the system case cover. 2. External SCSI devices (starting with ATX power supplies, the system LED lights...

User Guide
Page 54
... BIOS setting. Click the S t a r t button then select T u r n O f f C o m p u t e r . 2. If you are using Windows® 2000: 1. The power supply should turn off after Windows® shuts down the computer. 3. Pressing the power switch for details. 3-2 Chapter 3: Powering up Click the S t a r t button then click S h u t D o w n . . . 2. The power supply should turn off after Windows® shuts down. 3.2.2 Using the dual function...
... BIOS setting. Click the S t a r t button then select T u r n O f f C o m p u t e r . 2. If you are using Windows® 2000: 1. The power supply should turn off after Windows® shuts down the computer. 3. Pressing the power switch for details. 3-2 Chapter 3: Powering up Click the S t a r t button then click S h u t D o w n . . . 2. The power supply should turn off after Windows® shuts down. 3.2.2 Using the dual function...

User Guide
Page 56
... setup. See the "ASUS contact information" on the inside front cover of range Computer now booting from operating system Action • Check if the CPU fan is working properly. • Check the CPU fan and make sure it turns on after you apply power to the system. •...; Make sure that your CPU fan supports the fan speed detection function. • Check your power supply and make sure it is not defective. • Call ASUS technical support for details. 3-4 Chapter 3: Powering up See section 4.4.4 for assistance.
... setup. See the "ASUS contact information" on the inside front cover of range Computer now booting from operating system Action • Check if the CPU fan is working properly. • Check the CPU fan and make sure it turns on after you apply power to the system. •...; Make sure that your CPU fan supports the fan speed detection function. • Check your power supply and make sure it is not defective. • Call ASUS technical support for details. 3-4 Chapter 3: Powering up See section 4.4.4 for assistance.

User Guide
Page 98
...: [Disabled] [Enabled] 4.5.2 Hardware Monitor This menu shows the hardware monitoring status. This feature requires an ATX power supply that provides at least 1A on the system. Configuration options: [Disabled] [Ctrl+ESC] [Space Bar] [Power Key] [Any Key] Power Up By PS/2 Mouse [Disabled] When set to [Enabled], this parameter allows you to define specific...
...: [Disabled] [Enabled] 4.5.2 Hardware Monitor This menu shows the hardware monitoring status. This feature requires an ATX power supply that provides at least 1A on the system. Configuration options: [Disabled] [Ctrl+ESC] [Space Bar] [Power Key] [Any Key] Power Up By PS/2 Mouse [Disabled] When set to [Enabled], this parameter allows you to define specific...


