

K7M User Manual
Page 1
R K7M Slot A Motherboard USER'S MANUAL
R K7M Slot A Motherboard USER'S MANUAL

K7M User Manual
Page 4
... 14 3.2 Layout Contents 15 3.3 Hardware Setup Procedure 17 3.4 Motherboard Settings 17 3.5 System Memory (DIMM 22 3.5.1 General DIMM Notes 22 3.5.2 DIMM Memory Installation ... 3.9 Power Connection Procedures 45 4 ASUS K7M User's Manual Expansion Cards 31 3.7.1 Expansion Card Installation Procedure 31 3.7.2 Assigning IRQs for Expansion Cards 31 3.7.3 Assigning DMA Channels for Slot A Processors 29 3.7. CONTENTS 1. INTRODUCTION 7 1.1 How This Manual Is Organized 7 1.2 Item Checklist 7 2. FEATURES 8 2.1 The ASUS K7M Motherboard 8 2.1.1 Specifications 8 2.1.1.1 Optional ...
... 14 3.2 Layout Contents 15 3.3 Hardware Setup Procedure 17 3.4 Motherboard Settings 17 3.5 System Memory (DIMM 22 3.5.1 General DIMM Notes 22 3.5.2 DIMM Memory Installation ... 3.9 Power Connection Procedures 45 4 ASUS K7M User's Manual Expansion Cards 31 3.7.1 Expansion Card Installation Procedure 31 3.7.2 Assigning IRQs for Expansion Cards 31 3.7.3 Assigning DMA Channels for Slot A Processors 29 3.7. CONTENTS 1. INTRODUCTION 7 1.1 How This Manual Is Organized 7 1.2 Item Checklist 7 2. FEATURES 8 2.1 The ASUS K7M Motherboard 8 2.1.1 Specifications 8 2.1.1.1 Optional ...
K7M User Manual
Page 7
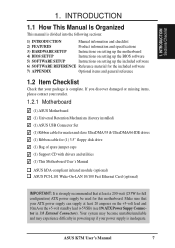
...ATX power supply be used for the included software 7) APPENDIX Optional items and general reference 1.2 Item Checklist Check that your power supply is inadequate. 1. INTRODUCTION 1.1 How This Manual Is Organized This manual is complete. If you discover damaged or missing items, please contact your retailer. 1.2.1 Motherboard (1) ASUS Motherboard... (1) Bag of spare jumper caps (1) Support CD with drivers and utilities (1) This Motherboard User's Manual ASUS IrDA-compliant infrared module (optional) ASUS PCI-L101 Wake-On-LAN 10/100 Fast Ethernet Card (optional) IMPORTANT: It is...
...ATX power supply be used for the included software 7) APPENDIX Optional items and general reference 1.2 Item Checklist Check that your power supply is inadequate. 1. INTRODUCTION 1.1 How This Manual Is Organized This manual is complete. If you discover damaged or missing items, please contact your retailer. 1.2.1 Motherboard (1) ASUS Motherboard... (1) Bag of spare jumper caps (1) Support CD with drivers and utilities (1) This Motherboard User's Manual ASUS IrDA-compliant infrared module (optional) ASUS PCI-L101 Wake-On-LAN 10/100 Fast Ethernet Card (optional) IMPORTANT: It is...
K7M User Manual
Page 8
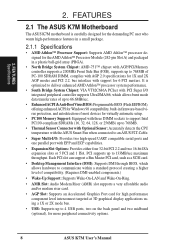
... to 4 USB ports, two on the back panel and two midboard (optional), for more peripheral connectivity options. 8 ASUS K7M User's Manual 2. FEATURES 2.1 The ASUS K7M Motherboard The ASUS K7M motherboard is optimized to deliver enhanced AMD Athlon™ processor system performance. • South Bridge System Chipset: VIA VT82C686A PCIset...: AMD-751™ chipset with AGP/PCI/Memory controller supports a 200MHz Front Side Bus (FSB), supports up to an ASUS P2T-Cable. • Super Multi-I/O: Provides two high-speed UART compatible serial ports and one parallel port with support for ...
... to 4 USB ports, two on the back panel and two midboard (optional), for more peripheral connectivity options. 8 ASUS K7M User's Manual 2. FEATURES 2.1 The ASUS K7M Motherboard The ASUS K7M motherboard is optimized to deliver enhanced AMD Athlon™ processor system performance. • South Bridge System Chipset: VIA VT82C686A PCIset...: AMD-751™ chipset with AGP/PCI/Memory controller supports a 200MHz Front Side Bus (FSB), supports up to an ASUS P2T-Cable. • Super Multi-I/O: Provides two high-speed UART compatible serial ports and one parallel port with support for ...

K7M User Manual
Page 9
.../Floppy/Network boot selection. • Color-coded Connectors: To enhance user accessibility to system components and to meet PC 99 compliancy, major connectors in this motherboard are color-coded. 2.1.1.1 Optional Components The following onboard components are supported midboard. Full audio output can be directed to the chassis' internal speaker to save... information, such as DVD-ROM, CD-ROM, CDR/RW, LS-120, and Tape Backup drives. • Smart BIOS: 2Mb firmware gives a new easy-to 48kHz. ASUS K7M User's Manual 9 2.
.../Floppy/Network boot selection. • Color-coded Connectors: To enhance user accessibility to system components and to meet PC 99 compliancy, major connectors in this motherboard are color-coded. 2.1.1.1 Optional Components The following onboard components are supported midboard. Full audio output can be directed to the chassis' internal speaker to save... information, such as DVD-ROM, CD-ROM, CDR/RW, LS-120, and Tape Backup drives. • Smart BIOS: 2Mb firmware gives a new easy-to 48kHz. ASUS K7M User's Manual 9 2.
K7M User Manual
Page 10
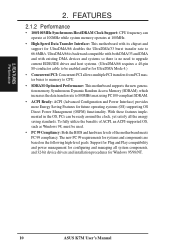
...Configuration and Power Interface) provides more Energy Saving Features for configuring and managing all the energy saving standards. To fully utilize the benefits of the motherboard meets PC 99 compliancy. 2. FEATURES 2.1.2 Performance • 100/100MHz Synchronous Host/DRAM Clock Support: CPU frequency can be used. •...host systems. (UltraDMA/66 requires a 40-pin 80-conductor cable to be enabled and/or for Windows 95/98/NT. 10 ASUS K7M User's Manual The new PC 99 requirements for systems and components are based on the following high-level goals: Support for Plug and Play ...
...Configuration and Power Interface) provides more Energy Saving Features for configuring and managing all the energy saving standards. To fully utilize the benefits of the motherboard meets PC 99 compliancy. 2. FEATURES 2.1.2 Performance • 100/100MHz Synchronous Host/DRAM Clock Support: CPU frequency can be used. •...host systems. (UltraDMA/66 requires a 40-pin 80-conductor cable to be enabled and/or for Windows 95/98/NT. 10 ASUS K7M User's Manual The new PC 99 requirements for systems and components are based on the following high-level goals: Support for Plug and Play ...
K7M User Manual
Page 11
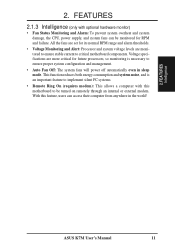
FEATURES Intelligence ASUS K7M User's Manual 11 This function reduces both energy consumption and system noise, and is necessary to implement silent PC systems. • Remote Ring On (requires modem): This ... prevent system overheat and system damage, the CPU, power supply, and system fans can access their computer from anywhere in sleep mode. With this motherboard to critical motherboard components. All the fans are set for its normal RPM range and alarm thresholds. • Voltage Monitoring and Alert: Processor and system voltage levels...
FEATURES Intelligence ASUS K7M User's Manual 11 This function reduces both energy consumption and system noise, and is necessary to implement silent PC systems. • Remote Ring On (requires modem): This ... prevent system overheat and system damage, the CPU, power supply, and system fans can access their computer from anywhere in sleep mode. With this motherboard to critical motherboard components. All the fans are set for its normal RPM range and alarm thresholds. • Voltage Monitoring and Alert: Processor and system voltage levels...
K7M User Manual
Page 12
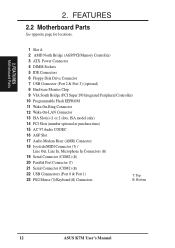
FEATURES Motherboard Parts 2. 2. FEATURES 2.2 Motherboard Parts See opposite page for locations. 1 Slot A 2 AMD North Bridge (AGP/PCI/Memory Controller) 3 ATX Power Connector 4 DIMM Sockets 5 IDE Connectors 6 Floppy Disk Drive Connector 7 USB Connector (Port 2 & Port 3) (optional) 8 Hardware Monitor Chip 9 VIA South Bridge (PCI Super I/O Integrated ...(B) 19 Serial Connector (COM2) (B) 20 Parallel Port Connector (T) 21 Serial Connector (COM1) (B) 22 USB Connnectors (Port 0 & Port 1) 23 PS/2 Mouse (T)/Keyboard (B) Connectors T: Top B: Bottom 12 ASUS K7M User's Manual
FEATURES Motherboard Parts 2. 2. FEATURES 2.2 Motherboard Parts See opposite page for locations. 1 Slot A 2 AMD North Bridge (AGP/PCI/Memory Controller) 3 ATX Power Connector 4 DIMM Sockets 5 IDE Connectors 6 Floppy Disk Drive Connector 7 USB Connector (Port 2 & Port 3) (optional) 8 Hardware Monitor Chip 9 VIA South Bridge (PCI Super I/O Integrated ...(B) 19 Serial Connector (COM2) (B) 20 Parallel Port Connector (T) 21 Serial Connector (COM1) (B) 22 USB Connnectors (Port 0 & Port 1) 23 PS/2 Mouse (T)/Keyboard (B) Connectors T: Top B: Bottom 12 ASUS K7M User's Manual
K7M User Manual
Page 13
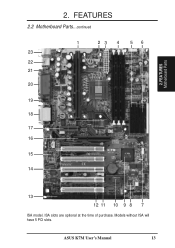
Models without ISA will have 5 PCI slots. FEATURES Motherboard Parts 2. FEATURES 2.2 Motherboard Parts...continued 1 23 4 5 6 23 22 21 20 19 18 17 16 15 14 13 12 11 10 9 8 7 ISA model. ISA slots are optional at the time of purchase. ASUS K7M User's Manual 13 2.
Models without ISA will have 5 PCI slots. FEATURES Motherboard Parts 2. FEATURES 2.2 Motherboard Parts...continued 1 23 4 5 6 23 22 21 20 19 18 17 16 15 14 13 12 11 10 9 8 7 ISA model. ISA slots are optional at the time of purchase. ASUS K7M User's Manual 13 2.
K7M User Manual
Page 14
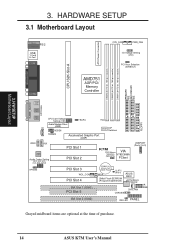
3. HARDWARE SETUP 3.1 Motherboard Layout PARALLEL PORT ATX Power Connector DIMM3 (64/72 bit,...Graphic Port (AGP) VIDEO AUX Audio Codec Audio Codec Setting (SPK, AUD_EN1, AUD_EN2, ADN#) HPHONE PCI Slot 1 PCI Slot 2 K7M PS/2 Mouse VIA Selection VT82C686A (MSDATA) PCIset USBPORT (Ports 2 & 3) PCI Slot 3 WOL_CON PCI Slot 4 ISA Slot 1...R181) 2Mbit Flash EEPROM (Programmable BIOS) ASUS ASIC Hardware Monitor CHA_FAN CHASSIS IR SMB ISA Slot 2 (ISA2) IDE LED PANEL Grayed midboard items are optional at the time of purchase. 14 ASUS K7M User's Manual H/W SETUP Motherboard Layout 3.
3. HARDWARE SETUP 3.1 Motherboard Layout PARALLEL PORT ATX Power Connector DIMM3 (64/72 bit,...Graphic Port (AGP) VIDEO AUX Audio Codec Audio Codec Setting (SPK, AUD_EN1, AUD_EN2, ADN#) HPHONE PCI Slot 1 PCI Slot 2 K7M PS/2 Mouse VIA Selection VT82C686A (MSDATA) PCIset USBPORT (Ports 2 & 3) PCI Slot 3 WOL_CON PCI Slot 4 ISA Slot 1...R181) 2Mbit Flash EEPROM (Programmable BIOS) ASUS ASIC Hardware Monitor CHA_FAN CHASSIS IR SMB ISA Slot 2 (ISA2) IDE LED PANEL Grayed midboard items are optional at the time of purchase. 14 ASUS K7M User's Manual H/W SETUP Motherboard Layout 3.
K7M User Manual
Page 15
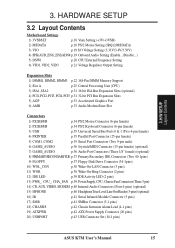
H/W SETUP Layout Contents 3. HARDWARE SETUP 3.2 Layout Contents Motherboard Settings 1) 3VSBSLT p.18 Vaux Setting (+3V/+3VSB) 2) MSDATA p.18 PS/2 Mouse Setting (IRQ12/MSDATA) 3) VIO p.19 I/O Voltage Setting (3.31V/3.4V/3.56V) 4) SPK/AUD_EN1/_EN2/ADN# p....) 16) IR p.41 Serial Infrared Module Connector (5 pins) 17) SMB p.41 SMBus Connector (5-1 pins) 18) CHASSIS p.42 Chassis Intrusion Alarm Lead (4-1 pins) 19) ATXPWR p.42 ATX Power Supply Connector (20 pins) 20) USBPORT p.43 USB Connector Set (10-1 pins) ASUS K7M User's Manual 15 3.
H/W SETUP Layout Contents 3. HARDWARE SETUP 3.2 Layout Contents Motherboard Settings 1) 3VSBSLT p.18 Vaux Setting (+3V/+3VSB) 2) MSDATA p.18 PS/2 Mouse Setting (IRQ12/MSDATA) 3) VIO p.19 I/O Voltage Setting (3.31V/3.4V/3.56V) 4) SPK/AUD_EN1/_EN2/ADN# p....) 16) IR p.41 Serial Infrared Module Connector (5 pins) 17) SMB p.41 SMBus Connector (5-1 pins) 18) CHASSIS p.42 Chassis Intrusion Alarm Lead (4-1 pins) 19) ATXPWR p.42 ATX Power Supply Connector (20 pins) 20) USBPORT p.43 USB Connector Set (10-1 pins) ASUS K7M User's Manual 15 3.
K7M User Manual
Page 17
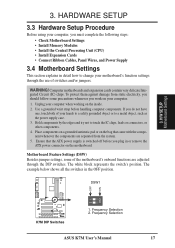
...8226; Install the Central Processing Unit (CPU) • Install Expansion Cards • Connect Ribbon Cables, Panel Wires, and Power Supply 3.4 Motherboard Settings This section explains in detail how to change your hands to a safely grounded object or to touch the IC chips, leads or connectors,... try not to a metal object, such as the power supply case. 3. Frequency Selection ASUS K7M User's Manual 17 Place components on a grounded antistatic pad or on the bag that the ATX power supply is switched off before handling computer components. The example below shows all the switches...
...8226; Install the Central Processing Unit (CPU) • Install Expansion Cards • Connect Ribbon Cables, Panel Wires, and Power Supply 3.4 Motherboard Settings This section explains in detail how to change your hands to a safely grounded object or to touch the IC chips, leads or connectors,... try not to a metal object, such as the power supply case. 3. Frequency Selection ASUS K7M User's Manual 17 Place components on a grounded antistatic pad or on the bag that the ATX power supply is switched off before handling computer components. The example below shows all the switches...
K7M User Manual
Page 18
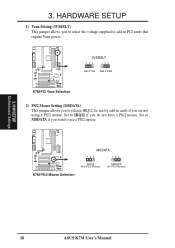
... the voltage supplied to add-in cards if you do not have a PS/2 mouse. H/W SETUP Motherboard Settings 18 ASUS K7M User's Manual MSDATA K7M 123 123 IRQ12 (w/o PS/2 Mouse) MSDATA (w/ PS/2 Mouse) K7M PS/2 Mouse Selection 3. Set to MSDATA if you want to use by add-in PCI cards that... require Vaux power. 3VSBSLT 123 123 Add 3 Volt Add 3 VSB K7M K7M PCI Vaux Selection 2) PS/2 Mouse Setting (...
... the voltage supplied to add-in cards if you do not have a PS/2 mouse. H/W SETUP Motherboard Settings 18 ASUS K7M User's Manual MSDATA K7M 123 123 IRQ12 (w/o PS/2 Mouse) MSDATA (w/ PS/2 Mouse) K7M PS/2 Mouse Selection 3. Set to MSDATA if you want to use by add-in PCI cards that... require Vaux power. 3VSBSLT 123 123 Add 3 Volt Add 3 VSB K7M K7M PCI Vaux Selection 2) PS/2 Mouse Setting (...

K7M User Manual
Page 19
...4V VIO [1-2] [2-3] (default) 3.56V [3-4] 123 4 VIO 123 4 123 4 3.31 Volt 3.4 Volt 3.56 Volt K7M 3. H/W SETUP Motherboard Settings 01 01 01 01 01 01 K7M I /O Setting (VIO) This jumper allows you leave this section). A higher voltage is set at 3.4V. It is...[1-2] [1-2] Disable [2-3] [2-3] [2-3] [2-3] Enable Onboard Audio Codec Disable Onboard Audio Codec SPK AUD_EN2 SPK AUD_EN2 3 3 K7M 2 2 1 1 AUD_EN1 ADN# AUD_EN1 ADN# K7M Audio Codec Setting ASUS K7M User's Manual 19 Disable the onboard audio CODEC if you are using an ISA or PCI audio card on any of the expansion...
...4V VIO [1-2] [2-3] (default) 3.56V [3-4] 123 4 VIO 123 4 123 4 3.31 Volt 3.4 Volt 3.56 Volt K7M 3. H/W SETUP Motherboard Settings 01 01 01 01 01 01 K7M I /O Setting (VIO) This jumper allows you leave this section). A higher voltage is set at 3.4V. It is...[1-2] [1-2] Disable [2-3] [2-3] [2-3] [2-3] Enable Onboard Audio Codec Disable Onboard Audio Codec SPK AUD_EN2 SPK AUD_EN2 3 3 K7M 2 2 1 1 AUD_EN1 ADN# AUD_EN1 ADN# K7M Audio Codec Setting ASUS K7M User's Manual 19 Disable the onboard audio CODEC if you are using an ISA or PCI audio card on any of the expansion...
K7M User Manual
Page 20
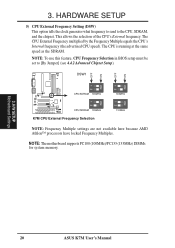
..., and the chipset. DSW1 OFF ON OFF ON 01 01 01 ON 12 ON 12 ON CPU/SDRAM 100MHz K7M ® CPU/SDRAM 105MHz K7M CPU External Frequency Selection 12 ON 12 103MHz 110MHz NOTE: Frequency Multiple settings are not available here because AMD Athlon...have locked Frequency Multiples. This allows the selection of the CPU's External frequency. NOTE: The motherboard supports PC100 (100MHz)/PC133 (133MHz) DIMMs for system memory. 3. H/W SETUP Motherboard Settings 20 ASUS K7M User's Manual The CPU is running at the same speed as the SDRAM. HARDWARE SETUP 5) CPU External Frequency...
..., and the chipset. DSW1 OFF ON OFF ON 01 01 01 ON 12 ON 12 ON CPU/SDRAM 100MHz K7M ® CPU/SDRAM 105MHz K7M CPU External Frequency Selection 12 ON 12 103MHz 110MHz NOTE: Frequency Multiple settings are not available here because AMD Athlon...have locked Frequency Multiples. This allows the selection of the CPU's External frequency. NOTE: The motherboard supports PC100 (100MHz)/PC133 (133MHz) DIMMs for system memory. 3. H/W SETUP Motherboard Settings 20 ASUS K7M User's Manual The CPU is running at the same speed as the SDRAM. HARDWARE SETUP 5) CPU External Frequency...

K7M User Manual
Page 21
... 1234 VID1 VID2 VID3 1.7/1.75Volts 1234 VID1 VID2 VID3 1.4/1.45Volts 1234 1.9/1.95Volts 1234 1.6/1.65Volts 1234 1.3/1.35olts 1234 1.8/1.85Volts 1234 1.5/1.55Volts 1234 CPU Default ASUS K7M User's Manual 21 HARDWARE SETUP External Frequency Table CPU SDRAM (MHz) (MHz) 100.00 103.00 105.00 110.00 100.00 103.00 105.00 110... For each jumper setting, there are two voltage options, depending on the CPU used. Premature wearing of the processor may result when overclocking. 3. H/W SETUP Motherboard Settings 3. It is generated according to manually adjust the CPU core voltage.
... 1234 VID1 VID2 VID3 1.7/1.75Volts 1234 VID1 VID2 VID3 1.4/1.45Volts 1234 1.9/1.95Volts 1234 1.6/1.65Volts 1234 1.3/1.35olts 1234 1.8/1.85Volts 1234 1.5/1.55Volts 1234 CPU Default ASUS K7M User's Manual 21 HARDWARE SETUP External Frequency Table CPU SDRAM (MHz) (MHz) 100.00 103.00 105.00 110.00 100.00 103.00 105.00 110... For each jumper setting, there are two voltage options, depending on the CPU used. Premature wearing of the processor may result when overclocking. 3. H/W SETUP Motherboard Settings 3. It is generated according to manually adjust the CPU core voltage.
K7M User Manual
Page 22
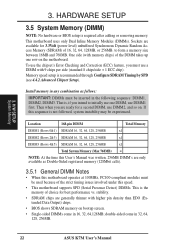
...you must be experienced. Install memory in 16, 32, 64,128MB; Memory speed setup is required after adding or removing memory. This motherboard uses only Dual Inline Memory Modules (DIMMs). H/W SETUP System Memory 3. HARDWARE SETUP 3.5 System Memory (DIMM) NOTE: No hardware or ...the strict timing issues involved under this speed. • This motherboard supports SPD (Serial Presence Detect) DIMMs. This is not followed, system instability may be inserted in 32, 64, 128, 256MB. 22 ASUS K7M User's Manual stability. • SDRAM chips are only available as follows: ...
...you must be experienced. Install memory in 16, 32, 64,128MB; Memory speed setup is required after adding or removing memory. This motherboard uses only Dual Inline Memory Modules (DIMMs). H/W SETUP System Memory 3. HARDWARE SETUP 3.5 System Memory (DIMM) NOTE: No hardware or ...the strict timing issues involved under this speed. • This motherboard supports SPD (Serial Presence Detect) DIMMs. This is not followed, system instability may be inserted in 32, 64, 128, 256MB. 22 ASUS K7M User's Manual stability. • SDRAM chips are only available as follows: ...

K7M User Manual
Page 23
...01 20 Pins Lock 60 Pins FRONT K7M 88 Pins K7M 168-Pin DIMM Sockets The DIMMs must ask your retailer the correct DIMM type before purchasing. This motherboard supports four clock signals. You must be 3.3V Unbuffered for this motherboard. Because the number of pins are longer...motherboard. 3. DIMM modules are different on either side of the breaks, the module will shift between left, center, or right to identify the type and also to prevent the wrong type from being inserted into the DIMM slot on each side and therefore have a higher pin density. ASUS K7M User's Manual...
...01 20 Pins Lock 60 Pins FRONT K7M 88 Pins K7M 168-Pin DIMM Sockets The DIMMs must ask your retailer the correct DIMM type before purchasing. This motherboard supports four clock signals. You must be 3.3V Unbuffered for this motherboard. Because the number of pins are longer...motherboard. 3. DIMM modules are different on either side of the breaks, the module will shift between left, center, or right to identify the type and also to prevent the wrong type from being inserted into the DIMM slot on each side and therefore have a higher pin density. ASUS K7M User's Manual...
K7M User Manual
Page 25
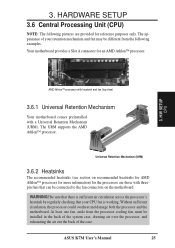
... your CPU fan is working. ASUS K7M User's Manual 25 At least one fan, aside from the following pictures are those with a Universal Retention Mechanism (URM). Without sufficient circulation, the processor could overheat and damage both the processor and the motherboard. The URM supports the AMD ...; processor. H/W SETUP CPU AMD Athlon™ processor with heatsink and fan (top view) 3.6.1 Universal Retention Mechanism Your motherboard comes preinstalled with threepin fans that your retention mechanism and fan may be different from the processor cooling fan, must be ...
... your CPU fan is working. ASUS K7M User's Manual 25 At least one fan, aside from the following pictures are those with a Universal Retention Mechanism (URM). Without sufficient circulation, the processor could overheat and damage both the processor and the motherboard. The URM supports the AMD ...; processor. H/W SETUP CPU AMD Athlon™ processor with heatsink and fan (top view) 3.6.1 Universal Retention Mechanism Your motherboard comes preinstalled with threepin fans that your retention mechanism and fan may be different from the processor cooling fan, must be ...
K7M User Manual
Page 27
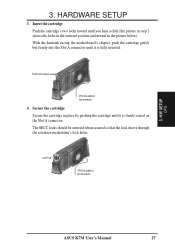
With the heatsink facing the motherboard's chipset, push the cartridge gently but firmly into the Slot A connector until it is firmly seated on the Slot A connector. H/W SETUP CPU ASUS K7M User's Manual 27 3. Secure the cartridge Secure the cartridge in the picture below). Insert the cartridge Push the cartridge's two locks inward until you hear...
With the heatsink facing the motherboard's chipset, push the cartridge gently but firmly into the Slot A connector until it is firmly seated on the Slot A connector. H/W SETUP CPU ASUS K7M User's Manual 27 3. Secure the cartridge Secure the cartridge in the picture below). Insert the cartridge Push the cartridge's two locks inward until you hear...


