User Guide for English Edition
Page 15
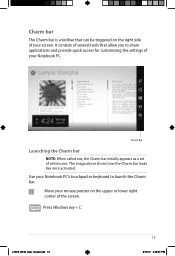
... the screen. Press Windows key + C. It consists of several tools that can be triggered on the upper or lower right corner of your screen. The image above shows how the Charm bar looks like once activated. Charm Bar Launching the Charm bar NOTE: When called out, the Charm bar initially appears...
... the screen. Press Windows key + C. It consists of several tools that can be triggered on the upper or lower right corner of your screen. The image above shows how the Charm bar looks like once activated. Charm Bar Launching the Charm bar NOTE: When called out, the Charm bar initially appears...

User's Manual for English Edition
Page 53
Using the touchpad The touchpad allows you can tap or click anywhere on the touchpad to activate its pointer, then slide your finger on the touchpad to move the pointer so you to use one-finger and multi-finger gestures to move the pointer onscreen. Slide horizontally Slide vertically Slide diagonally Notebook PC User Manual 53 Moving the pointer You can select and click items, rotate and zoom images, scroll lists, as well as swipe and switch between windows.
Using the touchpad The touchpad allows you can tap or click anywhere on the touchpad to activate its pointer, then slide your finger on the touchpad to move the pointer so you to use one-finger and multi-finger gestures to move the pointer onscreen. Slide horizontally Slide vertically Slide diagonally Notebook PC User Manual 53 Moving the pointer You can select and click items, rotate and zoom images, scroll lists, as well as swipe and switch between windows.

User's Manual for English Edition
Page 55
Using two fingers on the touchpad, you can scroll through lists vertically and horizontally. To enable continuous scrolling, hold your selected image. Using two fingers on the edge of your fingers on the touchpad, you can enlarge or reduce the view size of the touchpad when moving ...from up to down or left to zoom in or out. To rotate an image, place two fingers on the touchpad by using two fingers. Rotating images clockwise or counterclockwise is activated. Bring together or spread apart two fingers to right and vice versa. Notebook PC...
Using two fingers on the touchpad, you can scroll through lists vertically and horizontally. To enable continuous scrolling, hold your selected image. Using two fingers on the edge of your fingers on the touchpad, you can enlarge or reduce the view size of the touchpad when moving ...from up to down or left to zoom in or out. To rotate an image, place two fingers on the touchpad by using two fingers. Rotating images clockwise or counterclockwise is activated. Bring together or spread apart two fingers to right and vice versa. Notebook PC...
User's Manual for English Edition
Page 81
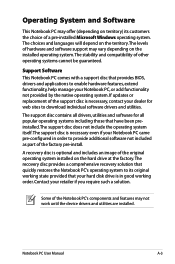
... cannot be guaranteed. A recovery disc is in order to enable hardware features, extend functionality, help manage your hard disk drive is optional and includes an image of the original operating system installed on the installed operating system. Support Software This Notebook PC comes with a support disc that your Notebook PC, or...
... cannot be guaranteed. A recovery disc is in order to enable hardware features, extend functionality, help manage your hard disk drive is optional and includes an image of the original operating system installed on the installed operating system. Support Software This Notebook PC comes with a support disc that your Notebook PC, or...
User's Manual for English Edition
Page 95
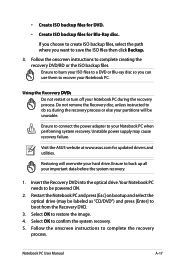
... to do so, during the recovery process. Follow the onscreen instructions to restore the image. 4. Restoring will be unusable. Select OK to complete creating the recovery DVD/BD or the ISO backup files. Visit the ASUS website at www.asus.com for Blu-Ray disc. Select OK to complete the recovery process. Follow...
... to do so, during the recovery process. Follow the onscreen instructions to restore the image. 4. Restoring will be unusable. Select OK to complete creating the recovery DVD/BD or the ISO backup files. Visit the ASUS website at www.asus.com for Blu-Ray disc. Select OK to complete the recovery process. Follow...

