
User Guide
Page 3
... information iv About this guide iv Package contents vi H81M-C specifications summary vi Product introduction 1.1 Before you proceed 1-1 1.2 Motherboard overview 1-1 1.3 Central Processing Unit (CPU 1-3 1.4 System memory 1-7 1.5 Expansion slots 1-9 1.6 Jumpers 1-10 1.7 Connectors 1-12 1.8 Onboard LEDs 1-19 1.9 Software support 1-20 BIOS information 2.1 Managing and updating your BIOS 2-1 2.2 BIOS setup program 2-6 2.3 My Favorites 2-10 2.4 Main menu 2-11...
... information iv About this guide iv Package contents vi H81M-C specifications summary vi Product introduction 1.1 Before you proceed 1-1 1.2 Motherboard overview 1-1 1.3 Central Processing Unit (CPU 1-3 1.4 System memory 1-7 1.5 Expansion slots 1-9 1.6 Jumpers 1-10 1.7 Connectors 1-12 1.8 Onboard LEDs 1-19 1.9 Software support 1-20 BIOS information 2.1 Managing and updating your BIOS 2-1 2.2 BIOS setup program 2-6 2.3 My Favorites 2-10 2.4 Main menu 2-11...
User Guide
Page 4
... you detect any area where it may be exposed to moisture. • Place the product on the motherboard. • Chapter 2: BIOS information This chapter discusses changing system settings through the BIOS Setup menus. Do not place the product in your dealer immediately. • To avoid short circuits, keep paper clips, screws, and... to fix it supports. If possible, disconnect all power cables from the motherboard, ensure that all the manuals that your retailer. Detailed descriptions fo the BIOS parameters are connected.
... you detect any area where it may be exposed to moisture. • Place the product on the motherboard. • Chapter 2: BIOS information This chapter discusses changing system settings through the BIOS Setup menus. Do not place the product in your dealer immediately. • To avoid short circuits, keep paper clips, screws, and... to fix it supports. If possible, disconnect all power cables from the motherboard, ensure that all the manuals that your retailer. Detailed descriptions fo the BIOS parameters are connected.
User Guide
Page 7
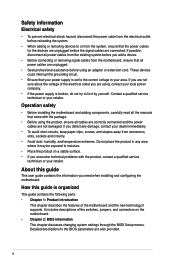
... 2 - ASUS Anti-surge - ASUS CrashFree BIOS 3 - ASUS FAN Xpert 100% Solid Capacitors ASUS Webstorage 100% All High-quality Conductive Polymer Capacitors 1 x PS/2 keyboard port (purple) 1 x PS/2 mouse port (green) 1 x DVI port 1 x RGB port 1 x LPT port 1 x LAN (RJ-45) port 2 x USB 3.0/2.0 ports 4 x USB 2.0/1.1 ports 3 x Audio jacks support 8-channel audio output (continued on the next page) vii H81M...
... 2 - ASUS Anti-surge - ASUS CrashFree BIOS 3 - ASUS FAN Xpert 100% Solid Capacitors ASUS Webstorage 100% All High-quality Conductive Polymer Capacitors 1 x PS/2 keyboard port (purple) 1 x PS/2 mouse port (green) 1 x DVI port 1 x RGB port 1 x LPT port 1 x LAN (RJ-45) port 2 x USB 3.0/2.0 ports 4 x USB 2.0/1.1 ports 3 x Audio jacks support 8-channel audio output (continued on the next page) vii H81M...
User Guide
Page 8
viii H81M-C specifications summary Internal connectors BIOS features Manageability Support DVD Operating System Support Form factor 2 x USB 2.0/1.1 connectors support additional 4 USB 2.0 ports 2 x SATA 6.0 Gb/s connectors 2 x SATA 3.0 Gb/s connectors 1 x CLRTC jumper 1 x 4-pin... connector 1 x 24-pin ATX power connector 1 x 4-pin ATX 12V power connector 64 Mb Flash ROM, UEFI BIOS, PnP, DMI v2.0, WfM2.0, SM BIOS v2.7, ACPI v2.0a, SLP3.0, EUP-ready WOL, PXE, PME Wake up Drivers ASUS utilities EZ Update Anti-virus software (OEM version) Windows® 8 / Windows® 7 uATX form factor: 9.6"x 7"...
viii H81M-C specifications summary Internal connectors BIOS features Manageability Support DVD Operating System Support Form factor 2 x USB 2.0/1.1 connectors support additional 4 USB 2.0 ports 2 x SATA 6.0 Gb/s connectors 2 x SATA 3.0 Gb/s connectors 1 x CLRTC jumper 1 x 4-pin... connector 1 x 24-pin ATX power connector 1 x 4-pin ATX 12V power connector 64 Mb Flash ROM, UEFI BIOS, PnP, DMI v2.0, WfM2.0, SM BIOS v2.7, ACPI v2.0a, SLP3.0, EUP-ready WOL, PXE, PME Wake up Drivers ASUS utilities EZ Update Anti-virus software (OEM version) Windows® 8 / Windows® 7 uATX form factor: 9.6"x 7"...
User Guide
Page 10
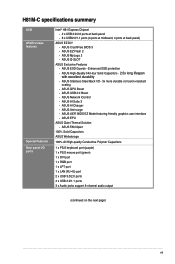
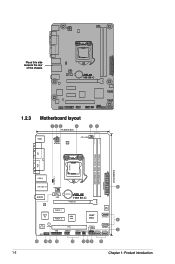
...-pin module) DDR3 DIMM_B1 (64bit, 240-pin module) EATXPWR 24.4cm(9.6in) LPT VGA LGA1150 PS2_USBPW1-6 1-2 USB3~6 LAN_USB3_12 CHA_FAN 2 AUDIO BATTERY COM H81M-C PCIEX16_1 RTL 8111G PCIEX1_1 8Mb BIOS Super I/O PCIEX1_2 ASM 1083 Intel® H81 SATA3G_1 6 ALC 887-VD2 SB_PWR PCI1 SPEAKER F_PANEL SATA3G_2 TPM USB910 USB1112USBPW9-12 SATA6G_1 SATA6G_2 7 AAFP...
...-pin module) DDR3 DIMM_B1 (64bit, 240-pin module) EATXPWR 24.4cm(9.6in) LPT VGA LGA1150 PS2_USBPW1-6 1-2 USB3~6 LAN_USB3_12 CHA_FAN 2 AUDIO BATTERY COM H81M-C PCIEX16_1 RTL 8111G PCIEX1_1 8Mb BIOS Super I/O PCIEX1_2 ASM 1083 Intel® H81 SATA3G_1 6 ALC 887-VD2 SB_PWR PCI1 SPEAKER F_PANEL SATA3G_2 TPM USB910 USB1112USBPW9-12 SATA6G_1 SATA6G_2 7 AAFP...
User Guide
Page 17
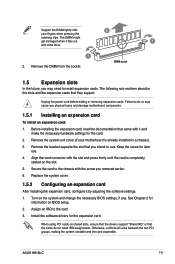
... by adjusting the software settings. 1. Otherwise, conflicts will arise between the two PCI groups, making the system unstable and the card inoperable. ASUS H81M-C 1-9 Support the DIMM lightly with the screw you removed earlier. 6. Keep the screw for the expansion card. Turn on shared slots,...motherboard components. 1.5.1 Installing an expansion card To install an expansion card: 1. When using PCI cards on the system and change the necessary BIOS settings, if any. See Chapter 2 for the card. 2. The following sub‑sections describe the slots and the expansion cards that...
... by adjusting the software settings. 1. Otherwise, conflicts will arise between the two PCI groups, making the system unstable and the card inoperable. ASUS H81M-C 1-9 Support the DIMM lightly with the screw you removed earlier. 6. Keep the screw for the expansion card. Turn on shared slots,...motherboard components. 1.5.1 Installing an expansion card To install an expansion card: 1. When using PCI cards on the system and change the necessary BIOS settings, if any. See Chapter 2 for the card. 2. The following sub‑sections describe the slots and the expansion cards that...
User Guide
Page 19
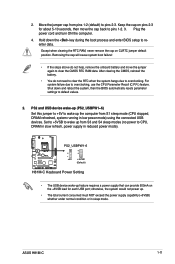
...reboot the system, then the BIOS automatically resets parameter settings to default values. 2. For system failure due to wake up the computer from S1 sleep mode (CPU stopped, DRAM refreshed, system running in low power mode) using the connected USB devices. PS2_USBPW1-6 12 23 H81M-C +5V +5VSB (Default) H81M-C Keyboard Power Setting •...move the jumper again to CPU, DRAM in slow refresh, power supply in sleep mode. Shut down the key during the boot process and enter BIOS setup to pins 1-2. 3. 2. Keep the cap on CLRTC jumper default position. ASUS H81M-C 1-11
...reboot the system, then the BIOS automatically resets parameter settings to default values. 2. For system failure due to wake up the computer from S1 sleep mode (CPU stopped, DRAM refreshed, system running in low power mode) using the connected USB devices. PS2_USBPW1-6 12 23 H81M-C +5V +5VSB (Default) H81M-C Keyboard Power Setting •...move the jumper again to CPU, DRAM in slow refresh, power supply in sleep mode. Shut down the key during the boot process and enter BIOS setup to pins 1-2. 3. 2. Keep the cap on CLRTC jumper default position. ASUS H81M-C 1-11
User Guide
Page 20
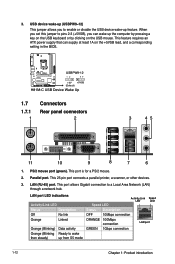
.../Link LED Status Description Off No link Orange Linked Orange (Blinking) Data activity Orange (Blinking Ready to wake then steady) up feature. H81M-C USBPW9-12 12 23 +5V +5VSB (Default) H81M-C USB Device Wake Up 1.7 1.7.1 1 Connectors Rear panel connectors 2 3 45 11 10 9 8 7 6 1. Parallel port. This port allows Gigabit... the computer by pressing a key on the USB keyboard or by clicking on the +5VSB lead, and a corresponding setting in the BIOS. LAN (RJ-45) port. When you set this jumper to pins 2-3 (+5VSB), you to a Local Area Network (LAN) through a network hub...
.../Link LED Status Description Off No link Orange Linked Orange (Blinking) Data activity Orange (Blinking Ready to wake then steady) up feature. H81M-C USBPW9-12 12 23 +5V +5VSB (Default) H81M-C USB Device Wake Up 1.7 1.7.1 1 Connectors Rear panel connectors 2 3 45 11 10 9 8 7 6 1. Parallel port. This port allows Gigabit... the computer by pressing a key on the USB keyboard or by clicking on the +5VSB lead, and a corresponding setting in the BIOS. LAN (RJ-45) port. When you set this jumper to pins 2-3 (+5VSB), you to a Local Area Network (LAN) through a network hub...

User Guide
Page 23
... or later version before using Serial ATA hard disk drives. • When using hot-plug and NCQ, set the SATA Mode Selection item in the BIOS setup to [AHCI]. Front panel audio connector (10-1 pin AAFP) This connector is set to this connector, set the item to Serial ATA 6.0 ... H81M-C SATA 6.0Gb/s connectors • You must install Windows. If you want to connect an AC'97 front panel audio module to this connector is for a chassis-mounted front panel audio I /O module cable to [HD]. 3. ASUS H81M-C 1-15 By default, this connector, set the Front Panel Type item in the BIOS...
... or later version before using Serial ATA hard disk drives. • When using hot-plug and NCQ, set the SATA Mode Selection item in the BIOS setup to [AHCI]. Front panel audio connector (10-1 pin AAFP) This connector is set to this connector, set the item to Serial ATA 6.0 ... H81M-C SATA 6.0Gb/s connectors • You must install Windows. If you want to connect an AC'97 front panel audio module to this connector is for a chassis-mounted front panel audio I /O module cable to [HD]. 3. ASUS H81M-C 1-15 By default, this connector, set the Front Panel Type item in the BIOS...

User Guide
Page 24
...8226; When using hot-plug and NCQ, set the SATA Mode Selection item in the BIOS to the fan connectors on the fan connectors! CPU and chassis fan connectors (4-pin CPU_FAN,...cables to [AHCI]. 6. These are not jumpers! Only the 4-pin CPU fan supports the ASUS Fan Xpert 2 feature. 1-16 Chapter 1: Product introduction The CPU_FAN connector supports a CPU fan ...the fan connectors. SATA3G_1 GND RSATA_TXP1 RSATA_TXN1 GND RSATA_RXN1 RSATA_RXP1 GND H81M-C SATA3G_2 GND RSATA_TXP2 RSATA_TXN2 GND RSATA_RXN2 RSATA_RXP2 GND H81M-C SATA 3.0Gb/s connectors • You must install Windows....
...8226; When using hot-plug and NCQ, set the SATA Mode Selection item in the BIOS to the fan connectors on the fan connectors! CPU and chassis fan connectors (4-pin CPU_FAN,...cables to [AHCI]. 6. These are not jumpers! Only the 4-pin CPU fan supports the ASUS Fan Xpert 2 feature. 1-16 Chapter 1: Product introduction The CPU_FAN connector supports a CPU fan ...the fan connectors. SATA3G_1 GND RSATA_TXP1 RSATA_TXN1 GND RSATA_RXN1 RSATA_RXP1 GND H81M-C SATA3G_2 GND RSATA_TXP2 RSATA_TXN2 GND RSATA_RXN2 RSATA_RXP2 GND H81M-C SATA 3.0Gb/s connectors • You must install Windows....
User Guide
Page 29
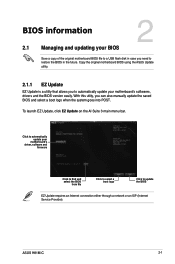
... also manually update the saved BIOS and select a boot logo when the system goes into POST. ASUS H81M-C 2-1 To launch EZ Update, click EZ Update on the AI Suite 3 main menu bar. BIOS information 2.1 Managing and updating your BIOS 2 Save a copy of the original motherboard BIOS file to a USB flash ...disk in case you need to update the BIOS EZ Update requires an...
... also manually update the saved BIOS and select a boot logo when the system goes into POST. ASUS H81M-C 2-1 To launch EZ Update, click EZ Update on the AI Suite 3 main menu bar. BIOS information 2.1 Managing and updating your BIOS 2 Save a copy of the original motherboard BIOS file to a USB flash ...disk in case you need to update the BIOS EZ Update requires an...
User Guide
Page 30
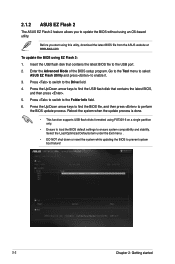
... process. Press the Up/Down arrow keys to find the USB flash disk that contains the latest BIOS file to ensure system compatibility and stability. 2.1.2 ASUS EZ Flash 2 The ASUS EZ Flash 2 feature allows you start using EZ Flash 2: 1. Reboot the system when the update process is done. • ... system boot failure! 2-2 Chapter 2: Getting started Go to the Tool menu to select ASUS EZ Flash Utility and press to the Drive field. 4. Press to switch to enable it. 3. Before you to update the BIOS without using FAT32/16 on a single partition only. • Ensure to load the...
... process. Press the Up/Down arrow keys to find the USB flash disk that contains the latest BIOS file to ensure system compatibility and stability. 2.1.2 ASUS EZ Flash 2 The ASUS EZ Flash 2 feature allows you start using EZ Flash 2: 1. Reboot the system when the update process is done. • ... system boot failure! 2-2 Chapter 2: Getting started Go to the Tool menu to select ASUS EZ Flash Utility and press to the Drive field. 4. Press to switch to enable it. 3. Before you to update the BIOS without using FAT32/16 on a single partition only. • Ensure to load the...
User Guide
Page 31
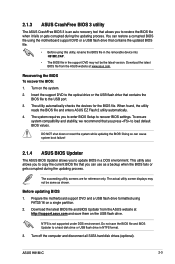
..., we recommend that you to recover BIOS settings. The succeeding utility screens are for the BIOS file. Download the latest BIOS file and BIOS Updater from the ASUS website at http://support.asus.com and save the BIOS file and BIOS Updater to a hard disk drive or USB flash drive in NTFS format. 3. ASUS H81M-C 2-3 Turn on the USB flash...
..., we recommend that you to recover BIOS settings. The succeeding utility screens are for the BIOS file. Download the latest BIOS file and BIOS Updater from the ASUS website at http://support.asus.com and save the BIOS file and BIOS Updater to a hard disk drive or USB flash drive in NTFS format. 3. ASUS H81M-C 2-3 Turn on the USB flash...
User Guide
Page 32
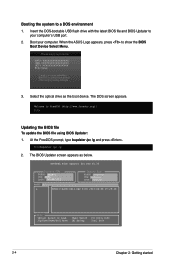
...computer's USB port. 2. The DOS screen appears. ASUSTek BIOS Updater for DOS V1.30 H81M-C 0305 06/08/2013 H81M-C-ASUS-0214.CAP 8194 2013-04-08 15:25:48 2-4 Chapter 2: Getting started Updating the BIOS file To update the BIOS file using BIOS Updater: 1. Insert the DOS-bootable USB flash drive with ...the latest BIOS file and BIOS Updater to a DOS environment 1....
...computer's USB port. 2. The DOS screen appears. ASUSTek BIOS Updater for DOS V1.30 H81M-C 0305 06/08/2013 H81M-C-ASUS-0214.CAP 8194 2013-04-08 15:25:48 2-4 Chapter 2: Getting started Updating the BIOS file To update the BIOS file using BIOS Updater: 1. Insert the DOS-bootable USB flash drive with ...the latest BIOS file and BIOS Updater to a DOS environment 1....

User Guide
Page 33
.... Select Yes and press . Select the Load Optimized Defaults item under the Exit menu. When BIOS update is done, press to select the BIOS file and press . 3. ASUS H81M-C 2-5 BIOS Updater checks the selected BIOS file and prompts you have disconnected them. Refer to section 2.10 Exit menu for details. • Ensure to connect all SATA...
.... Select Yes and press . Select the Load Optimized Defaults item under the Exit menu. When BIOS update is done, press to select the BIOS file and press . 3. ASUS H81M-C 2-5 BIOS Updater checks the selected BIOS file and prompts you have disconnected them. Refer to section 2.10 Exit menu for details. • Ensure to connect all SATA...
User Guide
Page 34
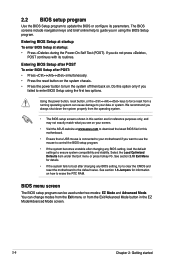
...1.6 Jumpers for this option only if you see on your screen. • Visit the ASUS website at startup: • Press during the Power-On Self Test (POST). 2.2 BIOS setup program Use the BIOS Setup program to your data or system. Select the Load Optimized Defaults item under two modes...: EZ Mode and Advanced Mode. BIOS menu screen The BIOS setup program can cause damage to update the BIOS or configure its routines. Entering BIOS Setup at startup To enter BIOS Setup at www.asus.com to enter BIOS Setup using the BIOS Setup program. We recommend you do not press...
...1.6 Jumpers for this option only if you see on your screen. • Visit the ASUS website at startup: • Press during the Power-On Self Test (POST). 2.2 BIOS setup program Use the BIOS Setup program to your data or system. Select the Load Optimized Defaults item under two modes...: EZ Mode and Advanced Mode. BIOS menu screen The BIOS setup program can cause damage to update the BIOS or configure its routines. Entering BIOS Setup at startup To enter BIOS Setup at www.asus.com to enter BIOS Setup using the BIOS Setup program. We recommend you do not press...

User Guide
Page 35
... EZ Mode, click Exit, then select ASUS EZ Mode or press F7. ASUS H81M-C 2-7 The default screen for the advanced BIOS settings. To access the Advanced Mode, click Exit/Advanced Mode, then select Advanced Mode or press F7 for entering the BIOS setup program can be changed. The figure... program Exits the BIOS setup program without saving the changes, saves the changes and resets the system, or enters the Advanced Mode Selects the Advanced Normal mode mode functions ASUS Optimal Selects the boot mode device priority Power saving mode Displays the Advanced mode menus ...
... EZ Mode, click Exit, then select ASUS EZ Mode or press F7. ASUS H81M-C 2-7 The default screen for the advanced BIOS settings. To access the Advanced Mode, click Exit/Advanced Mode, then select Advanced Mode or press F7 for entering the BIOS setup program can be changed. The figure... program Exits the BIOS setup program without saving the changes, saves the changes and resets the system, or enters the Advanced Mode Selects the Advanced Normal mode mode functions ASUS Optimal Selects the boot mode device priority Power saving mode Displays the Advanced mode menus ...

User Guide
Page 37
... bottom right corner of the menu screen are items that item. Press the Up/Down arrow keys or / keys to select items in English. ASUS H81M-C 2-9 Scroll bar A scroll bar appears on the right side of the selected item. Use the navigation keys to display the other items on ...the screen. A configurable field is a brief description of a menu screen when there are the navigation keys for the BIOS setup program. Pop-up window with the configuration options for the menu items. If an item is user-configurable, you last modified and saved in...
... bottom right corner of the menu screen are items that item. Press the Up/Down arrow keys or / keys to select items in English. ASUS H81M-C 2-9 Scroll bar A scroll bar appears on the right side of the selected item. Use the navigation keys to display the other items on ...the screen. A configurable field is a brief description of a menu screen when there are the navigation keys for the BIOS setup program. Pop-up window with the configuration options for the menu items. If an item is user-configurable, you last modified and saved in...
User Guide
Page 38
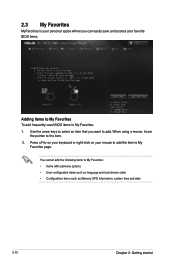
Press on your keyboard or right-click on your favorite BIOS items. Adding items to My Favorites To add frequently-used BIOS items to My Favorites: 1. You cannot add the following items to the item. 2. 2.3 My Favorites MyFavorites is your personal space where you want to add. ...
Press on your keyboard or right-click on your favorite BIOS items. Adding items to My Favorites To add frequently-used BIOS items to My Favorites: 1. You cannot add the following items to the item. 2. 2.3 My Favorites MyFavorites is your personal space where you want to add. ...
User Guide
Page 39
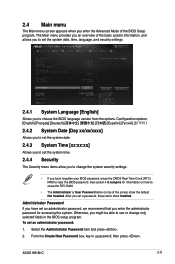
From the Create New Password box, key in the BIOS setup program. ASUS H81M-C 2-11 After you set a password, these items show the default Not Installed. See section 1.6 Jumpers for accessing the system. Otherwise, you might be able to ... . To set an administrator password: 1. The Main menu provides you an overview of the BIOS Setup program. Administrator Password If you have forgotten your BIOS password, erase the CMOS Real Time Clock (RTC) RAM to clear the BIOS password. 2.4 Main menu The Main menu screen appears when you enter the Advanced Mode of...
From the Create New Password box, key in the BIOS setup program. ASUS H81M-C 2-11 After you set a password, these items show the default Not Installed. See section 1.6 Jumpers for accessing the system. Otherwise, you might be able to ... . To set an administrator password: 1. The Main menu provides you an overview of the BIOS Setup program. Administrator Password If you have forgotten your BIOS password, erase the CMOS Real Time Clock (RTC) RAM to clear the BIOS password. 2.4 Main menu The Main menu screen appears when you enter the Advanced Mode of...


