
User Manual
Page 28
...immediately and run Windows disk checking program. IMPORTANT! 3 Getting Started Powering ON the Notebook PC The Notebook PC's power-ON message appears on the screen prompting you turn it will first run slower. IMPORTANT! DO NOT carry or cover a Notebook PC that is given during POST and gives a...is not a problem with any critical hard disk drive warning is powered ON with the display. If warnings are still given during the splash screen, standard boot information such as a permanent part of the system. WARNING! If you may result in for more effective scan and repair ...
...immediately and run Windows disk checking program. IMPORTANT! 3 Getting Started Powering ON the Notebook PC The Notebook PC's power-ON message appears on the screen prompting you turn it will first run slower. IMPORTANT! DO NOT carry or cover a Notebook PC that is given during POST and gives a...is not a problem with any critical hard disk drive warning is powered ON with the display. If warnings are still given during the splash screen, standard boot information such as a permanent part of the system. WARNING! If you may result in for more effective scan and repair ...

User Manual
Page 29
... the power saving features, your Notebook PC on the road, you continue to -RAM (STR) does not last long when the battery power is charged. Screen captures shown here are examples only and may fail to charge in the battery. Right-click the battery icon You will discharge over the battery...
... the power saving features, your Notebook PC on the road, you continue to -RAM (STR) does not last long when the battery power is charged. Screen captures shown here are examples only and may fail to charge in the battery. Right-click the battery icon You will discharge over the battery...

User Manual
Page 32
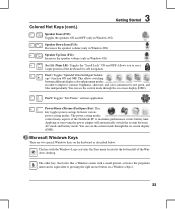
...): Wireless Models Only: Toggles the internal wireless LAN or Bluetooth (on selected models) ON or OFF with an on the Notebook PC's keyboard. stretches the screen area to use the wireless LAN or Bluetooth. 3 Getting Started Special Keyboard Functions Colored Hot Keys The following defines the colored hot keys on...
...): Wireless Models Only: Toggles the internal wireless LAN or Bluetooth (on selected models) ON or OFF with an on the Notebook PC's keyboard. stretches the screen area to use the wireless LAN or Bluetooth. 3 Getting Started Special Keyboard Functions Colored Hot Keys The following defines the colored hot keys on...
User Manual
Page 33
... volume (only in order to improve contrast, brightness, skin tone, and color saturation for cell navigation. You can see the current mode through the on -screen display (OSD). The other key, that looks like a Windows menu with the Windows Logo activates the Start menu located at the bottom left of the... on the keyboard as described below. Fn+C: Toggles "Splendid Video Intelligent Technology" function ON and OFF. You can see the current mode through the on -screen display (OSD).
... volume (only in order to improve contrast, brightness, skin tone, and color saturation for cell navigation. You can see the current mode through the on -screen display (OSD). The other key, that looks like a Windows menu with the Windows Logo activates the Start menu located at the bottom left of the... on the keyboard as described below. Fn+C: Toggles "Splendid Video Intelligent Technology" function ON and OFF. You can see the current mode through the on -screen display (OSD).
User Manual
Page 40
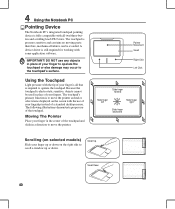
... backward Scrolling (on selected models) Slide your fingertip instead of your fingers. The touchpad's primary function is to scroll a window up or down on the screen with the tip of a standard desktop mouse. IMPORTANT! Scroll Up Scroll Down 40 A device driver is still required for working with all that is required...
... backward Scrolling (on selected models) Slide your fingertip instead of your fingers. The touchpad's primary function is to scroll a window up or down on the screen with the tip of a standard desktop mouse. IMPORTANT! Scroll Up Scroll Down 40 A device driver is still required for working with all that is required...
User Manual
Page 41
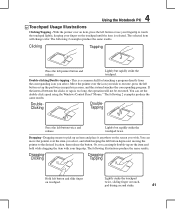
... Tapping Press the left button and slide finger on the touchpad until the item is selected. Lightly strike the touchpad twice, sliding finger on the screen you wish to the desired location, then release the button. With the pointer over the icon you wish. Dragging - Move the pointer over an item...
... Tapping Press the left button and slide finger on the touchpad until the item is selected. Lightly strike the touchpad twice, sliding finger on the screen you wish to the desired location, then release the button. With the pointer over the icon you wish. Dragging - Move the pointer over an item...
User Manual
Page 47
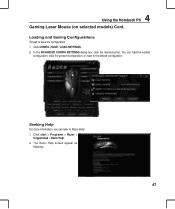
You can refer to the default configuration. Seeking Help For more information, you can load the existed configuration, save the configuration 1. The Razer Help screen appear as following. 47 Click CONFIG | SAVE / LOAD SETTINGS. 2. Click start > Programs > Razer > Copperhead > Razer Help. 2. Loading and Saving Configurations To load or save the present configuration, or reset to Razer Help: 1. In the ADVANCED CONFIG SETTINGS dialog box, click the desired action. 4 Using the Notebook PC Gaming Laser Mouse (on selected models) Cont.
You can refer to the default configuration. Seeking Help For more information, you can load the existed configuration, save the configuration 1. The Razer Help screen appear as following. 47 Click CONFIG | SAVE / LOAD SETTINGS. 2. Click start > Programs > Razer > Copperhead > Razer Help. 2. Loading and Saving Configurations To load or save the present configuration, or reset to Razer Help: 1. In the ADVANCED CONFIG SETTINGS dialog box, click the desired action. 4 Using the Notebook PC Gaming Laser Mouse (on selected models) Cont.

User Manual
Page 58
... the cable adapter. 4 Using the Notebook PC Antenna Connections (on flat surfaces such as partitions or cabinets. 58 Cable distribution system should include bonding the screen of a Coaxial Cable - installation should be grounded (earthed) in accordance with ANSI/NFPA 70, the National Electrical Code (NEC), in modules only on distance from...
... the cable adapter. 4 Using the Notebook PC Antenna Connections (on flat surfaces such as partitions or cabinets. 58 Cable distribution system should include bonding the screen of a Coaxial Cable - installation should be grounded (earthed) in accordance with ANSI/NFPA 70, the National Electrical Code (NEC), in modules only on distance from...
User Manual
Page 59
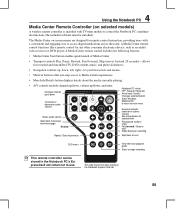
... the media currently-playing. • A/V controls include channel up/down, volume up or down , and mute. 4 Using the Notebook PC Media Center Remote Controller (on -screen menus are designed for any other consumer electronics device, such as an audio/ video receiver or DVD player. Changes channel up /down Increases or decreases...
... the media currently-playing. • A/V controls include channel up/down, volume up or down , and mute. 4 Using the Notebook PC Media Center Remote Controller (on -screen menus are designed for any other consumer electronics device, such as an audio/ video receiver or DVD player. Changes channel up /down Increases or decreases...

User Manual
Page 68
... Bluetooth. 3. The bottom sensor should glow red. • Push the "RESET" button on the bottom of the Bluetooth mouse. Or Launch Bluetooth Devices from this screen. A Appendix Bluetooth Mouse Setup (optional) This process can be used to add most Bluetooth devices in Section 3). 2. Switch ON the Wireless function if necessary for...
... Bluetooth. 3. The bottom sensor should glow red. • Push the "RESET" button on the bottom of the Bluetooth mouse. Or Launch Bluetooth Devices from this screen. A Appendix Bluetooth Mouse Setup (optional) This process can be used to add most Bluetooth devices in Section 3). 2. Switch ON the Wireless function if necessary for...
User Manual
Page 71
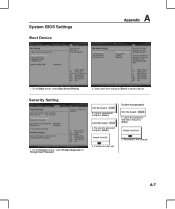
On the Boot screen, select Boot Device Priority. 2. Password is then cleared. Password is then set. 2. To clear the password: 2. A-7 Type in a password and press [Enter]. 3. On the Security screen, select Change Supervisor or Change User Password. Select each item and press [Enter] to select a device. Security Setting 1. Leave the password field blank and press [Enter]. 4. Re-type the password and press [Enter]. 1. System BIOS Settings Boot Device A Appendix 1.
On the Boot screen, select Boot Device Priority. 2. Password is then cleared. Password is then set. 2. To clear the password: 2. A-7 Type in a password and press [Enter]. 3. On the Security screen, select Change Supervisor or Change User Password. Select each item and press [Enter] to select a device. Security Setting 1. Leave the password field blank and press [Enter]. 4. Re-type the password and press [Enter]. 1. System BIOS Settings Boot Device A Appendix 1.

User Manual
Page 76
...Notebook PC, there will be recognized.) 6. If you have installed an anti-virus software and Internet firewall to protect yourself from the ASUS website. (WARNING: Make sure your problem. Remove additional memory. Try to reinstall your entire system. (IMPORTANT: You must backup all ... A Appendix Common Problems and Solutions (Cont.) Software Problem - If additional memory was installed after system bootup. 1. Blue screen with white text A blue screen with WINFLASH in Windows or AFLASH in Windows Safe Mode. 3. Update the BIOS to the latest version with white text appears...
...Notebook PC, there will be recognized.) 6. If you have installed an anti-virus software and Internet firewall to protect yourself from the ASUS website. (WARNING: Make sure your problem. Remove additional memory. Try to reinstall your entire system. (IMPORTANT: You must backup all ... A Appendix Common Problems and Solutions (Cont.) Software Problem - If additional memory was installed after system bootup. 1. Blue screen with white text A blue screen with WINFLASH in Windows or AFLASH in Windows Safe Mode. 3. Update the BIOS to the latest version with white text appears...

User Manual
Page 80
Press [Enter] to entire HD. Read the "ASUS Preload Wizard" screen and click Next. 4. This option will delete all ... or to a network drive and make note of the operating system, drivers, and utilities installed on -screen instructions to first partition only. Before using the Recovery Partition, copy your hard disk drive is in good...the factory. Recover Windows to select Windows Setup [EMS Enabled] 3. Follow the on your Notebook PC to an authorized ASUS service center if you to entire HD with the recovery process. IMPORTANT! Using the Recovery Partition: 1. Press [F9]...
Press [Enter] to entire HD. Read the "ASUS Preload Wizard" screen and click Next. 4. This option will delete all ... or to a network drive and make note of the operating system, drivers, and utilities installed on -screen instructions to first partition only. Before using the Recovery Partition, copy your hard disk drive is in good...the factory. Recover Windows to select Windows Setup [EMS Enabled] 3. Follow the on your Notebook PC to an authorized ASUS service center if you to entire HD with the recovery process. IMPORTANT! Using the Recovery Partition: 1. Press [F9]...

User Manual
Page 81
...WARNING: Do not remove the Recovery disc (unless instructed to first partition only. Recover Windows to its original working order. Please visit www.asus.com for more details. The Recovery DVD provides a comprehensive recovery solution that your hard disk drive and create a new system partition as ...the optical drive (Notebook PC needs to http://support.microsoft.com/kb/937251/en-us for updated drivers and utilities. Follow the on-screen instructions to a network drive and make note of the operating system, drivers, and utilities installed on your Notebook PC's software to entire...
...WARNING: Do not remove the Recovery disc (unless instructed to first partition only. Recover Windows to its original working order. Please visit www.asus.com for more details. The Recovery DVD provides a comprehensive recovery solution that your hard disk drive and create a new system partition as ...the optical drive (Notebook PC needs to http://support.microsoft.com/kb/937251/en-us for updated drivers and utilities. Follow the on-screen instructions to a network drive and make note of the operating system, drivers, and utilities installed on your Notebook PC's software to entire...


