
User Manual
Page 27
...manipulating this excess memory space. For optimum compatibility, it is that it will not cause any usage problem, but less memory size detected." Visit the ASUS website (www.asus.com) for system devices. aspx?SLanguage=en-us Under General Search, make the selections as shown, then click Search. Click the article titled "4GB ... memory modules from the same vendor. Important notice on each slot. 64-bit Windows® XP Professional x64 Edition Windows® Vista x64 Edition ASUS G-SURF365 1-15 We recommend that you would like to work under Windows® XP 32-bit version OS.
...manipulating this excess memory space. For optimum compatibility, it is that it will not cause any usage problem, but less memory size detected." Visit the ASUS website (www.asus.com) for system devices. aspx?SLanguage=en-us Under General Search, make the selections as shown, then click Search. Click the article titled "4GB ... memory modules from the same vendor. Important notice on each slot. 64-bit Windows® XP Professional x64 Edition Windows® Vista x64 Edition ASUS G-SURF365 1-15 We recommend that you would like to work under Windows® XP 32-bit version OS.

User Manual
Page 56
...to the floppy disk drive or the USB port. Save the BIOS file to download the latest BIOS file for the motherboard. 2. Visit the ASUS website (www.asus.com) to a floppy disk or a USB flash disk, then restart the system. 3. Go to the Tools menu to select EZ Flash2 and press... during the Power-On Self-Test (POST). Then press . 4. ASUSTek EZ Flash 2 BIOS ROM Utility V3.20 FLASH TYPE: ATMEL 26DF081/161/3 Current ROM BOARD: G-SURF365 VER: 0113 DATE: 11/12/2007 Update ROM BOARD: Unknown VER: Unknown DATE: Unknown PATH: A:\ A: Note [Enter] Select or Load [Tab] Switch [B] Backup...
...to the floppy disk drive or the USB port. Save the BIOS file to download the latest BIOS file for the motherboard. 2. Visit the ASUS website (www.asus.com) to a floppy disk or a USB flash disk, then restart the system. 3. Go to the Tools menu to select EZ Flash2 and press... during the Power-On Self-Test (POST). Then press . 4. ASUSTek EZ Flash 2 BIOS ROM Utility V3.20 FLASH TYPE: ATMEL 26DF081/161/3 Current ROM BOARD: G-SURF365 VER: 0113 DATE: 11/12/2007 Update ROM BOARD: Unknown VER: Unknown DATE: Unknown PATH: A:\ A: Note [Enter] Select or Load [Tab] Switch [B] Backup...

User Manual
Page 58
...turn off power during flash BIOS Reading file ....... Erasing flash ...... A:\>afudos /iG-SURF365.ROM AMI Firmware Update Utility - done Reading flash ...... done Verifying flash .... Visit the ASUS website (www.asus.com) and download the latest BIOS file for the motherboard. Copy the AFUDOS utility (...afudos.exe) from the hard disk drive. A:\>afudos /iG-SURF365.ROM AMI Firmware Update Utility - Version 1.19(ASUS V2.07(03.11.24BB)) Copyright...
...turn off power during flash BIOS Reading file ....... Erasing flash ...... A:\>afudos /iG-SURF365.ROM AMI Firmware Update Utility - done Reading flash ...... done Verifying flash .... Visit the ASUS website (www.asus.com) and download the latest BIOS file for the motherboard. Copy the AFUDOS utility (...afudos.exe) from the hard disk drive. A:\>afudos /iG-SURF365.ROM AMI Firmware Update Utility - Version 1.19(ASUS V2.07(03.11.24BB)) Copyright...

User Manual
Page 60
... this motherboard. Reading file "BURGUNDY.ROM". Checking for floppy... Bad BIOS checksum. Completed. Restart the system after the utility completes the updating process. Visit the ASUS website (www.asus.com) to the optical drive. 3. The utility then updates the corrupted BIOS file. Starting BIOS recovery... Bad BIOS checksum. Starting BIOS recovery... Start flashing... 4. Checking...
... this motherboard. Reading file "BURGUNDY.ROM". Checking for floppy... Bad BIOS checksum. Completed. Restart the system after the utility completes the updating process. Visit the ASUS website (www.asus.com) to the optical drive. 3. The utility then updates the corrupted BIOS file. Starting BIOS recovery... Bad BIOS checksum. Starting BIOS recovery... Start flashing... 4. Checking...

User Manual
Page 64
... for reference purposes only, and may not exactly match what you can also restart by pressing the reset button on your screen. • Visit the ASUS website (www.asus.com) to configure your system, or prompted to ensure system compatibility and stability. When you start up the computer, the system provides you scroll through...
... for reference purposes only, and may not exactly match what you can also restart by pressing the reset button on your screen. • Visit the ASUS website (www.asus.com) to configure your system, or prompted to ensure system compatibility and stability. When you start up the computer, the system provides you scroll through...

User Manual
Page 65
...change the settings. ASUS G-SURF365 2-13 Use [+] or [-] to select a field. Select Screen Select Item +- Use the navigation keys to select items in this chapter are for reference purposes only, and may not exactly match what you see on your screen. • Visit the ASUS website (www.asus.com) to download ...Mon 11/12/2007] [1.44M, 3.5 in.] [English] IDE Configuration Primary IDE Master Primary IDE Slave SATA1 SATA2 : [Not Detected] : [Not Detected] : [HDT722516DLA380] : [ASUS CRW-5232A1] System Information Tools Exit Use [ENTER]. [TAB], or [SHIFT-TAB] to configure system time.
...change the settings. ASUS G-SURF365 2-13 Use [+] or [-] to select a field. Select Screen Select Item +- Use the navigation keys to select items in this chapter are for reference purposes only, and may not exactly match what you see on your screen. • Visit the ASUS website (www.asus.com) to download ...Mon 11/12/2007] [1.44M, 3.5 in.] [English] IDE Configuration Primary IDE Master Primary IDE Slave SATA1 SATA2 : [Not Detected] : [Not Detected] : [HDT722516DLA380] : [ASUS CRW-5232A1] System Information Tools Exit Use [ENTER]. [TAB], or [SHIFT-TAB] to configure system time.
User Manual
Page 98
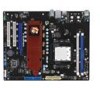
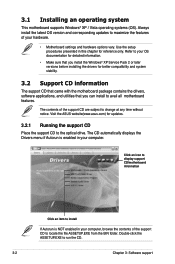
... the support CD Place the support CD to avail all motherboard features. Refer to your computer, browse the contents of your computer. Visit the ASUS website(www.asus.com) for reference only. Always install the latest OS version and corresponding updates to change at any time without notice. Use the setup procedures presented in...
... the support CD Place the support CD to avail all motherboard features. Refer to your computer, browse the contents of your computer. Visit the ASUS website(www.asus.com) for reference only. Always install the latest OS version and corresponding updates to change at any time without notice. Use the setup procedures presented in...


