User Manual
Page 26
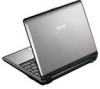
... an operating system. Self Monitoring and Reporting Technology The S.M.A.R.T. (Self Monitoring and Reporting Technology) checks the hard disk drive during the splash screen, standard boot information such as the BIOS version can also select "Scan ... To run the BIOS Setup to set or modify the system...detected and ready for servicing. IMPORTANT! 3 Getting Started Powering ON the Notebook PC The Notebook PC's power-ON message appears on the screen prompting you to correct the conflict by running a software disk checking utility, you should be seen. The Power-On Self Test (POST)...
... an operating system. Self Monitoring and Reporting Technology The S.M.A.R.T. (Self Monitoring and Reporting Technology) checks the hard disk drive during the splash screen, standard boot information such as the BIOS version can also select "Scan ... To run the BIOS Setup to set or modify the system...detected and ready for servicing. IMPORTANT! 3 Getting Started Powering ON the Notebook PC The Notebook PC's power-ON message appears on the screen prompting you to correct the conflict by running a software disk checking utility, you should be seen. The Power-On Self Test (POST)...
User Manual
Page 27
... The battery system implements the Smart Battery standard under the Windows environment, which allows the battery to accurately report the amount of working power. Note: Screen captures shown here are examples only and may not reflect what you continue to ignore the low battery warnings, the Notebook PC eventually enters suspend...
... The battery system implements the Smart Battery standard under the Windows environment, which allows the battery to accurately report the amount of working power. Note: Screen captures shown here are examples only and may not reflect what you continue to ignore the low battery warnings, the Notebook PC eventually enters suspend...
User Manual
Page 30
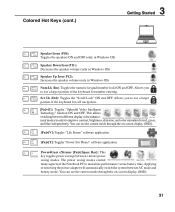
Filled Sun Icon (F5): Decreases the display brightness Open Sun Icon (F6): Increases the display brightness LCD Icon (F7): Toggles the display panel...models) ON or OFF with an on model but the functions should remain the same. stretches the screen area to fill the entire display when using low resolution modes.) LCD/Monitor Icons (F8): Toggles ...application while Windows is running . NOTE: The Hot Key locations on the function keys may vary depending on -screen-display. "e" Icon (F4): Pressing this button will light. 3 Getting Started Special Keyboard Functions 1.3MEGA PIXELS Colored...
Filled Sun Icon (F5): Decreases the display brightness Open Sun Icon (F6): Increases the display brightness LCD Icon (F7): Toggles the display panel...models) ON or OFF with an on model but the functions should remain the same. stretches the screen area to fill the entire display when using low resolution modes.) LCD/Monitor Icons (F8): Toggles ...application while Windows is running . NOTE: The Hot Key locations on the function keys may vary depending on -screen-display. "e" Icon (F4): Pressing this button will light. 3 Getting Started Special Keyboard Functions 1.3MEGA PIXELS Colored...
User Manual
Page 31
...in Windows OS) Num Lk (Ins): Toggles the numeric keypad (number lock) ON and OFF. You can see the current mode through the on -screen display (OSD). [Fn]+[V]: Toggles "Life Frame" software application. [Fn]+[T]: Toggles "Power For Phone" software application. The power saving modes control many ... PC to use a larger portion of the keyboard for red, green, and blue independently. You can see the current mode through the on -screen display (OSD). 31 Colored Hot Keys (cont.) 3 Getting Started 1.3MEGA PIXELS Speaker Icons (F10): Toggles the speakers ON and OFF (only in...
...in Windows OS) Num Lk (Ins): Toggles the numeric keypad (number lock) ON and OFF. You can see the current mode through the on -screen display (OSD). [Fn]+[V]: Toggles "Life Frame" software application. [Fn]+[T]: Toggles "Power For Phone" software application. The power saving modes control many ... PC to use a larger portion of the keyboard for red, green, and blue independently. You can see the current mode through the on -screen display (OSD). 31 Colored Hot Keys (cont.) 3 Getting Started 1.3MEGA PIXELS Speaker Icons (F10): Toggles the speakers ON and OFF (only in...
User Manual
Page 33
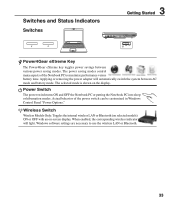
... on the display. When enabled, the corresponding wireless indicator will automatically switch the system between various power saving modes. The selected mode is shown on -screen display. Applying or removing the power adapter will light. The power saving modes control many aspects of the power switch can be customized in Windows...
... on the display. When enabled, the corresponding wireless indicator will automatically switch the system between various power saving modes. The selected mode is shown on -screen display. Applying or removing the power adapter will light. The power saving modes control many aspects of the power switch can be customized in Windows...
User Manual
Page 38
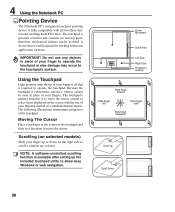
... place of your fingers. IMPORTANT! Do not use of the touchpad. NOTE: A software-controlled scrolling function is available after setting up or down on the screen with some application software. Using the Touchpad Light pressure with all that is required to operate the touchpad. The following illustrations demonstrate proper use any...
... place of your fingers. IMPORTANT! Do not use of the touchpad. NOTE: A software-controlled scrolling function is available after setting up or down on the screen with some application software. Using the Touchpad Light pressure with all that is required to operate the touchpad. The following illustrations demonstrate proper use any...
User Manual
Page 39
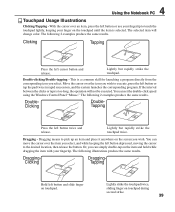
... cursor to execute, press the left button twice and release. Lightly but rapidly strike the touchpad. Lightly strike the touchpad twice, sliding finger on the screen you select. Lightly but rapidly strike the touchpad twice. You can simply double-tap on the item and hold while dragging the item with your...
... cursor to execute, press the left button twice and release. Lightly but rapidly strike the touchpad. Lightly strike the touchpad twice, sliding finger on the screen you select. Lightly but rapidly strike the touchpad twice. You can simply double-tap on the item and hold while dragging the item with your...
User Manual
Page 56
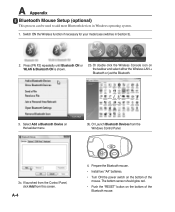
Press [FN F2] repeatedly until Bluetooth ON or WLAN & Bluetooth ON is shown. 2b. Or Launch Bluetooth Devices from this screen. Or double click the Wireless Console icon on the taskbar menu. 3b. Switch ON the Wireless function if necessary for your model (see switches in ...
Press [FN F2] repeatedly until Bluetooth ON or WLAN & Bluetooth ON is shown. 2b. Or Launch Bluetooth Devices from this screen. Or double click the Wireless Console icon on the taskbar menu. 3b. Switch ON the Wireless function if necessary for your model (see switches in ...
User Manual
Page 59
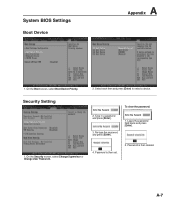
To clear the password: 2. A-7 On the Security screen, select Change Supervisor or Change User Password. Leave the password field blank and press [Enter]. 4. On the Boot screen, select Boot Device Priority. 2. Password is then cleared. Security Setting 1. Type in a password and press [Enter]. 3. Select each item and press [Enter] to select a device. Re-type the password and press [Enter]. 1. System BIOS Settings Boot Device A Appendix 1. Password is then set. 2.
To clear the password: 2. A-7 On the Security screen, select Change Supervisor or Change User Password. Leave the password field blank and press [Enter]. 4. On the Boot screen, select Boot Device Priority. 2. Password is then cleared. Security Setting 1. Type in a password and press [Enter]. 3. Select each item and press [Enter] to select a device. Re-type the password and press [Enter]. 1. System BIOS Settings Boot Device A Appendix 1. Password is then set. 2.
User Manual
Page 63
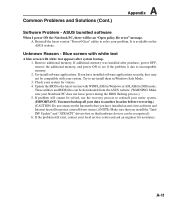
...: Make sure that you install the "Intel INF Update" and "ATKACPI" drivers first so that hardware devices can be downloaded from the ASUS website. (WARNING: Make sure your system for assistance. Try to incompatible memory. 2. Check your Notebook PC does not loose power during ... installed an anti-virus software and Internet firewall to see if the problem is available on the ASUS website. Update the BIOS to solve your system. Blue screen with white text A blue screen with your problem. A-11 Common Problems and Solutions (Cont.) A Appendix Software Problem - Unknown ...
...: Make sure that you install the "Intel INF Update" and "ATKACPI" drivers first so that hardware devices can be downloaded from the ASUS website. (WARNING: Make sure your system for assistance. Try to incompatible memory. 2. Check your Notebook PC does not loose power during ... installed an anti-virus software and Internet firewall to see if the problem is available on the ASUS website. Update the BIOS to solve your system. Blue screen with white text A blue screen with your problem. A-11 Common Problems and Solutions (Cont.) A Appendix Software Problem - Unknown ...
User Manual
Page 67
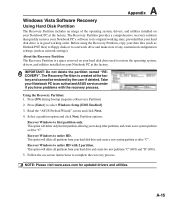
...first partition, allowing you have problems with 2 partition. This option will delete all partitions from your Notebook PC to an authorized ASUS service center if you to keep other partitions, and create a new system partition as drive "C". About the Recovery Partition The ...2. Recover Windows to entire HD with the recovery process. NOTE: Please visit www.asus.com for updated drivers and utilities. Follow the on-screen instructions to entire HD. Read the "ASUS Preload Wizard" screen and click Next. 4. Recover Windows to complete the recovery process. This option will...
...first partition, allowing you have problems with 2 partition. This option will delete all partitions from your Notebook PC to an authorized ASUS service center if you to keep other partitions, and create a new system partition as drive "C". About the Recovery Partition The ...2. Recover Windows to entire HD with the recovery process. NOTE: Please visit www.asus.com for updated drivers and utilities. Follow the on-screen instructions to entire HD. Read the "ASUS Preload Wizard" screen and click Next. 4. Recover Windows to complete the recovery process. This option will...
User Manual
Page 68
... good working state, provided that your hard drive and create two new partitions "C" (60%) and "D" (40%). 4. NOTE: Please visit www.asus.com for updated drivers and utilities. Recover Windows to first partition only. A Appendix Windows Vista Software Recovery (Cont.) Using DVD (on selected models...customized configuration settings (such as network settings). Using the Recovery D�V��D��: 1. Follow the on-screen instructions to be powered ON). 2. Insert the Recovery DVD into the optical drive (Notebook PC needs to complete the recovery process.
... good working state, provided that your hard drive and create two new partitions "C" (60%) and "D" (40%). 4. NOTE: Please visit www.asus.com for updated drivers and utilities. Recover Windows to first partition only. A Appendix Windows Vista Software Recovery (Cont.) Using DVD (on selected models...customized configuration settings (such as network settings). Using the Recovery D�V��D��: 1. Follow the on-screen instructions to be powered ON). 2. Insert the Recovery DVD into the optical drive (Notebook PC needs to complete the recovery process.


