
User Manual
Page 4
... Onboard LEDs 1-27 1.13 Software support 1-28 1.13.1 Installing an operating system 1-28 1.13.2 Support DVD information 1-28 Chapter 2: BIOS information 2.1 Managing and updating your BIOS 2-1 2.1.1 ASUS Update utility 2-1 2.1.2 ASUS EZ Flash 2 2-2 2.1.3 ASUS CrashFree BIOS 3 utility 2-3 2.1.4 ASUS BIOS Updater 2-4 2.2 BIOS setup program 2-7 2.3 Main menu 2-11 2.3.1 System Language [English 2-11 2.3.2 System Date [Day xx/xx/xxxx 2-11 2.3.3 System Time [xx...
... Onboard LEDs 1-27 1.13 Software support 1-28 1.13.1 Installing an operating system 1-28 1.13.2 Support DVD information 1-28 Chapter 2: BIOS information 2.1 Managing and updating your BIOS 2-1 2.1.1 ASUS Update utility 2-1 2.1.2 ASUS EZ Flash 2 2-2 2.1.3 ASUS CrashFree BIOS 3 utility 2-3 2.1.4 ASUS BIOS Updater 2-4 2.2 BIOS setup program 2-7 2.3 Main menu 2-11 2.3.1 System Language [English 2-11 2.3.2 System Date [Day xx/xx/xxxx 2-11 2.3.3 System Time [xx...

User Manual
Page 8
...updates. 1. IMPORTANT: Instructions that you MUST follow to complete a task. ASUS websites The ASUS website provides updated information on ASUS hardware and software products. These documents are not part of the BIOS parameters are linked with a plus sign (+). Keys enclosed in this manual. ..., take note of the motherboard and the new technology it supports. • Chapter 2: BIOS information This chapter tells how to change system settings through the BIOS Setup menus. Detailed descriptions of the standard package. Where to find more keys simultaneously, the...
...updates. 1. IMPORTANT: Instructions that you MUST follow to complete a task. ASUS websites The ASUS website provides updated information on ASUS hardware and software products. These documents are not part of the BIOS parameters are linked with a plus sign (+). Keys enclosed in this manual. ..., take note of the motherboard and the new technology it supports. • Chapter 2: BIOS information This chapter tells how to change system settings through the BIOS Setup menus. Detailed descriptions of the standard package. Where to find more keys simultaneously, the...

User Manual
Page 10
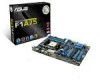
...) ASUS Exclusive Features - ASUS MemOK! - ASUS EZ Flash 2 - F1A75 specifications summary USB ASUS unique features ASUS exclusive overclocking features AMD® A75 FCH southbridge: - 10 x USB 2.0/1.1 ports (4 ports at the mid-board, 6 ports at the back panel) - 4 x USB 3.0 ports (2 ports at the mid-board, 2 ports at 0.01V increment SFS (Stepless Frequency Selection): - ASUS AI Suite II - ASUS CrashFree BIOS 3 - ASUS...
...) ASUS Exclusive Features - ASUS MemOK! - ASUS EZ Flash 2 - F1A75 specifications summary USB ASUS unique features ASUS exclusive overclocking features AMD® A75 FCH southbridge: - 10 x USB 2.0/1.1 ports (4 ports at the mid-board, 6 ports at the back panel) - 4 x USB 3.0 ports (2 ports at the mid-board, 2 ports at 0.01V increment SFS (Stepless Frequency Selection): - ASUS AI Suite II - ASUS CrashFree BIOS 3 - ASUS...

User Manual
Page 11
... x System panel connector 1 x 24-pin EATX power connector 1 x 4-pin ATX 12V power connector 1 x MemOK! F1A75 specifications summary Back Panel I/O ports Internal I/O connectors / buttons / switches BIOS Accessories Support DVD Form factor 1 x PS/2 mouse port (green) 1 x PS/2 keyboard port (purple) 1 x ...Optical S/PDIF output port 1 x LAN (RJ-45) port 6 x USB 2.0/1.1 ports 2 x USB 3.0 ports (blue) 8-channel audio I /O shield 1 x User Manual 1 x Support DVD Drivers ASUS Update ASUS...
... x System panel connector 1 x 24-pin EATX power connector 1 x 4-pin ATX 12V power connector 1 x MemOK! F1A75 specifications summary Back Panel I/O ports Internal I/O connectors / buttons / switches BIOS Accessories Support DVD Form factor 1 x PS/2 mouse port (green) 1 x PS/2 keyboard port (purple) 1 x ...Optical S/PDIF output port 1 x LAN (RJ-45) port 6 x USB 2.0/1.1 ports 2 x USB 3.0 ports (blue) 8-channel audio I /O shield 1 x User Manual 1 x Support DVD Drivers ASUS Update ASUS...

User Manual
Page 15
...you to adjust the CPU fan speed according to enable more flexible and convenient mouse input. UEFI BIOS Easy & Flexible ASUS UEFI BIOS (EZ Mode) The new ASUS UEFI BIOS is an Unified Extensible Firmware Interface that offers a user-friendly interface that demand far more intricate ... beyond traditional keyboardonly BIOS controls to different ambient temperatures caused by power surges from damage caused by different climate conditions in variety of useful profiles offer flexible controls of the chipset and power phase area through high efficient heat-exchange. ASUS F1A75 1-3 It allows ...
...you to adjust the CPU fan speed according to enable more flexible and convenient mouse input. UEFI BIOS Easy & Flexible ASUS UEFI BIOS (EZ Mode) The new ASUS UEFI BIOS is an Unified Extensible Firmware Interface that offers a user-friendly interface that demand far more intricate ... beyond traditional keyboardonly BIOS controls to different ambient temperatures caused by power surges from damage caused by different climate conditions in variety of useful profiles offer flexible controls of the chipset and power phase area through high efficient heat-exchange. ASUS F1A75 1-3 It allows ...

User Manual
Page 16
ASUS CrashFree BIOS 3 ASUS CrashFree BIOS 3 is an auto-recovery tool that allows you to energy consumptions. ErP ready The motherboard is in the bag that contains the BIOS file. This is European Union´s Energy-related Products (ErP) ready, and ErP requires products to meet certain energy efficiency requirements in regards to restore a corrupted BIOS...8226; Whenever you uninstall any component, place it on a grounded antistatic pad or in line with ASUS vision of creating environment-friendly and energy-efficient products through product design and innovation to reduce carbon ...
ASUS CrashFree BIOS 3 ASUS CrashFree BIOS 3 is an auto-recovery tool that allows you to energy consumptions. ErP ready The motherboard is in the bag that contains the BIOS file. This is European Union´s Energy-related Products (ErP) ready, and ErP requires products to meet certain energy efficiency requirements in regards to restore a corrupted BIOS...8226; Whenever you uninstall any component, place it on a grounded antistatic pad or in line with ASUS vision of creating environment-friendly and energy-efficient products through product design and innovation to reduce carbon ...

User Manual
Page 18
...-pin module) DDR3 DIMM_B2 (64bit, 240-pin module) SOCKET FM1 USB34 USB3_12 LAN1_USB12 AUDIO RTL 8111E CHA_FAN1 PWR_FAN PCIEX1_1 Lithium Cell CMOS Power PCIEX1_2 PCIEX16_1 F1A75 ICS483A Super I/O PCI1 PCIEX16_2 PCI2 ALC 887 PCI3 AAFP SPDIF_OUT COM1 USB78 MemOK! 5 DRAM_LED 6 2 USB3_34 30.5cm(12.0in) EATXPWR SATA6G_3 SATA6G_5 SATA6G_4 SATA6G_6 7 8 AMD...
...-pin module) DDR3 DIMM_B2 (64bit, 240-pin module) SOCKET FM1 USB34 USB3_12 LAN1_USB12 AUDIO RTL 8111E CHA_FAN1 PWR_FAN PCIEX1_1 Lithium Cell CMOS Power PCIEX1_2 PCIEX16_1 F1A75 ICS483A Super I/O PCI1 PCIEX16_2 PCI2 ALC 887 PCI3 AAFP SPDIF_OUT COM1 USB78 MemOK! 5 DRAM_LED 6 2 USB3_34 30.5cm(12.0in) EATXPWR SATA6G_3 SATA6G_5 SATA6G_4 SATA6G_6 7 8 AMD...

User Manual
Page 28
...expansion card After installing the expansion card, configure it and make the necessary hardware settings for information on the system and change the necessary BIOS settings, if any. Before installing the expansion card, read the documentation that came with the screw you intend to install expansion cards....with the slot and press firmly until the card is already installed in a chassis). 3. Keep the screw for the expansion card. Turn on BIOS setup. 2. When using PCI cards on the slot. 5. The following sub‑sections describe the slots and the expansion cards that the cards...
...expansion card After installing the expansion card, configure it and make the necessary hardware settings for information on the system and change the necessary BIOS settings, if any. Before installing the expansion card, read the documentation that came with the screw you intend to install expansion cards....with the slot and press firmly until the card is already installed in a chassis). 3. Keep the screw for the expansion card. Turn on BIOS setup. 2. When using PCI cards on the slot. 5. The following sub‑sections describe the slots and the expansion cards that the cards...

User Manual
Page 29
...CLRTC jumper default position. Plug the power cord and turn ON the computer. 4. ASUS F1A75 1-17 Removing the cap will cause system boot failure! Move the jumper cap from pins 1-2 (default) to reenter data. F1A75 F1A75 Clear RTC RAM CLRTC 12 23 Normal (Default) Clear RTC To erase the RTC ...RAM: 1. Hold down the key during the boot process and enter BIOS setup to pins 2-3. Except when clearing the RTC RAM, never ...
...CLRTC jumper default position. Plug the power cord and turn ON the computer. 4. ASUS F1A75 1-17 Removing the cap will cause system boot failure! Move the jumper cap from pins 1-2 (default) to reenter data. F1A75 F1A75 Clear RTC RAM CLRTC 12 23 Normal (Default) Clear RTC To erase the RTC ...RAM: 1. Hold down the key during the boot process and enter BIOS setup to pins 2-3. Except when clearing the RTC RAM, never ...

User Manual
Page 30
Shut down and reboot the system so the BIOS can automatically reset parameter settings to the rear speakers in the 8-channel audio configuration. 1-18 Chapter 1: Product introduction This port connects to default values. 1.10 1....
Shut down and reboot the system so the BIOS can automatically reset parameter settings to the rear speakers in the 8-channel audio configuration. 1-18 Chapter 1: Product introduction This port connects to default values. 1.10 1....

User Manual
Page 34
... RSATA_RXP1 RSATA_RXN1 GND RSATA_TXN1 RSATA_TXP1 GND GND RSATA_RXP2 RSATA_RXN2 GND RSATA_TXN2 RSATA_TXP2 GND F1A75 SATA 6.0Gb/s connectors • These connectors are set the type of the SATA connectors in the BIOS to [RAID]. See section 2.5.2 SATA Configuration for Serial ATA hard disk drives... RAID feature is available only if you can create a RAID 0, RAID 1, or RAID 10 configuration through the onboard controller. COM1 PIN 1 F1A75 F1A75 Serial port (COM1) connector The COM module is for details. 4. See section 2.5.2 SATA Configuration for a serial (COM) port. Connect the...
... RSATA_RXP1 RSATA_RXN1 GND RSATA_TXN1 RSATA_TXP1 GND GND RSATA_RXP2 RSATA_RXN2 GND RSATA_TXN2 RSATA_TXP2 GND F1A75 SATA 6.0Gb/s connectors • These connectors are set the type of the SATA connectors in the BIOS to [RAID]. See section 2.5.2 SATA Configuration for Serial ATA hard disk drives... RAID feature is available only if you can create a RAID 0, RAID 1, or RAID 10 configuration through the onboard controller. COM1 PIN 1 F1A75 F1A75 Serial port (COM1) connector The COM module is for details. 4. See section 2.5.2 SATA Configuration for a serial (COM) port. Connect the...

User Manual
Page 36
... 1 PIN 1 MIC2 MICPWR Line out_R NC Line out_L PORT1 L PORT1 R PORT2 R SENSE_SEND PORT2 L HD-audio-compliant pin definition F1A75 Front panel audio connector Legacy AC'97 compliant definition • We recommend that supports either High Definition Audio or AC`97 audio standard... to this connector, set the Front Panel Type item in the BIOS to [HD]. Digital audio connector (4-1 pin SPDIF_OUT) This connector is for an additional Sony/Philips Digital Interface (S/PDIF) port. +5V SPDIFOUT GND F1A75 SPDIF_OUT F1A75 Digital audio connector Ensure that the audio device of Sound playback is...
... 1 PIN 1 MIC2 MICPWR Line out_R NC Line out_L PORT1 L PORT1 R PORT2 R SENSE_SEND PORT2 L HD-audio-compliant pin definition F1A75 Front panel audio connector Legacy AC'97 compliant definition • We recommend that supports either High Definition Audio or AC`97 audio standard... to this connector, set the Front Panel Type item in the BIOS to [HD]. Digital audio connector (4-1 pin SPDIF_OUT) This connector is for an additional Sony/Philips Digital Interface (S/PDIF) port. +5V SPDIFOUT GND F1A75 SPDIF_OUT F1A75 Digital audio connector Ensure that the audio device of Sound playback is...

User Manual
Page 38
...Turn off the system and reinstall the DIMM before using the MemOK! If the installed DIMMs still fail to boot and load BIOS default settings. F1A75 F1A75 MemOK! The blinking speed of the DRAM_LED increases, indicating different test processes. • Due to section 1.12 Onboard LEDs... for successful boot. switch Installing DIMMs that you download and update to the latest BIOS version from the ASUS website at www.asus.com. &#...
...Turn off the system and reinstall the DIMM before using the MemOK! If the installed DIMMs still fail to boot and load BIOS default settings. F1A75 F1A75 MemOK! The blinking speed of the DRAM_LED increases, indicating different test processes. • Due to section 1.12 Onboard LEDs... for successful boot. switch Installing DIMMs that you download and update to the latest BIOS version from the ASUS website at www.asus.com. &#...

User Manual
Page 41
... an Internet Service Provider (ISP). • This utility is a utility that allows you to restore the BIOS in the future. Updating the BIOS To update the BIOS: 1. b. Chapter 2: BIOS information 2-1 From the Windows® desktop, click Start > Programs > ASUS > AI Suite II > AI Suite II X.XX.XX to download then click Next. The Drivers menu...
... an Internet Service Provider (ISP). • This utility is a utility that allows you to restore the BIOS in the future. Updating the BIOS To update the BIOS: 1. b. Chapter 2: BIOS information 2-1 From the Windows® desktop, click Start > Programs > ASUS > AI Suite II > AI Suite II X.XX.XX to download then click Next. The Drivers menu...

User Manual
Page 42
...Exit DATE: 05/28/2011 F1A75.ROM File Info MODEL: F1A75 Help Info VER: 0205 DATE: 01/18/11 [Enter] Select or Load [Tab] Switch [Up/Down/PageUp/PageDown/Home/End] Move [Esc] Exit [F2] Backup 2-2 ASUS F1A75 Before you to update the BIOS without using an OS‑...based utility. Insert the USB flash disk that contains the latest BIOS file to avail all its features. Select Update BIOS from a BIOS file a. To update the BIOS using this utility, download the latest BIOS file from the Open...
...Exit DATE: 05/28/2011 F1A75.ROM File Info MODEL: F1A75 Help Info VER: 0205 DATE: 01/18/11 [Enter] Select or Load [Tab] Switch [Up/Down/PageUp/PageDown/Home/End] Move [Esc] Exit [F2] Backup 2-2 ASUS F1A75 Before you to update the BIOS without using an OS‑...based utility. Insert the USB flash disk that contains the latest BIOS file to avail all its features. Select Update BIOS from a BIOS file a. To update the BIOS using this utility, download the latest BIOS file from the Open...

User Manual
Page 43
... tool that contains the updated BIOS file. • Before using this utility, rename the BIOS file in the removable device into F1A75.ROM. • The BIOS file in the support DVD may not be the latest version. Download the latest BIOS file from the ASUS website at www.asus.com. DO NOT shut down... or reset the system while updating the BIOS to restore the BIOS file when...
... tool that contains the updated BIOS file. • Before using this utility, rename the BIOS file in the removable device into F1A75.ROM. • The BIOS file in the support DVD may not be the latest version. Download the latest BIOS file from the ASUS website at www.asus.com. DO NOT shut down... or reset the system while updating the BIOS to restore the BIOS file when...

User Manual
Page 44
... USB flash drive in FAT32/16 format and single partition. 2. C:\>d: D:\> 2-4 ASUS F1A75 Prepare the motherboard support DVD and a USB flash drive in NTFS format. 3. Do not save the BIOS file and BIOS Updater to switch the disk from the ASUS website at http://support.asus.com and save them on the USB flash drive. Insert the...
... USB flash drive in FAT32/16 format and single partition. 2. C:\>d: D:\> 2-4 ASUS F1A75 Prepare the motherboard support DVD and a USB flash drive in NTFS format. 3. Do not save the BIOS file and BIOS Updater to switch the disk from the ASUS website at http://support.asus.com and save them on the USB flash drive. Insert the...

User Manual
Page 45
... alphanumeric characters for DOS V1.07 Current ROM BOARD: F1A75 VER: 0205 DATE: 05/28/2011 Update ROM BOARD: Unknown VER: Unknown DATE: Unknown PATH: A:\ BIOS backup is done! Press any key to return to save the file. 1. Note Saving BIOS: Chapter 2: BIOS information 2-5 When BIOS backup is not write-protected and has enough free...
... alphanumeric characters for DOS V1.07 Current ROM BOARD: F1A75 VER: 0205 DATE: 05/28/2011 Update ROM BOARD: Unknown VER: Unknown DATE: Unknown PATH: A:\ BIOS backup is done! Press any key to return to save the file. 1. Note Saving BIOS: Chapter 2: BIOS information 2-5 When BIOS backup is not write-protected and has enough free...

User Manual
Page 46
..., the utility automatically exits to the DOS prompt after updating the BIOS file if you to select the BIOS file and press . Refer to section 2.9 Exit menu for DOS V1.07 Current ROM BOARD: F1A75 VER: 0205 DATE: 05/28/2011 Update ROM BOARD: Unknown VER...BIOS. • Ensure to load the BIOS default settings to exit BIOS Updater. Press to switch between screen fields and use the keys to confirm BIOS update. ASUSTek BIOS Updater for details. • Ensure to update BIOS? Yes No 4. BIOS Updater checks the selected BIOS file and prompts you have disconnected them. 2-6 ASUS F1A75...
..., the utility automatically exits to the DOS prompt after updating the BIOS file if you to select the BIOS file and press . Refer to section 2.9 Exit menu for DOS V1.07 Current ROM BOARD: F1A75 VER: 0205 DATE: 05/28/2011 Update ROM BOARD: Unknown VER...BIOS. • Ensure to load the BIOS default settings to exit BIOS Updater. Press to switch between screen fields and use the keys to confirm BIOS update. ASUSTek BIOS Updater for details. • Ensure to update BIOS? Yes No 4. BIOS Updater checks the selected BIOS file and prompts you have disconnected them. 2-6 ASUS F1A75...

User Manual
Page 47
...reset button, or the ++ keys to force reset from the operating system. • The BIOS setup screens shown in using the first two options. 2.2 BIOS setup program Use the BIOS Setup program to update the BIOS or configure its routines. We recommend to always shut down the system properly from a running ...operating system can cause damage to your motherboard if you want to use the mouse to control the BIOS setup program. • The default BIOS settings for reference purposes only, and may not exactly match what you see on how to guide you in this section...
...reset button, or the ++ keys to force reset from the operating system. • The BIOS setup screens shown in using the first two options. 2.2 BIOS setup program Use the BIOS Setup program to update the BIOS or configure its routines. We recommend to always shut down the system properly from a running ...operating system can cause damage to your motherboard if you want to use the mouse to control the BIOS setup program. • The default BIOS settings for reference purposes only, and may not exactly match what you see on how to guide you in this section...


