
User Manual
Page 40
... memory settings. The blinking speed of the DRAM_LED. • The DRAM_LED also lights when the DIMM is tested. A message will appear during POST reminding you turn off the system and reinstall the DIMM before using the MemOK! 3. switch Installing DIMMs that you download and update to the ...latest BIOS version from the ASUS website at www.asus.com. • If you that the BIOS has been restored to begin automatic memory compatibility tuning for the exact location of the...
... memory settings. The blinking speed of the DRAM_LED. • The DRAM_LED also lights when the DIMM is tested. A message will appear during POST reminding you turn off the system and reinstall the DIMM before using the MemOK! 3. switch Installing DIMMs that you download and update to the ...latest BIOS version from the ASUS website at www.asus.com. • If you that the BIOS has been restored to begin automatic memory compatibility tuning for the exact location of the...
User Manual
Page 57
... with the last device on the system front panel case lights up for details. After applying power, the system power LED on the chain) c. ASUS F1A75-V PRO 2-37 Connect the power cord to a power outlet that all the connections, replace the system case cover. 2. Monitor b. Be sure that is ON...continuous beep followed by four short beeps Description VGA detected Quick boot set to green after the system LED turns on self tests or POST. After making all switches are running, the BIOS beeps (see anything within 30 seconds from orange to disabled No keyboard detected No ...
... with the last device on the system front panel case lights up for details. After applying power, the system power LED on the chain) c. ASUS F1A75-V PRO 2-37 Connect the power cord to a power outlet that all the connections, replace the system case cover. 2. Monitor b. Be sure that is ON...continuous beep followed by four short beeps Description VGA detected Quick boot set to green after the system LED turns on self tests or POST. After making all switches are running, the BIOS beeps (see anything within 30 seconds from orange to disabled No keyboard detected No ...
User Manual
Page 61
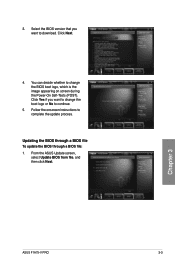
3. Updating the BIOS through a BIOS file To update the BIOS through a BIOS file: 1. Chapter 3 ASUS F1A75-V PRO 3-3 Select the BIOS version that you want to change the BIOS boot logo, which is the image appearing on screen during the Power‑On Self-Tests (POST). Click Next. 4. From the ASUS Update screen, select Update BIOS from file, and then click Next. Click Yes if you want to download. Follow the onscreen instructions to continue. 5. You can decide whether to change the boot logo or No to complete the update process.
3. Updating the BIOS through a BIOS file To update the BIOS through a BIOS file: 1. Chapter 3 ASUS F1A75-V PRO 3-3 Select the BIOS version that you want to change the BIOS boot logo, which is the image appearing on screen during the Power‑On Self-Tests (POST). Click Next. 4. From the ASUS Update screen, select Update BIOS from file, and then click Next. Click Yes if you want to download. Follow the onscreen instructions to continue. 5. You can decide whether to change the boot logo or No to complete the update process.
User Manual
Page 68
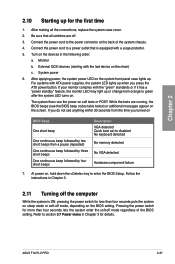
Entering BIOS Setup at startup To enter BIOS Setup at startup: • Press during the Power-On Self Test (POST). If you do not press , POST continues with its parameters. Using the power button, reset button, or the ++ keys to force reset from the operating system. • The ...BIOS setup screens shown in using the first two options. Chapter 3 3-10 Chapter 3: BIOS setup Entering BIOS Setup after POST To enter BIOS Setup after POST: • Press ++ simultaneously. • Press the reset button on the system chassis. • Press the power button to turn the ...
Entering BIOS Setup at startup To enter BIOS Setup at startup: • Press during the Power-On Self Test (POST). If you do not press , POST continues with its parameters. Using the power button, reset button, or the ++ keys to force reset from the operating system. • The ...BIOS setup screens shown in using the first two options. Chapter 3 3-10 Chapter 3: BIOS setup Entering BIOS Setup after POST To enter BIOS Setup after POST: • Press ++ simultaneously. • Press the reset button on the system chassis. • Press the power button to turn the ...
User Manual
Page 81
...to [Auto] for automatic configuration. Configuration options: [AHCI or RAID] [IDE] S.M.A.R.T. Configuration options: [Enabled] [Disabled] Chapter 3 ASUS F1A75-V PRO 3-23 Configuration options: [Disabled] [Enabled] 3.6.2 SATA Configuration While entering Setup, the BIOS automatically detects the presence of your hard disk...system. Status Check [Enabled] S.M.A.R.T. (Self-Monitoring, Analysis and Reporting Technology) is installed to report warning messages during the POST. When read/write of SATA devices. OnChip SATA MAX Speed [SATA 6.0Gb/s] Sets the maximum onboard SATA port speed....
...to [Auto] for automatic configuration. Configuration options: [AHCI or RAID] [IDE] S.M.A.R.T. Configuration options: [Enabled] [Disabled] Chapter 3 ASUS F1A75-V PRO 3-23 Configuration options: [Disabled] [Enabled] 3.6.2 SATA Configuration While entering Setup, the BIOS automatically detects the presence of your hard disk...system. Status Check [Enabled] S.M.A.R.T. (Self-Monitoring, Analysis and Reporting Technology) is installed to report warning messages during the POST. When read/write of SATA devices. OnChip SATA MAX Speed [SATA 6.0Gb/s] Sets the maximum onboard SATA port speed....
User Manual
Page 88
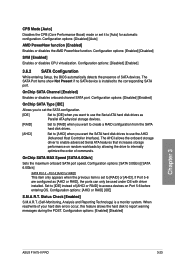
...items allow you to set the waiting time for the system to change the system boot options. Disables the full screen logo display feature. Post Report [5 sec] This item appears only when the Full Screen Logo item is set to [Disabled] and allows you to display the...] Full Screen Logo [Enabled] Enables the full screen logo display feature. EFI BIOS Utility - Sets the power-on state of the NumLock to use the ASUS MyLogo 2™ feature. Configuration options: [1 sec] [2 sec] [3 sec] [4 sec] [5 sec] [6 sec] [7 sec] [8 sec] [9 sec] [10 sec] [Until Press ESC] 3.8.3 Wait for the F1 ...
...items allow you to set the waiting time for the system to change the system boot options. Disables the full screen logo display feature. Post Report [5 sec] This item appears only when the Full Screen Logo item is set to [Disabled] and allows you to display the...] Full Screen Logo [Enabled] Enables the full screen logo display feature. EFI BIOS Utility - Sets the power-on state of the NumLock to use the ASUS MyLogo 2™ feature. Configuration options: [1 sec] [2 sec] [3 sec] [4 sec] [5 sec] [6 sec] [7 sec] [8 sec] [9 sec] [10 sec] [Until Press ESC] 3.8.3 Wait for the F1 ...
User Manual
Page 89
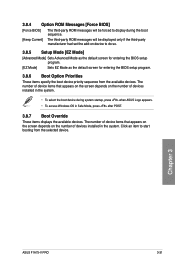
...messages will be displayed only if the third-party manufacturer had set the add-on the number of devices installed in Safe Mode, press after POST. 3.8.7 Boot Override These items displays the available devices. Click an item to do so. 3.8.5 Setup Mode [EZ Mode] [Advanced Mode...entering the BIOS setup program. 3.8.6 Boot Option Priorities These items specify the boot device priority sequence from the selected device. Chapter 3 ASUS F1A75-V PRO 3-31 3.8.4 Option ROM Messages [Force BIOS] [Force BIOS] The third-party ROM messages will be forced to display during system startup, press...
...messages will be displayed only if the third-party manufacturer had set the add-on the number of devices installed in Safe Mode, press after POST. 3.8.7 Boot Override These items displays the available devices. Click an item to do so. 3.8.5 Setup Mode [EZ Mode] [Advanced Mode...entering the BIOS setup program. 3.8.6 Boot Option Priorities These items specify the boot device priority sequence from the selected device. Chapter 3 ASUS F1A75-V PRO 3-31 3.8.4 Option ROM Messages [Force BIOS] [Force BIOS] The third-party ROM messages will be forced to display during system startup, press...
User Manual
Page 108
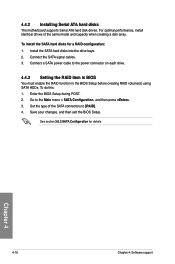
To install the SATA hard disks for details. Enter the BIOS Setup during POST. 2. Chapter 4 4-16 Chapter 4: Software support To do this: 1. Set the type of the same model and capacity when creating a disk array. For optimal performance, install ...
To install the SATA hard disks for details. Enter the BIOS Setup during POST. 2. Chapter 4 4-16 Chapter 4: Software support To do this: 1. Set the type of the same model and capacity when creating a disk array. For optimal performance, install ...
User Manual
Page 109
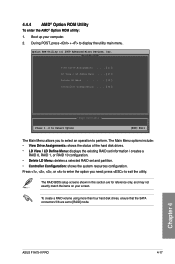
... screens shown in this section are set and partition. • Controller Configuration: shows the system resources configuration. Chapter 4 ASUS F1A75-V PRO 4-17 4.4.4 AMD® Option ROM Utility To enter the AMD® Option ROM utility: 1. During POST, press + to perform. Option ROM Utility (c) 2009 Advanced Micro Devices, Inc. [ Main Menu ] View Drive Assignments .......[ 1 ] LD...
... screens shown in this section are set and partition. • Controller Configuration: shows the system resources configuration. Chapter 4 ASUS F1A75-V PRO 4-17 4.4.4 AMD® Option ROM Utility To enter the AMD® Option ROM utility: 1. During POST, press + to perform. Option ROM Utility (c) 2009 Advanced Micro Devices, Inc. [ Main Menu ] View Drive Assignments .......[ 1 ] LD...
User Manual
Page 112
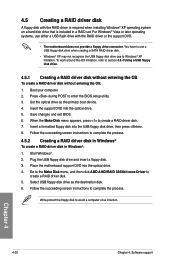
... disk. 3. Write-protect the floppy disk to enter the BIOS setup utility. 3. Boot your computer. 2. Insert a formatted floppy disk into the optical drive. 5. Press during POST to avoid a computer virus infection. Follow the succeeding screen instructions to section 4.6.4 Using a USB floppy disk drive. 4.5.1 Creating a RAID driver disk without entering the OS...
... disk. 3. Write-protect the floppy disk to enter the BIOS setup utility. 3. Boot your computer. 2. Insert a formatted floppy disk into the optical drive. 5. Press during POST to avoid a computer virus infection. Follow the succeeding screen instructions to section 4.6.4 Using a USB floppy disk drive. 4.5.1 Creating a RAID driver disk without entering the OS...
User Manual
Page 120
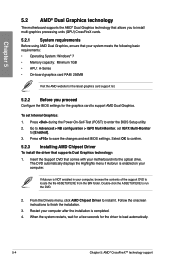
Press during the Power-On-Self-Test (POST) to confirm. 5.2.3 Installing AMD Chipset Driver To install the driver that supports Dual Graphics technology: 1. Select OK to enter the BIOS Setup utility. 2. Double-click ...
Press during the Power-On-Self-Test (POST) to confirm. 5.2.3 Installing AMD Chipset Driver To install the driver that supports Dual Graphics technology: 1. Select OK to enter the BIOS Setup utility. 2. Double-click ...


