User Manual
Page 5
Contents 3.8.4 3.8.5 3.8.6 3.8.7 Option ROM Messages [Force BIOS 3-31 Setup Mode [EZ Mode 3-31 Boot Option Priorities 3-31 Boot Override 3-31 3.9 Tools menu 3-32 3.9.1 ASUS EZ Flash Utility 3-32 3.9.2 ASUS O.C. Profile 3-32 3.9.3 ASUS SPD Information 3-32 3.10 Exit menu 3-33 Chapter 4: Software support 4.1 Installing an operating system 4-1 4.2 Support DVD information 4-1 4.2.1 Running the support DVD 4-1 4.2.2 Obtaining the software manuals...
Contents 3.8.4 3.8.5 3.8.6 3.8.7 Option ROM Messages [Force BIOS 3-31 Setup Mode [EZ Mode 3-31 Boot Option Priorities 3-31 Boot Override 3-31 3.9 Tools menu 3-32 3.9.1 ASUS EZ Flash Utility 3-32 3.9.2 ASUS O.C. Profile 3-32 3.9.3 ASUS SPD Information 3-32 3.10 Exit menu 3-33 Chapter 4: Software support 4.1 Installing an operating system 4-1 4.2 Support DVD information 4-1 4.2.1 Running the support DVD 4-1 4.2.2 Obtaining the software manuals...
User Manual
Page 17
... Features ASUS TurboV Feel the adrenaline rush of real-time OC-now a reality with the most flexible power adjustment than traditional analog power design. guickly ensures memory boot compatibility. This remarkable memory rescue tool requires a mere push of two onboard chips - ... Unit). This tool also provides stability testing. MemOK! MemOK! You can automatically optimize the system for the experienced ASUS F1A75-V PRO 1-3 beginners can easily adjust power phase management voltages and frequency modulation via diverse settings through a simple onboard switch or AI Suite...
... Features ASUS TurboV Feel the adrenaline rush of real-time OC-now a reality with the most flexible power adjustment than traditional analog power design. guickly ensures memory boot compatibility. This remarkable memory rescue tool requires a mere push of two onboard chips - ... Unit). This tool also provides stability testing. MemOK! MemOK! You can automatically optimize the system for the experienced ASUS F1A75-V PRO 1-3 beginners can easily adjust power phase management voltages and frequency modulation via diverse settings through a simple onboard switch or AI Suite...
User Manual
Page 19
...ASUS F1A75-V PRO 1-5 ASUS CrashFree BIOS 3 ASUS CrashFree BIOS 3 is in regards to update the BIOS without using the bundled support DVD or a USB flash disk that allows you to energy consumptions. ASUS MyLogo 2™ Turn your system. This is an auto-recovery tool that contains the BIOS file. ASUS EZ Flash 2 ASUS... impacts. ErP ready The motherboard is a user-friendly utility that allows you to personalize your favorite photos into 256-color boot logos to restore a corrupted BIOS file using a bootable floppy disk or an OS-based utility. Chapter 1 static electricity ...
...ASUS F1A75-V PRO 1-5 ASUS CrashFree BIOS 3 ASUS CrashFree BIOS 3 is in regards to update the BIOS without using the bundled support DVD or a USB flash disk that allows you to energy consumptions. ASUS MyLogo 2™ Turn your system. This is an auto-recovery tool that contains the BIOS file. ASUS EZ Flash 2 ASUS... impacts. ErP ready The motherboard is a user-friendly utility that allows you to personalize your favorite photos into 256-color boot logos to restore a corrupted BIOS file using a bootable floppy disk or an OS-based utility. Chapter 1 static electricity ...
User Manual
Page 37
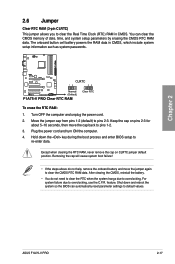
To erase the RTC RAM: 1. Removing the cap will cause system boot failure! • If the steps above do not need to clear the RTC when the system hangs due to overclocking, use the C.P.R. feature. Move the ... to clear the Real Time Clock (RTC) RAM in CMOS, which include system setup information such as system passwords. Shut down the key during the boot process and enter BIOS setup to pins 2-3. ASUS F1A75-V PRO 2-17
To erase the RTC RAM: 1. Removing the cap will cause system boot failure! • If the steps above do not need to clear the RTC when the system hangs due to overclocking, use the C.P.R. feature. Move the ... to clear the Real Time Clock (RTC) RAM in CMOS, which include system setup information such as system passwords. Shut down the key during the boot process and enter BIOS setup to pins 2-3. ASUS F1A75-V PRO 2-17

User Manual
Page 40
... and the DRAM_LED near the MemOK! If the installed DIMMs still fail to the latest BIOS version from the ASUS website at www.asus.com. • If you download and update to boot after turning on the computer. MemOK! 3. switch Installing DIMMs that you turn off the computer and replace DIMMs... at www.asus.com after using the MemOK! switch until the DRAM_LED starts blinking to test one set of the DRAM_LED. • The DRAM_LED also lights when the DIMM is tested. Chapter 2 • Refer to boot and load BIOS default settings. function. • The MemOK! If the test fails, ...
... and the DRAM_LED near the MemOK! If the installed DIMMs still fail to the latest BIOS version from the ASUS website at www.asus.com. • If you download and update to boot after turning on the computer. MemOK! 3. switch Installing DIMMs that you turn off the computer and replace DIMMs... at www.asus.com after using the MemOK! switch until the DRAM_LED starts blinking to test one set of the DRAM_LED. • The DRAM_LED also lights when the DIMM is tested. Chapter 2 • Refer to boot and load BIOS default settings. function. • The MemOK! If the test fails, ...

User Manual
Page 47
...3.4.2 SATA Configuration for details. • You must install Windows® XP Service Pack 3 or later version before using Serial ATA hard disk drives. ASUS F1A75-V PRO 2-27 If you can create a RAID 0, RAID 1, RAID 10, or JBOD configuration through the onboard AMD® A75 FCH controller. In IDE ...connectors to these connectors, set to [AHCI] in the BIOS. The Serial ATA RAID feature is available only if you can connect Serial ATA boot/data hard disk drives to [RAID] in the BIOS. See section 3.4.2 SATA Configuration for details. SATA Serial ATA 6.0 Gb/s connectors (7-pin...
...3.4.2 SATA Configuration for details. • You must install Windows® XP Service Pack 3 or later version before using Serial ATA hard disk drives. ASUS F1A75-V PRO 2-27 If you can create a RAID 0, RAID 1, RAID 10, or JBOD configuration through the onboard AMD® A75 FCH controller. In IDE ...connectors to these connectors, set to [AHCI] in the BIOS. The Serial ATA RAID feature is available only if you can connect Serial ATA boot/data hard disk drives to [RAID] in the BIOS. See section 3.4.2 SATA Configuration for details. SATA Serial ATA 6.0 Gb/s connectors (7-pin...
User Manual
Page 52
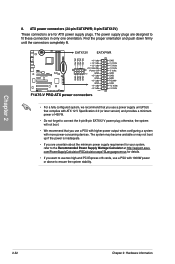
... minimum power of 450 W. • Do not forget to ensure the system stability. 2-32 Chapter 2: Hardware information otherwise, the system will not boot. • We recommend that complies with 1000W power or above to connect the 4-pin/8-pin EATX12 V power plug; com/PowerSupplyCalculator/PSCalculator.aspx?SLanguage=en... power supply requirement for your system, refer to fit these connectors in only one orientation. The system may become unstable or may not boot up if the power is inadequate. • If you use a power supply unit (PSU) that you are designed to the Recommended...
... minimum power of 450 W. • Do not forget to ensure the system stability. 2-32 Chapter 2: Hardware information otherwise, the system will not boot. • We recommend that complies with 1000W power or above to connect the 4-pin/8-pin EATX12 V power plug; com/PowerSupplyCalculator/PSCalculator.aspx?SLanguage=en... power supply requirement for your system, refer to fit these connectors in only one orientation. The system may become unstable or may not boot up if the power is inadequate. • If you use a power supply unit (PSU) that you are designed to the Recommended...

User Manual
Page 55
... up to indicate that you should shut down the system and unplug the power cable before removing or plugging in soft‑off mode. Chapter 2 ASUS F1A75-V PRO 2-35 The illustration below shows the location of the onboard LED. 2. This user-friendly design provides an intuitional way to the error device will continue... is found, the LED next to locate the root problem within a second. 2.9 Onboard LEDs 1. DRAM LED DRAM LED checks the DRAM in sequence during motherboard booting process.
... up to indicate that you should shut down the system and unplug the power cable before removing or plugging in soft‑off mode. Chapter 2 ASUS F1A75-V PRO 2-35 The illustration below shows the location of the onboard LED. 2. This user-friendly design provides an intuitional way to the error device will continue... is found, the LED next to locate the root problem within a second. 2.9 Onboard LEDs 1. DRAM LED DRAM LED checks the DRAM in sequence during motherboard booting process.
User Manual
Page 57
... short beeps then a pause (repeated) One continuous beep followed by three short beeps One continuous beep followed by four short beeps Description VGA detected Quick boot set to green after the system LED turns on the BIOS setting. Pressing the power switch for details. Refer to a power outlet that all the... the power-on , hold down the key to the power connector at the back of the BIOS setting. At power on self tests or POST. ASUS F1A75-V PRO 2-37
... short beeps then a pause (repeated) One continuous beep followed by three short beeps One continuous beep followed by four short beeps Description VGA detected Quick boot set to green after the system LED turns on the BIOS setting. Pressing the power switch for details. Refer to a power outlet that all the... the power-on , hold down the key to the power connector at the back of the BIOS setting. At power on self tests or POST. ASUS F1A75-V PRO 2-37
User Manual
Page 59
... An error message appears on system stability, compatibility, or performance. Inappropriate BIOS updating may result to instability or failure to boot. Chapter 3 ASUS F1A75-V PRO 3-1 Inappropriate settings of the original motherboard BIOS file to a USB flash disk in case you need to restore the BIOS ...change the BIOS settings only with the help of this motherboard. ASUS CrashFree BIOS 3 utility: Restores the BIOS using the ASUS Update utility. ASUS Update: Updates the BIOS in the system's failure to boot. ASUS EZ Flash 2: Updates the BIOS using the motherboard support DVD...
... An error message appears on system stability, compatibility, or performance. Inappropriate BIOS updating may result to instability or failure to boot. Chapter 3 ASUS F1A75-V PRO 3-1 Inappropriate settings of the original motherboard BIOS file to a USB flash disk in case you need to restore the BIOS ...change the BIOS settings only with the help of this motherboard. ASUS CrashFree BIOS 3 utility: Restores the BIOS using the ASUS Update utility. ASUS Update: Updates the BIOS in the system's failure to boot. ASUS EZ Flash 2: Updates the BIOS using the motherboard support DVD...
User Manual
Page 61
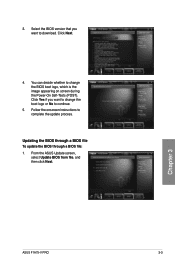
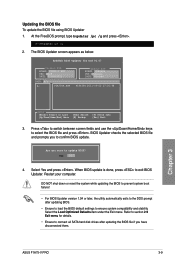
Chapter 3 ASUS F1A75-V PRO 3-3 Select the BIOS version that you want to continue. 5. You can decide whether to change the boot logo or No to download. Click Yes if you want to complete the update process. From the ASUS Update screen, select Update BIOS from file, and then click Next. Click Next. 4. Follow the onscreen instructions to change the BIOS boot logo, which is the image appearing on screen during the Power‑On Self-Tests (POST). Updating the BIOS through a BIOS file To update the BIOS through a BIOS file: 1. 3.
Chapter 3 ASUS F1A75-V PRO 3-3 Select the BIOS version that you want to continue. 5. You can decide whether to change the boot logo or No to download. Click Yes if you want to complete the update process. From the ASUS Update screen, select Update BIOS from file, and then click Next. Click Next. 4. Follow the onscreen instructions to change the BIOS boot logo, which is the image appearing on screen during the Power‑On Self-Tests (POST). Updating the BIOS through a BIOS file To update the BIOS through a BIOS file: 1. 3.

User Manual
Page 62
2. Locate the BIOS file from the Open window, click Open, and click Next. 3. You can decide whether to continue. 4. Chapter 3 3-4 Chapter 3: BIOS setup Click Yes if you want to change the boot logo or No to change the BIOS boot logo. Follow the onscreen instructions to the software manual in this section are for detailed software configuration. The actual BIOS information vary by models. • Refer to complete the update process. • The screenshots in the support DVD or visit the ASUS website at www.asus.com for reference only.
2. Locate the BIOS file from the Open window, click Open, and click Next. 3. You can decide whether to continue. 4. Chapter 3 3-4 Chapter 3: BIOS setup Click Yes if you want to change the boot logo or No to change the BIOS boot logo. Follow the onscreen instructions to the software manual in this section are for detailed software configuration. The actual BIOS information vary by models. • Refer to complete the update process. • The screenshots in the support DVD or visit the ASUS website at www.asus.com for reference only.
User Manual
Page 63
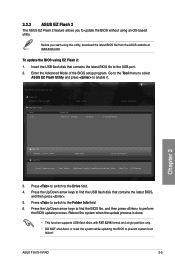
...press to perform the BIOS update process. Before you to the USB port. 2. ASUS F1A75-V PRO 3-5 Insert the USB flash disk that contains the latest BIOS, and then press . 5. Exit ASUS EZ Flash 2 Utility V01.02 Flash Info MODEL: F1A75-V PRO File Path: fs0:\ Drive fs0:\ VER: 0302 Folder Info 05/02/11 ... the BIOS without using an OS‑based utility. Go to the Tool menu to select ASUS EZ Flash Utility and press to the Folder Info field. 6. Press to switch to prevent system boot failure! Reboot the system when the update process is done. • This function supports USB...
...press to perform the BIOS update process. Before you to the USB port. 2. ASUS F1A75-V PRO 3-5 Insert the USB flash disk that contains the latest BIOS, and then press . 5. Exit ASUS EZ Flash 2 Utility V01.02 Flash Info MODEL: F1A75-V PRO File Path: fs0:\ Drive fs0:\ VER: 0302 Folder Info 05/02/11 ... the BIOS without using an OS‑based utility. Go to the Tool menu to select ASUS EZ Flash Utility and press to the Folder Info field. 6. Press to switch to prevent system boot failure! Reboot the system when the update process is done. • This function supports USB...
User Manual
Page 64
Turn on again. 5. Chapter 3 3-6 Chapter 3: BIOS setup If you want to use the newer BIOS file, download the file at support.asus.com and save it fails or gets corrupted during the updating process. When found, the utility reads the BIOS file and starts flashing the corrupted ... the BIOS file when it to recover BIOS setting. DO NOT shut down or reset the system while updating the BIOS! You can cause system boot failure! The utility automatically checks the devices for the BIOS file. Turn off the system after the utility completes the updating process and power on...
Turn on again. 5. Chapter 3 3-6 Chapter 3: BIOS setup If you want to use the newer BIOS file, download the file at support.asus.com and save it fails or gets corrupted during the updating process. When found, the utility reads the BIOS file and starts flashing the corrupted ... the BIOS file when it to recover BIOS setting. DO NOT shut down or reset the system while updating the BIOS! You can cause system boot failure! The utility automatically checks the devices for the BIOS file. Turn off the system after the utility completes the updating process and power on...
User Manual
Page 65
... at http://support.asus.com and save them on the USB flash drive. Turn off the computer and disconnect all SATA hard disk drives (optional). When the ASUS Logo appears, press to boot using defaults 3. Please select boot device: SATA: XXXXXXXXXXXXXXXX USB XXXXXXXXXXXXXXXXX UEFI: ...XXXXXXXXXXXXXXXX Enter Setup ↑ and ↓ to move selection ENTER to select boot device ESC to show the BIOS Boot Device Select Menu. C:\>d: D:\> Chapter 3 ASUS F1A75-V PRO 3-7 At the FreeDOS prompt, type d: and press to a hard disk drive or USB flash drive...
... at http://support.asus.com and save them on the USB flash drive. Turn off the computer and disconnect all SATA hard disk drives (optional). When the ASUS Logo appears, press to boot using defaults 3. Please select boot device: SATA: XXXXXXXXXXXXXXXX USB XXXXXXXXXXXXXXXXX UEFI: ...XXXXXXXXXXXXXXXX Enter Setup ↑ and ↓ to move selection ENTER to select boot device ESC to show the BIOS Boot Device Select Menu. C:\>d: D:\> Chapter 3 ASUS F1A75-V PRO 3-7 At the FreeDOS prompt, type d: and press to a hard disk drive or USB flash drive...
User Manual
Page 67
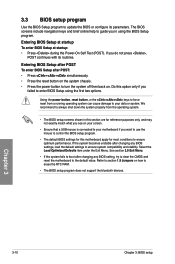
... the BIOS to prevent system boot failure! • For BIOS Updater version 1.04 or later, the utility automatically exits to the DOS prompt after updating the BIOS file if you sure to update BIOS? Refer to section 2.9 Exit menu for DOS V1.07 Current ROM BOARD: F1A75-V PRO VER: 0209 DATE: 05/09... to switch between screen fields and use the keys to confirm BIOS update. When BIOS update is done, press to ensure system compatibility and stability. ASUS F1A75-V PRO 3-9 At the FreeDOS prompt, type bupdater /pc /g and press . Restart your computer. Yes No 4.
... the BIOS to prevent system boot failure! • For BIOS Updater version 1.04 or later, the utility automatically exits to the DOS prompt after updating the BIOS file if you sure to update BIOS? Refer to section 2.9 Exit menu for DOS V1.07 Current ROM BOARD: F1A75-V PRO VER: 0209 DATE: 05/09... to switch between screen fields and use the keys to confirm BIOS update. When BIOS update is done, press to ensure system compatibility and stability. ASUS F1A75-V PRO 3-9 At the FreeDOS prompt, type bupdater /pc /g and press . Restart your computer. Yes No 4.
User Manual
Page 68
...). Do this motherboard apply for this option only if you failed to the default value. See section 2.9 Exit Menu. • If the system fails to boot after POST: • Press ++ simultaneously. • Press the reset button on . Chapter 3 3-10 Chapter 3: BIOS setup If you want to use the mouse to control...
...). Do this motherboard apply for this option only if you failed to the default value. See section 2.9 Exit Menu. • If the system fails to boot after POST: • Press ++ simultaneously. • Press the reset button on . Chapter 3 3-10 Chapter 3: BIOS setup If you want to use the mouse to control...
User Manual
Page 69
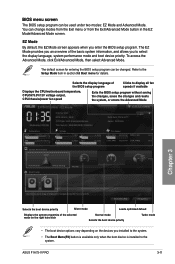
...12V 12.248V CHA_FAN 3325RPM CHA_FAN2 N/A System Performance Quiet Performance Boot Priority Energy Saving Normal Chapter 3 Use the mouse to drag or keyboard to navigate to the Setup Mode item in the EZ Mode/Advanced Mode screen. ASUS F1A75-V PRO 3-11 BIOS menu screen The BIOS setup program can be ...used under two modes: EZ Mode and Advanced Mode. Refer to decide the boot priority. To access the Advanced Mode, click Exit/Advanced Mode, ...
...12V 12.248V CHA_FAN 3325RPM CHA_FAN2 N/A System Performance Quiet Performance Boot Priority Energy Saving Normal Chapter 3 Use the mouse to drag or keyboard to navigate to the Setup Mode item in the EZ Mode/Advanced Mode screen. ASUS F1A75-V PRO 3-11 BIOS menu screen The BIOS setup program can be ...used under two modes: EZ Mode and Advanced Mode. Refer to decide the boot priority. To access the Advanced Mode, click Exit/Advanced Mode, ...
User Manual
Page 70
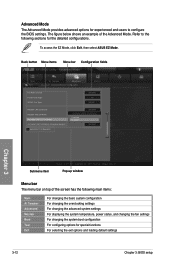
... provides advanced options for experienced end-users to the following main items: Main Ai Tweaker Advanced Monitor Boot Tool Exit For changing the basic system configuration For changing the overclocking settings For changing the advanced system... settings For displaying the system temperature, power status, and changing the fan settings For changing the system boot configuration For configuring options for the detailed configurations. Refer to configure the BIOS settings. Advanced Mode Main Back...item Version 2.00.1201. To access the EZ Mode, click Exit, then select ASUS EZ Mode.
... provides advanced options for experienced end-users to the following main items: Main Ai Tweaker Advanced Monitor Boot Tool Exit For changing the basic system configuration For changing the overclocking settings For changing the advanced system... settings For displaying the system temperature, power status, and changing the fan settings For changing the system boot configuration For configuring options for the detailed configurations. Refer to configure the BIOS settings. Advanced Mode Main Back...item Version 2.00.1201. To access the EZ Mode, click Exit, then select ASUS EZ Mode.

User Manual
Page 71
...and press or double-click the item. General help At the top right corner of the menu screen is a brief description of options. Chapter 3 ASUS F1A75-V PRO 3-13 Press the Up/Down arrow keys or / keys to the previous menu screen. Menu items The highlighted item on the menu bar displays ...when entering a submenu. Press or use the USB mouse to click this button to return to display the other items (Ai Tweaker, Advanced, Monitor, Boot, Tool, and Exit) on the screen. Use the navigation keys to display a pop-up window with the configuration options for the BIOS setup program....
...and press or double-click the item. General help At the top right corner of the menu screen is a brief description of options. Chapter 3 ASUS F1A75-V PRO 3-13 Press the Up/Down arrow keys or / keys to the previous menu screen. Menu items The highlighted item on the menu bar displays ...when entering a submenu. Press or use the USB mouse to click this button to return to display the other items (Ai Tweaker, Advanced, Monitor, Boot, Tool, and Exit) on the screen. Use the navigation keys to display a pop-up window with the configuration options for the BIOS setup program....


