User Manual
Page 5
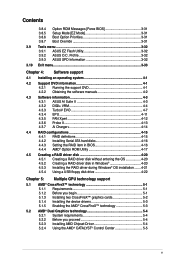
Contents 3.8.4 3.8.5 3.8.6 3.8.7 Option ROM Messages [Force BIOS 3-31 Setup Mode [EZ Mode 3-31 Boot Option Priorities 3-31 Boot Override 3-31 3.9 Tools menu 3-32 3.9.1 ASUS EZ Flash Utility 3-32 3.9.2 ASUS O.C. Profile 3-32 3.9.3 ASUS SPD Information 3-32 3.10 Exit menu 3-33 Chapter 4: Software support 4.1 Installing an operating system 4-1 4.2 Support DVD information 4-1 4.2.1 Running the support DVD 4-1 4.2.2 Obtaining the software manuals...
Contents 3.8.4 3.8.5 3.8.6 3.8.7 Option ROM Messages [Force BIOS 3-31 Setup Mode [EZ Mode 3-31 Boot Option Priorities 3-31 Boot Override 3-31 3.9 Tools menu 3-32 3.9.1 ASUS EZ Flash Utility 3-32 3.9.2 ASUS O.C. Profile 3-32 3.9.3 ASUS SPD Information 3-32 3.10 Exit menu 3-33 Chapter 4: Software support 4.1 Installing an operating system 4-1 4.2 Support DVD information 4-1 4.2.1 Running the support DVD 4-1 4.2.2 Obtaining the software manuals...
User Manual
Page 17
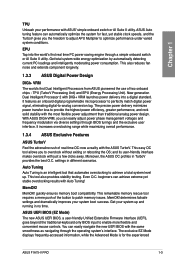
... easy OC tool allows you can automatically optimize the system for the experienced ASUS F1A75-V PRO 1-3 This remarkable memory rescue tool requires a mere push of two onboard chips - determines failsafe settings and dramatically improves your system up . Get your system boot success. The exclusive EZ Mode displays frequently-accessed information, while the Advanced Mode...
... easy OC tool allows you can automatically optimize the system for the experienced ASUS F1A75-V PRO 1-3 This remarkable memory rescue tool requires a mere push of two onboard chips - determines failsafe settings and dramatically improves your system up . Get your system boot success. The exclusive EZ Mode displays frequently-accessed information, while the Advanced Mode...
User Manual
Page 19
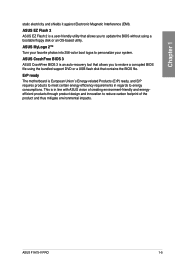
... BIOS 3 is a user-friendly utility that contains the BIOS file. ASUS EZ Flash 2 ASUS EZ Flash 2 is an auto-recovery tool that allows you to update the BIOS without using the bundled support DVD or a USB... of the product and thus mitigate environmental impacts. ASUS MyLogo 2™ Turn your favorite photos into 256-color boot logos to reduce carbon footprint of creating environment-friendly and energyefficient products through product design and innovation to personalize your system. ASUS F1A75-V PRO 1-5 Chapter 1 static electricity and shields it against Electronic Magnetic ...
... BIOS 3 is a user-friendly utility that contains the BIOS file. ASUS EZ Flash 2 ASUS EZ Flash 2 is an auto-recovery tool that allows you to update the BIOS without using the bundled support DVD or a USB... of the product and thus mitigate environmental impacts. ASUS MyLogo 2™ Turn your favorite photos into 256-color boot logos to reduce carbon footprint of creating environment-friendly and energyefficient products through product design and innovation to personalize your system. ASUS F1A75-V PRO 1-5 Chapter 1 static electricity and shields it against Electronic Magnetic ...
User Manual
Page 37
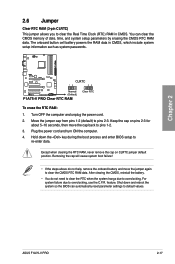
... steps above do not need to clear the RTC when the system hangs due to re-enter data. feature. Shut down the key during the boot process and enter BIOS setup to overclocking. Move the jumper cap from pins 1-2 (default) to clear the Real Time Clock (RTC) RAM in CMOS.... Chapter 2 2.6 Jumper Clear RTC RAM (3-pin CLRTC) This jumper allows you to pins 2-3. The onboard button cell battery powers the RAM data in CMOS. ASUS F1A75-V PRO 2-17 Turn OFF the computer and unplug the power cord. 2. After clearing the CMOS, reinstall the battery. • You do not help, remove the onboard...
... steps above do not need to clear the RTC when the system hangs due to re-enter data. feature. Shut down the key during the boot process and enter BIOS setup to overclocking. Move the jumper cap from pins 1-2 (default) to clear the Real Time Clock (RTC) RAM in CMOS.... Chapter 2 2.6 Jumper Clear RTC RAM (3-pin CLRTC) This jumper allows you to pins 2-3. The onboard button cell battery powers the RAM data in CMOS. ASUS F1A75-V PRO 2-17 Turn OFF the computer and unplug the power cord. 2. After clearing the CMOS, reinstall the battery. • You do not help, remove the onboard...

User Manual
Page 40
... for successful boot. switch lights continuously. switch does not function under Windows® OS environment. • During the tuning process, the system loads and tests failsafe memory settings. If the installed DIMMs still fail to the latest BIOS version from the ASUS website at www.asus.com. &#... at www.asus.com after the whole tuning process, the DRAM_LED lights continuously. switch Installing DIMMs that you that the BIOS has been restored to boot and load BIOS default settings. 3. switch to its default settings. • We recommend that are incompatible with ones ...
... for successful boot. switch lights continuously. switch does not function under Windows® OS environment. • During the tuning process, the system loads and tests failsafe memory settings. If the installed DIMMs still fail to the latest BIOS version from the ASUS website at www.asus.com. &#... at www.asus.com after the whole tuning process, the DRAM_LED lights continuously. switch Installing DIMMs that you that the BIOS has been restored to boot and load BIOS default settings. 3. switch to its default settings. • We recommend that are incompatible with ones ...

User Manual
Page 47
... ATA RAID feature is available only if you can create a RAID 0, RAID 1, RAID 10, or JBOD configuration through the onboard AMD® A75 FCH controller. ASUS F1A75-V PRO 2-27 See section 3.4.2 SATA Configuration for details. See section 3.4.2 SATA Configuration for details. • You must install Windows® XP Service Pack 3 or later version... connectors are for the Serial ATA 6.0 Gb/s signal cables for Serial ATA hard disk drives and optical disc drives. If you can connect Serial ATA boot/data hard disk drives to [AHCI] in the BIOS.
... ATA RAID feature is available only if you can create a RAID 0, RAID 1, RAID 10, or JBOD configuration through the onboard AMD® A75 FCH controller. ASUS F1A75-V PRO 2-27 See section 3.4.2 SATA Configuration for details. See section 3.4.2 SATA Configuration for details. • You must install Windows® XP Service Pack 3 or later version... connectors are for the Serial ATA 6.0 Gb/s signal cables for Serial ATA hard disk drives and optical disc drives. If you can connect Serial ATA boot/data hard disk drives to [AHCI] in the BIOS.
User Manual
Page 52
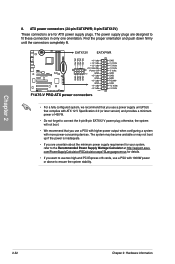
...; We recommend that you use a power supply unit (PSU) that you are designed to the Recommended Power Supply Wattage Calculator at http://support.asus. ATX power connectors (24-pin EATXPWR; 8-pin EATX12V) These connectors are for your system, refer to fit these connectors in only one orientation...power of 450 W. • Do not forget to ensure the system stability. 2-32 Chapter 2: Hardware information The system may become unstable or may not boot up if the power is inadequate. • If you use a PSU with higher power output when configuring a system with 1000W power or above to ...
...; We recommend that you use a power supply unit (PSU) that you are designed to the Recommended Power Supply Wattage Calculator at http://support.asus. ATX power connectors (24-pin EATXPWR; 8-pin EATX12V) These connectors are for your system, refer to fit these connectors in only one orientation...power of 450 W. • Do not forget to ensure the system stability. 2-32 Chapter 2: Hardware information The system may become unstable or may not boot up if the power is inadequate. • If you use a PSU with higher power output when configuring a system with 1000W power or above to ...

User Manual
Page 55
... error is ON, in sleep mode, or in sequence during motherboard booting process. The green LED lights up to indicate that you should shut down the system and unplug the power cable before removing or plugging in any motherboard component. Chapter 2 ASUS F1A75-V PRO 2-35 Standby Power LED The motherboard comes with a standby power...
... error is ON, in sleep mode, or in sequence during motherboard booting process. The green LED lights up to indicate that you should shut down the system and unplug the power cable before removing or plugging in any motherboard component. Chapter 2 ASUS F1A75-V PRO 2-35 Standby Power LED The motherboard comes with a standby power...
User Manual
Page 57
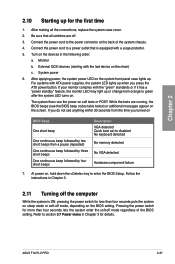
... power LED on self tests or POST. If you do not see the BIOS beep codes table below) or additional messages appear on the screen. ASUS F1A75-V PRO 2-37 Connect the power cord to enter the BIOS Setup. Turn on the chain) c. External SCSI devices (starting with a surge protector. 5. ...beeps then a pause (repeated) One continuous beep followed by three short beeps One continuous beep followed by four short beeps Description VGA detected Quick boot set to a power outlet that all the connections, replace the system case cover. 2. Be sure that is ON, pressing the power switch ...
... power LED on self tests or POST. If you do not see the BIOS beep codes table below) or additional messages appear on the screen. ASUS F1A75-V PRO 2-37 Connect the power cord to enter the BIOS Setup. Turn on the chain) c. External SCSI devices (starting with a surge protector. 5. ...beeps then a pause (repeated) One continuous beep followed by three short beeps One continuous beep followed by four short beeps Description VGA detected Quick boot set to a power outlet that all the connections, replace the system case cover. 2. Be sure that is ON, pressing the power switch ...
User Manual
Page 59
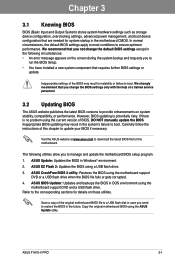
... future. Save a copy of BIOS, DO NOT manually update the BIOS. Chapter 3 ASUS F1A75-V PRO 3-1 Inappropriate BIOS updating may result to instability or failure to boot. Inappropriate settings of this motherboard. However, BIOS updating is no problem using the ASUS Update utility. ASUS Update: Updates the BIOS in the motherboard CMOS. If there is potentially risky...
... future. Save a copy of BIOS, DO NOT manually update the BIOS. Chapter 3 ASUS F1A75-V PRO 3-1 Inappropriate BIOS updating may result to instability or failure to boot. Inappropriate settings of this motherboard. However, BIOS updating is no problem using the ASUS Update utility. ASUS Update: Updates the BIOS in the motherboard CMOS. If there is potentially risky...
User Manual
Page 61
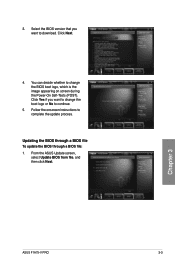
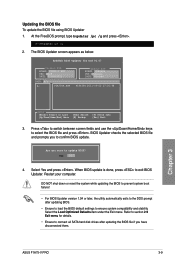
Select the BIOS version that you want to continue. 5. Updating the BIOS through a BIOS file To update the BIOS through a BIOS file: 1. 3. You can decide whether to change the boot logo or No to download. Click Yes if you want to complete the update process. Follow the onscreen instructions to change the BIOS boot logo, which is the image appearing on screen during the Power‑On Self-Tests (POST). Chapter 3 ASUS F1A75-V PRO 3-3 Click Next. 4. From the ASUS Update screen, select Update BIOS from file, and then click Next.
Select the BIOS version that you want to continue. 5. Updating the BIOS through a BIOS file To update the BIOS through a BIOS file: 1. 3. You can decide whether to change the boot logo or No to download. Click Yes if you want to complete the update process. Follow the onscreen instructions to change the BIOS boot logo, which is the image appearing on screen during the Power‑On Self-Tests (POST). Chapter 3 ASUS F1A75-V PRO 3-3 Click Next. 4. From the ASUS Update screen, select Update BIOS from file, and then click Next.

User Manual
Page 62
Chapter 3 3-4 Chapter 3: BIOS setup You can decide whether to change the boot logo or No to complete the update process. • The screenshots in the support DVD or visit the ASUS website at www.asus.com for reference only. Follow the onscreen instructions to continue. 4. Locate the BIOS file from the Open window, click Open, and click Next. 3. Click Yes if you want to the software manual in this section are for detailed software configuration. 2. The actual BIOS information vary by models. • Refer to change the BIOS boot logo.
Chapter 3 3-4 Chapter 3: BIOS setup You can decide whether to change the boot logo or No to complete the update process. • The screenshots in the support DVD or visit the ASUS website at www.asus.com for reference only. Follow the onscreen instructions to continue. 4. Locate the BIOS file from the Open window, click Open, and click Next. 3. Click Yes if you want to the software manual in this section are for detailed software configuration. 2. The actual BIOS information vary by models. • Refer to change the BIOS boot logo.
User Manual
Page 63
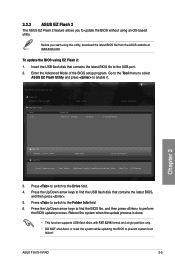
.../Down arrow keys to find the BIOS file, and then press to enable it. ASUS F1A75-V PRO 3-5 3.2.2 ASUS EZ Flash 2 The ASUS EZ Flash 2 feature allows you start using this utility, download the latest BIOS file from the ASUS website at www.asus.com. Reboot the system when the update process is done. • This function supports... update the BIOS without using EZ Flash 2: 1. Insert the USB flash disk that contains the latest BIOS, and then press . 5. Before you to prevent system boot failure! To update the BIOS using an OS‑based utility.
.../Down arrow keys to find the BIOS file, and then press to enable it. ASUS F1A75-V PRO 3-5 3.2.2 ASUS EZ Flash 2 The ASUS EZ Flash 2 feature allows you start using this utility, download the latest BIOS file from the ASUS website at www.asus.com. Reboot the system when the update process is done. • This function supports... update the BIOS without using EZ Flash 2: 1. Insert the USB flash disk that contains the latest BIOS, and then press . 5. Before you to prevent system boot failure! To update the BIOS using an OS‑based utility.
User Manual
Page 64
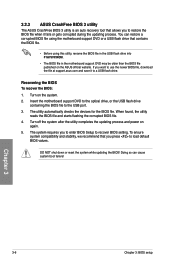
You can cause system boot failure! If you want to use the newer BIOS file, download the file at support.asus.com and save it fails or gets corrupted during the updating process. Turn on the ASUS official website. Doing so can restore a corrupted BIOS file using the motherboard ... requires you to enter BIOS Setup to a USB flash drive. The utility automatically checks the devices for the BIOS file. 3.2.3 ASUS CrashFree BIOS 3 utility The ASUS CrashFree BIOS 3 utility is an auto recovery tool that allows you to the USB port. 3. Insert the motherboard support DVD to...
You can cause system boot failure! If you want to use the newer BIOS file, download the file at support.asus.com and save it fails or gets corrupted during the updating process. Turn on the ASUS official website. Doing so can restore a corrupted BIOS file using the motherboard ... requires you to enter BIOS Setup to a USB flash drive. The utility automatically checks the devices for the BIOS file. 3.2.3 ASUS CrashFree BIOS 3 utility The ASUS CrashFree BIOS 3 utility is an auto recovery tool that allows you to the USB port. 3. Insert the motherboard support DVD to...
User Manual
Page 65
...: SATA: XXXXXXXXXXXXXXXX USB XXXXXXXXXXXXXXXXX UEFI: XXXXXXXXXXXXXXXX Enter Setup ↑ and ↓ to move selection ENTER to select boot device ESC to the USB port. 2. C:\>d: D:\> Chapter 3 ASUS F1A75-V PRO 3-7 The actual utility screen displays may not be same as the boot device. Insert the USB flash drive with the latest BIOS file and BIOS Updater to...
...: SATA: XXXXXXXXXXXXXXXX USB XXXXXXXXXXXXXXXXX UEFI: XXXXXXXXXXXXXXXX Enter Setup ↑ and ↓ to move selection ENTER to select boot device ESC to the USB port. 2. C:\>d: D:\> Chapter 3 ASUS F1A75-V PRO 3-7 The actual utility screen displays may not be same as the boot device. Insert the USB flash drive with the latest BIOS file and BIOS Updater to...
User Manual
Page 67
...is done, press to select the BIOS file and press . DO NOT shut down or reset the system while updating the BIOS to prevent system boot failure! • For BIOS Updater version 1.04 or later, the utility automatically exits to confirm BIOS update. The BIOS Updater screen appears as... the FreeDOS prompt, type bupdater /pc /g and press . Are you to the DOS prompt after updating the BIOS file if you have disconnected them. ASUS F1A75-V PRO 3-9 ASUSTek BIOS Updater for details. • Ensure to connect all SATA hard disk drives after updating BIOS. • Ensure to load the BIOS default...
...is done, press to select the BIOS file and press . DO NOT shut down or reset the system while updating the BIOS to prevent system boot failure! • For BIOS Updater version 1.04 or later, the utility automatically exits to confirm BIOS update. The BIOS Updater screen appears as... the FreeDOS prompt, type bupdater /pc /g and press . Are you to the DOS prompt after updating the BIOS file if you have disconnected them. ASUS F1A75-V PRO 3-9 ASUSTek BIOS Updater for details. • Ensure to connect all SATA hard disk drives after updating BIOS. • Ensure to load the BIOS default...
User Manual
Page 68
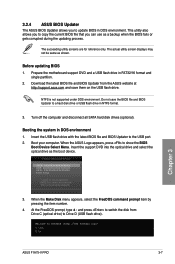
... system chassis. • Press the power button to turn the system off then back on. See section 2.9 Exit Menu. • If the system fails to boot after changing any BIOS settings, load the default settings to ensure system compatibility and stability. If you see on how to erase the RTC RAM...
... system chassis. • Press the power button to turn the system off then back on. See section 2.9 Exit Menu. • If the system fails to boot after changing any BIOS settings, load the default settings to ensure system compatibility and stability. If you see on how to erase the RTC RAM...
User Manual
Page 69
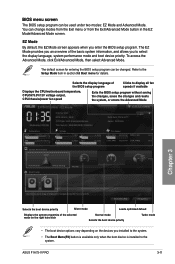
...when you installed to the system. • The Boot Menu(F8) button is available only when the boot device is installed to the system. Refer to decide the boot priority. The default screen for details. EZ Mode Wednesday [1/2/2008] F1A75-V PRO BIOS Version : 0402 CPU Type : AMD Engineering Sample... Mode. You can change modes from the Exit menu or from the Exit/Advanced Mode button in section 3.8 Boot menu for entering the BIOS setup program can be changed. ASUS F1A75-V PRO 3-11 To access the Advanced Mode, click Exit/Advanced Mode, then select Advanced Mode.
...when you installed to the system. • The Boot Menu(F8) button is available only when the boot device is installed to the system. Refer to decide the boot priority. The default screen for details. EZ Mode Wednesday [1/2/2008] F1A75-V PRO BIOS Version : 0402 CPU Type : AMD Engineering Sample... Mode. You can change modes from the Exit menu or from the Exit/Advanced Mode button in section 3.8 Boot menu for entering the BIOS setup program can be changed. ASUS F1A75-V PRO 3-11 To access the Advanced Mode, click Exit/Advanced Mode, then select Advanced Mode.
User Manual
Page 70
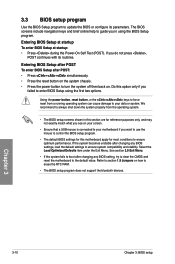
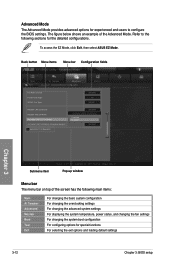
... Support Enabled > Serial Port Configuration Chapter 3 Submenu item Version 2.00.1201. To access the EZ Mode, click Exit, then select ASUS EZ Mode. Refer to configure the BIOS settings. The figure below shows an example of the screen has the following sections for special ...Advanced Mode The Advanced Mode provides advanced options for experienced end-users to the following main items: Main Ai Tweaker Advanced Monitor Boot Tool Exit For changing the basic system configuration For changing the overclocking settings For changing the advanced system settings For displaying the system...
... Support Enabled > Serial Port Configuration Chapter 3 Submenu item Version 2.00.1201. To access the EZ Mode, click Exit, then select ASUS EZ Mode. Refer to configure the BIOS settings. The figure below shows an example of the screen has the following sections for special ...Advanced Mode The Advanced Mode provides advanced options for experienced end-users to the following main items: Main Ai Tweaker Advanced Monitor Boot Tool Exit For changing the basic system configuration For changing the overclocking settings For changing the advanced system settings For displaying the system...

User Manual
Page 71
...when there are the navigation keys for the menu items. If an item is a brief description of the field opposite the item. Chapter 3 ASUS F1A75-V PRO 3-13 Navigation keys At the bottom right corner of options. Configuration fields These fields show the values for the BIOS setup program. You cannot ... the selected item. Press or use the USB mouse to click this button to return to display the other items (Ai Tweaker, Advanced, Monitor, Boot, Tool, and Exit) on the menu bar have their respective menu items. Back button This button appears when entering a submenu. Submenu items A...
...when there are the navigation keys for the menu items. If an item is a brief description of the field opposite the item. Chapter 3 ASUS F1A75-V PRO 3-13 Navigation keys At the bottom right corner of options. Configuration fields These fields show the values for the BIOS setup program. You cannot ... the selected item. Press or use the USB mouse to click this button to return to display the other items (Ai Tweaker, Advanced, Monitor, Boot, Tool, and Exit) on the menu bar have their respective menu items. Back button This button appears when entering a submenu. Submenu items A...


