
User Manual
Page 4
Table of Contents Task Manager 4-46 Favorites...4-47 Chapter 5: Installing & Optimizing Windows® XP Preparing to install Windows® XP 5-2 Installing Windows® XP 5-2 Optimizing Windows® XP 5-4 Changing Virtual Memory 5-4 Turning off System Restore 5-5 Compressing Disk Drive 5-6 Relocating Files 5-6 Deleting unnecessary Windows Components 5-8 Clearing System ...
Table of Contents Task Manager 4-46 Favorites...4-47 Chapter 5: Installing & Optimizing Windows® XP Preparing to install Windows® XP 5-2 Installing Windows® XP 5-2 Optimizing Windows® XP 5-4 Changing Virtual Memory 5-4 Turning off System Restore 5-5 Compressing Disk Drive 5-6 Relocating Files 5-6 Deleting unnecessary Windows Components 5-8 Clearing System ...

User Manual
Page 6
... on using the Eee PC's utilities. 5. Appendix Provides you information on your Eee PC. 6. Using the Eee PC Provides information on the Eee PC's components. 3. Getting Started Provides information on getting started with the Eee PC. 4. The following are reading the Eee PC User's Manual.This User's Manual provides information regarding the various components in the Eee PC and how to install and optimize Windows...
... on using the Eee PC's utilities. 5. Appendix Provides you information on your Eee PC. 6. Using the Eee PC Provides information on the Eee PC's components. 3. Getting Started Provides information on getting started with the Eee PC. 4. The following are reading the Eee PC User's Manual.This User's Manual provides information regarding the various components in the Eee PC and how to install and optimize Windows...

User Manual
Page 10
Preparing your Eee PC These are only quick instructions for reference only and may not exactly show your specific configuration. The illustration above is for using your national standard. Refer to page 3-2 for detailed inform1ation. 1. Install the battery pack 2 1 2 2. Read the following chapters for more details. 1-6 Chapter 1: Introducing the Eee PC Connect the AC power adapter 1 3 The wall outlet differs in type by country.Your Eee PC ships with an adapter compliant with your Eee PC.
Preparing your Eee PC These are only quick instructions for reference only and may not exactly show your specific configuration. The illustration above is for using your national standard. Refer to page 3-2 for detailed inform1ation. 1. Install the battery pack 2 1 2 2. Read the following chapters for more details. 1-6 Chapter 1: Introducing the Eee PC Connect the AC power adapter 1 3 The wall outlet differs in type by country.Your Eee PC ships with an adapter compliant with your Eee PC.

User Manual
Page 24
Most hotels will provide universal outlets to the DC power required by the Eee PC. Power System Using AC Power The Eee PC power comprises two parts, the power adapter and the battery power system.The power adapter converts AC power from a wall outlet to support different ... travelling. THE POWER ADAPTER MAY BECOME WARM TO HOT WHEN IN USE. Installing the prong-plug adapter Follow the instructions below to any 100V-120V as well as voltages. Your Eee PC comes with a universal AC-DC adapter for connection to install the prong-plug adapter if needed. 1. Incline the prong slightly to a ...
Most hotels will provide universal outlets to the DC power required by the Eee PC. Power System Using AC Power The Eee PC power comprises two parts, the power adapter and the battery power system.The power adapter converts AC power from a wall outlet to support different ... travelling. THE POWER ADAPTER MAY BECOME WARM TO HOT WHEN IN USE. Installing the prong-plug adapter Follow the instructions below to any 100V-120V as well as voltages. Your Eee PC comes with a universal AC-DC adapter for connection to install the prong-plug adapter if needed. 1. Incline the prong slightly to a ...

User Manual
Page 26
... 3 2 Only use battery packs and power adapters supplied with this 1 Eee PC or specifically approved by impact, turn OFF the Eee PC and contact an authorized service center. 3-4 Chapter 3: Getting Started Installing and Removing the Battery Pack Your Eee PC may result in fire, DO NOT short circuit the contacts, and DO NOT... for use with this may not have its battery pack installed. A fully charged pack will provide several hours of battery life. Additional battery packs are optional and can be purchased separately through an Eee PC retailer. If no1t, use and whenever it is any...
... 3 2 Only use battery packs and power adapters supplied with this 1 Eee PC or specifically approved by impact, turn OFF the Eee PC and contact an authorized service center. 3-4 Chapter 3: Getting Started Installing and Removing the Battery Pack Your Eee PC may result in fire, DO NOT short circuit the contacts, and DO NOT... for use with this may not have its battery pack installed. A fully charged pack will provide several hours of battery life. Additional battery packs are optional and can be purchased separately through an Eee PC retailer. If no1t, use and whenever it is any...

User Manual
Page 73
Printers To setup your printer, double-click Printers and press Add to the QVL in Appendix or visit our website for the latest qualified vendor for the printers. The installed printers display in standby, restart, or shut down the system. Refer to add a new printer. You can activate the task manager, put the system in the window. Instant Shutdown Click Instant Shutdown and select an action from the dialog box shown below. ASUS Eee PC 4-37
Printers To setup your printer, double-click Printers and press Add to the QVL in Appendix or visit our website for the latest qualified vendor for the printers. The installed printers display in standby, restart, or shut down the system. Refer to add a new printer. You can activate the task manager, put the system in the window. Instant Shutdown Click Instant Shutdown and select an action from the dialog box shown below. ASUS Eee PC 4-37
User Manual
Page 75
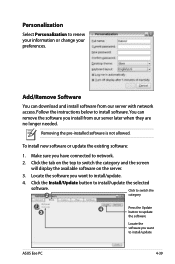
... to install/update the selected software. Click the tab on the server. 3. Locate the software you have connected to install software. Removing the pre-installed software is not allowed. Follow the instructions below to network. 2. Make sure you want to renew your information or change your preferences. Personalization Select Personalization to install/update ASUS Eee PC 4-39...
... to install/update the selected software. Click the tab on the server. 3. Locate the software you have connected to install software. Removing the pre-installed software is not allowed. Follow the instructions below to network. 2. Make sure you want to renew your information or change your preferences. Personalization Select Personalization to install/update ASUS Eee PC 4-39...
User Manual
Page 76
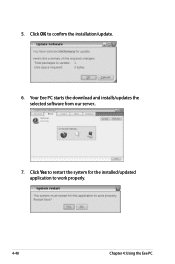
Click Yes to restart the system for the installed/updated application to confirm the installation/update. 6. Your Eee PC starts the download and installs/updates the selected software from our server.. 7. Click OK to work properly. 4-40 Chapter 4: Using the Eee PC 5.
Click Yes to restart the system for the installed/updated application to confirm the installation/update. 6. Your Eee PC starts the download and installs/updates the selected software from our server.. 7. Click OK to work properly. 4-40 Chapter 4: Using the Eee PC 5.
User Manual
Page 77
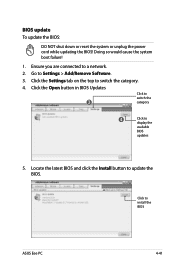
BIOS update To update the BIOS: DO NOT shut down or reset the system or unplug the power cord while updating the BIOS! Click the Settings tab on the top to update the BIOS. Locate the latest BIOS and click the Install button to switch the category. 4. Click the Open button in BIOS Updates Click to switch the 3 category 4 Click to install the BIOS ASUS Eee PC 4-41 Click to display the available BIOS updates 5. Doing so would cause the system boot failure! 1. Go to a network. 2. Ensure you are connected to Settings > Add/Remove Software. 3.
BIOS update To update the BIOS: DO NOT shut down or reset the system or unplug the power cord while updating the BIOS! Click the Settings tab on the top to update the BIOS. Locate the latest BIOS and click the Install button to switch the category. 4. Click the Open button in BIOS Updates Click to switch the 3 category 4 Click to install the BIOS ASUS Eee PC 4-41 Click to display the available BIOS updates 5. Doing so would cause the system boot failure! 1. Go to a network. 2. Ensure you are connected to Settings > Add/Remove Software. 3.
User Manual
Page 80
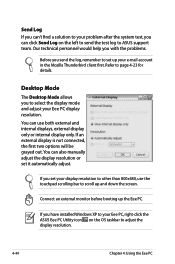
...installed Windows XP to your display resolution to other than 800x480, use both external and internal displays, external display only or internal display only. You can use the touchpad scrolling bar to scroll up and down the screen. Refer to adjust the display resolution. 4-44 Chapter 4: Using the Eee PC... If you set your Eee PC, right-click the ASUS Eee PC Utility icon on the left to send the test log to ASUS support team. Send Log If you can't find a solution to your Eee PC display resolution. If an external display is not...
...installed Windows XP to your display resolution to other than 800x480, use both external and internal displays, external display only or internal display only. You can use the touchpad scrolling bar to scroll up and down the screen. Refer to adjust the display resolution. 4-44 Chapter 4: Using the Eee PC... If you set your Eee PC, right-click the ASUS Eee PC Utility icon on the left to send the test log to ASUS support team. Send Log If you can't find a solution to your Eee PC display resolution. If an external display is not...

User Manual
Page 85
Preparing to Install Windows® XP Installing Windows® XP Optimizing Windows® XP 5 Installing & Optimizing Windows® XP
Preparing to Install Windows® XP Installing Windows® XP Optimizing Windows® XP 5 Installing & Optimizing Windows® XP

User Manual
Page 86
... drive to save the configuration and reboot the system. 5-2 Chapter 5: Installing & Optimizing Windows® XP Press to your Eee PC. 3. Ensure the disc you use a USB flash disk smaller than 1GB) or external hard disk drive • ASUS Eee PC support DVD • The older version of Windows® OS does ...not support USB DVDROM. Start the system and press on bootup to detect all the items. 4. We recommend you have is Windows® XP Service Pack 2. • Your Eee PC might not be able...
... drive to save the configuration and reboot the system. 5-2 Chapter 5: Installing & Optimizing Windows® XP Press to your Eee PC. 3. Ensure the disc you use a USB flash disk smaller than 1GB) or external hard disk drive • ASUS Eee PC support DVD • The older version of Windows® OS does ...not support USB DVDROM. Start the system and press on bootup to detect all the items. 4. We recommend you have is Windows® XP Service Pack 2. • Your Eee PC might not be able...

User Manual
Page 87
... important data before installing Windows® XP to install all your Eee PC. 8. Press to the USB DVD/CD-ROM and click InstAll - 6. You will lose all drivers. After entering Windows, insert the Support DVD to save the configuration and reboot the system. 12. ASUS Eee PC 5-3 Please select boot... device: HDD:SM-SILICONMOTION SM223AC USB:Slimtype DVD ↑ and ↓ to move selection ENTER to boot from the optical drive. After the Windows® XP OS installation is completed. Select USB:XXXXXX (may...
... important data before installing Windows® XP to install all your Eee PC. 8. Press to the USB DVD/CD-ROM and click InstAll - 6. You will lose all drivers. After entering Windows, insert the Support DVD to save the configuration and reboot the system. 12. ASUS Eee PC 5-3 Please select boot... device: HDD:SM-SILICONMOTION SM223AC USB:Slimtype DVD ↑ and ↓ to move selection ENTER to boot from the optical drive. After the Windows® XP OS installation is completed. Select USB:XXXXXX (may...

User Manual
Page 88
Click the Advanced tab on your Eee PC run faster. Click Advanced tab and the Change button to 200MB. Optimizing Windows® XP For the best performance of your Eee PC with Windows XP operating system, follow some quick steps below to make your needs. 1. Changing Virtual Memory ASUS Eee PC supprt DVD will by default set the virtual memory to change the virtual memory. 5-4 Chapter 5: Installing & Optimizing Windows® XP Go to Control Panel > System. 2. Change the virtual memory based on the top and click the Settings button in Performance area. 3.
Click the Advanced tab on your Eee PC run faster. Click Advanced tab and the Change button to 200MB. Optimizing Windows® XP For the best performance of your Eee PC with Windows XP operating system, follow some quick steps below to make your needs. 1. Changing Virtual Memory ASUS Eee PC supprt DVD will by default set the virtual memory to change the virtual memory. 5-4 Chapter 5: Installing & Optimizing Windows® XP Go to Control Panel > System. 2. Change the virtual memory based on the top and click the Settings button in Performance area. 3.
User Manual
Page 90
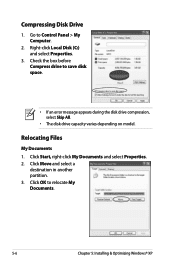
Check the box before Compress drive to relocate My Documents. 5-6 Chapter 5: Installing & Optimizing Windows® XP Click OK to save disk space. • If an error message appears during the disk drive compression, select Skip All. • The disk drive capacity varies depending on model. Click Start, right-click My Documents and select Properties. 2. Relocating Files My Documents 1. Right-click Local Disk (C:) and select Properties. 3. Click Move and select a destination in another partition. 3. Go to Control Panel > My Computer. 2. Compressing Disk Drive 1.
Check the box before Compress drive to relocate My Documents. 5-6 Chapter 5: Installing & Optimizing Windows® XP Click OK to save disk space. • If an error message appears during the disk drive compression, select Skip All. • The disk drive capacity varies depending on model. Click Start, right-click My Documents and select Properties. 2. Relocating Files My Documents 1. Right-click Local Disk (C:) and select Properties. 3. Click Move and select a destination in another partition. 3. Go to Control Panel > My Computer. 2. Compressing Disk Drive 1.

User Manual
Page 92
Go to All Programs > Accessories > Command Prompt. 2. Uncheck the boxes for the Windows components you do not need. Go to Control Panel > Add or Remove Programs. 2. Clearing System Backup Data 1. Click Add/Remove Windows Components on the left to clear the system backup data. 5-8 Chapter 5: Installing & Optimizing Windows® XP Key in sfc.exe/purgecache. 3. Deleting unnecessary Windows Components 1. Press to display the component wizard. 3.
Go to All Programs > Accessories > Command Prompt. 2. Uncheck the boxes for the Windows components you do not need. Go to Control Panel > Add or Remove Programs. 2. Clearing System Backup Data 1. Click Add/Remove Windows Components on the left to clear the system backup data. 5-8 Chapter 5: Installing & Optimizing Windows® XP Key in sfc.exe/purgecache. 3. Deleting unnecessary Windows Components 1. Press to display the component wizard. 3.
User Manual
Page 94
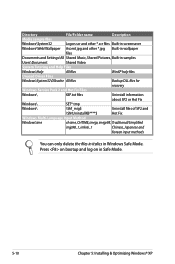
..., imejp, imejp98, Traditional/Simplified imjp98_1, imkr6_1 Chinese, Japanese and Korean input methods You can only delete the files in italics in Safe Mode. 5-10 Chapter 5: Installing & Optimizing Windows® XP
..., imejp, imejp98, Traditional/Simplified imjp98_1, imkr6_1 Chinese, Japanese and Korean input methods You can only delete the files in italics in Safe Mode. 5-10 Chapter 5: Installing & Optimizing Windows® XP

User Manual
Page 96
Click an icon to display support DVD/ Eee PC information Click an item to install If Autorun is enabled in your computer, browse the contents of the support DVD to locate the file ASSETUP.EXE from the BIN folder. All ... is NOT enabled in the Windows® XP SP2 environment. Support DVD information The support DVD that comes with the Eee PC package contains the drivers, software applications, and utilities that you can install to run the DVD. 6-2 Chapter 6: Support DVD & System Recovery Double-click the ASSETUP.EXE file to avail all the...
Click an icon to display support DVD/ Eee PC information Click an item to install If Autorun is enabled in your computer, browse the contents of the support DVD to locate the file ASSETUP.EXE from the BIN folder. All ... is NOT enabled in the Windows® XP SP2 environment. Support DVD information The support DVD that comes with the Eee PC package contains the drivers, software applications, and utilities that you can install to run the DVD. 6-2 Chapter 6: Support DVD & System Recovery Double-click the ASSETUP.EXE file to avail all the...
User Manual
Page 97
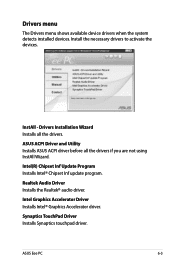
... update program. Synaptics TouchPad Driver Installs Synaptics touchpad driver. InstAll - ASUS ACPI Driver and Utility Installs ASUS ACPI driver before all the drivers. Realtek Audio Driver Installs the Realtek® audio driver. Intel Graphics Accelerator Driver Installs Intel® Graphics Accelerator driver. ASUS Eee PC 6-3 Install the necessary drivers to activate the devices. Drivers Installation Wizard Installs all the drivers if you are...
... update program. Synaptics TouchPad Driver Installs Synaptics touchpad driver. InstAll - ASUS ACPI Driver and Utility Installs ASUS ACPI driver before all the drivers. Realtek Audio Driver Installs the Realtek® audio driver. Intel Graphics Accelerator Driver Installs Intel® Graphics Accelerator driver. ASUS Eee PC 6-3 Install the necessary drivers to activate the devices. Drivers Installation Wizard Installs all the drivers if you are...

User Manual
Page 98
... Adobe® Acrobat® Reader that the Eee PC supports. This utility requires an Internet connection either through a network or an Internet Service Provider (ISP). ASUS Linux USB Flash Utility Makes a USB bootable disk with Linux system image for Utilities Installs all the utilities. Atheros Ethernet Utility Installs Atheros Ethernet utility. Utilities menu The Utilities menu shows...
... Adobe® Acrobat® Reader that the Eee PC supports. This utility requires an Internet connection either through a network or an Internet Service Provider (ISP). ASUS Linux USB Flash Utility Makes a USB bootable disk with Linux system image for Utilities Installs all the utilities. Atheros Ethernet Utility Installs Atheros Ethernet utility. Utilities menu The Utilities menu shows...


