
User Manual
Page 4
Table of Contents Task Manager 4-46 Favorites...4-47 Chapter 5: Installing & Optimizing Windows® XP Preparing to install Windows® XP 5-2 Installing Windows® XP 5-2 Optimizing Windows® XP 5-4 Changing Virtual Memory 5-4 Turning off System Restore 5-5 Compressing Disk Drive 5-6 Relocating Files 5-6 Deleting unnecessary Windows Components 5-8 Clearing System ...
Table of Contents Task Manager 4-46 Favorites...4-47 Chapter 5: Installing & Optimizing Windows® XP Preparing to install Windows® XP 5-2 Installing Windows® XP 5-2 Optimizing Windows® XP 5-4 Changing Virtual Memory 5-4 Turning off System Restore 5-5 Compressing Disk Drive 5-6 Relocating Files 5-6 Deleting unnecessary Windows Components 5-8 Clearing System ...

User Manual
Page 6
.... 3. Appendix Provides you information on how to use them. The following are reading the Eee PC User's Manual.This User's Manual provides information regarding the various components in the Eee PC and how to install and optimize Windows® XP on your Eee PC. 6. Installing & Optimizing Windows® XP Gives you QVL and gives safety statements. 1-2 Chapter 1: Introducing...
.... 3. Appendix Provides you information on how to use them. The following are reading the Eee PC User's Manual.This User's Manual provides information regarding the various components in the Eee PC and how to install and optimize Windows® XP on your Eee PC. 6. Installing & Optimizing Windows® XP Gives you QVL and gives safety statements. 1-2 Chapter 1: Introducing...

User Manual
Page 10
Read the following chapters for more details. 1-6 Chapter 1: Introducing the Eee PC Install the battery pack 2 1 2 2. Connect the AC power adapter 1 3 The wall outlet differs in type by country.Your Eee PC ships with an adapter compliant with your specific configuration. The illustration above is for using your Eee PC. Refer to page 3-2 for detailed inform1ation. 1. Preparing your Eee PC These are only quick instructions for reference only and may not exactly show your national standard.
Read the following chapters for more details. 1-6 Chapter 1: Introducing the Eee PC Install the battery pack 2 1 2 2. Connect the AC power adapter 1 3 The wall outlet differs in type by country.Your Eee PC ships with an adapter compliant with your specific configuration. The illustration above is for using your Eee PC. Refer to page 3-2 for detailed inform1ation. 1. Preparing your Eee PC These are only quick instructions for reference only and may not exactly show your national standard.

User Manual
Page 24
...1. Installing the prong-plug adapter Follow the instructions below to support different power cords as well as 220V-240V outlets without setting switches or using power converters. THE POWER ADAPTER MAY BECOME WARM TO HOT WHEN IN USE. Incline the prong slightly to the DC power required by the Eee PC. ...Power System Using AC Power The Eee PC power comprises two parts, the power adapter and the battery power system.The power adapter converts AC power from a wall ...
...1. Installing the prong-plug adapter Follow the instructions below to support different power cords as well as 220V-240V outlets without setting switches or using power converters. THE POWER ADAPTER MAY BECOME WARM TO HOT WHEN IN USE. Incline the prong slightly to the DC power required by the Eee PC. ...Power System Using AC Power The Eee PC power comprises two parts, the power adapter and the battery power system.The power adapter converts AC power from a wall ...

User Manual
Page 26
... battery pack: 1 To remove the battery pack: 2 2 1 1 3 2 Only use the following procedures to prolong battery life. Installing and Removing the Battery Pack Your Eee PC may result in fire, DO NOT short circuit the contacts, and DO NOT disassemble the battery. If no1t, use battery packs and power ... of a set of battery cells housed together. If there is any abnormal operation or damage to remove the battery pack while the Eee PC is depleted to install the battery pack. Never attempt to the battery pack caused by the manufacturer or retailer for use and whenever it is turned ON,...
... battery pack: 1 To remove the battery pack: 2 2 1 1 3 2 Only use the following procedures to prolong battery life. Installing and Removing the Battery Pack Your Eee PC may result in fire, DO NOT short circuit the contacts, and DO NOT disassemble the battery. If no1t, use battery packs and power ... of a set of battery cells housed together. If there is any abnormal operation or damage to remove the battery pack while the Eee PC is depleted to install the battery pack. Never attempt to the battery pack caused by the manufacturer or retailer for use and whenever it is turned ON,...

User Manual
Page 73
You can activate the task manager, put the system in the window. Refer to add a new printer. Instant Shutdown Click Instant Shutdown and select an action from the dialog box shown below. The installed printers display in standby, restart, or shut down the system. ASUS Eee PC 4-37 Printers To setup your printer, double-click Printers and press Add to the QVL in Appendix or visit our website for the latest qualified vendor for the printers.
You can activate the task manager, put the system in the window. Refer to add a new printer. Instant Shutdown Click Instant Shutdown and select an action from the dialog box shown below. The installed printers display in standby, restart, or shut down the system. ASUS Eee PC 4-37 Printers To setup your printer, double-click Printers and press Add to the QVL in Appendix or visit our website for the latest qualified vendor for the printers.
User Manual
Page 75
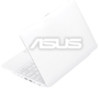
... button to renew your information or change your preferences. Add/Remove Software You can remove the software you have connected to install software. Click to switch the 2 category 3 4 Press the Update button to update the software Locate the software you want to switch the ...category and the screen will display the available software on the server. 3. You can download and install software from our server later when they are no longer needed. Click the tab on the top to install/update ASUS Eee PC 4-39 Locate the software you want to...
... button to renew your information or change your preferences. Add/Remove Software You can remove the software you have connected to install software. Click to switch the 2 category 3 4 Press the Update button to update the software Locate the software you want to switch the ...category and the screen will display the available software on the server. 3. You can download and install software from our server later when they are no longer needed. Click the tab on the top to install/update ASUS Eee PC 4-39 Locate the software you want to...
User Manual
Page 76
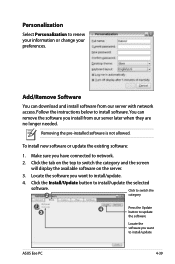
5. Your Eee PC starts the download and installs/updates the selected software from our server.. 7. Click Yes to restart the system for the installed/updated application to confirm the installation/update. 6. Click OK to work properly. 4-40 Chapter 4: Using the Eee PC
5. Your Eee PC starts the download and installs/updates the selected software from our server.. 7. Click Yes to restart the system for the installed/updated application to confirm the installation/update. 6. Click OK to work properly. 4-40 Chapter 4: Using the Eee PC
User Manual
Page 77
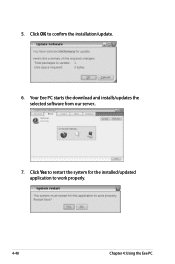
Click to Settings > Add/Remove Software. 3. Go to install the BIOS ASUS Eee PC 4-41 Ensure you are connected to update the BIOS. Locate the latest BIOS and click the Install button to a network. 2. Click the Settings tab on the top to display the available BIOS updates 5. BIOS update To update the BIOS: DO NOT shut down or reset the system or unplug the power cord while updating the BIOS! Click the Open button in BIOS Updates Click to switch the 3 category 4 Click to switch the category. 4. Doing so would cause the system boot failure! 1.
Click to Settings > Add/Remove Software. 3. Go to install the BIOS ASUS Eee PC 4-41 Ensure you are connected to update the BIOS. Locate the latest BIOS and click the Install button to a network. 2. Click the Settings tab on the top to display the available BIOS updates 5. BIOS update To update the BIOS: DO NOT shut down or reset the system or unplug the power cord while updating the BIOS! Click the Open button in BIOS Updates Click to switch the 3 category 4 Click to switch the category. 4. Doing so would cause the system boot failure! 1.
User Manual
Page 80
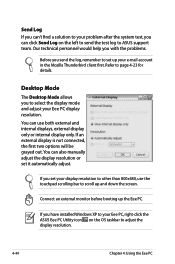
Send Log If you can't find a solution to your problem after the system test, you have installed Windows XP to your Eee PC, right-click the ASUS Eee PC Utility icon on the left to send the test log to ASUS support team. If you set it automatically adjust. You can also manually adjust the display resolution or...
Send Log If you can't find a solution to your problem after the system test, you have installed Windows XP to your Eee PC, right-click the ASUS Eee PC Utility icon on the left to send the test log to ASUS support team. If you set it automatically adjust. You can also manually adjust the display resolution or...

User Manual
Page 85
Preparing to Install Windows® XP Installing Windows® XP Optimizing Windows® XP 5 Installing & Optimizing Windows® XP
Preparing to Install Windows® XP Installing Windows® XP Optimizing Windows® XP 5 Installing & Optimizing Windows® XP

User Manual
Page 86
... 2: 1. Connect the power cord to your Eee PC. 3. Installing Windows® XP Follow the instructions below to save the configuration and reboot the system. 5-2 Chapter 5: Installing & Optimizing Windows® XP Go to [Start]. 5. Go to Advanced and set OS Installation to Advanced > Onboard Devices Configuration and enable all...Pack 2 disc to the USB DVD-ROM and connect the USB optical drive to your Eee PC, you use a USB flash disk smaller than 1GB) or external hard disk drive • ASUS Eee PC support DVD • The older version of Windows® OS does not support USB DVDROM...
... 2: 1. Connect the power cord to your Eee PC. 3. Installing Windows® XP Follow the instructions below to save the configuration and reboot the system. 5-2 Chapter 5: Installing & Optimizing Windows® XP Go to [Start]. 5. Go to Advanced and set OS Installation to Advanced > Onboard Devices Configuration and enable all...Pack 2 disc to the USB DVD-ROM and connect the USB optical drive to your Eee PC, you use a USB flash disk smaller than 1GB) or external hard disk drive • ASUS Eee PC support DVD • The older version of Windows® OS does not support USB DVDROM...

User Manual
Page 87
... appears. After the Windows® XP OS installation is completed. Go to Advanced and set OS Installation back to the USB DVD/CD-ROM and click InstAll - After entering Windows, insert the Support DVD to [Finish]. 11. ASUS Eee PC 5-3 6. Press on -screen instructions to your... data after deleting all drivers. Delete any existing partitions. Ensure to back up your important data before installing Windows® XP to complete the installation process. 10. Please select boot device:...
... appears. After the Windows® XP OS installation is completed. Go to Advanced and set OS Installation back to the USB DVD/CD-ROM and click InstAll - After entering Windows, insert the Support DVD to [Finish]. 11. ASUS Eee PC 5-3 6. Press on -screen instructions to your... data after deleting all drivers. Delete any existing partitions. Ensure to back up your important data before installing Windows® XP to complete the installation process. 10. Please select boot device:...

User Manual
Page 88
Go to 200MB. Click the Advanced tab on your needs. 1. Changing Virtual Memory ASUS Eee PC supprt DVD will by default set the virtual memory to Control Panel > System. 2. Click Advanced tab and the Change button to make your Eee PC run faster. Optimizing Windows® XP For the best performance of your Eee PC with Windows XP operating system, follow some quick steps below to change the virtual memory. 5-4 Chapter 5: Installing & Optimizing Windows® XP Change the virtual memory based on the top and click the Settings button in Performance area. 3.
Go to 200MB. Click the Advanced tab on your needs. 1. Changing Virtual Memory ASUS Eee PC supprt DVD will by default set the virtual memory to Control Panel > System. 2. Click Advanced tab and the Change button to make your Eee PC run faster. Optimizing Windows® XP For the best performance of your Eee PC with Windows XP operating system, follow some quick steps below to change the virtual memory. 5-4 Chapter 5: Installing & Optimizing Windows® XP Change the virtual memory based on the top and click the Settings button in Performance area. 3.
User Manual
Page 90
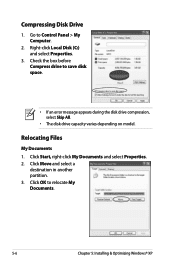
Relocating Files My Documents 1. Click Move and select a destination in another partition. 3. Compressing Disk Drive 1. Check the box before Compress drive to relocate My Documents. 5-6 Chapter 5: Installing & Optimizing Windows® XP Click Start, right-click My Documents and select Properties. 2. Click OK to save disk space. • If an error message appears during the disk drive compression, select Skip All. • The disk drive capacity varies depending on model. Go to Control Panel > My Computer. 2. Right-click Local Disk (C:) and select Properties. 3.
Relocating Files My Documents 1. Click Move and select a destination in another partition. 3. Compressing Disk Drive 1. Check the box before Compress drive to relocate My Documents. 5-6 Chapter 5: Installing & Optimizing Windows® XP Click Start, right-click My Documents and select Properties. 2. Click OK to save disk space. • If an error message appears during the disk drive compression, select Skip All. • The disk drive capacity varies depending on model. Go to Control Panel > My Computer. 2. Right-click Local Disk (C:) and select Properties. 3.

User Manual
Page 92
Go to clear the system backup data. 5-8 Chapter 5: Installing & Optimizing Windows® XP Key in sfc.exe/purgecache. 3. Press to Control Panel > Add or Remove Programs. 2. Uncheck the boxes for the Windows components you do not need. Clearing System Backup Data 1. Go to display the component wizard. 3. Click Add/Remove Windows Components on the left to All Programs > Accessories > Command Prompt. 2. Deleting unnecessary Windows Components 1.
Go to clear the system backup data. 5-8 Chapter 5: Installing & Optimizing Windows® XP Key in sfc.exe/purgecache. 3. Press to Control Panel > Add or Remove Programs. 2. Uncheck the boxes for the Windows components you do not need. Clearing System Backup Data 1. Go to display the component wizard. 3. Click Add/Remove Windows Components on the left to All Programs > Accessories > Command Prompt. 2. Deleting unnecessary Windows Components 1.
User Manual
Page 94
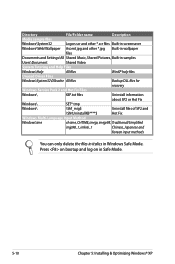
..., imejp, imejp98, Traditional/Simplified imjp98_1, imkr6_1 Chinese, Japanese and Korean input methods You can only delete the files in italics in Safe Mode. 5-10 Chapter 5: Installing & Optimizing Windows® XP Press on bootup and log on in Windows Safe Mode.
..., imejp, imejp98, Traditional/Simplified imjp98_1, imkr6_1 Chinese, Japanese and Korean input methods You can only delete the files in italics in Safe Mode. 5-10 Chapter 5: Installing & Optimizing Windows® XP Press on bootup and log on in Windows Safe Mode.

User Manual
Page 96
...the Drivers menu if Autorun is NOT enabled in the Windows® XP SP2 environment. Click an icon to display support DVD/ Eee PC information Click an item to install If Autorun is enabled in your computer, browse the contents of the support DVD to locate the file ASSETUP.EXE from the ...BIN folder. All the following screens appear only in your computer. Support DVD information The support DVD that comes with the Eee PC package contains the drivers, software applications, and utilities that you can install to run the DVD. 6-2 Chapter 6: Support DVD & System Recovery
...the Drivers menu if Autorun is NOT enabled in the Windows® XP SP2 environment. Click an icon to display support DVD/ Eee PC information Click an item to install If Autorun is enabled in your computer, browse the contents of the support DVD to locate the file ASSETUP.EXE from the ...BIN folder. All the following screens appear only in your computer. Support DVD information The support DVD that comes with the Eee PC package contains the drivers, software applications, and utilities that you can install to run the DVD. 6-2 Chapter 6: Support DVD & System Recovery
User Manual
Page 97
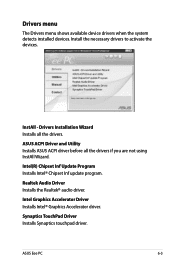
... shows available device drivers when the system detects installed devices. InstAll - ASUS Eee PC 6-3 Intel(R) Chipset Inf Update Program Installs Intel® Chipset Inf update program. Synaptics TouchPad Driver Installs Synaptics touchpad driver. Install the necessary drivers to activate the devices. Realtek Audio Driver Installs the Realtek® audio driver. Drivers Installation Wizard Installs all the drivers if you are not...
... shows available device drivers when the system detects installed devices. InstAll - ASUS Eee PC 6-3 Intel(R) Chipset Inf Update Program Installs Intel® Chipset Inf update program. Synaptics TouchPad Driver Installs Synaptics touchpad driver. Install the necessary drivers to activate the devices. Realtek Audio Driver Installs the Realtek® audio driver. Drivers Installation Wizard Installs all the drivers if you are not...

User Manual
Page 98
... Provider (ISP). Atheros Ethernet Utility Installs Atheros Ethernet utility. ASUS Update The ASUS Update utility allows you to update the Eee PC BIOS in Portable Document Format (PDF). Utilities menu The Utilities menu shows the applications that allows you to open, view, and print documents in the Windows® environment. ASUS Linux USB Flash Utility Makes a USB...
... Provider (ISP). Atheros Ethernet Utility Installs Atheros Ethernet utility. ASUS Update The ASUS Update utility allows you to update the Eee PC BIOS in Portable Document Format (PDF). Utilities menu The Utilities menu shows the applications that allows you to open, view, and print documents in the Windows® environment. ASUS Linux USB Flash Utility Makes a USB...


