
User Manual
Page 4
... Contents Notes for safe operation. Vital information that must be differences between your Eee PC as follows: WARNING! The actual bundled applications differ by models and territories. Getting Started Provides information on using the Eee PC's utilities. 4. Important information that must be followed for This Manual A few notes and warnings are used throughout this guide, allowing you information on the Eee PC's components. 2. iv Table...
... Contents Notes for safe operation. Vital information that must be differences between your Eee PC as follows: WARNING! The actual bundled applications differ by models and territories. Getting Started Provides information on using the Eee PC's utilities. 4. Important information that must be followed for This Manual A few notes and warnings are used throughout this guide, allowing you information on the Eee PC's components. 2. iv Table...

User Manual
Page 11
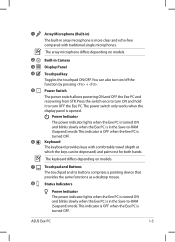
Power Indicator The power indicator lights when the Eee PC is turned ON and blinks slowly when the Eee PC is in Camera 3 Display Panel 4 Touchpad key Toggles the touchpad ON/OFF. ASUS Eee PC 1-3 The power switch only works when the display panel is turned OFF. 1 Microphone (Built-in) 2 Built-in the Save-to-RAM (Suspend) mode. The keyboard differs depending on /off the function by pressing + . 5 Power Switch The power switch allows powering ON and OFF the Eee PC and recovering from STR. You can be depressed) and...
Power Indicator The power indicator lights when the Eee PC is turned ON and blinks slowly when the Eee PC is in Camera 3 Display Panel 4 Touchpad key Toggles the touchpad ON/OFF. ASUS Eee PC 1-3 The power switch only works when the display panel is turned OFF. 1 Microphone (Built-in) 2 Built-in the Save-to-RAM (Suspend) mode. The keyboard differs depending on /off the function by pressing + . 5 Power Switch The power switch allows powering ON and OFF the Eee PC and recovering from STR. You can be depressed) and...
User Manual
Page 17
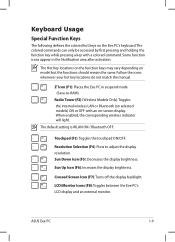
... the touchpad ON/OFF. Sun Down Icon (F5): Decreases the display brightness. The Hot Key locations on the function keys may vary depending on -screen-display. Radio Tower (F2) (Wireless Models Only):Toggles the internal wireless LAN or Bluetooth (on selected models) ON or OFF with a colored command. Sun Up Icon (F6): Increases the display brightness. Keyboard Usage Special Function Keys The following defines the colored hot keys on the Eee PC's keyboard. When enabled, the corresponding wireless indicator will light.
... the touchpad ON/OFF. Sun Down Icon (F5): Decreases the display brightness. The Hot Key locations on the function keys may vary depending on -screen-display. Radio Tower (F2) (Wireless Models Only):Toggles the internal wireless LAN or Bluetooth (on selected models) ON or OFF with a colored command. Sun Up Icon (F6): Increases the display brightness. Keyboard Usage Special Function Keys The following defines the colored hot keys on the Eee PC's keyboard. When enabled, the corresponding wireless indicator will light.
User Manual
Page 22
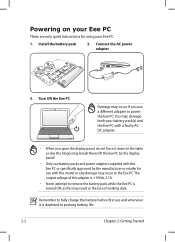
... display panel! • Only use battery packs and power adapters supplied with this Eee PC or specifically approved by the manufacturer or retailer for using your Eee PC. 1. Turn ON the Eee PC Damage may occur if you open the display panel, do not force it is turned ON, as this may result in the loss of this adapter is +19Vdc, 2.1A. • Never attempt to remove the battery pack while the Eee PC...
... display panel! • Only use battery packs and power adapters supplied with this Eee PC or specifically approved by the manufacturer or retailer for using your Eee PC. 1. Turn ON the Eee PC Damage may occur if you open the display panel, do not force it is turned ON, as this may result in the loss of this adapter is +19Vdc, 2.1A. • Never attempt to remove the battery pack while the Eee PC...
User Manual
Page 43
.... Click an icon to display the ASUS contact information. System information DVD content Technical support File list ASUS Eee PC 4-3 Drivers menu The Drivers menu shows available device drivers when the system detects installed devices. Utilities menu The Utilities menu shows the applications that the Eee PC supports. Install the necessary drivers to activate the devices. Other information The icons on the top right corner of the screen provide additional information on the Eee PC and the contents of the...
.... Click an icon to display the ASUS contact information. System information DVD content Technical support File list ASUS Eee PC 4-3 Drivers menu The Drivers menu shows available device drivers when the system detects installed devices. Utilities menu The Utilities menu shows the applications that the Eee PC supports. Install the necessary drivers to activate the devices. Other information The icons on the top right corner of the screen provide additional information on the Eee PC and the contents of the...
User Manual
Page 44
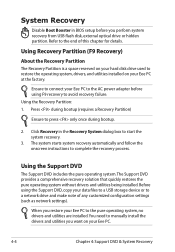
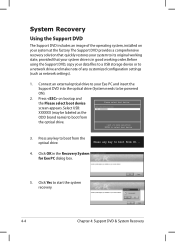
... settings). Using the Recovery Partition: 1. Using the Support DVD The Support DVD includes the pure operating system.The Support DVD provides a comprehensive recovery solution that quickly restores the pure operating system without drivers and utilities being installed. You need to manually install the drivers and utilities you perform system recovery from USB flash disk, external optical drive or hidden partition. Using Recovery Partition (F9 Recovery) About the Recovery Partition The Recovery Partition is a space reserved on your Eee PC at the factory. Click Recovery in BIOS setup...
... settings). Using the Recovery Partition: 1. Using the Support DVD The Support DVD includes the pure operating system.The Support DVD provides a comprehensive recovery solution that quickly restores the pure operating system without drivers and utilities being installed. You need to manually install the drivers and utilities you perform system recovery from USB flash disk, external optical drive or hidden partition. Using Recovery Partition (F9 Recovery) About the Recovery Partition The Recovery Partition is a space reserved on your Eee PC at the factory. Click Recovery in BIOS setup...
User Manual
Page 45
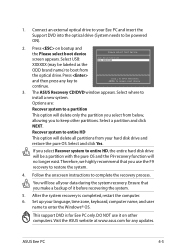
... ASUS Recovery CD/DVD window appears. Select a partition and click NEXT. If you make a backup of it on bootup and the Please select boot device screen appears. Select USB: XXXXXX (may be labeled as the Please select boot device: HDD:PM-ST9160310AS USB:XXXXXXXX ODD brand name) to entire HD, the entire hard disk drive will delete all your hard disk drive and restore the pure OS. ASUS Eee PC 4-5 Ensure that you to select boot device...
... ASUS Recovery CD/DVD window appears. Select a partition and click NEXT. If you make a backup of it on bootup and the Please select boot device screen appears. Select USB: XXXXXX (may be labeled as the Please select boot device: HDD:PM-ST9160310AS USB:XXXXXXXX ODD brand name) to entire HD, the entire hard disk drive will delete all your hard disk drive and restore the pure OS. ASUS Eee PC 4-5 Ensure that you to select boot device...
User Manual
Page 46
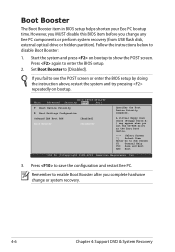
Press again to [Disabled]. Set Boot Booster to enter the BIOS setup. 2. A virtual floppy disk drive (Floppy Drive B: ) may appear when you set the CD-ROM drive as the first boot device. ←→ Select Screen ↑↓ Select Item Enter Go to enable Boot Booster after you complete hardware change any Eee PC components or perform system recovery (from USB flash disk, external optical drive or hidden partition). Remember to Sub Screen F1 General Help F10 Save and Exit ESC...
Press again to [Disabled]. Set Boot Booster to enter the BIOS setup. 2. A virtual floppy disk drive (Floppy Drive B: ) may appear when you set the CD-ROM drive as the first boot device. ←→ Select Screen ↑↓ Select Item Enter Go to enable Boot Booster after you complete hardware change any Eee PC components or perform system recovery (from USB flash disk, external optical drive or hidden partition). Remember to Sub Screen F1 General Help F10 Save and Exit ESC...
User Manual
Page 4
... used throughout this guide, allowing you to complete certain tasks safely and effectively.These notes have different degrees of Contents IMPORTANT! Appendix Gives you information on the Eee PC's components. 2. TIP: Tips for special situations. Getting Started Provides information on using the Eee PC's utilities. 4. Support DVD and System Recovery Gives you safety statements. Please accept your Eee PC and the pictures shown in the Eee PC...
... used throughout this guide, allowing you to complete certain tasks safely and effectively.These notes have different degrees of Contents IMPORTANT! Appendix Gives you information on the Eee PC's components. 2. TIP: Tips for special situations. Getting Started Provides information on using the Eee PC's utilities. 4. Support DVD and System Recovery Gives you safety statements. Please accept your Eee PC and the pictures shown in the Eee PC...
User Manual
Page 11
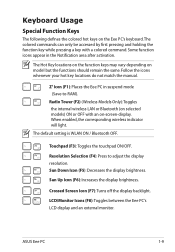
... models. 2 Built-in Camera 3 Display Panel 4 Touchpad key Toggles the touchpad ON/OFF. The array microphone differs depending on /off the function by pressing + . 5 Power Switch The power switch allows powering ON and OFF the Eee PC and recovering from STR. ASUS Eee PC 1-3 Power Indicator The power indicator lights when the Eee PC is turned ON and blinks slowly when the Eee PC is turned OFF. 6 Keyboard The keyboard provides keys with traditional single microphones. Press the switch once to turn ON and hold it to -RAM (Suspend) mode...
... models. 2 Built-in Camera 3 Display Panel 4 Touchpad key Toggles the touchpad ON/OFF. The array microphone differs depending on /off the function by pressing + . 5 Power Switch The power switch allows powering ON and OFF the Eee PC and recovering from STR. ASUS Eee PC 1-3 Power Indicator The power indicator lights when the Eee PC is turned ON and blinks slowly when the Eee PC is turned OFF. 6 Keyboard The keyboard provides keys with traditional single microphones. Press the switch once to turn ON and hold it to -RAM (Suspend) mode...
User Manual
Page 17
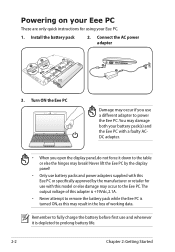
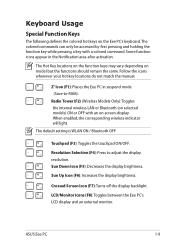
...internal wireless LAN or Bluetooth (on -screen-display. When enabled, the corresponding wireless indicator will light. ASUS Eee PC 1-9 The default setting is WLAN ON / Bluetooth OFF. LCD/Monitor Icons (F8): Toggles between the Eee PC's LCD display and an external monitor. Keyboard Usage Special Function Keys The following defines the colored hot keys on model but the functions should remain the same. Some function icons appear in suspend mode (Save-to adjust the display resolution. Sun Down Icon (F5): Decreases the display brightness. Crossed Screen Icon (F7): Turns...
...internal wireless LAN or Bluetooth (on -screen-display. When enabled, the corresponding wireless indicator will light. ASUS Eee PC 1-9 The default setting is WLAN ON / Bluetooth OFF. LCD/Monitor Icons (F8): Toggles between the Eee PC's LCD display and an external monitor. Keyboard Usage Special Function Keys The following defines the colored hot keys on model but the functions should remain the same. Some function icons appear in suspend mode (Save-to adjust the display resolution. Sun Down Icon (F5): Decreases the display brightness. Crossed Screen Icon (F7): Turns...
User Manual
Page 22
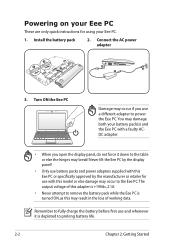
... Eee PC or specifically approved by the display panel! • Only use battery packs and power adapters supplied with this may occur to the Eee PC. The output voltage of this adapter is +19Vdc, 2.1A. • Never attempt to remove the battery pack while the Eee PC is depleted to prolong battery life. 2-2 Chapter 2: Getting Started Powering on your Eee PC These are only quick instructions for use a different adapter to power the Eee PC. Remember to fully charge...
... Eee PC or specifically approved by the display panel! • Only use battery packs and power adapters supplied with this may occur to the Eee PC. The output voltage of this adapter is +19Vdc, 2.1A. • Never attempt to remove the battery pack while the Eee PC is depleted to prolong battery life. 2-2 Chapter 2: Getting Started Powering on your Eee PC These are only quick instructions for use a different adapter to power the Eee PC. Remember to fully charge...
User Manual
Page 46
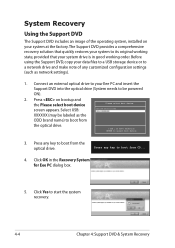
... working order. System Recovery Using the Support DVD The Support DVD includes an image of any customized configuration settings (such as the Please select boot device: HDD:PM-ST9160310AS USB:XXXXXXXX ODD brand name) to boot from the optical drive. ↑ and ↓ to move selection ENTER to boot from CD... 4. Before using the Support DVD, copy your Eee PC and insert the Support DVD into the optical drive (System needs to be labeled as network settings). 1. Press any key...
... working order. System Recovery Using the Support DVD The Support DVD includes an image of any customized configuration settings (such as the Please select boot device: HDD:PM-ST9160310AS USB:XXXXXXXX ODD brand name) to boot from the optical drive. ↑ and ↓ to move selection ENTER to boot from CD... 4. Before using the Support DVD, copy your Eee PC and insert the Support DVD into the optical drive (System needs to be labeled as network settings). 1. Press any key...
User Manual
Page 47
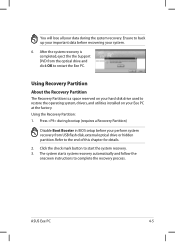
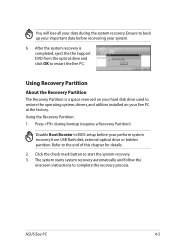
.... 6. ASUS Eee PC 4-5 Using the Recovery Partition: 1. After the system recovery is a space reserved on your data during bootup (requires a Recovery Partition) Disable Boot Booster in BIOS setup before recovering your perform system recovery from the optical drive and click OK to restart the Eee PC. Refer to start the system recovery. 3. The system starts system recovery automatically and follow the onscreen instructions to restore the operating system, drivers, and utilities installed on your hard disk drive used to complete the recovery process...
.... 6. ASUS Eee PC 4-5 Using the Recovery Partition: 1. After the system recovery is a space reserved on your data during bootup (requires a Recovery Partition) Disable Boot Booster in BIOS setup before recovering your perform system recovery from the optical drive and click OK to restart the Eee PC. Refer to start the system recovery. 3. The system starts system recovery automatically and follow the onscreen instructions to restore the operating system, drivers, and utilities installed on your hard disk drive used to complete the recovery process...
User Manual
Page 48
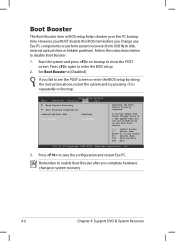
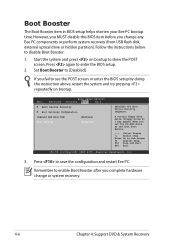
... Item Enter Go to enable Boot Booster after you complete hardware change any Eee PC components or perform system recovery (from USB flash disk, external optical drive or hidden partition). Remember to Sub Screen F1 General Help F10 Save and Exit ESC Exit v02.58 (C)Copyright 1985-2005, American Megatrends, Inc. 3. Set Boot Booster to [Disabled] If you change or system recovery. 4-6 Chapter 4: Support DVD & System Recovery Boot Booster The Boot Booster item in BIOS setup helps...
... Item Enter Go to enable Boot Booster after you complete hardware change any Eee PC components or perform system recovery (from USB flash disk, external optical drive or hidden partition). Remember to Sub Screen F1 General Help F10 Save and Exit ESC Exit v02.58 (C)Copyright 1985-2005, American Megatrends, Inc. 3. Set Boot Booster to [Disabled] If you change or system recovery. 4-6 Chapter 4: Support DVD & System Recovery Boot Booster The Boot Booster item in BIOS setup helps...
User Manual
Page 17
...-to adjust the display resolution. Zz Icon (F1): Places the Eee PC in the Notification area after activation. LCD/Monitor Icons (F8): Toggles between the Eee PC's LCD display and an external monitor. ASUS Eee PC 1-9 When enabled, the corresponding wireless indicator will light. The default setting is WLAN ON / Bluetooth OFF. Sun Up Icon (F6): Increases the display brightness. Keyboard Usage Special Function Keys The following defines the colored hot keys on model but the functions should remain the same. The Hot Key locations...
...-to adjust the display resolution. Zz Icon (F1): Places the Eee PC in the Notification area after activation. LCD/Monitor Icons (F8): Toggles between the Eee PC's LCD display and an external monitor. ASUS Eee PC 1-9 When enabled, the corresponding wireless indicator will light. The default setting is WLAN ON / Bluetooth OFF. Sun Up Icon (F6): Increases the display brightness. Keyboard Usage Special Function Keys The following defines the colored hot keys on model but the functions should remain the same. The Hot Key locations...
User Manual
Page 22
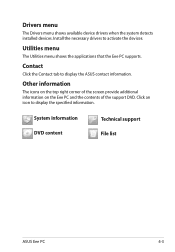
... to remove the battery pack while the Eee PC is depleted to prolong battery life. 2-2 Chapter 2: Getting Started Connect the AC power adapter 3 1 2 2 1 3 110V-220V 3. Powering on your Eee PC These are only quick instructions for use a different adapter to power the Eee PC. Turn ON the Eee PC Damage may result in the loss of working data. Install the battery pack 2. Never lift the Eee PC by the display panel! • Only use battery packs and power adapters supplied with this Eee PC or specifically...
... to remove the battery pack while the Eee PC is depleted to prolong battery life. 2-2 Chapter 2: Getting Started Connect the AC power adapter 3 1 2 2 1 3 110V-220V 3. Powering on your Eee PC These are only quick instructions for use a different adapter to power the Eee PC. Turn ON the Eee PC Damage may result in the loss of working data. Install the battery pack 2. Never lift the Eee PC by the display panel! • Only use battery packs and power adapters supplied with this Eee PC or specifically...
User Manual
Page 46
... recovery solution that quickly restores your system to its original working order. Press any customized configuration settings (such as the Please select boot device: HDD:PM-ST9160310AS USB:XXXXXXXX ODD brand name) to start the system recovery. 4-4 Chapter 4: Support DVD & System Recovery Before using the Support DVD, copy your data files to a USB storage device or to a network drive and make note of the operating system, installed on bootup and the Please select boot device screen appears. Connect an external optical drive...
... recovery solution that quickly restores your system to its original working order. Press any customized configuration settings (such as the Please select boot device: HDD:PM-ST9160310AS USB:XXXXXXXX ODD brand name) to start the system recovery. 4-4 Chapter 4: Support DVD & System Recovery Before using the Support DVD, copy your data files to a USB storage device or to a network drive and make note of the operating system, installed on bootup and the Please select boot device screen appears. Connect an external optical drive...
User Manual
Page 47
... instructions to start the system recovery. 3. Click the check mark button to complete the recovery process. ASUS Eee PC 4-5 Using Recovery Partition About the Recovery Partition The Recovery Partition is completed, eject the the Support DVD from the optical drive and click OK to back up your important data before your perform system recovery from USB flash disk, external optical drive or hidden partition. Press during the system recovery. Refer to restore the operating system, drivers, and utilities installed on your hard disk drive used...
... instructions to start the system recovery. 3. Click the check mark button to complete the recovery process. ASUS Eee PC 4-5 Using Recovery Partition About the Recovery Partition The Recovery Partition is completed, eject the the Support DVD from the optical drive and click OK to back up your important data before your perform system recovery from USB flash disk, external optical drive or hidden partition. Press during the system recovery. Refer to restore the operating system, drivers, and utilities installed on your hard disk drive used...
User Manual
Page 48
... POST screen or enter the BIOS setup by doing the instruction above, restart the system and try pressing repeatedly on bootup to save the configuration and restart Eee PC. Follow the instructions below to enter the BIOS setup. 2. Start the system and press on bootup. A virtual floppy disk drive (Floppy Drive B: ) may appear when you complete hardware change any Eee PC components or perform system recovery (from USB flash disk, external optical drive or hidden partition). Press...
... POST screen or enter the BIOS setup by doing the instruction above, restart the system and try pressing repeatedly on bootup to save the configuration and restart Eee PC. Follow the instructions below to enter the BIOS setup. 2. Start the system and press on bootup. A virtual floppy disk drive (Floppy Drive B: ) may appear when you complete hardware change any Eee PC components or perform system recovery (from USB flash disk, external optical drive or hidden partition). Press...


