Users Manual English
Page 3
Contents Safety information iv About this guide iv Package contents vi EX-H110M-V specifications summary vi Chapter 1: Product introduction Motherboard overview 1-1 Central Processing Unit (CPU 1-6 System memory 1-7 Chapter 2: BIOS information BIOS setup program 2-1 I-Cafe ...2-2 Main menu 2-3 Advanced menu 2-4 Monitor menu 2-5 Boot menu 2-6 Exit menu...2-8 Appendices Notices...A-1 ASUS contact information A-5 iii
Contents Safety information iv About this guide iv Package contents vi EX-H110M-V specifications summary vi Chapter 1: Product introduction Motherboard overview 1-1 Central Processing Unit (CPU 1-6 System memory 1-7 Chapter 2: BIOS information BIOS setup program 2-1 I-Cafe ...2-2 Main menu 2-3 Advanced menu 2-4 Monitor menu 2-5 Boot menu 2-6 Exit menu...2-8 Appendices Notices...A-1 ASUS contact information A-5 iii
Users Manual English
Page 4
...where it may be exposed to moisture. • Place the product on the motherboard. • Chapter 2: BIOS information This chapter discusses changing system settings through the BIOS Setup menus. Contact a qualified service technician or your power supply is organized This guide contains the following parts:...8226; If you add a device. • Before connecting or removing signal cables from the motherboard, ensure that the power cables for the BIOS parameters are also provided. If you are using, contact your dealer immediately. • To avoid short circuits, keep paper clips, screws,...
...where it may be exposed to moisture. • Place the product on the motherboard. • Chapter 2: BIOS information This chapter discusses changing system settings through the BIOS Setup menus. Contact a qualified service technician or your power supply is organized This guide contains the following parts:...8226; If you add a device. • Before connecting or removing signal cables from the motherboard, ensure that the power cables for the BIOS parameters are also provided. If you are using, contact your dealer immediately. • To avoid short circuits, keep paper clips, screws,...
Users Manual English
Page 8
EX-H110M-V specifications summary Internal connectors BIOS features Manageability Support DVD OS support Form factor 1 x USB 2.0/1.1 connectors support additional 2 USB 2.0/1.1 ports 1 x USB 3.0 connector support additional 2 USB 3.0 ports 4 x SATA 6.... x COM header 1 x LPT connector 1 x S/PDIF Out header 1 x System panel connector 64 Mb Flash ROM, UEFI AMI BIOS, PnP, DMI3.0, WfM2.0, SM BIOS 3.0, ACPI 5.0, Multi-language BIOS, F12 PrintScreen WfM 2.0, DMI 3.0, WOL by PME Drivers ASUS utilities Windows® 10 (64-bit only) Windows® 8.1 Windows® 7 uATX Form Factor, 8.9" x 7.1" in (22...
EX-H110M-V specifications summary Internal connectors BIOS features Manageability Support DVD OS support Form factor 1 x USB 2.0/1.1 connectors support additional 2 USB 2.0/1.1 ports 1 x USB 3.0 connector support additional 2 USB 3.0 ports 4 x SATA 6.... x COM header 1 x LPT connector 1 x S/PDIF Out header 1 x System panel connector 64 Mb Flash ROM, UEFI AMI BIOS, PnP, DMI3.0, WfM2.0, SM BIOS 3.0, ACPI 5.0, Multi-language BIOS, F12 PrintScreen WfM 2.0, DMI 3.0, WOL by PME Drivers ASUS utilities Windows® 10 (64-bit only) Windows® 8.1 Windows® 7 uATX Form Factor, 8.9" x 7.1" in (22...
Users Manual English
Page 9
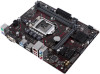
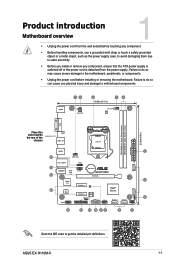
...RTD 2168 USB3_34 LGA1151 USB56 2 17 CHA_FAN LAN_USB78 TPM SATA6G_1 16 AUDIO COM 15 RTL 8111H BATTERY EX-H110M-V PCIEX16 Super 5 I/O PCIEX1_1 SPEAKER SATA6G_2 14 ALC 887 CLRTC PCIEX1_2 64Mb BIOS Intel® H110 SPDIF_OUT 6 LPT USB3_12 USB910 SATA6G_4 SATA6G_3 AAFP F_PANEL 13 12 11 10 9...ATX power supply is switched off or the power cord is detached from the wall socket before installing or removing the motherboard. ASUS EX-H110M-V 1-1 Product introduction Motherboard overview 1 • Unplug the power cord from the power supply. Failure to do so can ...
...RTD 2168 USB3_34 LGA1151 USB56 2 17 CHA_FAN LAN_USB78 TPM SATA6G_1 16 AUDIO COM 15 RTL 8111H BATTERY EX-H110M-V PCIEX16 Super 5 I/O PCIEX1_1 SPEAKER SATA6G_2 14 ALC 887 CLRTC PCIEX1_2 64Mb BIOS Intel® H110 SPDIF_OUT 6 LPT USB3_12 USB910 SATA6G_4 SATA6G_3 AAFP F_PANEL 13 12 11 10 9...ATX power supply is switched off or the power cord is detached from the wall socket before installing or removing the motherboard. ASUS EX-H110M-V 1-1 Product introduction Motherboard overview 1 • Unplug the power cord from the power supply. Failure to do so can ...
Users Manual English
Page 10
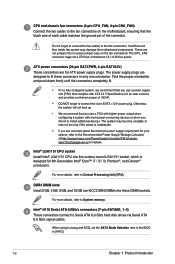
... unstable or may damage the motherboard components. Intel® LGA1151 CPU socket Install Intel® LGA1151 CPU into these connectors in the BIOS to [AHCI]. 1-2 Chapter 1: Product introduction Do not place jumper caps on the motherboard, ensuring that complies with more power-consuming ...+12V power plug. The power supply plugs are for your system, refer to the Recommended Power Supply Wattage Calculator at http://support.asus.com/PowerSupplyCalculator/PSCalculator. For more details, refer to Central Processing Unit (CPU). When using hot-plug and NCQ, set the SATA ...
... unstable or may damage the motherboard components. Intel® LGA1151 CPU socket Install Intel® LGA1151 CPU into these connectors in the BIOS to [AHCI]. 1-2 Chapter 1: Product introduction Do not place jumper caps on the motherboard, ensuring that complies with more power-consuming ...+12V power plug. The power supply plugs are for your system, refer to the Recommended Power Supply Wattage Calculator at http://support.asus.com/PowerSupplyCalculator/PSCalculator. For more details, refer to Central Processing Unit (CPU). When using hot-plug and NCQ, set the SATA ...
Users Manual English
Page 11
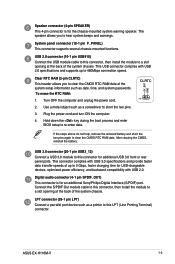
...Turn OFF the computer and unplug the power cord. 2. After clearing the CMOS, reinstall the battery. Plug the power cord and turn ON the computer. 4. ASUS EX-H110M-V 1-3 Clear RTC RAM (2-pin CLRTC) This header allows you to a slot opening at the back of the system chassis. Connect the S/PDIF Out module ...(4-pin SPEAKER) This 4-pin connector is for additional USB 3.0 front or rear panel ports. Hold down the key during the boot process and enter BIOS setup to re-enter data. +3V_BAT GND CLRTC PIN 1 If the steps above do not help, remove the onboard battery and short the two ...
...Turn OFF the computer and unplug the power cord. 2. After clearing the CMOS, reinstall the battery. Plug the power cord and turn ON the computer. 4. ASUS EX-H110M-V 1-3 Clear RTC RAM (2-pin CLRTC) This header allows you to a slot opening at the back of the system chassis. Connect the S/PDIF Out module ...(4-pin SPEAKER) This 4-pin connector is for additional USB 3.0 front or rear panel ports. Hold down the key during the boot process and enter BIOS setup to re-enter data. +3V_BAT GND CLRTC PIN 1 If the steps above do not help, remove the onboard battery and short the two ...
Users Manual English
Page 12
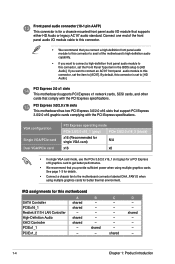
... Realtek 8111H LAN Controller High-Definition Audio XHCI Controller PCIEx1_1 PCIEx1_2 A shared shared - By default, this connector, set the Front Panel Type item in the BIOS setup to [HD Audio]. PCI Express 3.0/2.0 x16 slots This motherboard has two PCI Express 3.0/2.0 x16 slots that you provide sufficient power when using multiple graphics...
... Realtek 8111H LAN Controller High-Definition Audio XHCI Controller PCIEx1_1 PCIEx1_2 A shared shared - By default, this connector, set the Front Panel Type item in the BIOS setup to [HD Audio]. PCI Express 3.0/2.0 x16 slots This motherboard has two PCI Express 3.0/2.0 x16 slots that you provide sufficient power when using multiple graphics...
Users Manual English
Page 17
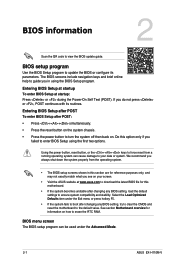
...first two options. Entering BIOS Setup after POST To enter BIOS Setup after changing any BIOS setting, load the default settings to view the BIOS update guide. Select the Load Optimized Defaults item under the Advanced Mode. 2-1 ASUS EX-H110M-V BIOS setup program Use the BIOS Setup program to guide... you in this section are for reference purposes only, and may not exactly match what you do not press or , POST continues with its parameters. The BIOS screens include navigation keys...
...first two options. Entering BIOS Setup after POST To enter BIOS Setup after changing any BIOS setting, load the default settings to view the BIOS update guide. Select the Load Optimized Defaults item under the Advanced Mode. 2-1 ASUS EX-H110M-V BIOS setup program Use the BIOS Setup program to guide... you in this section are for reference purposes only, and may not exactly match what you do not press or , POST continues with its parameters. The BIOS screens include navigation keys...
Users Manual English
Page 19
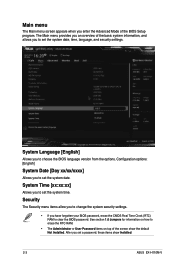
...Security menu items allow you to choose the BIOS language version from the options. System Time [xx:xx:xx] Allows you to change the system security settings. • If you enter the Advanced Mode of the screen show Installed. 2-3 ASUS EX-H110M-V System Language [English] Allows you to... erase the RTC RAM. • The Administrator or User Password items on top of the BIOS Setup program. See section 1.6 Jumpers for information on how to set the ...
...Security menu items allow you to choose the BIOS language version from the options. System Time [xx:xx:xx] Allows you to change the system security settings. • If you enter the Advanced Mode of the screen show Installed. 2-3 ASUS EX-H110M-V System Language [English] Allows you to... erase the RTC RAM. • The Administrator or User Password items on top of the BIOS Setup program. See section 1.6 Jumpers for information on how to set the ...

Users Manual English
Page 20
... in this menu allows you to the corresponding SATA port. The SATA Port items show the CPU-related information that the BIOS automatically detects. PCH Storage Configuration While entering Setup, the BIOS automatically detects the presence of the Advanced menu items. Incorrect field values can cause the system to change the settings...
... in this menu allows you to the corresponding SATA port. The SATA Port items show the CPU-related information that the BIOS automatically detects. PCH Storage Configuration While entering Setup, the BIOS automatically detects the presence of the Advanced menu items. Incorrect field values can cause the system to change the settings...
Users Manual English
Page 24
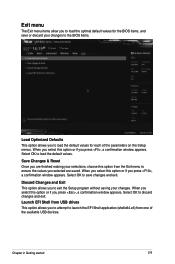
... default values for each of the available USB devices. Exit menu The Exit menu items allow you to load the optimal default values for the BIOS items, and save changes and exit. When you select this option or if you press , a confirmation window appears. Save Changes & Reset Once you are... finished making your changes to the BIOS items. Load Optimized Defaults This option allows you to launch the EFI Shell application (shellx64.efi) from the Exit menu to ensure the values you...
... default values for each of the available USB devices. Exit menu The Exit menu items allow you to load the optimal default values for the BIOS items, and save changes and exit. When you select this option or if you press , a confirmation window appears. Save Changes & Reset Once you are... finished making your changes to the BIOS items. Load Optimized Defaults This option allows you to launch the EFI Shell application (shellx64.efi) from the Exit menu to ensure the values you...


