Users Manual English
Page 2
... ARISING FROM ANY DEFECT OR ERROR IN THIS MANUAL OR PRODUCT. E11924 August 2016 Copyright © 2016 ASUSTeK COMPUTER INC. SPECIFICATIONS AND INFORMATION CONTAINED IN THIS MANUAL ARE FURNISHED FOR INFORMATIONAL USE ONLY, AND ARE SUBJECT TO CHANGE AT ANY TIME WITHOUT NOTICE, AND SHOULD NOT BE CONSTRUED AS A COMMITMENT BY ASUS. Such software in any form or...
... ARISING FROM ANY DEFECT OR ERROR IN THIS MANUAL OR PRODUCT. E11924 August 2016 Copyright © 2016 ASUSTeK COMPUTER INC. SPECIFICATIONS AND INFORMATION CONTAINED IN THIS MANUAL ARE FURNISHED FOR INFORMATIONAL USE ONLY, AND ARE SUBJECT TO CHANGE AT ANY TIME WITHOUT NOTICE, AND SHOULD NOT BE CONSTRUED AS A COMMITMENT BY ASUS. Such software in any form or...
Users Manual English
Page 4
... settings through the BIOS Setup menus. Contact a qualified service technician or your dealer immediately. • To avoid short circuits, keep paper clips, screws, and staples away from connectors, slots, sockets and circuitry. • Avoid dust, humidity, and temperature extremes. Do not place the product in your retailer. These devices could interrupt the grounding circuit. • Ensure that all power cables from the motherboard...
... settings through the BIOS Setup menus. Contact a qualified service technician or your dealer immediately. • To avoid short circuits, keep paper clips, screws, and staples away from connectors, slots, sockets and circuitry. • Avoid dust, humidity, and temperature extremes. Do not place the product in your retailer. These devices could interrupt the grounding circuit. • Ensure that all power cables from the motherboard...
Users Manual English
Page 6
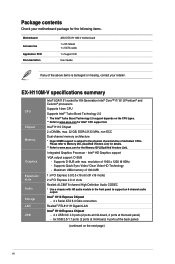
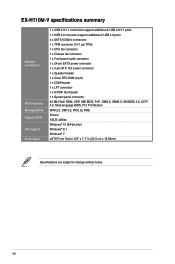
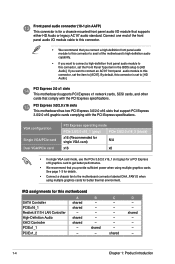
... ASUS EX-H110M-V motherboard 1 x I/O Shield 1 x SATA cable 1 x Support CD User Guide If any of individual CPUs. Supports D-SUB with HD audio module in the front panel to the physical characteristics of the above items is subject to support an 8-channel audio output. Maximum UMA memory of 1920 x 1200 @ 60Hz - resolution of 1024 MB 1 x PCI Express 3.0/2.0 x16 slot (@ x16 mode) 2 x PCI Express 2.0 x1 slots Realtek ALC887 8-channel High Definition Audio CODEC * Use a chassis with max. EX-H110M-V specifications summary CPU Chipset Memory Graphics Expansion slots Audio Storage LAN USB...
... ASUS EX-H110M-V motherboard 1 x I/O Shield 1 x SATA cable 1 x Support CD User Guide If any of individual CPUs. Supports D-SUB with HD audio module in the front panel to the physical characteristics of the above items is subject to support an 8-channel audio output. Maximum UMA memory of 1920 x 1200 @ 60Hz - resolution of 1024 MB 1 x PCI Express 3.0/2.0 x16 slot (@ x16 mode) 2 x PCI Express 2.0 x1 slots Realtek ALC887 8-channel High Definition Audio CODEC * Use a chassis with max. EX-H110M-V specifications summary CPU Chipset Memory Graphics Expansion slots Audio Storage LAN USB...
Users Manual English
Page 8
...2 USB 2.0/1.1 ports 1 x USB 3.0 connector support additional 2 USB 3.0 ports 4 x SATA 6.0Gb/s connectors 1 x TPM connector (14-1 pin TPM) 1 x CPU fan connector 1 x Chassis fan connector 1 x Front panel audio connector 1 x 24-pin EATX power connector 1 x 4-pin ATX 12V power connector 1 x Speaker header 1 x Clear RTC RAM (2 pin) 1 x COM header 1 x LPT connector 1 x S/PDIF Out header 1 x System panel connector 64 Mb Flash ROM, UEFI AMI BIOS, PnP, DMI3.0, WfM2.0, SM BIOS 3.0, ACPI 5.0, Multi-language BIOS, F12 PrintScreen WfM 2.0, DMI 3.0, WOL by PME Drivers ASUS utilities Windows® 10 (64-bit...
...2 USB 2.0/1.1 ports 1 x USB 3.0 connector support additional 2 USB 3.0 ports 4 x SATA 6.0Gb/s connectors 1 x TPM connector (14-1 pin TPM) 1 x CPU fan connector 1 x Chassis fan connector 1 x Front panel audio connector 1 x 24-pin EATX power connector 1 x 4-pin ATX 12V power connector 1 x Speaker header 1 x Clear RTC RAM (2 pin) 1 x COM header 1 x LPT connector 1 x S/PDIF Out header 1 x System panel connector 64 Mb Flash ROM, UEFI AMI BIOS, PnP, DMI3.0, WfM2.0, SM BIOS 3.0, ACPI 5.0, Multi-language BIOS, F12 PrintScreen WfM 2.0, DMI 3.0, WOL by PME Drivers ASUS utilities Windows® 10 (64-bit...
Users Manual English
Page 9
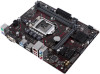
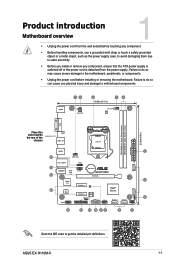
... cause you install or remove any component, ensure that the ATX power supply is switched off or the power cord is detached from the wall socket before installing or removing the motherboard. Failure to do so may cause severe damage to motherboard components. ASUS EX-H110M-V 1-1 Product introduction Motherboard overview 1 • Unplug the power cord from the power supply. KBMS 12 ATX12V 3 18.03cm(7.1in) 14 CPU_FAN DIGI +VRM VGA DDR4...
... cause you install or remove any component, ensure that the ATX power supply is switched off or the power cord is detached from the wall socket before installing or removing the motherboard. Failure to do so may cause severe damage to motherboard components. ASUS EX-H110M-V 1-1 Product introduction Motherboard overview 1 • Unplug the power cord from the power supply. KBMS 12 ATX12V 3 18.03cm(7.1in) 14 CPU_FAN DIGI +VRM VGA DDR4...
Users Manual English
Page 10
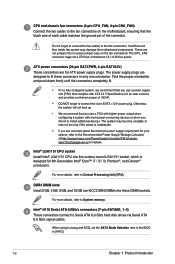
... intend to install additional devices. The power supply plugs are not jumpers! When using hot-plug and NCQ, set the SATA Mode Selection item in only one orientation. Otherwise, the system will not boot up if the power is designed for your system, refer to the Recommended Power Supply Wattage Calculator at http://support.asus.com/PowerSupplyCalculator/PSCalculator. CPU and chassis fan connectors (4-pin CPU_FAN, 4-pin CHA_FAN) Connect the fan cables to the fan connectors on the fan connectors! Do...
... intend to install additional devices. The power supply plugs are not jumpers! When using hot-plug and NCQ, set the SATA Mode Selection item in only one orientation. Otherwise, the system will not boot up if the power is designed for your system, refer to the Recommended Power Supply Wattage Calculator at http://support.asus.com/PowerSupplyCalculator/PSCalculator. CPU and chassis fan connectors (4-pin CPU_FAN, 4-pin CHA_FAN) Connect the fan cables to the fan connectors on the fan connectors! Do...
Users Manual English
Page 11
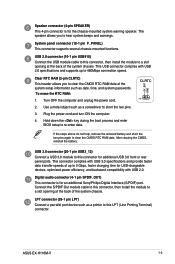
... chassis. System panel connector (10-1 pin F_PANEL) This connector supports several chassis-mounted functions. Clear RTC RAM (2-pin CLRTC) This header allows you to 5 Gbps, faster charging time for USB-chargeable devices, optimized power efficiency, and backward compatibility with USB 2.0. USB 2.0 connector (10-1 pin USB910) Connect the USB module cable to this connector for additional USB 3.0 front or rear panel ports. Use a metal object such as date, time, and system passwords. Plug the power cord and turn ON the computer. 4. Speaker connector (4-pin SPEAKER) This 4-pin connector...
... chassis. System panel connector (10-1 pin F_PANEL) This connector supports several chassis-mounted functions. Clear RTC RAM (2-pin CLRTC) This header allows you to 5 Gbps, faster charging time for USB-chargeable devices, optimized power efficiency, and backward compatibility with USB 2.0. USB 2.0 connector (10-1 pin USB910) Connect the USB module cable to this connector for additional USB 3.0 front or rear panel ports. Use a metal object such as date, time, and system passwords. Plug the power cord and turn ON the computer. 4. Speaker connector (4-pin SPEAKER) This 4-pin connector...
Users Manual English
Page 12
...connector, set the Front Panel Type item in the BIOS setup to [AC97]. B - - - - - Connect one end of the front panel audio I /O module that support PCI Express 3.0/2.0 x16 graphic cards complying with the PCI Express specifications. IRQ assignments for better thermal environment. C shared D - - shared - By default, this motherboard SATA Controller PCIEx16_1 Realtek 8111H LAN Controller High-Definition Audio XHCI Controller PCIEx1_1 PCIEx1_2 A shared shared - PCI Express 3.0/2.0 x16 slots This motherboard has two PCI Express 3.0/2.0 x16 slots that supports either HD Audio...
...connector, set the Front Panel Type item in the BIOS setup to [AC97]. B - - - - - Connect one end of the front panel audio I /O module that support PCI Express 3.0/2.0 x16 graphic cards complying with the PCI Express specifications. IRQ assignments for better thermal environment. C shared D - - shared - By default, this motherboard SATA Controller PCIEx16_1 Realtek 8111H LAN Controller High-Definition Audio XHCI Controller PCIEx1_1 PCIEx1_2 A shared shared - PCI Express 3.0/2.0 x16 slots This motherboard has two PCI Express 3.0/2.0 x16 slots that supports either HD Audio...
Users Manual English
Page 13
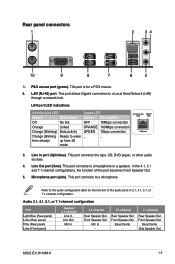
... Bass/Center Side Speaker Out ASUS EX-H110M-V 1-5 This port connects to a microphone. In the 4.1, 5.1 and 7.1-channel configurations, the function of the audio ports in 2.1, 4.1, 5.1, or 7.1-channel configuration. This port connects to a headphone or a speaker. Line Out port (lime). LAN (RJ-45) port. This port allows Gigabit connection to wake then steady) up from S5 mode Speed LED Status Description OFF 10Mbps connection ORANGE 100Mbps connection GREEN 1Gbps connection _ _ Activity Link Speed LED LED LAN port 3. LAN port LED indications Activity...
... Bass/Center Side Speaker Out ASUS EX-H110M-V 1-5 This port connects to a microphone. In the 4.1, 5.1 and 7.1-channel configurations, the function of the audio ports in 2.1, 4.1, 5.1, or 7.1-channel configuration. This port connects to a headphone or a speaker. Line Out port (lime). LAN (RJ-45) port. This port allows Gigabit connection to wake then steady) up from S5 mode Speed LED Status Description OFF 10Mbps connection ORANGE 100Mbps connection GREEN 1Gbps connection _ _ Activity Link Speed LED LED LAN port 3. LAN port LED indications Activity...
Users Manual English
Page 14
...PnP cap is missing, or if you connect USB 3.0 devices to the PnP cap/socket contacts/motherboard components. • Keep the cap after installing the motherboard. To configure a 7.1-channel audio output: Use a chassis with a surface mount LGA1150 socket designed for a PS/2 keyboard. These 4-pin Universal Serial Bus (USB) ports are for USB 2.0/1.1 devices. 7. Some legacy USB devices must update their firmware for a VGA monitor or other VGA-compatible devices. 10. Video Graphics Adapter (VGA) port. PS/2 keyboard port (purple). ASUS will process Return Merchandise Authorization (RMA...
...PnP cap is missing, or if you connect USB 3.0 devices to the PnP cap/socket contacts/motherboard components. • Keep the cap after installing the motherboard. To configure a 7.1-channel audio output: Use a chassis with a surface mount LGA1150 socket designed for a PS/2 keyboard. These 4-pin Universal Serial Bus (USB) ports are for USB 2.0/1.1 devices. 7. Some legacy USB devices must update their firmware for a VGA monitor or other VGA-compatible devices. 10. Video Graphics Adapter (VGA) port. PS/2 keyboard port (purple). ASUS will process Return Merchandise Authorization (RMA...

Users Manual English
Page 15
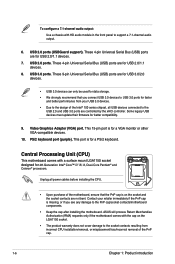
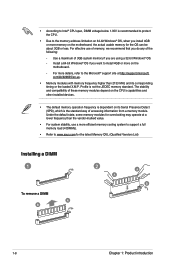
...) Dual Inline Memory Module (DIMM) sockets. System memory Overview This motherboard comes with the retailer to the CPU heatsink and CPU before you install memory modules of the DDR4 DIMM sockets: DIMM_A1 DIMM_B1 Channel Channel A Channel B Sockets DIMM_A1 DIMM_B1 • You may install varying memory sizes in Channel A and Channel B. The system maps the total size of the lower-sized channel for single-channel operation. • Always install DIMMs with the same CAS latency. ASUS EX-H110M-V 1-7 Installing the CPU...
...) Dual Inline Memory Module (DIMM) sockets. System memory Overview This motherboard comes with the retailer to the CPU heatsink and CPU before you install memory modules of the DDR4 DIMM sockets: DIMM_A1 DIMM_B1 Channel Channel A Channel B Sockets DIMM_A1 DIMM_B1 • You may install varying memory sizes in Channel A and Channel B. The system maps the total size of the lower-sized channel for single-channel operation. • Always install DIMMs with the same CAS latency. ASUS EX-H110M-V 1-7 Installing the CPU...
Users Manual English
Page 16
... installed devices. • The default memory operation frequency is dependent on its corresponding timing or the loaded X.M.P. The stability and compatibility of accessing information from a memory module. • According to Intel® CPU spec, DIMM voltage below 1.35V is recommended to protect the CPU. • Due to the memory address limitation on 32-bit Windows® OS, when you want to install 4GB or more on the motherboard...
... installed devices. • The default memory operation frequency is dependent on its corresponding timing or the loaded X.M.P. The stability and compatibility of accessing information from a memory module. • According to Intel® CPU spec, DIMM voltage below 1.35V is recommended to protect the CPU. • Due to the memory address limitation on 32-bit Windows® OS, when you want to install 4GB or more on the motherboard...
Users Manual English
Page 17
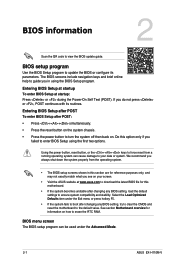
... boot after changing any BIOS setting, load the default settings to ensure system compatibility and stability. Using the power button, reset button, or the ++ keys to update the BIOS or configure its routines. Select the Load Optimized Defaults item under the Advanced Mode. 2-1 ASUS EX-H110M-V BIOS setup program Use the BIOS Setup program to force reset from the operating system. • The BIOS setup screens shown in using the first two options. The BIOS screens include navigation keys and brief online help to guide you in this motherboard...
... boot after changing any BIOS setting, load the default settings to ensure system compatibility and stability. Using the power button, reset button, or the ++ keys to update the BIOS or configure its routines. Select the Load Optimized Defaults item under the Advanced Mode. 2-1 ASUS EX-H110M-V BIOS setup program Use the BIOS Setup program to force reset from the operating system. • The BIOS setup screens shown in using the first two options. The BIOS screens include navigation keys and brief online help to guide you in this motherboard...
Users Manual English
Page 18
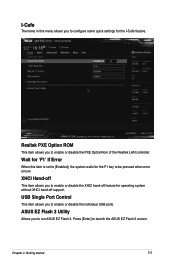
ASUS EZ Flash 3 Utility Allows you to enable or disable the individual USB ports. USB Single Port Control This item allows you to run ASUS EZ Flash 3. Chapter 2: Getting started 2-2 Press [Enter] to launch the ASUS EZ Flash 3 screen. Realtek PXE Option ROM This item allows you to enable or disable the XHCI hand‑off feature for operating system without XHCI hand-off This item allows you to enable or disable the PXE...
ASUS EZ Flash 3 Utility Allows you to enable or disable the individual USB ports. USB Single Port Control This item allows you to run ASUS EZ Flash 3. Chapter 2: Getting started 2-2 Press [Enter] to launch the ASUS EZ Flash 3 screen. Realtek PXE Option ROM This item allows you to enable or disable the XHCI hand‑off feature for operating system without XHCI hand-off This item allows you to enable or disable the PXE...
Users Manual English
Page 19
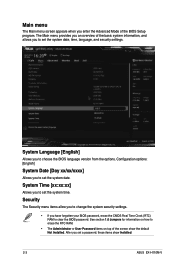
... section 1.6 Jumpers for information on how to erase the RTC RAM. • The Administrator or User Password items on top of the screen show Installed. 2-3 ASUS EX-H110M-V After you to set the system date, time, language, and security settings. The Main menu provides you an overview of the BIOS Setup program. Configuration options: [English] System Date [Day xx/xx/xxxx] Allows you enter the Advanced Mode of the...
... section 1.6 Jumpers for information on how to erase the RTC RAM. • The Administrator or User Password items on top of the screen show Installed. 2-3 ASUS EX-H110M-V After you to set the system date, time, language, and security settings. The Main menu provides you an overview of the BIOS Setup program. Configuration options: [English] System Date [Day xx/xx/xxxx] Allows you enter the Advanced Mode of the...

Users Manual English
Page 20
CPU Configuration The items in this menu show Empty if no SATA device is installed to the corresponding SATA port. Be cautious when changing the settings of SATA devices. USB Configuration The items in this menu allow you to change the USB-related features. PCH-FW Configuration The items in this menu allows you to configure the management engine technology settings. Chapter 2: Getting started 2-4 PCH Storage Configuration While entering Setup, the BIOS automatically detects the presence of the Advanced...
CPU Configuration The items in this menu show Empty if no SATA device is installed to the corresponding SATA port. Be cautious when changing the settings of SATA devices. USB Configuration The items in this menu allow you to change the USB-related features. PCH-FW Configuration The items in this menu allows you to configure the management engine technology settings. Chapter 2: Getting started 2-4 PCH Storage Configuration While entering Setup, the BIOS automatically detects the presence of the Advanced...
Users Manual English
Page 21
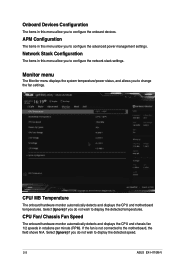
...menu allow you to configure the advanced power management settings. Monitor menu The Monitor menu displays the system temperature/power status, and allows you do not wish to display the detected speed. 2-5 ASUS EX-H110M-V If the fan is not connected to configure the onboard devices. CPU/ MB Temperature The onboard hardware monitor automatically detects and displays the CPU and motherboard temperatures. Select [Ignore] if you to change the fan settings. CPU Fan/ Chassis Fan Speed The onboard hardware monitor automatically detects and displays the CPU and chassis fan 1/2 speeds...
...menu allow you to configure the advanced power management settings. Monitor menu The Monitor menu displays the system temperature/power status, and allows you do not wish to display the detected speed. 2-5 ASUS EX-H110M-V If the fan is not connected to configure the onboard devices. CPU/ MB Temperature The onboard hardware monitor automatically detects and displays the CPU and motherboard temperatures. Select [Ignore] if you to change the fan settings. CPU Fan/ Chassis Fan Speed The onboard hardware monitor automatically detects and displays the CPU and chassis fan 1/2 speeds...
Users Manual English
Page 22
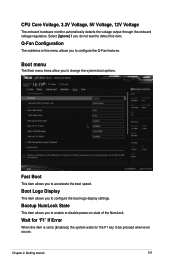
... configure the boot logo display settings. Chapter 2: Getting started 2-6 Select [Ignore] if you to detect this item. Fast Boot This item allows you to change the system boot options. Wait for the F1 key to accelerate the boot speed. Boot menu The Boot menu items allow you to enable or disable power-on state of the NumLock. CPU Core Voltage, 3.3V Voltage, 5V Voltage, 12V Voltage The onboard hardware monitor automatically detects the voltage output through the onboard voltage regulators. Q-Fan Configuration...
... configure the boot logo display settings. Chapter 2: Getting started 2-6 Select [Ignore] if you to detect this item. Fast Boot This item allows you to change the system boot options. Wait for the F1 key to accelerate the boot speed. Boot menu The Boot menu items allow you to enable or disable power-on state of the NumLock. CPU Core Voltage, 3.3V Voltage, 5V Voltage, 12V Voltage The onboard hardware monitor automatically detects the voltage output through the onboard voltage regulators. Q-Fan Configuration...
Users Manual English
Page 23
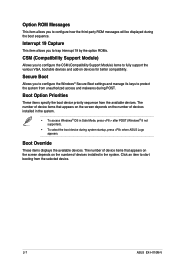
... the option ROMs. CSM (Compatibility Support Module) Allows you to configure the Windows® Secure Boot settings and manage its keys to fully support the various VGA, bootable devices and add-on the number of devices installed in the system. • To access Windows® OS in the system. Boot Option Priorities These items specify the boot device priority sequence from the selected device. 2-7 ASUS EX-H110M-V Secure Boot Allows you to configure the CSM (Compatibility Support Module...
... the option ROMs. CSM (Compatibility Support Module) Allows you to configure the Windows® Secure Boot settings and manage its keys to fully support the various VGA, bootable devices and add-on the number of devices installed in the system. • To access Windows® OS in the system. Boot Option Priorities These items specify the boot device priority sequence from the selected device. 2-7 ASUS EX-H110M-V Secure Boot Allows you to configure the CSM (Compatibility Support Module...
Users Manual English
Page 25
... by the party responsible for compliance could void the user's authority to operate this equipment does cause harmful interference to radio or television reception, which can radiate radio frequency energy and, if not installed and used in a residential installation. The use of shielded cables for connection of the monitor to the graphics card is subject to the following measures: • Reorient...
... by the party responsible for compliance could void the user's authority to operate this equipment does cause harmful interference to radio or television reception, which can radiate radio frequency energy and, if not installed and used in a residential installation. The use of shielded cables for connection of the monitor to the graphics card is subject to the following measures: • Reorient...


