
User Guide
Page 3
Contents Safety information iv About this guide iv Package contents vi EX-B250-V7 specifications summary vi Chapter 1 Product introduction Motherboard overview 1-1 Central Processing Unit (CPU 1-6 System memory 1-7 Chapter 2 BIOS information BIOS setup program 2-1 I-Cafe ...2-2 Main menu 2-3 Advanced menu 2-4 Monitor menu 2-5 Boot menu 2-6 Exit menu...2-8 Appendix Notices...A-1 iii
Contents Safety information iv About this guide iv Package contents vi EX-B250-V7 specifications summary vi Chapter 1 Product introduction Motherboard overview 1-1 Central Processing Unit (CPU 1-6 System memory 1-7 Chapter 2 BIOS information BIOS setup program 2-1 I-Cafe ...2-2 Main menu 2-3 Advanced menu 2-4 Monitor menu 2-5 Boot menu 2-6 Exit menu...2-8 Appendix Notices...A-1 iii

User Guide
Page 4
...the motherboard and the new technology it may be exposed to moisture. • Place the product on the motherboard. • Chapter 2: BIOS information This chapter discusses changing system settings through the BIOS Setup menus. iv These devices could interrupt the grounding circuit. • Ensure that the power cables for the... BIOS parameters are not damaged. If possible, disconnect all cables are correctly connected and the power cables are also provided. If you detect any...
...the motherboard and the new technology it may be exposed to moisture. • Place the product on the motherboard. • Chapter 2: BIOS information This chapter discusses changing system settings through the BIOS Setup menus. iv These devices could interrupt the grounding circuit. • Ensure that the power cables for the... BIOS parameters are not damaged. If possible, disconnect all cables are correctly connected and the power cables are also provided. If you detect any...
User Guide
Page 8
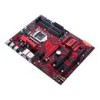
...ATX Form Factor, 12" x 9" (30.48cm x 22.86cm) Specifications are only supported when using 6th Generation Intel® Processors. EX-B250-V7 specifications summary Rear panel I/O ports Internal connectors BIOS features Manageability Support DVD OS support Form factor 1 x LAN (RJ-45) port 4 x USB 3.0/ 2.0 ports 4 x USB ... Clear RTC RAM (2 pin) 1 x System panel connector 1 x Water pump header 128 Mb Flash ROM, UEFI AMI BIOS, PnP, DMI3.0, SM BIOS 3.0, ACPI 6.0, ASUS EZ Flash 3, CrashFree BIOS 3, F12 I café super mode DMI 3.0, WOL by PME Drivers Windows® 10 (64-bit only) Windows&#...
...ATX Form Factor, 12" x 9" (30.48cm x 22.86cm) Specifications are only supported when using 6th Generation Intel® Processors. EX-B250-V7 specifications summary Rear panel I/O ports Internal connectors BIOS features Manageability Support DVD OS support Form factor 1 x LAN (RJ-45) port 4 x USB 3.0/ 2.0 ports 4 x USB ... Clear RTC RAM (2 pin) 1 x System panel connector 1 x Water pump header 128 Mb Flash ROM, UEFI AMI BIOS, PnP, DMI3.0, SM BIOS 3.0, ACPI 6.0, ASUS EZ Flash 3, CrashFree BIOS 3, F12 I café super mode DMI 3.0, WOL by PME Drivers Windows® 10 (64-bit only) Windows&#...
User Guide
Page 11
... to [AHCI]. Turn OFF the computer and unplug the power cord. 2. ASUS EX-B250-V7 1-3 After clearing the CMOS, reinstall the battery. When using hot-plug and NCQ, set the SATA Mode Selection item in the BIOS to clear the CMOS RTC RAM data of the system chassis Digital audio connector... up to a slot opening at the back of the system setup information such as date, time, and system passwords. Intel® B250 Serial ATA 6.0Gb/s connectors (7-pin SATA6G_1~6) These connectors connect to Serial ATA 6.0 Gb/s hard disk drives via Serial ATA 6.0 Gb/s signal cables....
... to [AHCI]. Turn OFF the computer and unplug the power cord. 2. ASUS EX-B250-V7 1-3 After clearing the CMOS, reinstall the battery. When using hot-plug and NCQ, set the SATA Mode Selection item in the BIOS to clear the CMOS RTC RAM data of the system chassis Digital audio connector... up to a slot opening at the back of the system setup information such as date, time, and system passwords. Intel® B250 Serial ATA 6.0Gb/s connectors (7-pin SATA6G_1~6) These connectors connect to Serial ATA 6.0 Gb/s hard disk drives via Serial ATA 6.0 Gb/s signal cables....

User Guide
Page 12
..., and other cards that you want to connect a high-definition front panel audio module to this connector, set the Front Panel Type item in the BIOS setup to [HD Audio]. Connect one end of the motherboard's high-definition audio capability. • If you connect USB 3.0 devices to [AC97]. By default, this...
..., and other cards that you want to connect a high-definition front panel audio module to this connector, set the Front Panel Type item in the BIOS setup to [HD Audio]. Connect one end of the motherboard's high-definition audio capability. • If you connect USB 3.0 devices to [AC97]. By default, this...
User Guide
Page 17
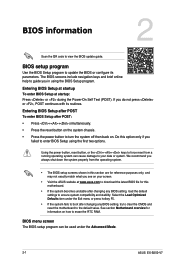
...or system. Entering BIOS Setup at startup To enter BIOS Setup at www.asus.com to erase the RTC RAM. Entering BIOS Setup after POST To enter BIOS Setup after changing any BIOS setting, load the default settings to update the BIOS or configure its routines. BIOS setup program Use the BIOS Setup program to... the system chassis. • Press the power button to turn the system off then back on how to download the latest BIOS file for information on . Select the Load Optimized Defaults item under the Advanced Mode. 2-1 ASUS EX-B250-V7 BIOS information 2 Scan the QR code to enter...
...or system. Entering BIOS Setup at startup To enter BIOS Setup at www.asus.com to erase the RTC RAM. Entering BIOS Setup after POST To enter BIOS Setup after changing any BIOS setting, load the default settings to update the BIOS or configure its routines. BIOS setup program Use the BIOS Setup program to... the system chassis. • Press the power button to turn the system off then back on how to download the latest BIOS file for information on . Select the Load Optimized Defaults item under the Advanced Mode. 2-1 ASUS EX-B250-V7 BIOS information 2 Scan the QR code to enter...

User Guide
Page 18
... 3 Utility Allows you to run ASUS EZ Flash 3. Intel PXE Option ROM This item allows you to enable or disable the PXE OptionRom of the Intel LAN controller. This item allows you to easily enter the BIOS setup. USB Keyboard and Mouse Simulator This item allows you to select the desired additional... the I -Cafe The items in this item is set Boot Logo Display to be pressed when error occurs. The values range from 0 to launch the ASUS EZ Flash 3 screen. Press [Enter] to 10 seconds. Chapter...
... 3 Utility Allows you to run ASUS EZ Flash 3. Intel PXE Option ROM This item allows you to enable or disable the PXE OptionRom of the Intel LAN controller. This item allows you to easily enter the BIOS setup. USB Keyboard and Mouse Simulator This item allows you to select the desired additional... the I -Cafe The items in this item is set Boot Logo Display to be pressed when error occurs. The values range from 0 to launch the ASUS EZ Flash 3 screen. Press [Enter] to 10 seconds. Chapter...
User Guide
Page 19
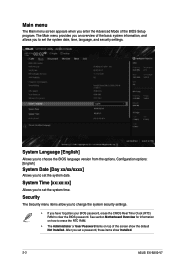
... erase the CMOS Real Time Clock (RTC) RAM to choose the BIOS language version from the options. Main menu The Main menu screen appears when you enter the Advanced Mode of the screen show Installed. 2-3 ASUS EX-B250-V7 Configuration options: [English] System Date [Day xx/xx/xxxx] Allows... you to erase the RTC RAM. • The Administrator or User Password items on how to set the system time. See section Motherboard Overview for information on top of the BIOS Setup program....
... erase the CMOS Real Time Clock (RTC) RAM to choose the BIOS language version from the options. Main menu The Main menu screen appears when you enter the Advanced Mode of the screen show Installed. 2-3 ASUS EX-B250-V7 Configuration options: [English] System Date [Day xx/xx/xxxx] Allows... you to erase the RTC RAM. • The Administrator or User Password items on how to set the system time. See section Motherboard Overview for information on top of the BIOS Setup program....

User Guide
Page 20
PCH Storage Configuration While entering Setup, the BIOS automatically detects the presence of the Advanced menu items. Incorrect field values can cause the system to malfunction. PCH-FW Configuration The items in this .... Advanced menu The Advanced menu items allow you to configure the onboard devices. The SATA Port items show the CPU-related information that the BIOS automatically detects. Chapter 2: BIOS Information 2-4 CPU Configuration The items in this menu allow you to change the settings for the CPU and other system devices. Be cautious...
PCH Storage Configuration While entering Setup, the BIOS automatically detects the presence of the Advanced menu items. Incorrect field values can cause the system to malfunction. PCH-FW Configuration The items in this .... Advanced menu The Advanced menu items allow you to configure the onboard devices. The SATA Port items show the CPU-related information that the BIOS automatically detects. Chapter 2: BIOS Information 2-4 CPU Configuration The items in this menu allow you to change the settings for the CPU and other system devices. Be cautious...

User Guide
Page 22
Fast Boot This item allows you to configure the Q-Fan features. Chapter 2: BIOS Information 2-6 Q-Fan Configuration The subitems in this item. Boot Configuration This item allows you to accelerate the boot speed. CPU Core Voltage, 3.3V Voltage, 5V ...
Fast Boot This item allows you to configure the Q-Fan features. Chapter 2: BIOS Information 2-6 Q-Fan Configuration The subitems in this item. Boot Configuration This item allows you to accelerate the boot speed. CPU Core Voltage, 3.3V Voltage, 5V ...

User Guide
Page 24
.... Discard Changes & Exit This option allows you to exit the Setup program without saving your changes to the BIOS items. Load Optimized Defaults This option allows you to load the default values for the BIOS items, and save changes and exit. When you select this option or if you press , a confirmation window...
.... Discard Changes & Exit This option allows you to exit the Setup program without saving your changes to the BIOS items. Load Optimized Defaults This option allows you to load the default values for the BIOS items, and save changes and exit. When you select this option or if you press , a confirmation window...


