User's Manual for English Edition
Page 2
All Rights Reserved. All trademarks are the property of this manual may or may be registered trademarks or copyrights of ASUSTeK COMPUTER, INC. ("ASUS"). Every effort has been made to ensure that the contents of their respective companies, and are correct and up to make ...and corporate names mentioned in any form or by any means, except documentation kept by the purchaser for identification purposes only. No part of this manual, including the products and software described in it, may not be reproduced, transmitted, transcribed, stored in a retrieval system, or translated into ...
All Rights Reserved. All trademarks are the property of this manual may or may be registered trademarks or copyrights of ASUSTeK COMPUTER, INC. ("ASUS"). Every effort has been made to ensure that the contents of their respective companies, and are correct and up to make ...and corporate names mentioned in any form or by any means, except documentation kept by the purchaser for identification purposes only. No part of this manual, including the products and software described in it, may not be reproduced, transmitted, transcribed, stored in a retrieval system, or translated into ...
User's Manual for English Edition
Page 3
English Contents Contents...3 Notices...5 Notes for this manual...11 Safety information...12 Welcome 14 Package contents...14 Getting to know your ASUS All-in-one PC 15 Front view...15 Rear view...17 Side view...19 Using the touch screen...20 Showing the touch pointer...20 Cleaning ...-in-one PC 22 Placing on the desktop...22 Installing the wall mount adapter 22 Setting up your ASUS All-in-one PC 24 Connecting the wired keyboard and mouse 24 Powering on the system...25 Powering off...25 Calibrating the screen...26 Configuring a ...
English Contents Contents...3 Notices...5 Notes for this manual...11 Safety information...12 Welcome 14 Package contents...14 Getting to know your ASUS All-in-one PC 15 Front view...15 Rear view...17 Side view...19 Using the touch screen...20 Showing the touch pointer...20 Cleaning ...-in-one PC 22 Placing on the desktop...22 Installing the wall mount adapter 22 Setting up your ASUS All-in-one PC 24 Connecting the wired keyboard and mouse 24 Powering on the system...25 Powering off...25 Calibrating the screen...26 Configuring a ...

User's Manual for English Edition
Page 11
... IMPORTANT: Instructions that you MUST follow to yourself. In addition, please visit http://www. Visit the ASUS website at www.asus.com for special situations. energystar.gov for this manual To ensure that you complete a task. TIP: Tips and useful information that you perform certain tasks ...for the latest information. All ASUS products with the ENERGY STAR logo comply with territories. To wake your computer, click the mouse or press any key on the ENERGY STAR joint program. All illustrations and screenshots in -one PC ET1612I Series 11 Please visit http://www...
... IMPORTANT: Instructions that you MUST follow to yourself. In addition, please visit http://www. Visit the ASUS website at www.asus.com for special situations. energystar.gov for this manual To ensure that you complete a task. TIP: Tips and useful information that you perform certain tasks ...for the latest information. All ASUS products with the ENERGY STAR logo comply with territories. To wake your computer, click the mouse or press any key on the ENERGY STAR joint program. All illustrations and screenshots in -one PC ET1612I Series 11 Please visit http://www...
User's Manual for English Edition
Page 23
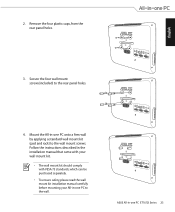
...wall mount kit should comply with VESA 75 standards, which can be purchased separately. • To ensure safety, please read the wall mount kit installation manual carefully before mounting your All-in -one PC to the wall mount screws. 2. Mount the All-in-one PC onto a firm wall by applying ...a standard wall mount kit (pad and rack) to the wall. -2 -1 -2 -1 -2 -1 ASUS All-in -one PC ET1612I Series 23 English Secure the four wall mount screws(included) to the rear panel holes. 4. Remove the four plastic caps, from the rear...
...wall mount kit should comply with VESA 75 standards, which can be purchased separately. • To ensure safety, please read the wall mount kit installation manual carefully before mounting your All-in -one PC to the wall mount screws. 2. Mount the All-in-one PC onto a firm wall by applying ...a standard wall mount kit (pad and rack) to the wall. -2 -1 -2 -1 -2 -1 ASUS All-in -one PC ET1612I Series 23 English Secure the four wall mount screws(included) to the rear panel holes. 4. Remove the four plastic caps, from the rear...


