
User Manual
Page 2
1. Installation 3. How to Operate 1) Form Preparation 2) Loading forms 3) Start 4) Fold Setting 5) Operator Panel 6) Manual Feed 5. Trouble Shooting 1) Paper Jam 2) Double Feed 3) Mis-Feed 4) Skewed Fold 2 Introduction Pressure Sealer ES-5000 Table of Contents 2. Maintenance 1) General Cleaning 2) Paper Dust 3) Cleaning Pickup and Fold Rollers 4) Cleaning Press Rollers 6. Features 1) Specifications 2) General views 4.
1. Installation 3. How to Operate 1) Form Preparation 2) Loading forms 3) Start 4) Fold Setting 5) Operator Panel 6) Manual Feed 5. Trouble Shooting 1) Paper Jam 2) Double Feed 3) Mis-Feed 4) Skewed Fold 2 Introduction Pressure Sealer ES-5000 Table of Contents 2. Maintenance 1) General Cleaning 2) Paper Dust 3) Cleaning Pickup and Fold Rollers 4) Cleaning Press Rollers 6. Features 1) Specifications 2) General views 4.

User Manual
Page 3
Names of the form, whether use a "C", "V", "Z" or "Double" fold. 1. Introduction Pressure Sealer ES-5000 produces folded and sealed mailable documents with cut-sheet Pressure Seal forms. Pressure activated adhesive applied forms provide and instantly secure seal on all sides of each part 2. 3
Names of the form, whether use a "C", "V", "Z" or "Double" fold. 1. Introduction Pressure Sealer ES-5000 produces folded and sealed mailable documents with cut-sheet Pressure Seal forms. Pressure activated adhesive applied forms provide and instantly secure seal on all sides of each part 2. 3
User Manual
Page 4
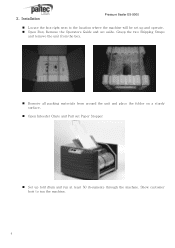
Grasp the two Shipping Straps and remove the unit from the box. Remove all packing materials from around the unit and place the folder on a sturdy surface. Open Infeeder Chute and Pull out Paper Stopper Set up and operate. Open Box, Remove the Operators Guide and set up fold drum and run the machine. 4 Show customer how to the location where the machine will be set aside. Installation Pressure Sealer ES-5000 Locate the box right next to run at least 50 documents through the machine. 2.
Grasp the two Shipping Straps and remove the unit from the box. Remove all packing materials from around the unit and place the folder on a sturdy surface. Open Infeeder Chute and Pull out Paper Stopper Set up and operate. Open Box, Remove the Operators Guide and set up fold drum and run the machine. 4 Show customer how to the location where the machine will be set aside. Installation Pressure Sealer ES-5000 Locate the box right next to run at least 50 documents through the machine. 2.
User Manual
Page 5
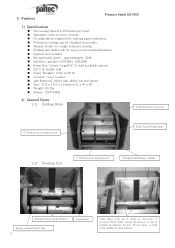
1) Features Pressure Sealer ES-5000 1) Specifications Processing Speed 4,200 forms per hour Automatic jam recovery system No adjustment required for easy access and maintenance Digital reset counter Exceptionally quiet - approximately 45db Infeeder capacity-150(24#), 120(28#) Form Size: Letter, Legal(14" Z-fold available option) Z,C,V & double fold Paper Weights...
1) Features Pressure Sealer ES-5000 1) Specifications Processing Speed 4,200 forms per hour Automatic jam recovery system No adjustment required for easy access and maintenance Digital reset counter Exceptionally quiet - approximately 45db Infeeder capacity-150(24#), 120(28#) Form Size: Letter, Legal(14" Z-fold available option) Z,C,V & double fold Paper Weights...
User Manual
Page 6
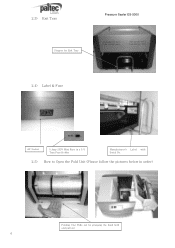
2.3) Exit Tray Pressure Sealer ES-5000 Stopper for Exit Tray 2.4) Label & Fuse AC Socket 5 Amp 250V Mini Fuse in a 1/4 Turn Fuse Holder Manufacturer's Label with Serial No. 2.5) How to Open the Fold Unit (Please follow the pictures below in order) Folding Unit Pulls out by grasping the hand hold and pull out 6
2.3) Exit Tray Pressure Sealer ES-5000 Stopper for Exit Tray 2.4) Label & Fuse AC Socket 5 Amp 250V Mini Fuse in a 1/4 Turn Fuse Holder Manufacturer's Label with Serial No. 2.5) How to Open the Fold Unit (Please follow the pictures below in order) Folding Unit Pulls out by grasping the hand hold and pull out 6
User Manual
Page 7
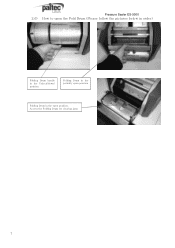
Pressure Sealer ES-5000 2.6) How to open the Fold Drum (Please follow the pictures below in order) Folding Drum handle in the Unlock(down) position Folding Drum in the partially open position Folding Drum in the open position. Access the Folding Drum for clearing jams 7
Pressure Sealer ES-5000 2.6) How to open the Fold Drum (Please follow the pictures below in order) Folding Drum handle in the Unlock(down) position Folding Drum in the partially open position Folding Drum in the open position. Access the Folding Drum for clearing jams 7
User Manual
Page 8
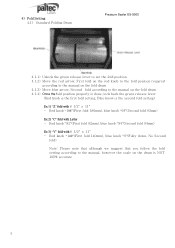
...in the chart below. Adjust if necessary and then proceed to verify that may have not been changed. The Paper tray can hold up and document sequence will be fanned properly on both sides to find out more accurate the fold position and compare the folded position ... settings are OK and have been induced by readjusting the fold guide.(Please use plain paper for proper feeding. How to operate Pressure Sealer ES-5000 1) Form preparation Forms must be the same as the sequence in the Paper tray 3) Start (Press Start button to fold & seal) 3.1 ) If the output is acceptable, Run ...
...in the chart below. Adjust if necessary and then proceed to verify that may have not been changed. The Paper tray can hold up and document sequence will be fanned properly on both sides to find out more accurate the fold position and compare the folded position ... settings are OK and have been induced by readjusting the fold guide.(Please use plain paper for proper feeding. How to operate Pressure Sealer ES-5000 1) Form preparation Forms must be the same as the sequence in the Paper tray 3) Start (Press Start button to fold & seal) 3.1 ) If the output is acceptable, Run ...
User Manual
Page 9
... fold fold) mm), blue knob "0"(Fully down, No Second Note: Please note that although we suggest that you follow the fold setting according to the manual on the drum is the second fold setting) Ex 1) "Z" fold with - Red knob "92"(First fold 92mm), blue knob "94"(Second fold 94mm) Ex 3) "V" fold with... the fold drum 4.1.3) Move blue arrow, Second fold according to the manual, however the scale on the fold drum 4.1.4) Once the fold position properly is done, lock back the green release lever (Red knob is the first fold setting, Blue know is NOT 100% accurate 9 Red knob "186"(First fold ...
... fold fold) mm), blue knob "0"(Fully down, No Second Note: Please note that although we suggest that you follow the fold setting according to the manual on the drum is the second fold setting) Ex 1) "Z" fold with - Red knob "92"(First fold 92mm), blue knob "94"(Second fold 94mm) Ex 3) "V" fold with... the fold drum 4.1.3) Move blue arrow, Second fold according to the manual, however the scale on the fold drum 4.1.4) Once the fold position properly is done, lock back the green release lever (Red knob is the first fold setting, Blue know is NOT 100% accurate 9 Red knob "186"(First fold ...

User Manual
Page 10
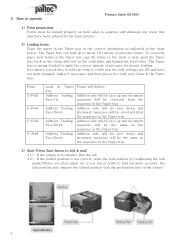
5) Operator Panel 5.1) Power Switch: Power On/Off 5.2) Reset: Reset button will clear the display count 5.3) Start/Stop: Start/Stop button will start or stop the Feed cycle 5.4) Counter: Display will show the total page count/resettable as well as below for the details Pressure Sealer ES-5000 6) Manual Feed 6.1) Fold the form manually and insert the form to the manual feeder 6.2) Press Start button to run the machine Note: This is ideal for...
5) Operator Panel 5.1) Power Switch: Power On/Off 5.2) Reset: Reset button will clear the display count 5.3) Start/Stop: Start/Stop button will start or stop the Feed cycle 5.4) Counter: Display will show the total page count/resettable as well as below for the details Pressure Sealer ES-5000 6) Manual Feed 6.1) Fold the form manually and insert the form to the manual feeder 6.2) Press Start button to run the machine Note: This is ideal for...
User Manual
Page 11
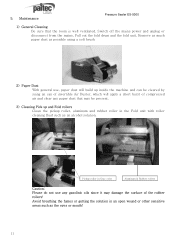
... Aluminum & Rubber rollers Caution: Please do not use , paper dust will apply a short burst of the rubber rollers! Maintenance Pressure Sealer ES-5000 1) General Cleaning Be sure that may be present. 3) Cleaning Pick up inside the machine and can be cleared by suing an can of invertible Air Duster, ...roller in an open wound or other sensitive areas such as possible using a soft brush 2) Paper Dust With general use any gasolinic oils since it may damage the surface of compressed air and clear any paper dust that the room is well ventilated, Switch off the mains power and unplug ...
... Aluminum & Rubber rollers Caution: Please do not use , paper dust will apply a short burst of the rubber rollers! Maintenance Pressure Sealer ES-5000 1) General Cleaning Be sure that may be present. 3) Cleaning Pick up inside the machine and can be cleared by suing an can of invertible Air Duster, ...roller in an open wound or other sensitive areas such as possible using a soft brush 2) Paper Dust With general use any gasolinic oils since it may damage the surface of compressed air and clear any paper dust that the room is well ventilated, Switch off the mains power and unplug ...

User Manual
Page 12
Depending on the Press rollers. Clean both Upper & Lower Press 12 Pressure Sealer ES-5000 4) Cleaning Press Rollers With general use, toner will vary. Check the rollers for build up will build up on the type of laser printer, toner and fuser, the degree of build up and clean on a regular basis with roller cleaning fluid.
Depending on the Press rollers. Clean both Upper & Lower Press 12 Pressure Sealer ES-5000 4) Cleaning Press Rollers With general use, toner will vary. Check the rollers for build up will build up on the type of laser printer, toner and fuser, the degree of build up and clean on a regular basis with roller cleaning fluid.

User Manual
Page 13
Trouble Shooting 1) Paper Jam 1.1) Feeding Unit Jam Do not pull the document backward in the event of the red arrow in the picture on the right 13 Open the Fold Drum Unit by pushing down the Fold Drum handle as the direction of the red arrow in the picture on the right Pressure... Sealer ES-5000 Pull the paper to the direction of the red arrow as shown in the picture on the right 1.2) Folding Unit Jam Open the Fold Drum Unit by pushing down the Fold Drum handle as shown in the direction of jam in the picture on the right...
Trouble Shooting 1) Paper Jam 1.1) Feeding Unit Jam Do not pull the document backward in the event of the red arrow in the picture on the right 13 Open the Fold Drum Unit by pushing down the Fold Drum handle as the direction of the red arrow in the picture on the right Pressure... Sealer ES-5000 Pull the paper to the direction of the red arrow as shown in the picture on the right 1.2) Folding Unit Jam Open the Fold Drum Unit by pushing down the Fold Drum handle as shown in the direction of jam in the picture on the right...
User Manual
Page 14
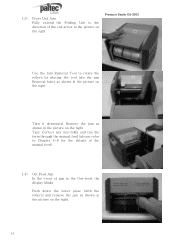
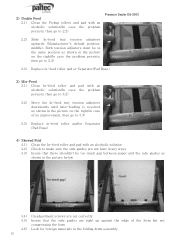
... as shown in the picture on the right Tips: Correct any mis-folds and run the form through the manual feed (please refer to rotate the rollers by placing the tool into the jam Removal holes as shown in the picture on the right. 14 1.3) Press Unit Jam Fully extend the Folding Unit... right Pressure Sealer ES-5000 Use the Jam Removal Tool to Chapter 4-6 for the details of the manual feed) 1.4) Out Feed Jam In the event of jam in the Out-feed, the display blinks Push down the lower plate (with the rollers) and remove the jam as shown in the picture on the right Turn it downward.
... as shown in the picture on the right Tips: Correct any mis-folds and run the form through the manual feed (please refer to rotate the rollers by placing the tool into the jam Removal holes as shown in the picture on the right. 14 1.3) Press Unit Jam Fully extend the Folding Unit... right Pressure Sealer ES-5000 Use the Jam Removal Tool to Chapter 4-6 for the details of the manual feed) 1.4) Out Feed Jam In the event of jam in the Out-feed, the display blinks Push down the lower plate (with the rollers) and remove the jam as shown in the picture on the right Turn it downward.
User Manual
Page 15
...same position as shown in the picture on the right(In case the problem persists, then go to 2.3) 2.3) Replace in-feed roller and or Separator(Pad Base) 3) Mis-Feed 3.1) Clean In-feed roller and pad with an alcoholic solution(In case the problem persists, then go to 3.2) 3.2) Move the In-feed ... solution(In case the problem persists, then go to make sure the side guides are not bent in any ways 4.3) Insure that there shouldn't be too much gap between paper and the side guides as shown in the picture below 4.4) On adjustment screws are set correctly 4.5) Insure that the side guides are right ...
...same position as shown in the picture on the right(In case the problem persists, then go to 2.3) 2.3) Replace in-feed roller and or Separator(Pad Base) 3) Mis-Feed 3.1) Clean In-feed roller and pad with an alcoholic solution(In case the problem persists, then go to 3.2) 3.2) Move the In-feed ... solution(In case the problem persists, then go to make sure the side guides are not bent in any ways 4.3) Insure that there shouldn't be too much gap between paper and the side guides as shown in the picture below 4.4) On adjustment screws are set correctly 4.5) Insure that the side guides are right ...

User Manual
Page 16
Headquaters & Factory 15951 SW 41st Street. Pressure Sealer ES-5000 4.7) Clean the fold rollers with an alcoholic solution 4.8) Examine and replace any folding roller with imperfections such as flat spots or swelling 4.9) Replace or exchange from side to side the folding roller compression springs Division of Pai Trading, Inc. Suite 400 Davie, FL 33331 Email: [email protected] www.paitec.com 16
Headquaters & Factory 15951 SW 41st Street. Pressure Sealer ES-5000 4.7) Clean the fold rollers with an alcoholic solution 4.8) Examine and replace any folding roller with imperfections such as flat spots or swelling 4.9) Replace or exchange from side to side the folding roller compression springs Division of Pai Trading, Inc. Suite 400 Davie, FL 33331 Email: [email protected] www.paitec.com 16


