

User Guide
Page 2
... THE PRODUCTS AND SOFTWARE DESCRIBED IN IT. SERVICE AND SUPPORT Visit our multi-language web site at http://support.asus.com 2 Mini Desktop PC User Guide UNDER NO CIRCUMSTANCES IS ASUS LIABLE FOR ANY OF THE FOLLOWING: (1) THIRDPARTY CLAIMS AGAINST YOU FOR DAMAGES; (2) LOSS OF, OR DAMAGE ...TO, YOUR RECORDS OR DATA; Copyright © 2014 ASUSTeK COMPUTER INC. IN NO EVENT SHALL ASUS, ITS DIRECTORS, OFFICERS, EMPLOYEES OR...
... THE PRODUCTS AND SOFTWARE DESCRIBED IN IT. SERVICE AND SUPPORT Visit our multi-language web site at http://support.asus.com 2 Mini Desktop PC User Guide UNDER NO CIRCUMSTANCES IS ASUS LIABLE FOR ANY OF THE FOLLOWING: (1) THIRDPARTY CLAIMS AGAINST YOU FOR DAMAGES; (2) LOSS OF, OR DAMAGE ...TO, YOUR RECORDS OR DATA; Copyright © 2014 ASUSTeK COMPUTER INC. IN NO EVENT SHALL ASUS, ITS DIRECTORS, OFFICERS, EMPLOYEES OR...

User Guide
Page 3
...Typography...9 Icons ...9 Safety precautions 10 Using your Mini Desktop PC 10 Servicing and replacement of parts 10 Caring for your Mini Desktop PC 11 Proper disposal 11 Package contents 12 Chapter 1: Mini Desktop PC parts and features Getting to know your Mini Desktop PC 14 Main box...15 Front features...15 Rear... to the main box 28 Setting up your Mini Desktop PC 30 Powering on...36 Using a VESA mount (optional 37 Chapter 3: Using your Mini Desktop PC Proper posture when using your Mini Desktop PC 42 Tips on using your Mini Desktop PC 43 Using the optical drive 44 Inserting an ...
...Typography...9 Icons ...9 Safety precautions 10 Using your Mini Desktop PC 10 Servicing and replacement of parts 10 Caring for your Mini Desktop PC 11 Proper disposal 11 Package contents 12 Chapter 1: Mini Desktop PC parts and features Getting to know your Mini Desktop PC 14 Main box...15 Front features...15 Rear... to the main box 28 Setting up your Mini Desktop PC 30 Powering on...36 Using a VESA mount (optional 37 Chapter 3: Using your Mini Desktop PC Proper posture when using your Mini Desktop PC 42 Tips on using your Mini Desktop PC 43 Using the optical drive 44 Inserting an ...

User Guide
Page 4
... Snap feature...74 Other keyboard shortcuts 76 Connecting to the Internet 78 Turning your Mini Desktop PC off 82 Putting your Mini Desktop PC on sleep mode 82 Windows® 8.1 lock screen 83 Customizing your lock screen 84 Chapter 5: ASUS Business Manager ASUS Business Manager 88 Installing ASUS Business Manager 88 Starting ASUS Manager 90 4 Mini Desktop PC User Guide
... Snap feature...74 Other keyboard shortcuts 76 Connecting to the Internet 78 Turning your Mini Desktop PC off 82 Putting your Mini Desktop PC on sleep mode 82 Windows® 8.1 lock screen 83 Customizing your lock screen 84 Chapter 5: ASUS Business Manager ASUS Business Manager 88 Installing ASUS Business Manager 88 Starting ASUS Manager 90 4 Mini Desktop PC User Guide

User Guide
Page 5
... Chapter 7: Basic Input and Output System (BIOS) Knowing BIOS 132 Entering BIOS 132 BIOS menu options 133 Main ...133 Advanced...134 Boot ...135 Tool ...136 ASUS EZ Flash 2 Utility 137 Configuring HDD access 138 Configuring USB ports 141 Troubleshooting Power ...148 Display ...149 LAN ...150 Audio ...151 System ...152 CPU ...153...
... Chapter 7: Basic Input and Output System (BIOS) Knowing BIOS 132 Entering BIOS 132 BIOS menu options 133 Main ...133 Advanced...134 Boot ...135 Tool ...136 ASUS EZ Flash 2 Utility 137 Configuring HDD access 138 Configuring USB ports 141 Troubleshooting Power ...148 Display ...149 LAN ...150 Audio ...151 System ...152 CPU ...153...
User Guide
Page 7
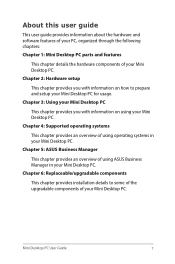
... This chapter provides an overview of using operating systems in your Mini Desktop PC. Chapter 5: ASUS Business Manager This chapter provides an overview of using your Mini Desktop PC. Chapter 2: Hardware setup This chapter provides you with information on using ASUS Business Manager in your Mini Desktop PC. Chapter 6: Replaceable/upgradable components This chapter provides installation details to...
... This chapter provides an overview of using operating systems in your Mini Desktop PC. Chapter 5: ASUS Business Manager This chapter provides an overview of using your Mini Desktop PC. Chapter 2: Hardware setup This chapter provides you with information on using ASUS Business Manager in your Mini Desktop PC. Chapter 6: Replaceable/upgradable components This chapter provides installation details to...

User Guide
Page 8
Chapter 7: BIOS This chapter provides information on how to for maintaining and fixing common issues with your Mini Desktop PC. 8 Mini Desktop PC User Guide Appendices This section includes notices and safety statements your Mini Desktop PC. Troubleshooting This section presents some recommended tips, hardware FAQs, and software FAQs you can refer to change the system settings through the BIOS Setup menus.
Chapter 7: BIOS This chapter provides information on how to for maintaining and fixing common issues with your Mini Desktop PC. 8 Mini Desktop PC User Guide Appendices This section includes notices and safety statements your Mini Desktop PC. Troubleshooting This section presents some recommended tips, hardware FAQs, and software FAQs you can refer to change the system settings through the BIOS Setup menus.

User Guide
Page 9
... be followed to in this user guide. WARNING! NOTE: This message contains additional information and tips that must be followed to your Mini Desktop PC. = Use a mouse. = Use a keyboard. Icons The icons below indicate the devices you safe while performing tasks and prevent damage...or procedures while working on the Windows® 8.1 operating system of your Mini Desktop PC's data and components. Typography Bold = This indicates a menu or an item that you can help complete tasks. Mini Desktop PC User Guide 9 Italic = This indicates sections that must be selected. ...
... be followed to in this user guide. WARNING! NOTE: This message contains additional information and tips that must be followed to your Mini Desktop PC. = Use a mouse. = Use a keyboard. Icons The icons below indicate the devices you safe while performing tasks and prevent damage...or procedures while working on the Windows® 8.1 operating system of your Mini Desktop PC's data and components. Typography Bold = This indicates a menu or an item that you can help complete tasks. Mini Desktop PC User Guide 9 Italic = This indicates sections that must be selected. ...
User Guide
Page 10
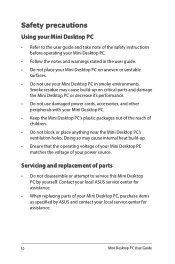
... not use damaged power cords, accessories, and other peripherals with your Mini Desktop PC. • Keep the Mini Desktop PC's plastic packages out of the reach of children. • Do not block or place anything near the Mini Desktop PC's ventilation holes. Contact your local ASUS service center for assistance. • When replacing parts of parts •...
... not use damaged power cords, accessories, and other peripherals with your Mini Desktop PC. • Keep the Mini Desktop PC's plastic packages out of the reach of children. • Do not block or place anything near the Mini Desktop PC's ventilation holes. Contact your local ASUS service center for assistance. • When replacing parts of parts •...

User Guide
Page 11
This product has been designed to enable proper reuse of parts and recycling. Check local regulations for your Mini Desktop PC • Switch off then unplug the Mini Desktop PC from the power outlet before cleaning it dry using a soft dry cloth. • Do not use a clean soft cloth.... Do not throw the battery in municipal waste. Wipe it . • When cleaning the Mini Desktop PC's housing, use liquid or aerosole cleaners, benzene, or thinners on your Mini Desktop PC in municipal waste. The symbol of the crossed out wheeled bin indicates that the product (electrical,...
This product has been designed to enable proper reuse of parts and recycling. Check local regulations for your Mini Desktop PC • Switch off then unplug the Mini Desktop PC from the power outlet before cleaning it dry using a soft dry cloth. • Do not use a clean soft cloth.... Do not throw the battery in municipal waste. Wipe it . • When cleaning the Mini Desktop PC's housing, use liquid or aerosole cleaners, benzene, or thinners on your Mini Desktop PC in municipal waste. The symbol of the crossed out wheeled bin indicates that the product (electrical,...

User Guide
Page 12
... or malfunction during normal and proper use within the warranty period, bring the warranty card to the ASUS Service Center for VESA mounting plate 4 pcs. Package contents Your Mini Desktop PC package contains the following items: Mini Desktop PC E810 Series main box Mini Desktop PC E810 Series docking (optional) AC power adapter stand antenna Power cable USB bridge (optional...
... or malfunction during normal and proper use within the warranty period, bring the warranty card to the ASUS Service Center for VESA mounting plate 4 pcs. Package contents Your Mini Desktop PC package contains the following items: Mini Desktop PC E810 Series main box Mini Desktop PC E810 Series docking (optional) AC power adapter stand antenna Power cable USB bridge (optional...

User Guide
Page 14
Getting to know your Mini Desktop PC Your Mini Desktop PC is an optional accessory to external devices. Docking (optional) The docking is made up of your Mini Desktop PC. It contains an optical disc drive and additional I /O ports that connects your Mini Desktop PC to your Mini Desktop PC. Main box The main box contains the operating system and main hardware peripherals of these devices: a main box and an optional docking. It also includes a set ot I /O ports for external device connectivity. 14 Mini Desktop PC User Guide
Getting to know your Mini Desktop PC Your Mini Desktop PC is an optional accessory to external devices. Docking (optional) The docking is made up of your Mini Desktop PC. It contains an optical disc drive and additional I /O ports that connects your Mini Desktop PC to your Mini Desktop PC. Main box The main box contains the operating system and main hardware peripherals of these devices: a main box and an optional docking. It also includes a set ot I /O ports for external device connectivity. 14 Mini Desktop PC User Guide

User Guide
Page 15
..., insert a straightened paper clip into this user guide. Microphone input jack port The microphone input jack port allows you to connect your Mini Desktop PC to amplified speakers or headphones. Mini Desktop PC User Guide 15 NOTE: For details about using BIOS, refer to the Chapter 7: Basic Input and Output System (BIOS) section in... Before booting up to 5 Gbit/s and are backward compatible to USB 2.0. Audio output jack port The audio output jack port allows you to connect your Mini Desktop PC to an external microphone.
..., insert a straightened paper clip into this user guide. Microphone input jack port The microphone input jack port allows you to connect your Mini Desktop PC to amplified speakers or headphones. Mini Desktop PC User Guide 15 NOTE: For details about using BIOS, refer to the Chapter 7: Basic Input and Output System (BIOS) section in... Before booting up to 5 Gbit/s and are backward compatible to USB 2.0. Audio output jack port The audio output jack port allows you to connect your Mini Desktop PC to an external microphone.

User Guide
Page 16
... wake it up from sleep or hibernate mode. WARNING! Air vents The air vents allow cool air to enter and warm air to put your Mini Desktop PC on or off. In the event that paper, books, clothing, cables, or other objects do not block any of the air vents or else... overheating may occur. 16 Mini Desktop PC User Guide Ensure that your Mini Desktop PC becomes unresponsive, press and hold the power button for about four (4) seconds until your Mini Desktop PC shuts down. You can also use the power button to exit the...
... wake it up from sleep or hibernate mode. WARNING! Air vents The air vents allow cool air to enter and warm air to put your Mini Desktop PC on or off. In the event that paper, books, clothing, cables, or other objects do not block any of the air vents or else... overheating may occur. 16 Mini Desktop PC User Guide Ensure that your Mini Desktop PC becomes unresponsive, press and hold the power button for about four (4) seconds until your Mini Desktop PC shuts down. You can also use the power button to exit the...

User Guide
Page 17
...-I USB 2.0 port The USB 2.0 (Universal Serial Bus 2.0) port is compatible with the docking of your Mini Desktop PC section in this user guide. Insert the USB bridge into this port to the Setting up your Mini Desktop PC. LAN port Insert the network cable into this port to connect to a local area network. * on...
...-I USB 2.0 port The USB 2.0 (Universal Serial Bus 2.0) port is compatible with the docking of your Mini Desktop PC section in this user guide. Insert the USB bridge into this port to the Setting up your Mini Desktop PC. LAN port Insert the network cable into this port to connect to a local area network. * on...

User Guide
Page 18
... it is HDCP compliant and allows you to secure your Mini Desktop PC to connect your Mini Desktop PC using Kensington® compatible Mini Desktop PC security products. 18 Mini Desktop PC User Guide Kensington® security slot The Kensington® security slot allows you to connect your Mini Desktop PC to any DVI-I port is connected to hot while...
... it is HDCP compliant and allows you to secure your Mini Desktop PC to connect your Mini Desktop PC using Kensington® compatible Mini Desktop PC security products. 18 Mini Desktop PC User Guide Kensington® security slot The Kensington® security slot allows you to connect your Mini Desktop PC to any DVI-I port is connected to hot while...

User Guide
Page 19
Mini Desktop PC User Guide 19 WARNING! Antenna connector This connector is used to connect the bundled antenna to exit the Mini Desktop PC. Ensure that paper, books, clothing, cables, or other objects do not block any of the air vents or else overheating may occur. Side features Air vents The air vents allow cool air to enter and warm air to your Mini Desktop PC.
Mini Desktop PC User Guide 19 WARNING! Antenna connector This connector is used to connect the bundled antenna to exit the Mini Desktop PC. Ensure that paper, books, clothing, cables, or other objects do not block any of the air vents or else overheating may occur. Side features Air vents The air vents allow cool air to enter and warm air to your Mini Desktop PC.

User Guide
Page 20
Guide slots for the Mini Desktop PC stand This screw hole allows you to ensure that your Mini Desktop PC when connecting it with its bundled stand. 20 Mini Desktop PC User Guide It also provides additional support to properly orient your device is held securely in place. Screw hole for the Mini Desktop PC stand These slots allow you to attach and secure your Mini Desktop PC with the bundled stand.
Guide slots for the Mini Desktop PC stand This screw hole allows you to ensure that your Mini Desktop PC when connecting it with its bundled stand. 20 Mini Desktop PC User Guide It also provides additional support to properly orient your device is held securely in place. Screw hole for the Mini Desktop PC stand These slots allow you to attach and secure your Mini Desktop PC with the bundled stand.

User Guide
Page 21
Screw holes for the optional docking This screw hole allows you to connect and secure your Mini Desktop PC with the bottom side down and also covers the chassis screws of your Mini Desktop PC while laid on a flat surface with its optional docking. Mini Desktop PC User Guide 21 Bottom features Removable rubber feet These removable rubber feet has two functions: it protects your Mini Desktop PC.
Screw holes for the optional docking This screw hole allows you to connect and secure your Mini Desktop PC with the bottom side down and also covers the chassis screws of your Mini Desktop PC while laid on a flat surface with its optional docking. Mini Desktop PC User Guide 21 Bottom features Removable rubber feet These removable rubber feet has two functions: it protects your Mini Desktop PC.
User Guide
Page 22
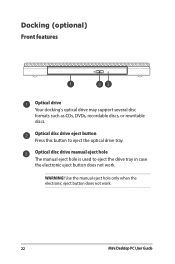
WARNING! Optical disc drive eject button Press this button to eject the drive tray in case the electronic eject button does not work . 22 Mini Desktop PC User Guide Optical disc drive manual eject hole The manual eject hole is used to eject the optical drive tray. Docking (optional) Front features Optical drive Your docking's optical drive may support several disc formats such as CDs, DVDs, recordable discs, or rewritable discs. Use the manual eject hole only when the electronic eject button does not work .
WARNING! Optical disc drive eject button Press this button to eject the drive tray in case the electronic eject button does not work . 22 Mini Desktop PC User Guide Optical disc drive manual eject hole The manual eject hole is used to eject the optical drive tray. Docking (optional) Front features Optical drive Your docking's optical drive may support several disc formats such as CDs, DVDs, recordable discs, or rewritable discs. Use the manual eject hole only when the electronic eject button does not work .

User Guide
Page 23
COM port This COM port is compatible with USB 2.0 or USB 1.1 devices. COM Rear features USB 2.0 ports The USB 2.0 (Universal Serial Bus 2.0) port is for pointing devices or other serial devices Parallel port This parallel port allows you to connect your Mini Desktop PC to external devices that uses parallel port connectors, such as printers and scanners. Mini Desktop PC User Guide 23
COM port This COM port is compatible with USB 2.0 or USB 1.1 devices. COM Rear features USB 2.0 ports The USB 2.0 (Universal Serial Bus 2.0) port is for pointing devices or other serial devices Parallel port This parallel port allows you to connect your Mini Desktop PC to external devices that uses parallel port connectors, such as printers and scanners. Mini Desktop PC User Guide 23


