
User Manual
Page 1
E45M1-M PRO Motherboard
E45M1-M PRO Motherboard

User Manual
Page 3
Contents Notices...vi Safety information vii About this guide viii E45M1-M PRO specifications summary ix Chapter 1: Product introduction 1.1 Welcome 1-1 1.2 Package contents 1-1 1.3 Special features 1-1 1.3.1 Product highlights 1-1 1.3.2 Innovative ASUS features 1-2 1.4 Before you proceed 1-4 1.5 Motherboard overview 1-5 1.5.1 Placement direction 1-5 1.5.2 Screw holes 1-5 1.5.3 Motherboard layout 1-6 1.5.4 Layout contents 1-6 1.6 Accelerated Processing Unit (APU 1-7 1.6.1 Installing the CPU fan 1-7 1.6.2 Uninstalling the CPU fan 1-8 1.7 System memory 1-8 1.7.1 Overview...
Contents Notices...vi Safety information vii About this guide viii E45M1-M PRO specifications summary ix Chapter 1: Product introduction 1.1 Welcome 1-1 1.2 Package contents 1-1 1.3 Special features 1-1 1.3.1 Product highlights 1-1 1.3.2 Innovative ASUS features 1-2 1.4 Before you proceed 1-4 1.5 Motherboard overview 1-5 1.5.1 Placement direction 1-5 1.5.2 Screw holes 1-5 1.5.3 Motherboard layout 1-6 1.5.4 Layout contents 1-6 1.6 Accelerated Processing Unit (APU 1-7 1.6.1 Installing the CPU fan 1-7 1.6.2 Uninstalling the CPU fan 1-8 1.7 System memory 1-8 1.7.1 Overview...

User Manual
Page 7
...crossed out wheeled bin indicates that the power cables for disposal of parts and recycling. DO NOT throw the motherboard in our products at ASUS REACH website at http://csr.asus.com/english/REACH.htm. If you are using the product, ensure that the battery should not be placed ...and circuitry. • Avoid dust, humidity, and temperature extremes. Do not place the product in municipal waste. Operation safety • Before installing the motherboard and adding devices on it may become wet. • Place the product on a stable surface. • If you are not sure about the voltage...
...crossed out wheeled bin indicates that the power cables for disposal of parts and recycling. DO NOT throw the motherboard in our products at ASUS REACH website at http://csr.asus.com/english/REACH.htm. If you are using the product, ensure that the battery should not be placed ...and circuitry. • Avoid dust, humidity, and temperature extremes. Do not place the product in municipal waste. Operation safety • Before installing the motherboard and adding devices on it may become wet. • Place the product on a stable surface. • If you are not sure about the voltage...

User Manual
Page 8
...descriptions of the BIOS parameters are not part of the standard package. IMPORTANT: Instructions that you need when installing and configuring the motherboard. Where to find more keys simultaneously, the key names are linked with a plus sign (+). How this guide This user ... updated information on ASUS hardware and software products. Refer to complete a task. These documents are also provided. About this guide is organized This guide contains the following parts: • Chapter 1: Product introduction This chapter describes the features of the motherboard and the new ...
...descriptions of the BIOS parameters are not part of the standard package. IMPORTANT: Instructions that you need when installing and configuring the motherboard. Where to find more keys simultaneously, the key names are linked with a plus sign (+). How this guide This user ... updated information on ASUS hardware and software products. Refer to complete a task. These documents are also provided. About this guide is organized This guide contains the following parts: • Chapter 1: Product introduction This chapter describes the features of the motherboard and the new ...

User Manual
Page 11
...) combines processing power and advanced DirectX® 11 graphics in the long line of ASUS quality motherboards! Chapter 1: Product introduction 1-1 Before you for the following items. Motherboard Cables Accessories Application DVD Documentation ASUS E45M1-M PRO motherboard 2 x Serial ATA 6.0Gb/s cables 1 x I/O shield 1 x CPU Fan ASUS motherboard support DVD User Manual If any of new features and latest technologies, making it...
...) combines processing power and advanced DirectX® 11 graphics in the long line of ASUS quality motherboards! Chapter 1: Product introduction 1-1 Before you for the following items. Motherboard Cables Accessories Application DVD Documentation ASUS E45M1-M PRO motherboard 2 x Serial ATA 6.0Gb/s cables 1 x I/O shield 1 x CPU Fan ASUS motherboard support DVD User Manual If any of new features and latest technologies, making it...

User Manual
Page 12
...the Serial ATA (SATA) interface, delivering up to 2.5GT/s interface speed and PCI Express 2.0 x 16 (at the back I/O This motherboard provides convenient connectivity to 6.0 Gb/s data transfer. Users can easily navigate the UEFI BIOS with the smoothness of real-time OC-now a...BIOS offers a user-friendly interface that demand far more flexible and convenient input with quick scrolling. Moreover, the ASUS OC profiles in different scenarios. 1-2 ASUS E45M1-M PRO ASUS provides extra SATA 6.0Gb/s ports with enhanced scalability, faster data retrieval, and double the bandwidth of current bus...
...the Serial ATA (SATA) interface, delivering up to 2.5GT/s interface speed and PCI Express 2.0 x 16 (at the back I/O This motherboard provides convenient connectivity to 6.0 Gb/s data transfer. Users can easily navigate the UEFI BIOS with the smoothness of real-time OC-now a...BIOS offers a user-friendly interface that demand far more flexible and convenient input with quick scrolling. Moreover, the ASUS OC profiles in different scenarios. 1-2 ASUS E45M1-M PRO ASUS provides extra SATA 6.0Gb/s ports with enhanced scalability, faster data retrieval, and double the bandwidth of current bus...

User Manual
Page 13
... the BC 1.1 function. *** The actual charging speed may vary with no need to use software package. ASUS Anti-Surge Protection This special design prevents expensive devices and the motherboard from switching power supply (PSU). Ai Charger+ ASUS Ai Charger+, the latest Ai Charger* version, brings you can not only easily charge iPod, iPhone...
... the BC 1.1 function. *** The actual charging speed may vary with no need to use software package. ASUS Anti-Surge Protection This special design prevents expensive devices and the motherboard from switching power supply (PSU). Ai Charger+ ASUS Ai Charger+, the latest Ai Charger* version, brings you can not only easily charge iPod, iPhone...

User Manual
Page 14
eliminates the need to the motherboard, peripherals, or components. 1-4 ASUS E45M1-M PRO Failure to do so may cause severe damage to open the system chassis and clear the RTC data. C.P.R. (CPU Parameter Recall) The BIOS C.P.R. Simply shut ... socket before you install motherboard components or change any component, ensure that the ATX power supply is switched off or the power cord is European Union´s Energy-related Products (ErP) ready, and ErP requires products to meet certain energy efficiency requirements in the bag that came with ASUS vision of creating...
eliminates the need to the motherboard, peripherals, or components. 1-4 ASUS E45M1-M PRO Failure to do so may cause severe damage to open the system chassis and clear the RTC data. C.P.R. (CPU Parameter Recall) The BIOS C.P.R. Simply shut ... socket before you install motherboard components or change any component, ensure that the ATX power supply is switched off or the power cord is European Union´s Energy-related Products (ErP) ready, and ErP requires products to meet certain energy efficiency requirements in the bag that came with ASUS vision of creating...

User Manual
Page 15
...chassis E45M1-M PRO Chapter 1: Product introduction 1-5 The edge with external ports goes to the rear part of the chassis as indicated in the correct orientation. Do not overtighten the screws! Ensure that you place it into it. 1.5 Motherboard overview Before you install the motherboard, study... the configuration of your chassis to ensure that the motherboard fits into the chassis in the image below. 1.5.2 Screw holes Place six screws ...
...chassis E45M1-M PRO Chapter 1: Product introduction 1-5 The edge with external ports goes to the rear part of the chassis as indicated in the correct orientation. Do not overtighten the screws! Ensure that you place it into it. 1.5 Motherboard overview Before you install the motherboard, study... the configuration of your chassis to ensure that the motherboard fits into the chassis in the image below. 1.5.2 Screw holes Place six screws ...

User Manual
Page 16
...LPT connector (26-1 pin LPT) 1-17 1-20 14. IEEE 1394a connector (10-1 pin IE1394_1) 1-18 1-16 15. 1.5.3 Motherboard layout 1 23 2 18.3cm(7.2in) 4 5 KB_USB56 SPDIFO _HDMI ATX12V CPU_FAN 02LED2 6 TURBO_KEY_II DDR3 DIMM_A1 (64bit, 240-pin module... PCIEX16 7 SATA6G_5 RTL 8111E ALC 887 AAFP CLRTC PCIEX1_1 VIA VT6308P Asmedia ASM1083 Super I/O PCI1 E45M1-M PRO Lithium Cell CMOS Power SB_PWR PCI2 SPDIF_OUT IE1394_1 LPT USB1314 USB1112 USB910 USB78 32Mb BIOS COM1 PANEL ...Power LED 1-21 1-7 11. Digital audio connector (4-1 pin SPDIF_OUT) 1-16 1-6 ASUS E45M1-M PRO
...LPT connector (26-1 pin LPT) 1-17 1-20 14. IEEE 1394a connector (10-1 pin IE1394_1) 1-18 1-16 15. 1.5.3 Motherboard layout 1 23 2 18.3cm(7.2in) 4 5 KB_USB56 SPDIFO _HDMI ATX12V CPU_FAN 02LED2 6 TURBO_KEY_II DDR3 DIMM_A1 (64bit, 240-pin module... PCIEX16 7 SATA6G_5 RTL 8111E ALC 887 AAFP CLRTC PCIEX1_1 VIA VT6308P Asmedia ASM1083 Super I/O PCI1 E45M1-M PRO Lithium Cell CMOS Power SB_PWR PCI2 SPDIF_OUT IE1394_1 LPT USB1314 USB1112 USB910 USB78 32Mb BIOS COM1 PANEL ...Power LED 1-21 1-7 11. Digital audio connector (4-1 pin SPDIF_OUT) 1-16 1-6 ASUS E45M1-M PRO
User Manual
Page 17
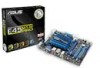
...connect the CPU fan connector! CPU_FAN CPU FAN PWM CPU FAN IN CPU FAN PWR GND E45M1-M PRO E45M1-M PRO CPU fan connector • Do not forget to the connector on the motherboard labeled CPU_FAN. Hardware monitoring errors can occur if you fail to plug this connector. •...CPU fan is installed properly when overclocking. 1.6 Accelerated Processing Unit (APU) The motherboard comes with an integrated AMD® Dual-Core Processor E-450 with AMD® RadeonTM HD 6320 Discrete-Class graphics E45M1-M PRO E45M1-M PRO Integrated AMD® Dual-Core Processor E-450 1.6.1 Installing the CPU fan To...
...connect the CPU fan connector! CPU_FAN CPU FAN PWM CPU FAN IN CPU FAN PWR GND E45M1-M PRO E45M1-M PRO CPU fan connector • Do not forget to the connector on the motherboard labeled CPU_FAN. Hardware monitoring errors can occur if you fail to plug this connector. •...CPU fan is installed properly when overclocking. 1.6 Accelerated Processing Unit (APU) The motherboard comes with an integrated AMD® Dual-Core Processor E-450 with AMD® RadeonTM HD 6320 Discrete-Class graphics E45M1-M PRO E45M1-M PRO Integrated AMD® Dual-Core Processor E-450 1.6.1 Installing the CPU fan To...
User Manual
Page 18
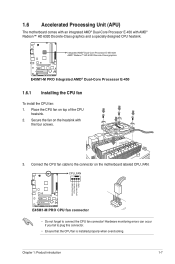
... the four screws from the CPU heatsink. 1.7 System memory 1.7.1 Overview The motherboard comes with less power consumption. The figure illustrates the location of the DDR3 DIMM sockets: DIMM_A1 DIMM_A2 Channel Channel A Sockets DIMM_A1 E45M1-M PRO E45M1-M PRO 240-pin DDR3 DIMM sockets DIMM_A2 1-8 ASUS E45M1-M PRO DDR3 modules are developed for better performance with two Double Data Rate...
... the four screws from the CPU heatsink. 1.7 System memory 1.7.1 Overview The motherboard comes with less power consumption. The figure illustrates the location of the DDR3 DIMM sockets: DIMM_A1 DIMM_A2 Channel Channel A Sockets DIMM_A1 E45M1-M PRO E45M1-M PRO 240-pin DDR3 DIMM sockets DIMM_A2 1-8 ASUS E45M1-M PRO DDR3 modules are developed for better performance with two Double Data Rate...

User Manual
Page 19
...non‑ECC DDR3 DIMMs into the DIMM sockets. • We recommend that you do any of 512Mb (64MB) chips or less. Visit the ASUS website at a lower frequency than the vendor-marked value. Chapter 1: Product introduction 1-9 Use a maximum of 3GB system memory if you are using a...install the memory modules from a memory module. For effective use of memory, we recommend that you install 4GB or more on the motherboard. • This motherboard does not support DIMMs made up of the following: - The default memory operation frequency is the standard way of accessing information from ...
...non‑ECC DDR3 DIMMs into the DIMM sockets. • We recommend that you do any of 512Mb (64MB) chips or less. Visit the ASUS website at a lower frequency than the vendor-marked value. Chapter 1: Product introduction 1-9 Use a maximum of 3GB system memory if you are using a...install the memory modules from a memory module. For effective use of memory, we recommend that you install 4GB or more on the motherboard. • This motherboard does not support DIMMs made up of the following: - The default memory operation frequency is the standard way of accessing information from ...

User Manual
Page 20
Remove the system unit cover (if your motherboard is completely seated on shared slots, ensure that the drivers support "Share IRQ" or that supports PCI Express x16 2.0 graphic cards complying with the PCI Express specifications. 1-10 ASUS E45M1-M PRO Keep the screw for the expansion card. Replace ...the card. 2. Otherwise, conflicts will arise between the two PCI groups, making the system unstable and the card inoperable. 1.8.3 PCI slots This motherboard has two PCI slots that supports cards such as a LAN card, SCSI card, USB card, and other cards that comply with PCI specifications....
Remove the system unit cover (if your motherboard is completely seated on shared slots, ensure that the drivers support "Share IRQ" or that supports PCI Express x16 2.0 graphic cards complying with the PCI Express specifications. 1-10 ASUS E45M1-M PRO Keep the screw for the expansion card. Replace ...the card. 2. Otherwise, conflicts will arise between the two PCI groups, making the system unstable and the card inoperable. 1.8.3 PCI slots This motherboard has two PCI slots that supports cards such as a LAN card, SCSI card, USB card, and other cards that comply with PCI specifications....
User Manual
Page 25
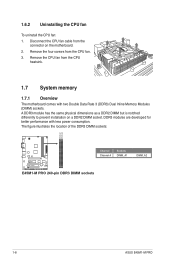
... out_R NC Line out_L PORT1 L PORT1 R PORT2 R SENSE_SEND PORT2 L E45M1-M PRO HD-audio-compliant Legacy AC'97 pin definition compliant definition E45M1-M PRO Front panel audio connector • We recommend that you connect a high-definition front panel audio module to this connector, set to the motherboard. Chapter 1: Product introduction 1-15 2. CPU and chassis fan connectors...
... out_R NC Line out_L PORT1 L PORT1 R PORT2 R SENSE_SEND PORT2 L E45M1-M PRO HD-audio-compliant Legacy AC'97 pin definition compliant definition E45M1-M PRO Front panel audio connector • We recommend that you connect a high-definition front panel audio module to this connector, set to the motherboard. Chapter 1: Product introduction 1-15 2. CPU and chassis fan connectors...
User Manual
Page 28
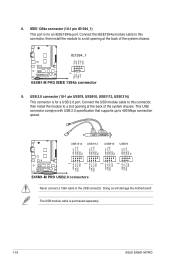
...motherboard! USB1314 USB1112 USB910 USB78 USB+5V USB_P14USB_P14+ GND NC USB+5V USB_P12USB_P12+ GND NC USB+5V USB_P10USB_P10+ GND NC USB+5V USB_P8USB_P8+ GND NC USB+5V USB_P13USB_P13+ GND USB+5V USB_P11USB_P11+ GND USB+5V USB_P9USB_P9+ GND USB+5V USB_P7USB_P7+ GND E45M1-M PRO PIN 1 PIN 1 PIN 1 PIN 1 E45M1-M PRO... USB2.0 connectors Never connect a 1394 cable to 480 Mbps connection speed. IEEE 1394a connector (10-1 pin IE1394_1) This port is purchased separately. 1-18 ASUS E45M1-M PRO
...motherboard! USB1314 USB1112 USB910 USB78 USB+5V USB_P14USB_P14+ GND NC USB+5V USB_P12USB_P12+ GND NC USB+5V USB_P10USB_P10+ GND NC USB+5V USB_P8USB_P8+ GND NC USB+5V USB_P13USB_P13+ GND USB+5V USB_P11USB_P11+ GND USB+5V USB_P9USB_P9+ GND USB+5V USB_P7USB_P7+ GND E45M1-M PRO PIN 1 PIN 1 PIN 1 PIN 1 E45M1-M PRO... USB2.0 connectors Never connect a 1394 cable to 480 Mbps connection speed. IEEE 1394a connector (10-1 pin IE1394_1) This port is purchased separately. 1-18 ASUS E45M1-M PRO

User Manual
Page 31
... LED The motherboard comes with a standby power LED that you should shut down the system and unplug the power cable before removing or plugging in soft-off mode. The illustration below shows the location of the onboard LED. SB_PWR E45M1-M PRO ON OFF Standby Power Powered Off E45M1-M PRO Onboard LED 2. O2LED2 E45M1-M PRO E45M1-M PRO Turbo Key II...
... LED The motherboard comes with a standby power LED that you should shut down the system and unplug the power cable before removing or plugging in soft-off mode. The illustration below shows the location of the onboard LED. SB_PWR E45M1-M PRO ON OFF Standby Power Powered Off E45M1-M PRO Onboard LED 2. O2LED2 E45M1-M PRO E45M1-M PRO Turbo Key II...

User Manual
Page 32
...only. To run the DVD. 1-22 ASUS E45M1-M PRO The following screen is enabled in your hardware. • Motherboard settings and hardware options vary. Click an icon to display Support DVD/ motherboard information Click an item to change at www.asus.com for updates. 1.13 Software support ...1.13.1 Installing an operating system This motherboard supports Windows® XP / Vista / 7 Operating Systems (OS). Click Drivers, ...
...only. To run the DVD. 1-22 ASUS E45M1-M PRO The following screen is enabled in your hardware. • Motherboard settings and hardware options vary. Click an icon to display Support DVD/ motherboard information Click an item to change at www.asus.com for updates. 1.13 Software support ...1.13.1 Installing an operating system This motherboard supports Windows® XP / Vista / 7 Operating Systems (OS). Click Drivers, ...

User Manual
Page 33
... Next. Chapter 2 BIOS information 2.1 Managing and updating your BIOS Save a copy of the original motherboard BIOS file to a USB flash disk in case you to manage, save, and update the motherboard BIOS in Windows® environment. • ASUS Update requires an Internet connection either of the following methods: Updating from the popup menu...
... Next. Chapter 2 BIOS information 2.1 Managing and updating your BIOS Save a copy of the original motherboard BIOS file to a USB flash disk in case you to manage, save, and update the motherboard BIOS in Windows® environment. • ASUS Update requires an Internet connection either of the following methods: Updating from the popup menu...
User Manual
Page 35
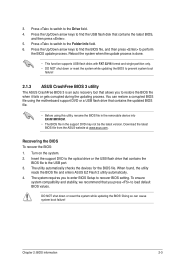
...and then press . 5. Press the Up/Down arrow keys to perform the BIOS update process. When found, the utility reads the BIOS file and enters ASUS EZ Flash 2 utility automatically. 4. To ensure system compatibility and stability, we recommend that contains the BIOS file to the Folder Info field. 6. Reboot ...the optical drive or the USB flash drive that you to load default BIOS values. Doing so can restore a corrupted BIOS file using the motherboard support DVD or a USB flash drive that allows you press to restore the BIOS file when it fails or gets corrupted during the updating ...
...and then press . 5. Press the Up/Down arrow keys to perform the BIOS update process. When found, the utility reads the BIOS file and enters ASUS EZ Flash 2 utility automatically. 4. To ensure system compatibility and stability, we recommend that contains the BIOS file to the Folder Info field. 6. Reboot ...the optical drive or the USB flash drive that you to load default BIOS values. Doing so can restore a corrupted BIOS file using the motherboard support DVD or a USB flash drive that allows you press to restore the BIOS file when it fails or gets corrupted during the updating ...


