
User Guide
Page 2
...LOSS OF USE OR DATA, INTERRUPTION OF BUSINESS AND THE LIKE), EVEN IF ASUS HAS BEEN ADVISED OF THE POSSIBILITY OF SUCH DAMAGES ARISING FROM ANY DEFECT OR ERROR IN THIS MANUAL OR PRODUCT. SPECIFICATIONS AND INFORMATION CONTAINED IN THIS MANUAL ARE FURNISHED FOR INFORMATIONAL USE ONLY, AND ...ARE SUBJECT TO CHANGE AT ANY TIME WITHOUT NOTICE, AND SHOULD NOT BE CONSTRUED AS A COMMITMENT BY ASUS. All Rights Reserved. E1469 Revised Edition V3 November...
...LOSS OF USE OR DATA, INTERRUPTION OF BUSINESS AND THE LIKE), EVEN IF ASUS HAS BEEN ADVISED OF THE POSSIBILITY OF SUCH DAMAGES ARISING FROM ANY DEFECT OR ERROR IN THIS MANUAL OR PRODUCT. SPECIFICATIONS AND INFORMATION CONTAINED IN THIS MANUAL ARE FURNISHED FOR INFORMATIONAL USE ONLY, AND ...ARE SUBJECT TO CHANGE AT ANY TIME WITHOUT NOTICE, AND SHOULD NOT BE CONSTRUED AS A COMMITMENT BY ASUS. All Rights Reserved. E1469 Revised Edition V3 November...

User Guide
Page 5
... 5.6 Boot menu 5-25 5.7 Exit menu 5-27 Appendix A.1 Subsystem A-2 A.1.1 Front and rear panel features A-2 A.1.2 Removing the top cover A-3 A.1.3 Installing a hard disk drive A-3 A.1.4 Connecting the Subsystem to DiGiMatrix A-4 A.2 DiGiMatrix remote controller A-5 A.2.1 Specifications A-5 A.2.2 Remote control layout A-5 A.2.3 Remote control functions in Audio DJ A-6 A.2.4 Remote control functions in Home Theater .......... A-7 A.3 Optical drive technical specifications A-9 A.4 Wireless LAN adapter channels A-10 ASUS DiGiMatrix v
... 5.6 Boot menu 5-25 5.7 Exit menu 5-27 Appendix A.1 Subsystem A-2 A.1.1 Front and rear panel features A-2 A.1.2 Removing the top cover A-3 A.1.3 Installing a hard disk drive A-3 A.1.4 Connecting the Subsystem to DiGiMatrix A-4 A.2 DiGiMatrix remote controller A-5 A.2.1 Specifications A-5 A.2.2 Remote control layout A-5 A.2.3 Remote control functions in Audio DJ A-6 A.2.4 Remote control functions in Home Theater .......... A-7 A.3 Optical drive technical specifications A-9 A.4 Wireless LAN adapter channels A-10 ASUS DiGiMatrix v
User Guide
Page 8
...DiGiMatrix Subsystem, remote controller, optical drive technical specifications, and IEEE 802.11b channels for experienced users and integrators with the system. How this guide Audience This guide provides general information and installation instructions about the P4SQ motherboard that came with hardware knowledge of the ASUS DiGiMatrix... This chapter tells how to install components in the ASUS DiGiMatrix system. 3. Chapter 4: Motherboard Information This chapter gives information about the ASUS DiGiMatrix. The chapter lists the system features including introduction on...
...DiGiMatrix Subsystem, remote controller, optical drive technical specifications, and IEEE 802.11b channels for experienced users and integrators with the system. How this guide Audience This guide provides general information and installation instructions about the P4SQ motherboard that came with hardware knowledge of the ASUS DiGiMatrix... This chapter tells how to install components in the ASUS DiGiMatrix system. 3. Chapter 4: Motherboard Information This chapter gives information about the ASUS DiGiMatrix. The chapter lists the system features including introduction on...
User Guide
Page 24
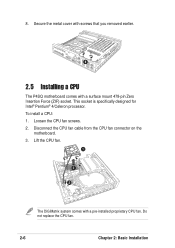
This socket is specifically designed for Intel® Pentium® 4/Celeron processor. Disconnect the CPU fan cable from the CPU fan connector on the motherboard. 3. Loosen the CPU fan screws. 2. 8. Do not replace the CPU fan. 2-6 Chapter 2: Basic Installation To install a CPU: 1. Secure the metal cover with screws that you removed earlier. 8 2.5 Installing a CPU The P4SQ motherboard comes with a pre-installed proprietary CPU fan. Lift the CPU fan. 1 3 2 The DiGiMatrix system comes with a surface mount 478-pin Zero Insertion Force (ZIF) socket.
This socket is specifically designed for Intel® Pentium® 4/Celeron processor. Disconnect the CPU fan cable from the CPU fan connector on the motherboard. 3. Loosen the CPU fan screws. 2. 8. Do not replace the CPU fan. 2-6 Chapter 2: Basic Installation To install a CPU: 1. Secure the metal cover with screws that you removed earlier. 8 2.5 Installing a CPU The P4SQ motherboard comes with a pre-installed proprietary CPU fan. Lift the CPU fan. 1 3 2 The DiGiMatrix system comes with a surface mount 478-pin Zero Insertion Force (ZIF) socket.
User Guide
Page 108
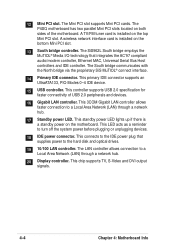
.... This connects to turn off the system power before plugging or unplugging devices. 18 IDE power connector. 12 Mini PCI slot. This controller supports USB 2.0 specification for faster connectivity of the motherboard.
.... This connects to turn off the system power before plugging or unplugging devices. 18 IDE power connector. 12 Mini PCI slot. This controller supports USB 2.0 specification for faster connectivity of the motherboard.
User Guide
Page 110
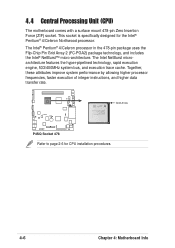
... cache. Together, these attributes improve system performance by allowing higher processor frequencies, faster execution of integer instructions, and higher data transfer rate. This socket is specifically designed for CPU installation procedures. 4-6 Chapter 4: Motherboard Info Gold Arrow P4SQ P4SQ Socket 478 Refer to page 2-6 for the Intel® Pentium® 4/Celeron Northwood...
... cache. Together, these attributes improve system performance by allowing higher processor frequencies, faster execution of integer instructions, and higher data transfer rate. This socket is specifically designed for CPU installation procedures. 4-6 Chapter 4: Motherboard Info Gold Arrow P4SQ P4SQ Socket 478 Refer to page 2-6 for the Intel® Pentium® 4/Celeron Northwood...
User Guide
Page 124
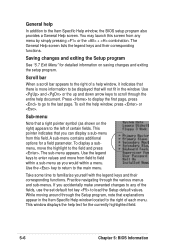
...the currently highlighted field. 5-6 Chapter 5: BIOS Information A sub-menu contains additional options for detailed information on the right) appears to the Item Specific Help window, the BIOS setup program also provides a General Help screen. The sub-menu appears. You may launch this screen from this field....the + combination. Use the key to return to the field and press . Sub-menu Note that will not fit in the Item Specific Help window located to the right of each menu. This window displays the help window, press or . This pointer indicates that explanations ...
...the currently highlighted field. 5-6 Chapter 5: BIOS Information A sub-menu contains additional options for detailed information on the right) appears to the Item Specific Help window, the BIOS setup program also provides a General Help screen. The sub-menu appears. You may launch this screen from this field....the + combination. Use the key to return to the field and press . Sub-menu Note that will not fit in the Item Specific Help window located to the right of each menu. This window displays the help window, press or . This pointer indicates that explanations ...
User Guide
Page 141
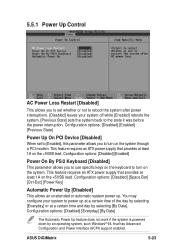
5.5.1 Power Up Control AC Power Loss Restart [Disabled] This allows you to set to [Enabled], this parameter allows you to use specific keys on the keyboard to turn on the system through a PCI modem. Configuration options: [Disabled] [Enabled] [Previous State] Power Up On PCI ...allows an unattended or automatic system power up at a certain time of the day by selecting [Everyday] or at least 1A on the +5VSB lead. ASUS DiGiMatrix 5-23 Configuration options: [Disabled] [Enabled] Power On By PS/2 Keyboard [Disabled] This parameter allows you to power up . You may configure your...
5.5.1 Power Up Control AC Power Loss Restart [Disabled] This allows you to set to [Enabled], this parameter allows you to use specific keys on the keyboard to turn on the system through a PCI modem. Configuration options: [Disabled] [Enabled] [Previous State] Power Up On PCI ...allows an unattended or automatic system power up at a certain time of the day by selecting [Everyday] or at least 1A on the +5VSB lead. ASUS DiGiMatrix 5-23 Configuration options: [Disabled] [Enabled] Power On By PS/2 Keyboard [Disabled] This parameter allows you to power up . You may configure your...
User Guide
Page 147
Appendix The Appendix provides information on the DiGiMatrix Subsystem, remote controller, optical drive technical specifications, and IEEE 802.11b channels for the wireless LAN adapter. ASUS DiGiMatrix Appendix
Appendix The Appendix provides information on the DiGiMatrix Subsystem, remote controller, optical drive technical specifications, and IEEE 802.11b channels for the wireless LAN adapter. ASUS DiGiMatrix Appendix
User Guide
Page 151
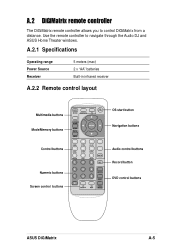
A.2.1 Specifications Operating range Power Source Receiver 5 meters (max) 2 x "AA" batteries Built-in infrared receiver A.2.2 Remote control layout Multimedia buttons Mode/Memory buttons Control buttons Numeric buttons Screen control buttons OS start button Navigation buttons Audio control buttons Record button DVD control buttons ASUS DiGiMatrix A-5 Use the remote controller to control DiGiMatrix from a distance. A.2 DiGiMatrix remote controller The DiGiMatrix remote controller allows you to navigate through the Audio DJ and ASUS Home Theater windows.
A.2.1 Specifications Operating range Power Source Receiver 5 meters (max) 2 x "AA" batteries Built-in infrared receiver A.2.2 Remote control layout Multimedia buttons Mode/Memory buttons Control buttons Numeric buttons Screen control buttons OS start button Navigation buttons Audio control buttons Record button DVD control buttons ASUS DiGiMatrix A-5 Use the remote controller to control DiGiMatrix from a distance. A.2 DiGiMatrix remote controller The DiGiMatrix remote controller allows you to navigate through the Audio DJ and ASUS Home Theater windows.