
User Guide
Page 4
...3-2 3.3.1 Running the support CD 3-3 3.3.2 Drivers menu 3-3 3.3.3 Utilities menu 3-5 3.3.4 ASUS contact information 3-6 3.3.5 Other information 3-6 3.4 Software information 3-7 3.4.1 ASUS Update 3-7 3.4.2 ASUS PC Probe 3-9 3.4.3 Multi-channel audio feature 3-13 3.4.4 Music Wizard 3-16 3.5 Audio... volume 3-21 3.6 ASUS Home Theater 3-22 3.6.1 Installing ASUS Home Theater 3-22 3.6.2 Using ASUS Home Theater 3-24 5.6.3 Entertainment modes 3-26 3.7 ASUS Wireless LAN adapter 3-35 3.7.1 Installing the WLAN Card utilities and driver ...... 3-36 3.7.2 Setting the Windows® XP wireless ...
...3-2 3.3.1 Running the support CD 3-3 3.3.2 Drivers menu 3-3 3.3.3 Utilities menu 3-5 3.3.4 ASUS contact information 3-6 3.3.5 Other information 3-6 3.4 Software information 3-7 3.4.1 ASUS Update 3-7 3.4.2 ASUS PC Probe 3-9 3.4.3 Multi-channel audio feature 3-13 3.4.4 Music Wizard 3-16 3.5 Audio... volume 3-21 3.6 ASUS Home Theater 3-22 3.6.1 Installing ASUS Home Theater 3-22 3.6.2 Using ASUS Home Theater 3-24 5.6.3 Entertainment modes 3-26 3.7 ASUS Wireless LAN adapter 3-35 3.7.1 Installing the WLAN Card utilities and driver ...... 3-36 3.7.2 Setting the Windows® XP wireless ...

User Guide
Page 18
... 1: System Introduction Audio DJ The LED panel displays the playlist number when Audio DJ is in degree Celsius when DiGiMatrix is set to -Disk) state. FM radio mode 10 HD CD FM 88..70 Refer to page 3-21... HD CD FM 00:00 - VOLUME + Time - CPU Temperature - The LED panel displays the CPU temperature in Windows® mode. In play status, the LED panel displays the play icon, track number, and track duration. 00... audio mode. The LED panel displays the system time in 24-hour format when DiGiMatrix is in soft-off or stand-by mode, S3 (Suspend-to-RAM), or S4 (Suspend-to HD ...
... 1: System Introduction Audio DJ The LED panel displays the playlist number when Audio DJ is in degree Celsius when DiGiMatrix is set to -Disk) state. FM radio mode 10 HD CD FM 88..70 Refer to page 3-21... HD CD FM 00:00 - VOLUME + Time - CPU Temperature - The LED panel displays the CPU temperature in Windows® mode. In play status, the LED panel displays the play icon, track number, and track duration. 00... audio mode. The LED panel displays the system time in 24-hour format when DiGiMatrix is in soft-off or stand-by mode, S3 (Suspend-to-RAM), or S4 (Suspend-to HD ...

User Guide
Page 34
... for more information. 3.2 Powering up Visit the ASUS website for general reference only. Always install the latest OS version and corresponding updates so you can maximize the features of the support CD are subject to your hardware. 3.1 Installing an operating system The DiGiMatrix system supports Windows® 2000/XP operating systems (OS). Because...
... for more information. 3.2 Powering up Visit the ASUS website for general reference only. Always install the latest OS version and corresponding updates so you can maximize the features of the support CD are subject to your hardware. 3.1 Installing an operating system The DiGiMatrix system supports Windows® 2000/XP operating systems (OS). Because...
User Guide
Page 37
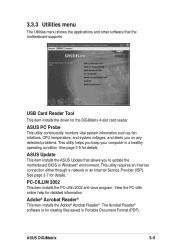
...See page 3-9 for detailed information. Adobe® Acrobat Reader® This item installs the Adobe® Acrobat Reader®. ASUS DiGiMatrix 3-5 ASUS PC Probe This utility continuously monitors vital system information such as fan rotations, CPU temperature, and system voltages, and alerts you... This item installs the ASUS Update that the motherboard supports. 3.3.3 Utilities menu The Utilities menu shows the applications and other software that allows you keep your computer in Windows® environment, This utility requires an Internet connection either through a network or ...
...See page 3-9 for detailed information. Adobe® Acrobat Reader® This item installs the Adobe® Acrobat Reader®. ASUS DiGiMatrix 3-5 ASUS PC Probe This utility continuously monitors vital system information such as fan rotations, CPU temperature, and system voltages, and alerts you... This item installs the ASUS Update that the motherboard supports. 3.3.3 Utilities menu The Utilities menu shows the applications and other software that allows you keep your computer in Windows® environment, This utility requires an Internet connection either through a network or ...
User Guide
Page 39
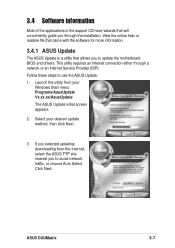
... is a utility that will conveniently guide you to use the ASUS Update. 1. Select your Windows Start menu: Programs/AsusUpdate Vx.xx.xx/AsusUpdate The ASUS Update initial screen appears. 2. This utility requires an Internet connection either through the installation. ASUS DiGiMatrix 3-7 Follow these steps to avoid network traffic, or choose Auto Select. Launch the utility...
... is a utility that will conveniently guide you to use the ASUS Update. 1. Select your Windows Start menu: Programs/AsusUpdate Vx.xx.xx/AsusUpdate The ASUS Update initial screen appears. 2. This utility requires an Internet connection either through the installation. ASUS DiGiMatrix 3-7 Follow these steps to avoid network traffic, or choose Auto Select. Launch the utility...

User Guide
Page 40
Click Next. 5. Click Flash to complete the update process. 3-8 Chapter 3: Starting up prompting you wish to locate the file. The BIOS ROM information is displayed. Select the file, click Save, then follow the screen instructions to update the BIOS. 4. From the FTP site, select the BIOS version that you to download. If you selected the option to update the BIOS from a file, a window pops up
Click Next. 5. Click Flash to complete the update process. 3-8 Chapter 3: Starting up prompting you wish to locate the file. The BIOS ROM information is displayed. Select the file, click Save, then follow the screen instructions to update the BIOS. 4. From the FTP site, select the BIOS version that you to download. If you selected the option to update the BIOS from a file, a window pops up
User Guide
Page 41
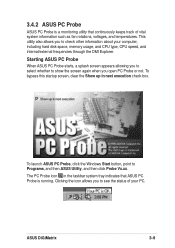
To launch ASUS PC Probe, click the Windows Start button, point to show the screen again when you open PC Probe or not. To bypass this startup screen, clear the Show up in ..., voltages, and temperatures. This utility also allows you to check other information about your PC. ASUS DiGiMatrix 3-9 Starting ASUS PC Probe When ASUS PC Probe starts, a splash screen appears allowing you to select whether to Programs, and then ASUS Utility, and then click Probe Vx.xx. The PC Probe icon in next execution check box...
To launch ASUS PC Probe, click the Windows Start button, point to show the screen again when you open PC Probe or not. To bypass this startup screen, clear the Show up in ..., voltages, and temperatures. This utility also allows you to check other information about your PC. ASUS DiGiMatrix 3-9 Starting ASUS PC Probe When ASUS PC Probe starts, a splash screen appears allowing you to select whether to Programs, and then ASUS Utility, and then click Probe Vx.xx. The PC Probe icon in next execution check box...
User Guide
Page 45
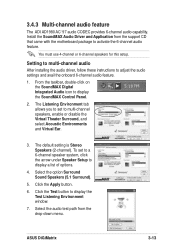
...options. 4. Click the Apply button. 6. From the taskbar, double-click on the SoundMAX Digital Integrated Audio icon to display the Test Listening Environment window. 7. Select the option Surround Sound Speakers (5.1 Surround). 5. Click the Test button to display the SoundMAX Control Panel. 2. 3.4.3 Multi-channel audio... came with the motherboard package to adjust the audio settings and avail the onboard 6-channel audio feature. 1. ASUS DiGiMatrix 3-13 Setting to multi-channel audio After installing the audio driver, follow these instructions to activate the 6-channel audio feature.
...options. 4. Click the Apply button. 6. From the taskbar, double-click on the SoundMAX Digital Integrated Audio icon to display the Test Listening Environment window. 7. Select the option Surround Sound Speakers (5.1 Surround). 5. Click the Test button to display the SoundMAX Control Panel. 2. 3.4.3 Multi-channel audio... came with the motherboard package to adjust the audio settings and avail the onboard 6-channel audio feature. 1. ASUS DiGiMatrix 3-13 Setting to multi-channel audio After installing the audio driver, follow these instructions to activate the 6-channel audio feature.

User Guide
Page 47
...front panel microphone. 3. Click Close. The rear panel Mic port (pink) is automatically disabled when you enable the front panel Mic port. ASUS DiGiMatrix 3-15 Adjusting the volume settings 1. To achieve 6-channel audio capability when playing DVDs, check the boxes opposite AC3 SPDIF and PCM SPDIF. ...Click Close for the new settings to display the Volume Control window. 2. Only one Mic port works at a time. Click the Volume Control Advanced button. Click on the Windows® taskbar to take effect. Check the box opposite Mic2 Select to display the...
...front panel microphone. 3. Click Close. The rear panel Mic port (pink) is automatically disabled when you enable the front panel Mic port. ASUS DiGiMatrix 3-15 Adjusting the volume settings 1. To achieve 6-channel audio capability when playing DVDs, check the boxes opposite AC3 SPDIF and PCM SPDIF. ...Click Close for the new settings to display the Volume Control window. 2. Only one Mic port works at a time. Click the Volume Control Advanced button. Click on the Windows® taskbar to take effect. Check the box opposite Mic2 Select to display the...

User Guide
Page 48
...Wizard utility is included in the support CD that came with the DiGiMatrix package. The Music Wizard window displays the playlists or folders (P1 to install Music Wizard. Launching Music Wizard Launch the Music Wizard utility from the Windows® desktop by clicking Start > All Programs > O2Micro Music ...Wizard > Music Wizard. Refer page 3-5 to P9) and command buttons located at the bottom of the window. See next section for the Audio DJ feature. 3.4.4 Music Wizard The Music Wizard allows you play them using the Audio DJ feature. Creating ...
...Wizard utility is included in the support CD that came with the DiGiMatrix package. The Music Wizard window displays the playlists or folders (P1 to install Music Wizard. Launching Music Wizard Launch the Music Wizard utility from the Windows® desktop by clicking Start > All Programs > O2Micro Music ...Wizard > Music Wizard. Refer page 3-5 to P9) and command buttons located at the bottom of the window. See next section for the Audio DJ feature. 3.4.4 Music Wizard The Music Wizard allows you play them using the Audio DJ feature. Creating ...

User Guide
Page 49
...folder: 1. Click OK when done. Locate the folder with the MP3 files. 2. You may also drag and drop MP3 files to the Selected Files window to add more files to add the file. 3. Click OK when done. Type a file name, then click Save. Select the MP3 file, then click... Select the folder, then click Select. Saving your playlist or folder When prompted, save the playlist or the folder. The Music Wizard window displays the created playlist and folder. ASUS DiGiMatrix 3-17 Locate the MP3 files you wish to add to remove the folder. 3. Click Unselect to the playlist. 2. To create ...
...folder: 1. Click OK when done. Locate the folder with the MP3 files. 2. You may also drag and drop MP3 files to the Selected Files window to add more files to add the file. 3. Click OK when done. Type a file name, then click Save. Select the MP3 file, then click... Select the folder, then click Select. Saving your playlist or folder When prompted, save the playlist or the folder. The Music Wizard window displays the created playlist and folder. ASUS DiGiMatrix 3-17 Locate the MP3 files you wish to add to remove the folder. 3. Click Unselect to the playlist. 2. To create ...

User Guide
Page 50
Select a playlist, then click Edit. 2. Select the file you wish to /from the Existing Files window, then click Select. Click a playlist icon to remove the file from the Selected Files window, then click Unselect. A confirmation window appears. Editing your playlist or folder To add/remove a file to add from a playlist: 1. Click OK to view all MP3 files saved on that playlist or folder. Click OK when done. To remove a file, select the file from the playlist. 3-18 Chapter 3: Starting up
Select a playlist, then click Edit. 2. Select the file you wish to /from the Existing Files window, then click Select. Click a playlist icon to remove the file from the Selected Files window, then click Unselect. A confirmation window appears. Editing your playlist or folder To add/remove a file to add from a playlist: 1. Click OK to view all MP3 files saved on that playlist or folder. Click OK when done. To remove a file, select the file from the playlist. 3-18 Chapter 3: Starting up
User Guide
Page 51
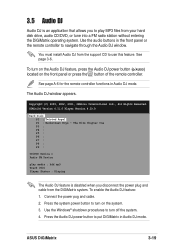
.... To enable the Audio DJ feature: 1. Press the Audio DJ power button to put DiGIMatrix in the front panel or the remote controller to navigate through the Audio DJ window. 3.5 Audio DJ Audio DJ is disabled when you to play media : hdd mp3 Track 0001 Player Status : ...FM radio station without entering the DiGiMatrix operating system. Use the Windows® shutdown procedures to use this feature. You must install Audio DJ from the support CD to turn off the system. 4. See page A-6 for the remote controller functions in Audio DJ mode. ASUS DiGiMatrix 3-19 Connect the power pug ...
.... To enable the Audio DJ feature: 1. Press the Audio DJ power button to put DiGIMatrix in the front panel or the remote controller to navigate through the Audio DJ window. 3.5 Audio DJ Audio DJ is disabled when you to play media : hdd mp3 Track 0001 Player Status : ...FM radio station without entering the DiGiMatrix operating system. Use the Windows® shutdown procedures to use this feature. You must install Audio DJ from the support CD to turn off the system. 4. See page A-6 for the remote controller functions in Audio DJ mode. ASUS DiGiMatrix 3-19 Connect the power pug ...
User Guide
Page 52
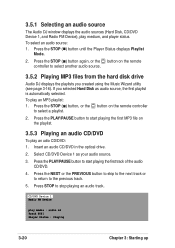
3.5.1 Selecting an audio source The Audio DJ window displays the audio sources (Hard Disk, CD/DVD Device 1, and Radio FM Device), play an MP3 playlist: 1. To play medium, and player status. Press the ...
3.5.1 Selecting an audio source The Audio DJ window displays the audio sources (Hard Disk, CD/DVD Device 1, and Radio FM Device), play an MP3 playlist: 1. To play medium, and player status. Press the ...

User Guide
Page 54
Read the License Agreement, then click Yes. When prompted, select the program folder where you to save the ASUS Home Theater program icons. The initial installation window appears. Click Next. 3-22 Chapter 3: Starting up Click Next. 3.6 ASUS Home Theater The ASUS Home Theater allows you intend to maximize the DiGiMatrix multimedia features. The following sections provide information on installing and using the ASUS Home Theater. 3.6.1 Installing ASUS Home Theater Place the ASUS Home Theater CD into the optical drive to start installation.
Read the License Agreement, then click Yes. When prompted, select the program folder where you to save the ASUS Home Theater program icons. The initial installation window appears. Click Next. 3-22 Chapter 3: Starting up Click Next. 3.6 ASUS Home Theater The ASUS Home Theater allows you intend to maximize the DiGiMatrix multimedia features. The following sections provide information on installing and using the ASUS Home Theater. 3.6.1 Installing ASUS Home Theater Place the ASUS Home Theater CD into the optical drive to start installation.

User Guide
Page 55
... Home Theater settings using the Setup button in Windows®: 1. A Configuration window appears. 2. Reboot your system. See pages 24, 33, and 34 for details. ASUS DiGiMatrix 3-23 From the Windows® desktop, click Start > All Programs > Home Theater > Home Theater Config. Click OK when done. To launch the ASUS Home Theater, click Start > All Programs > Home...
... Home Theater settings using the Setup button in Windows®: 1. A Configuration window appears. 2. Reboot your system. See pages 24, 33, and 34 for details. ASUS DiGiMatrix 3-23 From the Windows® desktop, click Start > All Programs > Home Theater > Home Theater Config. Click OK when done. To launch the ASUS Home Theater, click Start > All Programs > Home...
User Guide
Page 56
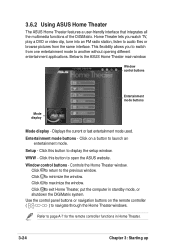
... Theater features a user-friendly interface that integrates all the multimedia functions of the DiGiMatrix. Window control buttons Entertainment mode buttons Mode display Mode display - Window control buttons - Click to return to open the ASUS website. Click this button to audio files or browse pictures from one entertainment mode to page A-7 for the remote controller...
... Theater features a user-friendly interface that integrates all the multimedia functions of the DiGiMatrix. Window control buttons Entertainment mode buttons Mode display Mode display - Window control buttons - Click to return to open the ASUS website. Click this button to audio files or browse pictures from one entertainment mode to page A-7 for the remote controller...
User Guide
Page 57
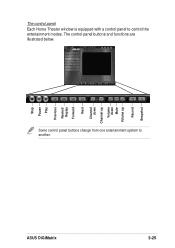
The control panel Each Home Theater window is equipped with a control panel to another. Some control panel buttons change from one entertainment system to control the entertainment modes. The control panel buttons and functions are illustrated below. Stop Pause Play Previous Rewind/ Replay Forward Next Channel down Channel up Volume down Mute Volume up Record Snapshot ASUS DiGiMatrix 3-25
The control panel Each Home Theater window is equipped with a control panel to another. Some control panel buttons change from one entertainment system to control the entertainment modes. The control panel buttons and functions are illustrated below. Stop Pause Play Previous Rewind/ Replay Forward Next Channel down Channel up Volume down Mute Volume up Record Snapshot ASUS DiGiMatrix 3-25
User Guide
Page 58
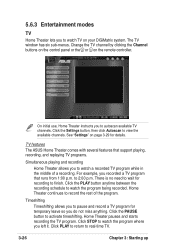
...the available channels. Click the Settings button, then click Autoscan to 2:00 p.m. TV features The ASUS Home Theater comes with several features that runs from 1:00 p.m. Timeshifting Timeshifting allows you to pause...so you to record the rest of a recording. Home Theater continues to watch TV on your DiGiMatrix system. There is no need to wait for details. On initial use, Home Theater instructs ... Click the PLAY button anytime between the recording schedule to activate timeshifting. The TV window has six sub-menus. Change the TV channel by clicking the Channel buttons on ...
...the available channels. Click the Settings button, then click Autoscan to 2:00 p.m. TV features The ASUS Home Theater comes with several features that runs from 1:00 p.m. Timeshifting Timeshifting allows you to pause...so you to record the rest of a recording. Home Theater continues to watch TV on your DiGiMatrix system. There is no need to wait for details. On initial use, Home Theater instructs ... Click the PLAY button anytime between the recording schedule to activate timeshifting. The TV window has six sub-menus. Change the TV channel by clicking the Channel buttons on ...

User Guide
Page 59
... to the recorded program list. Recorded TV The Recorded TV option lets you replay a portion of each recorded program. A window displays a snapshot of a recorded program. Visit the Titan TV website for details. ASUS DiGiMatrix 3-27 Guide Click the Guide button to activate the instant replay feature. Organize your recorded programs by clicking the...
... to the recorded program list. Recorded TV The Recorded TV option lets you replay a portion of each recorded program. A window displays a snapshot of a recorded program. Visit the Titan TV website for details. ASUS DiGiMatrix 3-27 Guide Click the Guide button to activate the instant replay feature. Organize your recorded programs by clicking the...


