

User Guide
Page 5
Table of contents 4.4 Central Processing Unit (CPU 4-6 4.5 System memory 4-7 4.6 Jumper 4-8 4.7 Connectors 4-9 Chapter 5: BIOS information 5.1 Managing and updating your BIOS 5-2 5.2 BIOS Setup program 5-4...A.1 Subsystem A-2 A.1.1 Front and rear panel features A-2 A.1.2 Removing the top cover A-3 A.1.3 Installing a hard disk drive A-3 A.1.4 Connecting the Subsystem to DiGiMatrix A-4 A.2 DiGiMatrix remote controller A-5 A.2.1 Specifications A-5 A.2.2 Remote control layout A-5 A.2.3 Remote control functions in Audio DJ A-6 A.2.4 Remote control functions in Home Theater .......... ...
Table of contents 4.4 Central Processing Unit (CPU 4-6 4.5 System memory 4-7 4.6 Jumper 4-8 4.7 Connectors 4-9 Chapter 5: BIOS information 5.1 Managing and updating your BIOS 5-2 5.2 BIOS Setup program 5-4...A.1 Subsystem A-2 A.1.1 Front and rear panel features A-2 A.1.2 Removing the top cover A-3 A.1.3 Installing a hard disk drive A-3 A.1.4 Connecting the Subsystem to DiGiMatrix A-4 A.2 DiGiMatrix remote controller A-5 A.2.1 Specifications A-5 A.2.2 Remote control layout A-5 A.2.3 Remote control functions in Audio DJ A-6 A.2.4 Remote control functions in Home Theater .......... ...
User Guide
Page 12
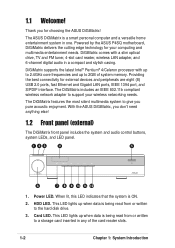
... when data is being read from or written to support your computing and multimedia entertainment needs. Providing the best connectivity for choosing the ASUS DiGiMatrix! VOLUME + 6 7 8 9 10 11 12 1. This LED lights up when data is being read from or written to...HDD LED. DiGiMatrix supports the latest Intel® Pentium® 4/Celeron processor with a slim optical drive, TV and FM tuner, 4-slot card reader, wireless LAN adapter, and 6-channel digital audio in any of system memory. With the ASUS DiGiMatrix, you pure acoustic enjoyment. The ASUS DiGiMatrix is ON...
... when data is being read from or written to support your computing and multimedia entertainment needs. Providing the best connectivity for choosing the ASUS DiGiMatrix! VOLUME + 6 7 8 9 10 11 12 1. This LED lights up when data is being read from or written to...HDD LED. DiGiMatrix supports the latest Intel® Pentium® 4/Celeron processor with a slim optical drive, TV and FM tuner, 4-slot card reader, wireless LAN adapter, and 6-channel digital audio in any of system memory. With the ASUS DiGiMatrix, you pure acoustic enjoyment. The ASUS DiGiMatrix is ON...

User Guide
Page 14
...Pro™ card slot. In CD/HD mode, selects the next audio track/file. CompactFlash®/Microdrive™ card slot. This slot is for a Memory Stick®/Memory Stick Pro™ storage card. 15. This is inserted into any of the card slots. 13 14 15 16 17 18 - NEXT button. Press... button to the illustration on the right. Flip down the front panel door to open. You can not close the front panel door if a flash memory card is a slim DVD-ROM/CD-RW/DVD-RW drive. 1-4 Chapter 1: System Introduction This slot is for a CompactFlash®/Microdrive™ storage card. 14....
...Pro™ card slot. In CD/HD mode, selects the next audio track/file. CompactFlash®/Microdrive™ card slot. This slot is for a Memory Stick®/Memory Stick Pro™ storage card. 15. This is inserted into any of the card slots. 13 14 15 16 17 18 - NEXT button. Press... button to the illustration on the right. Flip down the front panel door to open. You can not close the front panel door if a flash memory card is a slim DVD-ROM/CD-RW/DVD-RW drive. 1-4 Chapter 1: System Introduction This slot is for a CompactFlash®/Microdrive™ storage card. 14....
User Guide
Page 20
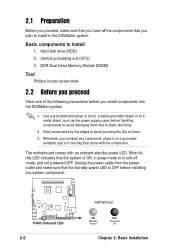
...a grounded wrist strap or touch a safely grounded object or to avoid damaging them . 3. The motherboard comes with the component. DDR Dual Inline Memory Module (DIMM) Tool Phillips (cross) screw driver 2.2 Before you proceed Take note of the following precautions before handling components to a metal object,... came with an onboard standby power LED. Basic components to static electricity. 2. Hold components by the edges to install in the DiGiMatrix system. When lit, this LED indicates that the system is OFF before installing any component, place it on them due to install...
...a grounded wrist strap or touch a safely grounded object or to avoid damaging them . 3. The motherboard comes with the component. DDR Dual Inline Memory Module (DIMM) Tool Phillips (cross) screw driver 2.2 Before you proceed Take note of the following precautions before handling components to a metal object,... came with an onboard standby power LED. Basic components to static electricity. 2. Hold components by the edges to install in the DiGiMatrix system. When lit, this LED indicates that the system is OFF before installing any component, place it on them due to install...
User Guide
Page 27
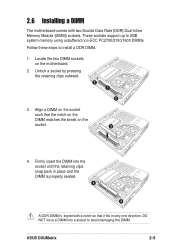
... such that it fits in place and the DIMM is properly seated. 4 4 A DDR DIMM is keyed with two Double Data Rate (DDR) Dual Inline Memory Module (DIMM) sockets. ASUS DiGiMatrix 2-9 Locate the two DIMM sockets on the motherboard. 2. Firmly insert the DIMM into a socket to install a DDR DIMM. 1. 2.6 Installing a DIMM The motherboard .... 3 4. DO NOT force a DIMM into the socket until the retaining clips snap back in only one direction. These sockets support up to 2GB system memory using unbuffered non-ECC PC2700/2100/1600 DIMMs. Follow these steps to avoid damaging the DIMM.
... such that it fits in place and the DIMM is properly seated. 4 4 A DDR DIMM is keyed with two Double Data Rate (DDR) Dual Inline Memory Module (DIMM) sockets. ASUS DiGiMatrix 2-9 Locate the two DIMM sockets on the motherboard. 2. Firmly insert the DIMM into a socket to install a DDR DIMM. 1. 2.6 Installing a DIMM The motherboard .... 3 4. DO NOT force a DIMM into the socket until the retaining clips snap back in only one direction. These sockets support up to 2GB system memory using unbuffered non-ECC PC2700/2100/1600 DIMMs. Follow these steps to avoid damaging the DIMM.
User Guide
Page 41
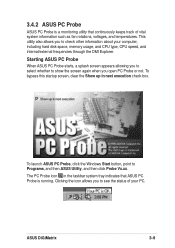
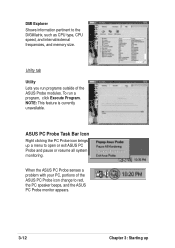
..., a splash screen appears allowing you to select whether to show the screen again when you to Programs, and then ASUS Utility, and then click Probe Vx.xx. ASUS DiGiMatrix 3-9 The PC Probe icon in next execution check box. To bypass this startup screen, clear the Show up in ...the taskbar system tray indicates that continuously keeps track of your computer, including hard disk space, memory usage, and CPU type, CPU speed...
..., a splash screen appears allowing you to select whether to show the screen again when you to Programs, and then ASUS Utility, and then click Probe Vx.xx. ASUS DiGiMatrix 3-9 The PC Probe icon in next execution check box. To bypass this startup screen, clear the Show up in ...the taskbar system tray indicates that continuously keeps track of your computer, including hard disk space, memory usage, and CPU type, CPU speed...

User Guide
Page 43
Memory Shows the DiGiMatrix memory load, memory usage, and paging file usage. ASUS DiGiMatrix 3-11 History Lets you set threshold levels and polling intervals or refresh times of the DiGiMatrix temperature, fan rotation, and voltages. Information tab Hard Drive Shows the used . Settings Lets you record the monitoring activity of a certain component of the DiGiMatrix' hard disk drive and the file allocation table or file system used and free space of your DiGiMatrix for future reference.
Memory Shows the DiGiMatrix memory load, memory usage, and paging file usage. ASUS DiGiMatrix 3-11 History Lets you set threshold levels and polling intervals or refresh times of the DiGiMatrix temperature, fan rotation, and voltages. Information tab Hard Drive Shows the used . Settings Lets you record the monitoring activity of a certain component of the DiGiMatrix' hard disk drive and the file allocation table or file system used and free space of your DiGiMatrix for future reference.
User Guide
Page 44
... icon change to red, the PC speaker beeps, and the ASUS PC Probe monitor appears. 3-12 Chapter 3: Starting up a menu to the DiGiMatrix, such as CPU type, CPU speed, and internal/external frequencies, and memory size. NOTE: This feature is currently unavailable. ASUS PC Probe Task Bar Icon Right clicking the PC Probe icon...
... icon change to red, the PC speaker beeps, and the ASUS PC Probe monitor appears. 3-12 Chapter 3: Starting up a menu to the DiGiMatrix, such as CPU type, CPU speed, and internal/external frequencies, and memory size. NOTE: This feature is currently unavailable. ASUS PC Probe Task Bar Icon Right clicking the PC Probe icon...
User Guide
Page 107
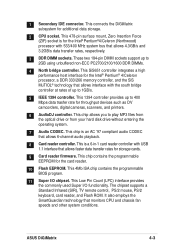
... SiS651 controller integrates a high performance host interface for the Intel® Pentium® 4/Celeron processor, a DDR 333/266 memory controller, and the SiS MuTIOL® technology that allows interface with the south bridge controller at rates of up to 1GB...transfer rates, respectively. 3 DDR DIMM sockets. This connects the DiGiMatrix subsystem for the card reader. 10 Flash EEPROM. It also employs the SmartGuardian technology that allows 6-channel audio playback. 8 Card reader controller. ASUS DiGiMatrix 4-3 This Low Pin Count (LPC) interface provides the commonly ...
... SiS651 controller integrates a high performance host interface for the Intel® Pentium® 4/Celeron processor, a DDR 333/266 memory controller, and the SiS MuTIOL® technology that allows interface with the south bridge controller at rates of up to 1GB...transfer rates, respectively. 3 DDR DIMM sockets. This connects the DiGiMatrix subsystem for the card reader. 10 Flash EEPROM. It also employs the SmartGuardian technology that allows 6-channel audio playback. 8 Card reader controller. ASUS DiGiMatrix 4-3 This Low Pin Count (LPC) interface provides the commonly ...
User Guide
Page 111
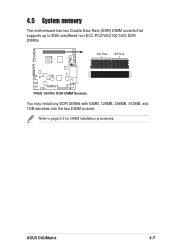
ASUS DiGiMatrix 4-7 Refer to 2GB unbuffered non-ECC PC2700/2100/1600 DDR DIMMs. 104 Pins 80 Pins P4SQ P4SQ 184-Pin DDR DIMM Sockets You may install any DDR DIMMs with 64MB, 128MB, 256MB, 512MB, and 1GB densities into the two DIMM sockets. 4.5 System memory The motherboard has two Double Data Rate (DDR) DIMM sockets that supports up to page 2-9 for DIMM installation procedures.
ASUS DiGiMatrix 4-7 Refer to 2GB unbuffered non-ECC PC2700/2100/1600 DDR DIMMs. 104 Pins 80 Pins P4SQ P4SQ 184-Pin DDR DIMM Sockets You may install any DDR DIMMs with 64MB, 128MB, 256MB, 512MB, and 1GB densities into the two DIMM sockets. 4.5 System memory The motherboard has two Double Data Rate (DDR) DIMM sockets that supports up to page 2-9 for DIMM installation procedures.
User Guide
Page 112
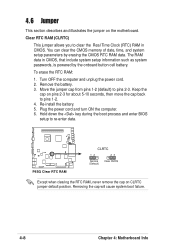
... the computer and unplug the power cord. 2. 4.6 Jumper This section describes and illustrates the jumper on CLRTC jumper default position. You can clear the CMOS memory of date, time, and system setup parameters by the onboard button cell battery. The RAM data in CMOS. Remove the battery. 3.
... the computer and unplug the power cord. 2. 4.6 Jumper This section describes and illustrates the jumper on CLRTC jumper default position. You can clear the CMOS memory of date, time, and system setup parameters by the onboard button cell battery. The RAM data in CMOS. Remove the battery. 3.

User Guide
Page 121
...USB port or a USB floppy disk drive. File not found , the following prompts appear if you typed. Flash Memory: SST 49LF004 Update Main BIOS area (Y/N)? _ 7. Press Y to reboot" appears. ASUS DiGiMatrix 5-3 if you proceed to look for NEW BIOS: _", type in File] BIOS Version: P4SQ Boot Block WARNING!...the system without the USB flash disk. 5. At the above prompt, type Y to update the BIOS (Y/N)? _ If you downloaded from the ASUS website, then press . DO NOT shutdown or reset the system while updating the BIOS area! The following message appears on screen. [BIOS ...
...USB port or a USB floppy disk drive. File not found , the following prompts appear if you typed. Flash Memory: SST 49LF004 Update Main BIOS area (Y/N)? _ 7. Press Y to reboot" appears. ASUS DiGiMatrix 5-3 if you proceed to look for NEW BIOS: _", type in File] BIOS Version: P4SQ Boot Block WARNING!...the system without the USB flash disk. 5. At the above prompt, type Y to update the BIOS (Y/N)? _ If you downloaded from the ASUS website, then press . DO NOT shutdown or reset the system while updating the BIOS area! The following message appears on screen. [BIOS ...

User Guide
Page 126
...section "3.6 Jumper" for information on how to halt. Forgot the password? Halt On [All Errors] This field specifies the types of conventional memory detected by the system during system startup. Passwords are not case sensitive, meaning, passwords typed in the Main menu. If you did not ...the configuration fields. Configuration options: [All Errors] [No Error] [All but Keyboard] [All but Disk] [All but Disk/Keyboard] Installed Memory [XXX MB] This field automatically displays the amount of errors that will cause the system to erase the RTC RAM. A note about passwords The...
...section "3.6 Jumper" for information on how to halt. Forgot the password? Halt On [All Errors] This field specifies the types of conventional memory detected by the system during system startup. Passwords are not case sensitive, meaning, passwords typed in the Main menu. If you did not ...the configuration fields. Configuration options: [All Errors] [No Error] [All but Keyboard] [All but Disk] [All but Disk/Keyboard] Installed Memory [XXX MB] This field automatically displays the amount of errors that will cause the system to erase the RTC RAM. A note about passwords The...

User Guide
Page 132
5.4 Advanced menu CPU Speed [Manual] This parameter allows you wish to adjust the setting manually. Memory Frequency [Auto] This field determines whether the memory clock frequency is non-configurable when you install a locked CPU. When set to the system frequency. Configuration options: [Auto] [3:4] [3:5] BIOS Update [Enabled] This field functions ...
5.4 Advanced menu CPU Speed [Manual] This parameter allows you wish to adjust the setting manually. Memory Frequency [Auto] This field determines whether the memory clock frequency is non-configurable when you install a locked CPU. When set to the system frequency. Configuration options: [Auto] [3:4] [3:5] BIOS Update [Enabled] This field functions ...

User Guide
Page 134
... options: [2.5T] [2T] [1.5T] [3T] SDRAM RAS to the SDRAM. The EEPROM on the memory modules that you set the optimal timings for items 2-5, depending on the memory module stores critical information about the module, such as memory type, size, speed, voltage interface, and module banks. The default setting is user configurable only...
... options: [2.5T] [2T] [1.5T] [3T] SDRAM RAS to the SDRAM. The EEPROM on the memory modules that you set the optimal timings for items 2-5, depending on the memory module stores critical information about the module, such as memory type, size, speed, voltage interface, and module banks. The default setting is user configurable only...

User Guide
Page 135
... item allows you have installed a 3D graphics device, select at least 16MB VGA shared memory size. If you to set the memory space reserved for other system devices. Configuration options: [6T] [7T] [5T] [4T] SDRAM Command Lead-off time. ASUS DiGiMatrix 5-17 Configuration options: [4MB] [8MB] [16MB] [32MB] [64MB] [128MB] [256MB] Onboard VGA Shared...
... item allows you have installed a 3D graphics device, select at least 16MB VGA shared memory size. If you to set the memory space reserved for other system devices. Configuration options: [6T] [7T] [5T] [4T] SDRAM Command Lead-off time. ASUS DiGiMatrix 5-17 Configuration options: [4MB] [8MB] [16MB] [32MB] [64MB] [128MB] [256MB] Onboard VGA Shared...
User Guide
Page 151
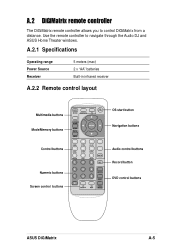
A.2.1 Specifications Operating range Power Source Receiver 5 meters (max) 2 x "AA" batteries Built-in infrared receiver A.2.2 Remote control layout Multimedia buttons Mode/Memory buttons Control buttons Numeric buttons Screen control buttons OS start button Navigation buttons Audio control buttons Record button DVD control buttons ASUS DiGiMatrix A-5 Use the remote controller to control DiGiMatrix from a distance. A.2 DiGiMatrix remote controller The DiGiMatrix remote controller allows you to navigate through the Audio DJ and ASUS Home Theater windows.
A.2.1 Specifications Operating range Power Source Receiver 5 meters (max) 2 x "AA" batteries Built-in infrared receiver A.2.2 Remote control layout Multimedia buttons Mode/Memory buttons Control buttons Numeric buttons Screen control buttons OS start button Navigation buttons Audio control buttons Record button DVD control buttons ASUS DiGiMatrix A-5 Use the remote controller to control DiGiMatrix from a distance. A.2 DiGiMatrix remote controller The DiGiMatrix remote controller allows you to navigate through the Audio DJ and ASUS Home Theater windows.

