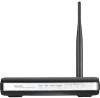
User Manual
Page 3
... the Quick Internet Setup (QIS 11 Setting up the wireless ADSL router 12 Chapter 3: Configuring the network clients Accessing the wireless router 16 Setting an IP address for wired or wireless clients 16 Chapter 4: Configuring via the web GUI Configuring via the web GUI 20 Using the Network Map 21 Creating multiple...
... the Quick Internet Setup (QIS 11 Setting up the wireless ADSL router 12 Chapter 3: Configuring the network clients Accessing the wireless router 16 Setting an IP address for wired or wireless clients 16 Chapter 4: Configuring via the web GUI Configuring via the web GUI 20 Using the Network Map 21 Creating multiple...
User Manual
Page 16
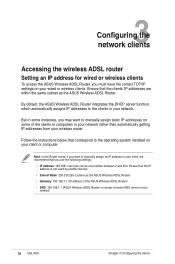
... assign a known DNS server in your network 16 DSL-N10 Chapter 3: Configuring the clients Ensure that the clients' IP addresses are within the same subnet as the ASUS Wireless ADSL Router) • Gateway: 192.168.1.1 (IP address of the clients or computers in your network. By default, the ASUS Wireless ADSL Router integrates the DHCP server function, which...
... assign a known DNS server in your network 16 DSL-N10 Chapter 3: Configuring the clients Ensure that the clients' IP addresses are within the same subnet as the ASUS Wireless ADSL Router) • Gateway: 192.168.1.1 (IP address of the clients or computers in your network. By default, the ASUS Wireless ADSL Router integrates the DHCP server function, which...
User Manual
Page 17
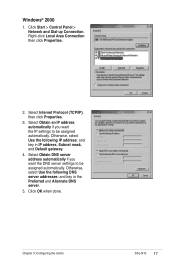
... key in the Preferred and Alternate DNS server. 5. Otherwise, select Use the following DNS server addresses: and key in IP address, Subnet mask, and Default gateway. 4. Chapter 3: Configuring the clients DSL-N10 17 Select Obtain an IP address automatically if you want the IP settings to be assigned automatically. Click Start > Control Panel > Network and Dial-up Connection...
... key in the Preferred and Alternate DNS server. 5. Otherwise, select Use the following DNS server addresses: and key in IP address, Subnet mask, and Default gateway. 4. Chapter 3: Configuring the clients DSL-N10 17 Select Obtain an IP address automatically if you want the IP settings to be assigned automatically. Click Start > Control Panel > Network and Dial-up Connection...
User Manual
Page 18
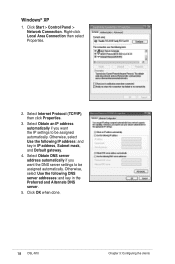
Otherwise, select Use the following IP address: and key in the Preferred and Alternate DNS server. 5. Select Obtain an IP address automatically if you want the IP settings to be assigned automatically. Click OK when done. 18 DSL-N10 Chapter 3: Configuring the clients Click Start > Control Panel > Network Connection. Right-click Local Area Connection then select Properties. 2. Select...
Otherwise, select Use the following IP address: and key in the Preferred and Alternate DNS server. 5. Select Obtain an IP address automatically if you want the IP settings to be assigned automatically. Click OK when done. 18 DSL-N10 Chapter 3: Configuring the clients Click Start > Control Panel > Network Connection. Right-click Local Area Connection then select Properties. 2. Select...

User Manual
Page 19
... if you want the DNS server settings to be assigned automatically. Click OK when done. Chapter 3: Configuring the clients DSL-N10 19 Windows® Vista/7 1. Select Obtain an IP address automatically if you want the IP settings to Start > Control Panel > Network and Internet > Network and Sharing Center. Go to be assigned automatically. Otherwise, select...
... if you want the DNS server settings to be assigned automatically. Click OK when done. Chapter 3: Configuring the clients DSL-N10 19 Windows® Vista/7 1. Select Obtain an IP address automatically if you want the IP settings to Start > Control Panel > Network and Internet > Network and Sharing Center. Go to be assigned automatically. Otherwise, select...
User Manual
Page 20
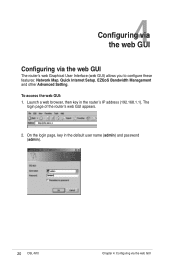
4 Configuring via the web GUI Configuring via the web GUI On the login page, key in the router's IP address (192.168.1.1). The login page of the router's web GUI appears. 2. Launch a web browser, then key in the default user name (admin) and password (admin). 20 DSL-N10 Chapter 4: Configuring via the web GUI The router's web Graphical User Interface (web GUI) allows you to configure these features: Network Map, Quick Internet Setup, EZQoS Bandwidth Management and other Advanced Setting. To access the web GUI: 1.
4 Configuring via the web GUI Configuring via the web GUI On the login page, key in the router's IP address (192.168.1.1). The login page of the router's web GUI appears. 2. Launch a web browser, then key in the default user name (admin) and password (admin). 20 DSL-N10 Chapter 4: Configuring via the web GUI The router's web Graphical User Interface (web GUI) allows you to configure these features: Network Map, Quick Internet Setup, EZQoS Bandwidth Management and other Advanced Setting. To access the web GUI: 1.
User Manual
Page 21
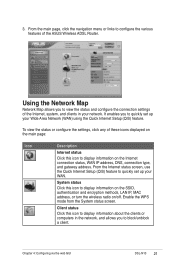
...Client status Click this icon to display information about the clients or computers in your network. Chapter 4: Configuring via the web GUI DSL-N10 21 3. It enables you to view the status and configure the connection settings of the Internet, system, and clients in the ...status or configure the settings, click any of the ASUS Wireless ADSL Router. From the main page, click the navigation menu or links to display information on the Internet connection status, WAN IP address, DNS, connection type, and gateway address. From the Internet status screen, use the Quick...
...Client status Click this icon to display information about the clients or computers in your network. Chapter 4: Configuring via the web GUI DSL-N10 21 3. It enables you to view the status and configure the connection settings of the Internet, system, and clients in the ...status or configure the settings, click any of the ASUS Wireless ADSL Router. From the main page, click the navigation menu or links to display information on the Internet connection status, WAN IP address, DNS, connection type, and gateway address. From the Internet status screen, use the Quick...
User Manual
Page 39
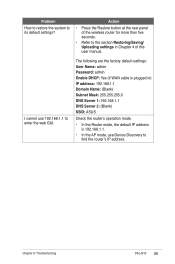
... Chapter 6: Troubleshooting DSL-N10 39 I cannot use Device Discovery to the section Restoring/Saving/ Uploading settings in Chapter 4 of this user manual. The following are the factory default settings: User Name: admin Password: admin Enable DHCP: Yes (if WAN cable is plugged in) IP address: 192.168.1.1 ...: (Blank) Subnet Mask: 255.255.255.0 DNS Server 1: 192.168.1.1 DNS Server 2: (Blank) SSID: ASUS Check the router's operation mode. • In the Router mode, the default IP address is 192.168.1.1. • In the AP mode, use 192.168.1.1 to its default settings? Action •...
... Chapter 6: Troubleshooting DSL-N10 39 I cannot use Device Discovery to the section Restoring/Saving/ Uploading settings in Chapter 4 of this user manual. The following are the factory default settings: User Name: admin Password: admin Enable DHCP: Yes (if WAN cable is plugged in) IP address: 192.168.1.1 ...: (Blank) Subnet Mask: 255.255.255.0 DNS Server 1: 192.168.1.1 DNS Server 2: (Blank) SSID: ASUS Check the router's operation mode. • In the Router mode, the default IP address is 192.168.1.1. • In the AP mode, use 192.168.1.1 to its default settings? Action •...


