
CUSL2 User Manual
Page 1
® CUSL2 Intel® 815E ATX Motherboard USER'S MANUAL
® CUSL2 Intel® 815E ATX Motherboard USER'S MANUAL
CUSL2 User Manual
Page 4
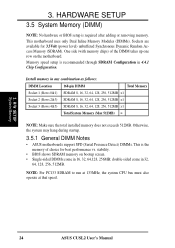
... 58 4.4.1 Chip Configuration 61 4.4.2 I/O Device Configuration 64 4.4.3 PCI Configuration 66 4.4.4 Shadow Configuration 68 4 ASUS CUSL2 User's Manual HARDWARE SETUP 14 3.1 CUSL2 Motherboard Layout 14 3.2 Layout Contents 15 3.3 Hardware Setup Procedure 17 3.4 Motherboard Settings 17 3.5 System Memory (DIMM 24 3.5.1 General DIMM Notes 24 3.5.2 Memory Installation 25 3.6 Central Processing...3.7.4 Accelerated Graphics Port (AGP) Pro Slot 29 3.8 External Connectors 30 3.9 Starting Up the First Time 43 4. FEATURES 8 2.1 The ASUS CUSL2 8 2.2 CUSL2 Motherboard Components 12 3.
... 58 4.4.1 Chip Configuration 61 4.4.2 I/O Device Configuration 64 4.4.3 PCI Configuration 66 4.4.4 Shadow Configuration 68 4 ASUS CUSL2 User's Manual HARDWARE SETUP 14 3.1 CUSL2 Motherboard Layout 14 3.2 Layout Contents 15 3.3 Hardware Setup Procedure 17 3.4 Motherboard Settings 17 3.5 System Memory (DIMM 24 3.5.1 General DIMM Notes 24 3.5.2 Memory Installation 25 3.6 Central Processing...3.7.4 Accelerated Graphics Port (AGP) Pro Slot 29 3.8 External Connectors 30 3.9 Starting Up the First Time 43 4. FEATURES 8 2.1 The ASUS CUSL2 8 2.2 CUSL2 Motherboard Components 12 3.
CUSL2 User Manual
Page 7
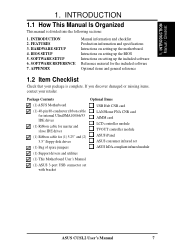
... of spare jumpers (1) Support drivers and utilities (1) This Motherboard User's Manual (1) ASUS 3-port USB connector set with bracket Optional Items USB Hub CNR card LAN/Home PNA CNR card AIMM card LCD controller module TVOUT controller module ASUS iPanel ASUS consumer infrared set ASUS IrDA-compliant infrared module ASUS CUSL2 User's Manual 7 INTRODUCTION 2. SOFTWARE SETUP 6. HARDWARE SETUP...
... of spare jumpers (1) Support drivers and utilities (1) This Motherboard User's Manual (1) ASUS 3-port USB connector set with bracket Optional Items USB Hub CNR card LAN/Home PNA CNR card AIMM card LCD controller module TVOUT controller module ASUS iPanel ASUS consumer infrared set ASUS IrDA-compliant infrared module ASUS CUSL2 User's Manual 7 INTRODUCTION 2. SOFTWARE SETUP 6. HARDWARE SETUP...
CUSL2 User Manual
Page 8
able in 64, 128, 256, 512MB densities) up to allow manual adjustment of the processor's external frequency. 8 ASUS CUSL2 User's Manual Supports UltraDMA/100, UltraDMA/66, UltraDMA/33, PIO Modes 3 & 4 and Bus Master IDE DMA Mode 2, and Enhanced IDE devices, such as DVD-ROM... compression, precise pixel interpolation, full 2D hardware acceleration, and motion video acceleration. This slot can transport twice the amount of 266MB/sec - FEATURES 2.1 The ASUS CUSL2 The ASUS CUSL2 motherboard is enabled. two USB controllers for up to 100MB/sec; FEATURES Specifications 2.
able in 64, 128, 256, 512MB densities) up to allow manual adjustment of the processor's external frequency. 8 ASUS CUSL2 User's Manual Supports UltraDMA/100, UltraDMA/66, UltraDMA/33, PIO Modes 3 & 4 and Bus Master IDE DMA Mode 2, and Enhanced IDE devices, such as DVD-ROM... compression, precise pixel interpolation, full 2D hardware acceleration, and motion video acceleration. This slot can transport twice the amount of 266MB/sec - FEATURES 2.1 The ASUS CUSL2 The ASUS CUSL2 motherboard is enabled. two USB controllers for up to 100MB/sec; FEATURES Specifications 2.

CUSL2 User Manual
Page 9
... ECP capabilities. UART2 can support Bus Master PCI cards, such as not to damage the motherboard, peripherals, and/or components. • One Touch Management: Supports an optional ASUS iPanel, an easy to physically transport commands and information between SMBus devices. Hardware random number... master busses to the memory and processor. • Onboard LED: The onboard LED will light up to the motherboard. ASUS CUSL2 User's Manual 9 FEATURES Specifications 2. With an ASUS iPanel, you can monitor your computer system's vital components. • LCD/TV Output: The LCD/TV interface...
... ECP capabilities. UART2 can support Bus Master PCI cards, such as not to damage the motherboard, peripherals, and/or components. • One Touch Management: Supports an optional ASUS iPanel, an easy to physically transport commands and information between SMBus devices. Hardware random number... master busses to the memory and processor. • Onboard LED: The onboard LED will light up to the motherboard. ASUS CUSL2 User's Manual 9 FEATURES Specifications 2. With an ASUS iPanel, you can monitor your computer system's vital components. • LCD/TV Output: The LCD/TV interface...
CUSL2 User Manual
Page 10
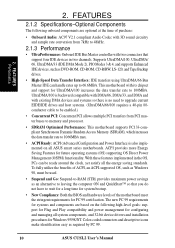
...to 100MB/s. With these features implemented in two channels. ACPI provides more Energy Saving Features for configuring and managing all ASUS smart series motherboards. The new PC 99 requirements for systems and components are optional at the time of purchase: • Onboard ...rates up to -RAM (STR) provides maximum power savings as required by PC 99. 10 ASUS CUSL2 User's Manual FEATURES Performance 2. To fully utilize the benefits of the motherboard meet the stringent requirements for Windows 95/98/NT. FEATURES 2.1.2 Specifications-Optional Components The following...
...to 100MB/s. With these features implemented in two channels. ACPI provides more Energy Saving Features for configuring and managing all ASUS smart series motherboards. The new PC 99 requirements for systems and components are optional at the time of purchase: • Onboard ...rates up to -RAM (STR) provides maximum power savings as required by PC 99. 10 ASUS CUSL2 User's Manual FEATURES Performance 2. To fully utilize the benefits of the motherboard meet the stringent requirements for Windows 95/98/NT. FEATURES 2.1.2 Specifications-Optional Components The following...
CUSL2 User Manual
Page 11
...Dual Function Power Button: Through BIOS, the power button can be enabled or disabled through an internal or external modem. With this motherboard supports processor thermal sensing and auto-protection. • Voltage Monitoring and Alert: System voltage levels are set for its normal RPM range... limited resources more information) button. Through the way a particular LED illuminates, the user can access any information from a fax/modem. ASUS CUSL2 User's Manual 11 This function requires ACPI OS and driver support. • Peripheral Power Up: Keyboard or Mouse power up to be...
...Dual Function Power Button: Through BIOS, the power button can be enabled or disabled through an internal or external modem. With this motherboard supports processor thermal sensing and auto-protection. • Voltage Monitoring and Alert: System voltage levels are set for its normal RPM range... limited resources more information) button. Through the way a particular LED illuminates, the user can access any information from a fax/modem. ASUS CUSL2 User's Manual 11 This function requires ACPI OS and driver support. • Peripheral Power Up: Keyboard or Mouse power up to be...
CUSL2 User Manual
Page 12
2. FEATURES MB Components 2. Location Processor Support Socket 370 for locations. FEATURES 2.2 CUSL2 Motherboard Components See opposite page for Pentium III/Celeron (FC-PGA) Processors ..... 1 Feature Setting DIP Switches 5 Chipsets Intel 815E Graphics Memory ...19 1 or 2 CNR Slots 15 System I/O USB Headers 14 1 Floppy Disk Drive Connector 6 2 IDE Connectors (UltraDMA/100 Support 4 1 Serial COM2 Header 7 1 ASUS iPanel Connector 8 1 Parallel Port Connector Top) 23 1 Serial COM1 Port Connector Bottom) 24 2 USB Port Connectors 25 1 PS/2 Mouse Connector Top) 26 1 PS/2...
2. FEATURES MB Components 2. Location Processor Support Socket 370 for locations. FEATURES 2.2 CUSL2 Motherboard Components See opposite page for Pentium III/Celeron (FC-PGA) Processors ..... 1 Feature Setting DIP Switches 5 Chipsets Intel 815E Graphics Memory ...19 1 or 2 CNR Slots 15 System I/O USB Headers 14 1 Floppy Disk Drive Connector 6 2 IDE Connectors (UltraDMA/100 Support 4 1 Serial COM2 Header 7 1 ASUS iPanel Connector 8 1 Parallel Port Connector Top) 23 1 Serial COM1 Port Connector Bottom) 24 2 USB Port Connectors 25 1 PS/2 Mouse Connector Top) 26 1 PS/2...
CUSL2 User Manual
Page 14
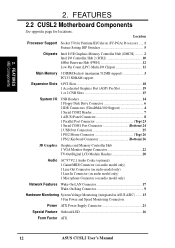
HARDWARE SETUP 3.1 CUSL2 Motherboard Layout PS/2KBMS T: Mouse B: Keyboard USB T: Port1 B: Port2 COM1 KBPWR USBPWR01 PWR_FAN Socket 370 BS133 CPU_FAN VIO DSW DIMM1 (64/72 bit, 168-pin module) ... PCI3 ® USB47 Audio Codec Setting JTPWR PLED2 CNR2 CNR1 AFPANEL PCI4 PCI5 CUSL2 PCI6 USB56 USBPWR56 4Mbit Firmware Hub (FWH) USB2 USBPWR47 ASUS ASIC USBPWR2 with Hardware CHA_FAN Monitor JEN ACHA Super I/O WOR COM2 IDELED PANEL Grayed components are optional at the time of purchase. 14 ASUS CUSL2 User's Manual H/W SETUP Motherboard Layout FLOPPY 3. 3.
HARDWARE SETUP 3.1 CUSL2 Motherboard Layout PS/2KBMS T: Mouse B: Keyboard USB T: Port1 B: Port2 COM1 KBPWR USBPWR01 PWR_FAN Socket 370 BS133 CPU_FAN VIO DSW DIMM1 (64/72 bit, 168-pin module) ... PCI3 ® USB47 Audio Codec Setting JTPWR PLED2 CNR2 CNR1 AFPANEL PCI4 PCI5 CUSL2 PCI6 USB56 USBPWR56 4Mbit Firmware Hub (FWH) USB2 USBPWR47 ASUS ASIC USBPWR2 with Hardware CHA_FAN Monitor JEN ACHA Super I/O WOR COM2 IDELED PANEL Grayed components are optional at the time of purchase. 14 ASUS CUSL2 User's Manual H/W SETUP Motherboard Layout FLOPPY 3. 3.
CUSL2 User Manual
Page 15
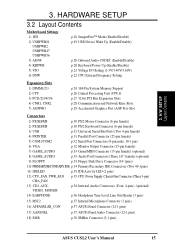
HARDWARE SETUP 3.2 Layout Contents Motherboard Settings 1) JEN 2) USBPWR01 USBPWR2 USBPWR47 USBPWR56 3) ADN# 4) KBPWR 5) VIO 6) DSW p.18 JumperFree™ Mode (Enable/Disable) p.19 USB Device Wake Up (Enable/Disable) p.20... (Four 4-pins) (optional) 14) EARPHONE p.36 Headphone True-Level Line Out Header (3 pins) 15) MIC2 p.37 Internal Microphone Connector (3 pins) 16) AFPANEL/IR_CON p.37 ASUS iPanel Connector (12-1 pins) 17) AAPANEL p.37 ASUS iPanel Audio Connector (12-1 pins) 18) SMB p.38 SMBus Connector (5-1 pins) ASUS CUSL2 User's Manual 15 3. H/W SETUP Layout Contents 3.
HARDWARE SETUP 3.2 Layout Contents Motherboard Settings 1) JEN 2) USBPWR01 USBPWR2 USBPWR47 USBPWR56 3) ADN# 4) KBPWR 5) VIO 6) DSW p.18 JumperFree™ Mode (Enable/Disable) p.19 USB Device Wake Up (Enable/Disable) p.20... (Four 4-pins) (optional) 14) EARPHONE p.36 Headphone True-Level Line Out Header (3 pins) 15) MIC2 p.37 Internal Microphone Connector (3 pins) 16) AFPANEL/IR_CON p.37 ASUS iPanel Connector (12-1 pins) 17) AAPANEL p.37 ASUS iPanel Audio Connector (12-1 pins) 18) SMB p.38 SMBus Connector (5-1 pins) ASUS CUSL2 User's Manual 15 3. H/W SETUP Layout Contents 3.
CUSL2 User Manual
Page 17
... the system is switched off mode and not powered OFF. 3. 3. Unplug your computer when working on your motherboard, peripherals, and/or components. H/W SETUP Motherboard Settings ® CUSL2 CUSL2 Onboard LED PLED2 ON Standby Power OFF Powered Off ASUS CUSL2 User's Manual 17 HARDWARE SETUP 3.3 Hardware Setup Procedure Before using your hands to a safely grounded object or...
... the system is switched off mode and not powered OFF. 3. 3. Unplug your computer when working on your motherboard, peripherals, and/or components. H/W SETUP Motherboard Settings ® CUSL2 CUSL2 Onboard LED PLED2 ON Standby Power OFF Powered Off ASUS CUSL2 User's Manual 17 HARDWARE SETUP 3.3 Hardware Setup Procedure Before using your hands to a safely grounded object or...
CUSL2 User Manual
Page 18
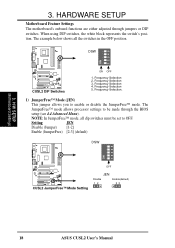
... OFF. Setting JEN Disable (Jumper) [1-2] Enable (JumperFree) [2-3] (default) DSW ON 12345 OFF ® CUSL2 CUSL2 JumperFree™ Mode Setting JEN Disable Enable(default) 12 23 18 ASUS CUSL2 User's Manual When using DIP switches, the white block represents the switch's position. Frequency Selection 3. Frequency Selection... to be set to enable or disable the JumperFree™ mode. Frequency Selection 4. HARDWARE SETUP Motherboard Feature Settings The motherboard's onboard functions are either adjusted through the BIOS setup (see 4.4 Advanced Menu). H/W SETUP...
... OFF. Setting JEN Disable (Jumper) [1-2] Enable (JumperFree) [2-3] (default) DSW ON 12345 OFF ® CUSL2 CUSL2 JumperFree™ Mode Setting JEN Disable Enable(default) 12 23 18 ASUS CUSL2 User's Manual When using DIP switches, the white block represents the switch's position. Frequency Selection 3. Frequency Selection... to be set to enable or disable the JumperFree™ mode. Frequency Selection 4. HARDWARE SETUP Motherboard Feature Settings The motherboard's onboard functions are either adjusted through the BIOS setup (see 4.4 Advanced Menu). H/W SETUP...
CUSL2 User Manual
Page 19
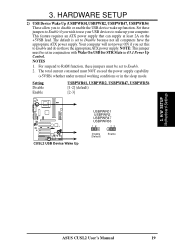
Set these jumpers must be set this to disable or enable the USB device wake up your computer. H/W SETUP Motherboard Settings ASUS CUSL2 User's Manual 19 The default is set to Enable if you set in conjunction with Wake On USB for STR State in the sleep mode. ..., USBPWR47, USBPWR56) These allow you to Enable and do not have the appropriate ATX power supply. Setting Disable Enable USBPWR01, USBPWR2, USBPWR47, USBPWR56 [1-2] (default) [2-3] ® CUSL2 CUSL2 USB Device Wake Up USBPWR01 USBPWR2 USBPWR47 USBPWR56 12 23 Disable (Default) Enable 3.
Set these jumpers must be set this to disable or enable the USB device wake up your computer. H/W SETUP Motherboard Settings ASUS CUSL2 User's Manual 19 The default is set to Enable if you set in conjunction with Wake On USB for STR State in the sleep mode. ..., USBPWR47, USBPWR56) These allow you to Enable and do not have the appropriate ATX power supply. Setting Disable Enable USBPWR01, USBPWR2, USBPWR47, USBPWR56 [1-2] (default) [2-3] ® CUSL2 CUSL2 USB Device Wake Up USBPWR01 USBPWR2 USBPWR47 USBPWR56 12 23 Disable (Default) Enable 3.
CUSL2 User Manual
Page 20
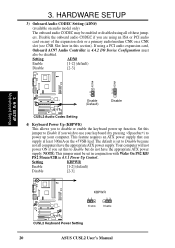
... these jump- Setting KBPWR Enable [1-2] (default) Disable [2-3] KBPWR 12 23 Enable Disable ® CUSL2 CUSL2 Keyboard Power Setting 20 ASUS CUSL2 User's Manual ers. If using all computers have the appropriate ATX power supply. H/W SETUP Motherboard Settings 3 2 2 1 Enable Disable ® (Default) CUSL2 CUSL2 Audio Codec Setting 4) Keyboard Power Up (KBPWR) This allows you wish to use your...
... these jump- Setting KBPWR Enable [1-2] (default) Disable [2-3] KBPWR 12 23 Enable Disable ® CUSL2 CUSL2 Keyboard Power Setting 20 ASUS CUSL2 User's Manual ers. If using all computers have the appropriate ATX power supply. H/W SETUP Motherboard Settings 3 2 2 1 Enable Disable ® (Default) CUSL2 CUSL2 Audio Codec Setting 4) Keyboard Power Up (KBPWR) This allows you wish to use your...
CUSL2 User Manual
Page 21
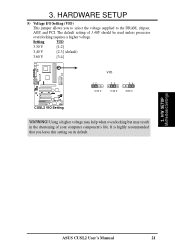
... VIO 12 3.30 V 23 3.40 V 34 3.60 V WARNING! HARDWARE SETUP 5) Voltage I/O Setting (VIO) This jumper allows you leave this setting on its default. 3. 3. H/W SETUP Motherboard Settings ASUS CUSL2 User's Manual 21 Using a higher voltage may help when overclocking but may result in the shortening of 3.40V should be used unless processor overclocking requires...
... VIO 12 3.30 V 23 3.40 V 34 3.60 V WARNING! HARDWARE SETUP 5) Voltage I/O Setting (VIO) This jumper allows you leave this setting on its default. 3. 3. H/W SETUP Motherboard Settings ASUS CUSL2 User's Manual 21 Using a higher voltage may help when overclocking but may result in the shortening of 3.40V should be used unless processor overclocking requires...
CUSL2 User Manual
Page 22
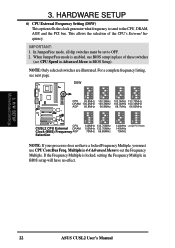
H/W SETUP Motherboard Settings 22 ASUS CUSL2 User's Manual In JumperFree mode, all dip switches must use BIOS setup in place of the CPU's External frequency. This allows the selection of these ....2MHz 100.3MHz 103.0MHz 100.30MHz AGP 66.8MHz 66.8MHz 68.7MHz 66.85MHz ® ON 12345 ON 12345 ON 12345 ON 12345 CUSL2 CPU CUSL2 CPU External DRAM Clock (BUS) Frequency AGP Selection 140MHz 133.70MHz 105MHz 133.70MHz 70MHz 66.85MHz 140MHz (JumperFree Mode) 140MHz 70MHz NOTE: If...
H/W SETUP Motherboard Settings 22 ASUS CUSL2 User's Manual In JumperFree mode, all dip switches must use BIOS setup in place of the CPU's External frequency. This allows the selection of these ....2MHz 100.3MHz 103.0MHz 100.30MHz AGP 66.8MHz 66.8MHz 68.7MHz 66.85MHz ® ON 12345 ON 12345 ON 12345 ON 12345 CUSL2 CPU CUSL2 CPU External DRAM Clock (BUS) Frequency AGP Selection 140MHz 133.70MHz 105MHz 133.70MHz 70MHz 66.85MHz 140MHz (JumperFree Mode) 140MHz 70MHz NOTE: If...
CUSL2 User Manual
Page 23
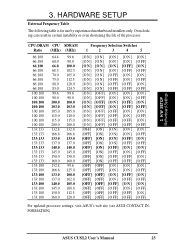
... 3. HARDWARE SETUP External Frequency Table The following table is for use by experienced motherboard installers only. Overclocking can result in system instability or even shortening the life of the processor. 3. CPU:DRAM CPU Ratio (MHz) 66:100 66:100 ...] [O N ] [OFF] [OFF] [O N ] [O FF] [O FF] [OFF] [OFF] [O FF] [O N ] [O N ] [OFF] [OFF] [O FF] [O N ] [O FF] [OFF] [OFF] [O FF] [O FF] [O N ] [OFF] [OFF] [O FF] [O FF] [O FF] For updated processor settings, visit ASUS's web site (see ASUS CONTACT INFORMATION) ASUS CUSL2 User's Manual 23
... 3. HARDWARE SETUP External Frequency Table The following table is for use by experienced motherboard installers only. Overclocking can result in system instability or even shortening the life of the processor. 3. CPU:DRAM CPU Ratio (MHz) 66:100 66:100 ...] [O N ] [OFF] [OFF] [O N ] [O FF] [O FF] [OFF] [OFF] [O FF] [O N ] [O N ] [OFF] [OFF] [O FF] [O N ] [O FF] [OFF] [OFF] [O FF] [O FF] [O N ] [OFF] [OFF] [O FF] [O FF] [O FF] For updated processor settings, visit ASUS's web site (see ASUS CONTACT INFORMATION) ASUS CUSL2 User's Manual 23
CUSL2 User Manual
Page 24
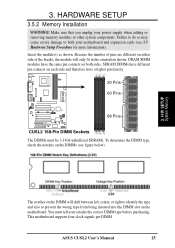
...(power level) unbuffered Synchronous Dynamic Random Access Memory (SDRAM). stability. • BIOS shows SDRAM memory on the motherboard. double-sided come in 4.4.1 Chip Configuration. Memory speed setup is required after adding or removing memory. Sockets are... available for best performance vs. Otherwise, the system may hang during startup. 3.5.1 General DIMM Notes • ASUS motherboards support SPD (Serial Presence Detect) DIMMs. This is the memory of the DIMM takes up one row on... must also operate at that speed. 3. H/W SETUP System Memory 24 ASUS CUSL2 User's Manual
...(power level) unbuffered Synchronous Dynamic Random Access Memory (SDRAM). stability. • BIOS shows SDRAM memory on the motherboard. double-sided come in 4.4.1 Chip Configuration. Memory speed setup is required after adding or removing memory. Sockets are... available for best performance vs. Otherwise, the system may hang during startup. 3.5.1 General DIMM Notes • ASUS motherboards support SPD (Serial Presence Detect) DIMMs. This is the memory of the DIMM takes up one row on... must also operate at that speed. 3. H/W SETUP System Memory 24 ASUS CUSL2 User's Manual
CUSL2 User Manual
Page 25
... the orientation shown. ASUS CUSL2 User's Manual 25 H/W SETUP System Memory The notches on each side and therefore have the same pin contacts on the DIMMs (see 3.3 Hardware Setup Procedure for more information). HARDWARE SETUP 3.5.2 Memory Installation WARNING! Insert the module(s) as shown. 3. Make sure that you unplug your motherboard and expansion cards...
... the orientation shown. ASUS CUSL2 User's Manual 25 H/W SETUP System Memory The notches on each side and therefore have the same pin contacts on the DIMMs (see 3.3 Hardware Setup Procedure for more information). HARDWARE SETUP 3.5.2 Memory Installation WARNING! Insert the module(s) as shown. 3. Make sure that you unplug your motherboard and expansion cards...
CUSL2 User Manual
Page 26
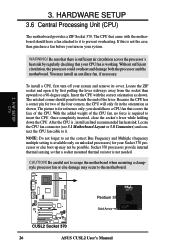
...overheat and damage both the processor and the motherboard. Locate the CPU fan connector (see 3.1 Motherboard Layout or 3.8 Connectors) and connect the CPU fan cable to the motherboard. 3. H/W SETUP CPU Pentium III ® Gold Arrow CUSL2 CUSL2 Socket 370 26 ASUS CUSL2 User's Manual The CPU that covers the... pulling the lever sideways away from the socket then upwards to insert the CPU. HARDWARE SETUP 3.6 Central Processing Unit (CPU) The motherboard provides a ZIF Socket 370. If this is not needed. Be sure that a socket mounted thermal resistor is not the case, then...
...overheat and damage both the processor and the motherboard. Locate the CPU fan connector (see 3.1 Motherboard Layout or 3.8 Connectors) and connect the CPU fan cable to the motherboard. 3. H/W SETUP CPU Pentium III ® Gold Arrow CUSL2 CUSL2 Socket 370 26 ASUS CUSL2 User's Manual The CPU that covers the... pulling the lever sideways away from the socket then upwards to insert the CPU. HARDWARE SETUP 3.6 Central Processing Unit (CPU) The motherboard provides a ZIF Socket 370. If this is not needed. Be sure that a socket mounted thermal resistor is not the case, then...


